A Beginners Guide to WordPress Database Management

One of the many reasons for WordPress’ popularity lies in its beginner-friendly approach, which requires little to no prior technical knowledge from its users. This makes it easy to get a grip on the basics of website creation simply by using the WordPress interface, plugins, and themes.
However, anyone planning to go past the basics will need to familiarize themselves to some degree with how WordPress works. One of those important, “under the hood” concepts is that of WordPress databases and how they work. This is what we’ll be focusing on today. We’ll also cover some of the most important database management operations every webmaster should know. Equipped with the knowledge in this guide, you will be able to both perform some database tasks on your own and troubleshoot issues more quickly and efficiently. With that being said, let us begin.
Qode Themes: Top Picks
View Collection


Understanding WordPress databases
Before we dive into what actions you can perform on a WordPress database, we’ll make a quick overview of what a WordPress database is, what it contains, and how it can be edited using the phpMyAdmin application. This will provide you with a broader perspective on WordPress databases and illustrate why some actions are done the way they are.
What is a WordPress database and what tables does it contain
The concept of databases isn’t confined to WordPress; databases in general present a system of getting and storing data in a well-organized manner. In most cases, WordPress uses MySQL as its database management system with PHP as a means of getting data from and storing it into those MySQL databases.
Even though the complexity of a MySQL database can vary, its overall structure is the same. It is divided into tables, which contain rows and columns, with the corresponding database data being stored inside parts of those rows or columns called fields. This structure is easy to navigate and, with only a bit of knowledge of its significance, users can easily edit the fields with the data.
As for the data, WordPress databases contain all the information relevant to a WordPress website. This includes the content of all pages, posts, and custom posts, as well as content regarding its taxonomies, all user-related data, WordPress site-wide settings, and all the options of your theme and installed plugins. A database holds all the data a WordPress website needs to function properly.
With that being said, let’s examine what tables a WordPress database can contain. During its standard 5-minute installation, WordPress creates 12 tables inside your database: wp_posts, wp_postmeta, wp_comments, wp_commentmeta, wp_options, wp_users, wp_usermeta, wp_terms, wp_termmeta, wp_term_relationships, wp_term_taxonomy and wp_links. These tables are integral to managing your website and are a part of any clean installation of WordPress. Their number may increase when you install new plugins to your website, as those plugins could create additional tables in your database. However, in this guide, we will focus on a few of the most important tables from the 12 listed above. For more information on all the tables, we recommend taking a look at the database description on the WordPress Codex.
The wp_posts table is probably the most important one in your WordPress database. It contains the relevant information on your posts, pages, menu items, attachments, and custom post types. Among other pieces of data, it holds the ID of a post, its content, author ID, date of creation, excerpt, title, comment status (if it can be commented on), and publish status (e.g. ‘pending’, ‘publish’ or ‘private’).
The wp_comments table contains all the comments left on your site and relevant data about them. It keeps the content of the comment, its author, his e-mail, URL and IP address, date when the comment was posted, and its type (comment, pingback, or trackback).
The wp_users table contains the information on the users managing your WordPress website. Among its fields, it has the user ID, username and password, user email, and URL.
The wp_options table contains the information on your active plugins and their settings, as well as theme settings, widget content, and cache. It holds the name of the setting stored, its value, and if it is autoloaded.
What is phpMyAdmin and how to use it?
Simply put, phpMyAdmin is a web-based database management tool. It is used for managing MySQL databases within a web browser. With it, you can perform or run all the MySQL operations either via queries or via the provided interface. You can import and export databases, edit tables, rows or fields, and a lot more. In the following section, we will explain how you can perform the most important database operations that a WordPress webmaster may need.
Now that you know what phpMyAdmin is, and what its role is, let’s review how you can access it and what potential issues you might face. As this step is a requirement for any of the management actions we’ll describe below, you should carefully review this section and return to it if needed. With that being said, we will show you how to access phpMyAdmin via cPanel and in localhost. If you aren’t using cPanel as your web hosting platform, we advise asking your hosting provider for more information on how to access phpMyAdmin.
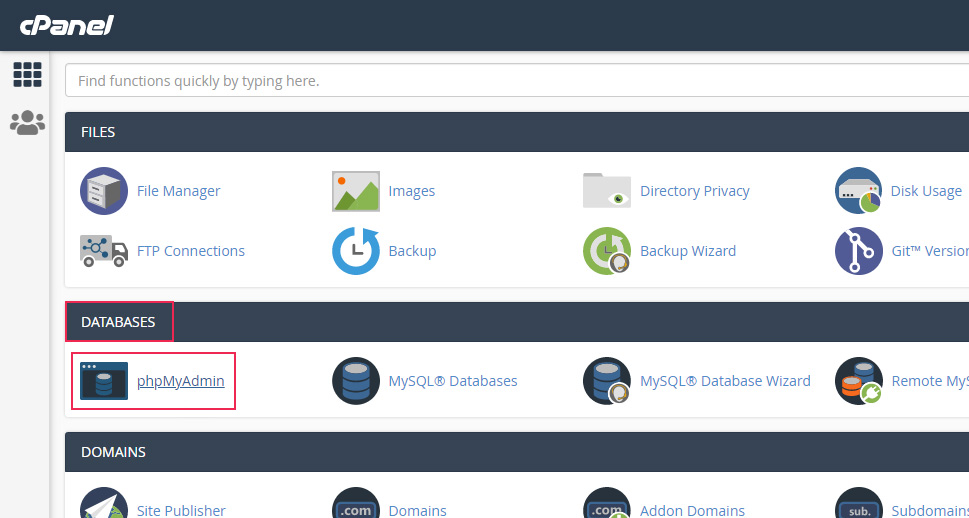
If you are logged in to cPanel, you can access phpMyAdmin by clicking on the phpMyAdmin option, located in the Databases section towards the top.
When the phpMyAdmin application opens, you will be able to access your database by locating it from the list of databases on the left and then clicking on it to open.

To access phpMyAdmin in localhost, add phpmyadmin to the end of your localhost address. In most cases, this means typing in http://localhost/phpmyadmin/ into your browser’s address bar. In some cases, this address could also include a port number; this happens when your Apache server isn’t bound to the default port 80.
Navigate to the appropriate phpMyAdmin address, and there you will see the phpMyAdmin login screen. To log in, insert your MySQL username and password and press the Go button.

Just like with cPanel, locate the database of your localhost website from the list on the left and click on it to see the tables it contains.

Two potential issues can arise when trying to access your MySQL database—not knowing your MySQL credentials, and not knowing your database name. Let’s take a look at how you can resolve both.
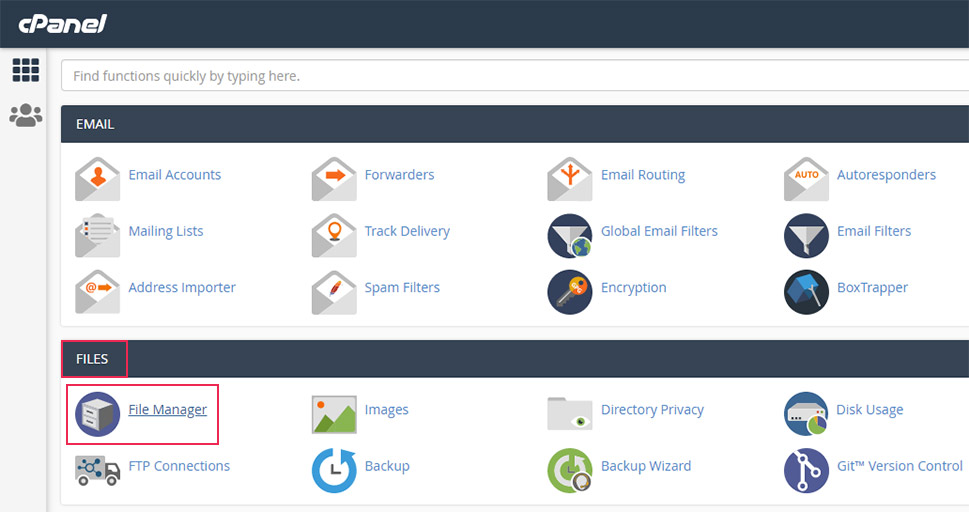
To figure out both your MySQL credentials and your database name, you only need to examine your wp-config.php file. This file is located in the root WordPress directory, which is generally called public_html. If you’re working on localhost, simply search for the wp-config.php file in the site’s directory on your computer. And if you’re working on a live site, return to the main cPanel view and click on the File Manager option, located in the Files section near the top.
Next, navigate to your root WordPress directory (public_html), find the wp-config.php file within, right-click on it and select the View option from the dropdown menu.

When the file opens, find the following line, which will be near the top:
define(‘DB_NAME’, ‘your_database_name’);
Additionally, look for these two lines, as well
define( 'DB_USER', 'your_username' );
and
define( 'DB_PASSWORD', 'your_password' );
They will show your MySQL username and password. Keep in mind, the placeholder names we used here will be replaced with the appropriate information on your end.

Once you’ve figured out your database name and MySQL username and password, proceed as described before.
As an additional piece of advice—you might have noticed that all the tables in your database have the same prefix. The default WordPress database prefix is wp_ and that’s what we’ll be referring to in our guide. However, you can change the default database prefix, and some WordPress users choose to do so for security reasons. So, if you changed your database prefix, then you should look for tables with the same names (e.g. posts, comments, users, etc.) but with your custom database prefix. For example, instead of looking for the wp_users table, you should look for yourprefix_users, where the yourprefix will be replaced with your actual database prefix.
How to manage a WordPress database
Now that you have a better idea of what a WordPress database is and how to access its tables, let’s explain what operations you can perform over them. There are a lot of things you can do, and they usually depend on what you want to achieve. So, in the sections below, we’ll cover the most important operations, those which are vital for maintaining every WordPress website. Let’s begin.
WordPress stores all website content as well as any changes made inside the website’s database. Given this knowledge, it becomes clear that a backup of the website’s database is an integral part of protecting the website, should something happen to it. As such, it is the first operation we will cover in this guide. In the paragraphs below, we will explain how you can make a manual database backup. You should know that there are also other ways of creating database backups, including some database plugins you can look into.
To create a database backup, log in to phpMyAdmin and locate your website’s database. Then, click on it once to open and then click on the Export tab in the top section of your screen.

In this tab, you can export the database as a .sql file that will serve as a database backup. To do this, you need to choose the export method and leave the format as SQL, which will be selected by default. There are two export methods you can use—Quick and Custom. With the Custom method, you will be able to specify which tables should be exported, and you’ll get several format-specific options. However, unless you are familiar with those options, we advise using the Quick method. After selecting it, press the Go button to export the file.

This will start a download of the backup file, titled your-database-name.sql (with the your-database-name part replaced accordingly).
Now that you know how to create a database backup, we recommend making one before trying any of the other database operations that we’ll be covering in this article. And, if you want to learn alternate ways of creating database backups, you can take a look at our articles on making database backups, as well as on the best WordPress backup plugins in general.
Importing a database
Another crucial database management operation you should learn early on is how to import a database. Its primary uses are to restore a safe database backup in case of errors on the website or import an exported database in case of website migrations. But, since database import is a delicate operation, there are some things you need to be aware of before you start.
For starters, if you import a database file with the same name as an existing database, you will override all equivalent tables within that database. If this happens with your website database, then you will lose your site content. As such, we advise against importing a database file if it has a name that matches a database in use. Instead, we suggest you create a new database and then import the content of the .sql file into it. We will take you through the necessary steps for this below.
However, if your goal is to restore a backup database, we advise dropping the tables of the existing database and then you can import the backup, as outlined below. We also explained this process in detail in our article on restoring a website backup manually, so you can check that out for more information. With that being said, let’s dive into the import process.
Once you’ve logged into phpMyAdmin, click on the Databases tab in the top section of your screen. To create a new database, set a name for it in the input field under the Create database section. Then, keeping the Collation option selected, click on the Create button to create the new database.

After that, select the new database and click on the Import tab in the screen’s top section.

In the main section of the screen, press the Choose file button and then select the database .sql file in the file dialog window that opens. Next, set the format to SQL and press the Go button to import the file.

You will need to wait for a bit until the file is uploaded. When it’s done, you’ll be able to see all the queries that were executed by uploading it.
Optimizing a WordPress database
If you’ve been running a WordPress website for a while, chances are high that your database isn’t optimized. It could contain leftover data and even tables belonging to plugins and themes that were uninstalled from the website. It’s also possible that the existing data isn’t optimally stored and therefore requires more storage space.
Since a non-optimized database can hurt the overall performance of your website and, in some cases, drive you to needlessly pay for more storage space, we recommend regularly optimizing your database. We will take you through the steps for doing this using phpMyAdmin. But, you should first make a database backup, just in case. After you’ve done that, you can proceed as described below.
To optimize your WordPress database, you need to log into phpMyAdmin, locate your database and click on it to open.
Then, check all the tables in the database by clicking on the Check all link at the bottom and select the Optimize table option from the dropdown next to it.

When you press the Optimize table option, a query will run on all the selected tables. You will have to wait until it’s finished.
You can also optimize your database using a database-altering plugin like WP-Optimize. And there are other methods you can use as well—we summed those up in our article on how to optimize your database. Moreover, if you want to clean up your database from extraneous plugin data, you can check out our tutorial on how to properly uninstall a WordPress plugin.
Changing a WordPress password
Not being able to log in to a website—whether the problem was caused by a forgotten password or one that was changed without notice—is an experience we all share. While WordPress offers a relatively easy way of recovering a password, it’s not foolproof. Therefore, knowing other ways of changing the password so that you can regain access to the WordPress dashboard can prove extremely valuable. One of these alternative ways is to change the password directly in the website’s database. We’ll show you how to do this below.
After opening your website’s database, locate the wp_users table and click on it to open.

Here, you will see a list of all current users alongside their data. Start by locating the exact user whose password you wish to alter within the user_login column. Then, click on the Edit button located in the same row as that user’s username.

In the following window, locate the row that contains the field called user_pass. Position yourself within this row and set the function name to MD5 and then replace the current password value with your new password. To save the change, press the Go button below.

After that, you can navigate to your website’s login URL and insert your username and the newly created password to log in. This will let you regain access to the dashboard if you were locked out.
Changing a WordPress username
If you are concerned about the security strength of your WordPress admin username, or simply want to make your username more aligned with your brand, you can do so by changing it directly in the database. This can be done very quickly, as we will show below. If you’d like to explore different ways of changing your username, you can check out our article on changing WordPress usernames.
To change your WordPress username, log into your website’s database, and click on the wp_users table to see the list of currently available users.
Then, find the username you wish to change and click on the Edit button located within its row.

On the following screen, change the current user_login value to your preferred username. Then save the change by clicking on the Go button below.

Shortly after completing the previous step, you will see a success message stating that the username was changed. By doing this, you’ve made your website more secure. However, there are other things you can do to improve your site’s security, particularly in terms of the database. We will share more suggestions on database and website security in the last section of this article.
Creating a new admin user
Another way your database can help you regain access to your WordPress dashboard if you’re locked out of it is by creating a new admin user. Knowing how to do it can also help you if you’ve accidentally deleted your previous administrative account, for example. In this section, we will show you how to create a new admin user by editing the website’s database. And you should know that you’re not limited to admin user roles alone—you can use your database to add any type of new user.
To do this, access phpMyAdmin and click on your website’s database to open it. Then, locate the wp_users table and click on it, as well.
When you open the users table, you will be placed within the Browse tab. Switch to the Insert tab by clicking on it (you can find it in the top section of your screen).

To add a new user, you will need to fill in the following details: user_login, user_pass (with the MD5 encrypting function selected), user_nicename, user_email, user_url, user_registered, and display_name. After inserting all that, press the Go button below.

Then, click to access the Browse tab once more. Since we haven’t specified the newly created user’s ID, one will be created automatically and you can see it under the Browse tab. Make sure to remember the ID, as it will be important for the remaining steps.

Next, return to the main screen of your database and access the wp_usermeta table by clicking on it.

After opening the wp_usermeta table, switch to the Insert tab. You will see a screen with two sections similar to the one shown below.

This is the final and most important step—assigning a user role to the new user. Strictly speaking, this step makes the difference between various user roles as this is when you add the appropriate privileges. Let’s see how you can add administrative privileges to a newly created user.
In the first section, add the user’s ID as the value of the user_id column, and put wp_capabilities as the value of the meta_key column. Then add the following code as the value of the meta_value column:
a:1:{s:13:"administrator";b:1;}

Then, scroll down to the second section and add the user’s ID as the user_id value. Also, insert wp_user_level as the meta_key value and put 10 as the meta_value. Finally, click on the Go button to add these privileges to your new user.

Changing WordPress URLs in the database
There are a lot of reasons why you might need to occasionally update your site’s WordPress URLs; more specifically, its WordPress and Site address. For example, when switching from HTTP to HTTPS, moving a website from localhost to a live server, or troubleshooting login redirect issues. Whatever the reason, knowing multiple ways of performing this operation can be helpful, especially if you are experiencing issues that have left you locked out of the WordPress dashboard. In this section, we will show you how to change your WordPress URLs by changing the equivalent options within your database. If you’d like to learn more about the subject, you can check out our article on editing the WordPress URLs.
To change the WordPress URLs via the database, log in to phpMyAdmin. Then select your website’s database by clicking on it, and open the wp_options table. The central part of your screen will show all the rows within that table. Locate the two rows which contain siteurl and home as their option_name values.

To change the siteurl, click the Edit option within that row.

On the following screen, insert your new siteurl as the value in the option_value row and click on the Go button to save it.

Edit your home URL in the same way—simply use the steps described above to edit the option titled home.
In both cases, shortly after performing the steps, you will see a message showing what was changed. If you were experiencing login issues, you should check if they’ve been resolved by trying to log in once more.
Deactivating all WordPress plugins
One of the most frequent reasons for WordPress errors and website issues in general lies in faulty plugins. These problems are caused either by an incompatibility between plugins or between the plugins and the theme/WordPress core files.
A quick way of determining whether a problem you’re experiencing is caused by your plugins is to deactivate them all and see the results. If the issue is resolved afterward, it confirms that one of the plugins was the cause behind it. You can pinpoint the faulty plugin by reactivating them all and, then, deactivating them one at a time until the error is resolved once more. In this process, the plugin that was deactivated last before the issue was resolved is the culprit.
The troubleshooting technique we just described is very simple and, often, very effective. However, it relies on your ability to access and disable the plugins, which is difficult if you can’t reach your WordPress dashboard due to the issue at hand. In these cases, knowing multiple ways to disable WordPress plugins is a great asset. And it can prove helpful when troubleshooting a wide range of WordPress issues. Therefore, the next WordPress database management operation we’ll be covering is how to disable WordPress plugins in the database.
After accessing phpMyAdmin, open your database from the list on the left. Locate the wp_options table within and click on it to open.

Within the options table, locate the active_plugins field and click on the Edit button next to it. If you have difficulty finding it, consider showing at least 50 rows per page as opposed to the default 25. This is done by changing the number of rows option, which is located near the bottom of the main phpMyAdmin section.

When you’ve opened the active_plugins field for editing, replace the current value in the option_value row with a:0:{} and click on the Go button.

Doing this will disable all your WordPress plugins. Then, you can proceed to troubleshoot the issue you are having. Since this is a very important troubleshooting technique, we recommend you learn more about disabling WordPress plugins as it’s bound to prove useful in the future.
Changing the active WordPress theme
Another WordPress database management operation that can help you with troubleshooting is changing your WordPress theme. Almost as frequently as it happens with plugins, a problem you’re experiencing could be caused by the code of your current theme.
The process of figuring out whether this is the case is quite simple—you only need to activate one of the default WordPress themes installed on your website and check the results. If the issue resolves itself after switching from your current theme to the default one, it means that the theme you were using was causing the problem. We will show you how to change your active WordPress theme via the database. You can use this method if you are denied access to your WordPress dashboard.
Before we start, please note that having a default WordPress theme (e.g. Twenty Twenty-One) installed on your server is a requirement for this process.
After accessing your website’s database, click on the wp_options table to open it.
Then, locate the template and stylesheet fields in the main section of your screen. If you weren’t able to find those options straightaway, consider increasing the number of rows visible per page using the option near the bottom of the main section.

To edit the row with template, click on the Edit button.

Then, find the option_value field and change its value by entering the name of the theme you wish to activate. There are two conditions you need to fulfill for this to work. One, the theme has to be installed on your server, and two, the inserted name must match the theme folder name listed in the /wp-content/themes directory. When you’ve met those conditions, you can click on the Go button to save the changes you’ve made.

After that, proceed to change the row with the stylesheet value in the same way as described above. Then you can proceed with the remaining steps for the appropriate troubleshooting process. If you’d like to learn more about this topic, you can check out our article on the different ways of changing your WordPress theme.
Performing find and replace in the database
If you ever added SSL to your website, moved it from localhost to live server, or cloned it, you know that replacing all the URLs is an important step in the process. In most cases, this change is made either using database-altering plugins or by performing suitable queries in the database. We will show you how the latter works.
If you haven’t done so already, we strongly suggest you create a database backup before performing search-replace across your whole database. If anything goes wrong, the consequences would be irreversible. Once you have a database backup made and safely stored, you can proceed as described below.
After logging into phpMyAdmin, locate your website from the list on the left and click on its database.
Next, switch to the SQL tab (found near the top of the screen) by clicking on it.

As we mentioned already, you should have a database backup before you go any further with this operation—any mistakes after this point could cost your website highly. If you already have a backup made, then you can proceed to use the code shown below. Paste it into the query window, but make sure to use your URLs instead of our placeholders. Also, the URLs should be added without the trailing slashes at the end. When you’re done, press the Go button to update the URLs.
UPDATE wp_posts SET post_content = REPLACE (post_content, 'your-old-website-url', 'your-new-website-url');

If you aren’t confident about performing the search-replace on the first go, you can opt for a test run. This is done by pressing the Simulate query button instead of the Go button. After seeing the results of the test run, you can re-run the query, this time for real, and perform the changes.
The query we shared above changes all instances of your-website-url to your-new-website-url inside the content of all your posts. Similar queries can be created for changing the URLs found in custom fields for posts and users. You can see an example below.
UPDATE wp_postmeta SET meta_value = replace(meta_value,'your-old-website-url','your-new-website-url');
UPDATE wp_usermeta SET meta_value = replace(meta_value, 'your-old-website-url','your-new-website-url');
To learn more about this subject, you can take a look at our article on how to perform search and replace in WordPress.
Maintaining database and website security
In the previous section, we looked at several important WordPress database management operations which would be useful to a wide range of WordPress users. To finish up this guide, we want to touch on a vitally important topic for any WordPress website and its database—security. Even though a perfect defense against hacking attacks doesn’t exist, there are several things you can do to improve your overall website security.
We mentioned earlier that some WordPress users opt to change the database prefix. This is a small but beneficial security measure, which is used to fend off SQL injection attacks. Attackers can exploit the well-known structure of the WordPress database and its default table prefix (wp_) in an attempt to recover sensitive user information. By changing the default database prefix, you can introduce a hard-to-guess element that will significantly improve your website’s security against SQL injection attacks.
Additionally, you should make sure to use usernames and passwords that are hard to crack as they will help maintain the security of your website against brute force attacks. While this advice seems common sense, a large percentage of users still tend to default to passwords that are easy to guess (such as 12345, Password, Admin…). You should also practice making regular backups of your whole website and storing them in a safe location. This will allow you to restore your site quickly if something were to happen.
Finally, the best advice we can give you is to look into and use a quality WordPress security plugin. The best security plugins offer a wide range of security scans and constantly updated malware firewalls against various threats. Some of those plugins have both premium and free versions, with the premium versions offering added levels of security, customer support, and help with cleaning the website after hacking attacks. Therefore, finding a high-quality security plugin should be a priority for everyone—it will provide a great level of protection to your WordPress database, files, and your website as a whole.
Final Thoughts
For a lot of WordPress users, especially the less experienced ones, the thought of working on a WordPress database can seem scary and daunting. Most tend to leave any database-related tasks to someone more technically skilled. But databases contain all website content, and mastering even the basics of WordPress database management can go a long way in improving your overall WordPress skills. This will make you more comfortable with using WordPress, which will help you perform daily tasks quickly as well as troubleshoot some of the more common WordPress errors with ease.
This guide is designed to help you understand the structure of a typical WordPress database and show you some useful operations you can do with it. Throughout the text, we also explained how to edit a database’s tables, rows, and fields to be able to perform those operations. Finally, we would like to stress one last time the importance of regular database backups. They are especially valuable to have before making any edits just in case something goes wrong. Once you have a database backup safely made, you can try out any or all of the operations we mentioned or investigate and learn about more advanced operations on your own.
