How to Change the WordPress Database Prefix to Improve Security

WordPress is a system of files that functions around a centralized database. This database is used to store all of the pertinent information, options, and settings needed for a WordPress website to function. For this very reason, it is a common target for malicious attacks and its security should be one of the priorities for every WordPress developer. Among a long list of security features that can be utilized within WordPress itself, many of them can be added to the wp-config.php file. One of those settings is the table_prefix option that we will be covering in this article.
Namely, WordPress databases have a default prefix of “wp_” which exposes them to attacks that can exploit the use of such default settings and use them to gather valuable user information. To protect against this form of attack, you simply need to change the table prefix to something other than “wp_” that others will not be able to predict.
Changing the WordPress Database Prefix
This process involves three main steps, however, before attempting these it is always a good idea to back-up the database so that you can simply restore it if necessary.
For the first part of changing the prefix, you will utilize the wp-config.php file and change the default prefix for all tables. In order to do so, you will have to access your website via FTP and edit the wp-config.php file in the root directory. Right-click this file and select View/Edit from the dropdown list.
Once the file opens in a new window, within it you will need to modify the following line:
$table_prefix = 'wp_';
into
$table_prefix = ‘wp_new_';

We have set the default database prefix to “wp_new_ “. You are free to change this to whatever you’d like. However, keep in mind that you can only use numbers, letters, and underscores to construct the prefix. The beginning must still consist of “wp_” and you can input your part of the prefix after it. Also, it is good practice that you end the new prefix with an underscore “_“ so the table names will be easily discernible.
After changing the line you need to save your changes. The following pop-up will appear:

Simply click Yes and the editing of the file is done.
Now if you try to access your website once again you will be prompted to start the database set up once again, since the new setting for the prefixes has to be applied. If you do this, your entire database will be overridden and you will lose everything stored within it. This means that if you have already started work on your website, everything you’ve done up to now will be erased.

In order to avoid this, you will need to change the names of all the existing tables (and some occurrences of the prefix inside the tables) from within phpMyAdmin.
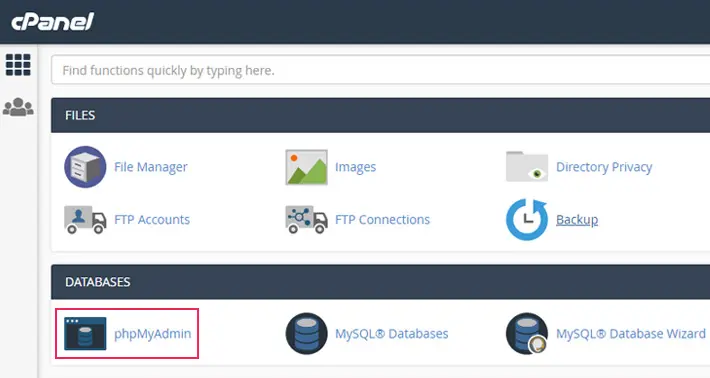
If you’re working on a live server, to log in to your installation’s phpMyAdmin you will either have to contact your hosting provider or access your cPanel and navigate to phpMyAdmin.
If you’re working on a local server, you can go to the designated dashboard for it. For example, if you’re using XAMPP, go to the control panel and press the admin button for MySQL.

Once you have done either of these you will be redirected to the phpMyAdmin dashboard page on your default browser.

On the left-hand side of the page, you will see a list of your databases. Choose the one you would like to edit by simply clicking on it. If you have been working on a premium WordPress theme, chances are the next screen will have quite a lot of tables shown:

It would be tedious work to change them all one by one. Luckily, when you scroll down to the bottom of this page you will see a check all option. Click on it and from the dropdown next to it choose the option Replace table prefix.

A small window will pop up with two text boxes. One is for inputting the old table prefix, which in our case is “wp_”, and the second one is to input the new prefix we previously defined in the wp-config.php file, which in our case is “wp_new_”.

By pressing the Continue button you will execute the change and you will be able to move on to the last step.
Qode WordPress Themes: Top Picks
View Collection


Since the database tables themselves are connected, there are certain entries within some of them that point to one of the other tables. Within these, the old prefix is still used. If you leave it like that, errors will occur and you once again may end up having to restore your backed-up database to keep from losing all the progress you made with building your website.
In order to avoid this you should navigate to the SQL tab near the top of the browser window and add the following code into the text field that appears:
SELECT * FROM 'wp_new_options' WHERE 'option_name' LIKE 'wp\\_%'
Once you have input this code you should modify the “wp_new_options” part to reflect your new prefix (so it should contain your new prefix followed by the word “options”). This will access the options table and retrieve from it any option_name attribute which starts with “wp_”. In essence, it will retrieve all of this attribute’s values that start with the old prefix.


Once you press the Go button a list of all of the entries to this table will be shown along with a notice of how many have been found.

Now that we have located all the instances of the old prefix within the options table you will need to change them one by one. To do so, you can simply double click the option_name field and add your new prefix instead of the old one. Once you click outside of the text box again the information will be saved and a notification will pop up.

You will also need to do this for the “usermeta” table.
As in the step above, navigate to the SQL tab once again and paste the following code into the large text box.
SELECT * FROM ‘wp_new_usermeta’ WHERE ‘meta_key’ LIKE ‘wp\\_%’
Changing the “wp_new_” prefix into the one you chose. After pressing the Go button, you should see a list of instances of the old prefix within the “usermeta” table.

This time you will need to manually amend the “meta_key” column values to include the new prefix instead of the old one.

Once you have done this, the process of changing the table prefix is complete and you will be able to navigate back to your website without any issue.
Final Thoughts
This concludes our tutorial on changing the default WordPress database prefix. By following these steps, you can create some peace of mind for yourself and ensure that your database and website are that much safer from any potential cyber attacks.
