How to Protect Your WordPress Website from Brute Force Attacks
Hacking attacks are becoming more frequent in recent years, they’ve made website security one of the top concerns of every webmaster. With WordPress being the most used content management platform, it means WordPress websites are the most common victims of those attacks.
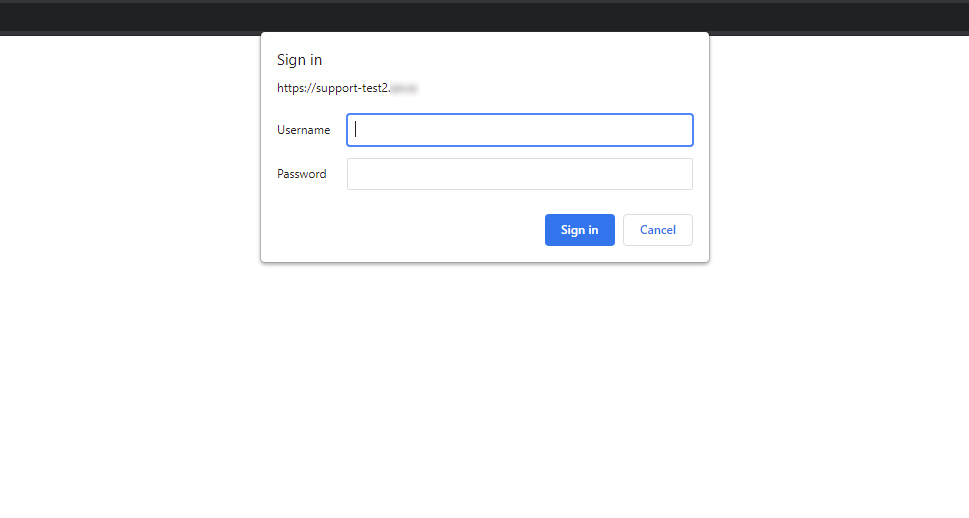
While WordPress has always strived to improve its security by patching any security vulnerabilities it discovers, it has always struggled against brute force attacks. The reason for it is that WordPress has a single log-in screen, which we’re all familiar with. But, that means that your security against brute force attackers is as strong as your WordPress credentials.
In this article, we’ll explain how to shore up your website security and protect your WordPress site from brute force attacks. Additionally, we will cover what those attacks are so that you can fully understand the importance of the security methods we suggest. If you’d like to skip ahead to any particular security suggestion, you can do so using the links below:
Qode Themes: Top Picks
View Collection


Understanding what brute force attacks are
Simply put, brute force attacks are a type of hacking attack that relies on trial and error as a way of breaking into a specific website or network. More precisely, hackers resort to exhaustively guessing your login username and password as a means of getting access to the website.
Even though this might seem tedious or, even, pointless, it is far from it. Since WordPress doesn’t include any default way of limiting failed login attempts, hackers can automate the guessing process and go through tens of thousands of common passwords in a matter of seconds. As such, your website could be seconds away from getting brute-forced, if you are using a password that is considered weak.
Once they gain access to the backend of your website, hackers can install malware, steal valuable information, deny you access to your website or delete it. On the other hand, even if they don’t get in, a high frequency of HTTP requests towards your server can slow your site down severely, or even crash it. Because of this, it is important to tackle brute force attacks using multiple methods. This will let you avoid or negate any harm hackers could inflict on your website. Now let’s take a look at what those methods are.
How to protect your WordPress website from brute force attacks
Even though there are numerous security precautions you can take, we decided to cover only the ten most important ones in this article. Most of these methods can be applied using custom code, but we opted to make this article more beginner-friendly and offer alternatives accessible to all. Therefore, we tried to offer suitable WordPress plugins for every given method, wherever possible. It is also worth noting that, while perfect security against brute force attacks might not be attainable, using the methods from our list will make your website as secure as possible. So, let’s begin.
One of the biggest reasons why WordPress websites frequently suffer brute force attacks is that their default file and folder structure (and which file is responsible for the login process) are well-known. As a result, a WordPress site’s default login URL can easily be accessed. This makes your credentials the only form of protection against brute force attacks. Therefore, the most obvious way of adding an extra layer of protection against those attacks is by changing the default WordPress login URL. You can accomplish this with custom code or with a suitable WordPress plugin.
We have opted to show you how to change the default WordPress login URL using a plugin called WP Hide Login. This is a very lightweight plugin, made specifically for changing the login and redirection URLs. As the plugin page mentions, this won’t change any WordPress core files or add rewrite rules in the .htaccess files. Instead, it works by intercepting page requests. Let’s take a look at how it is used.
After installing the plugin, navigate to Settings > General and scroll toward the bottom of the page, where you will find the WPS Hide Login subsection.
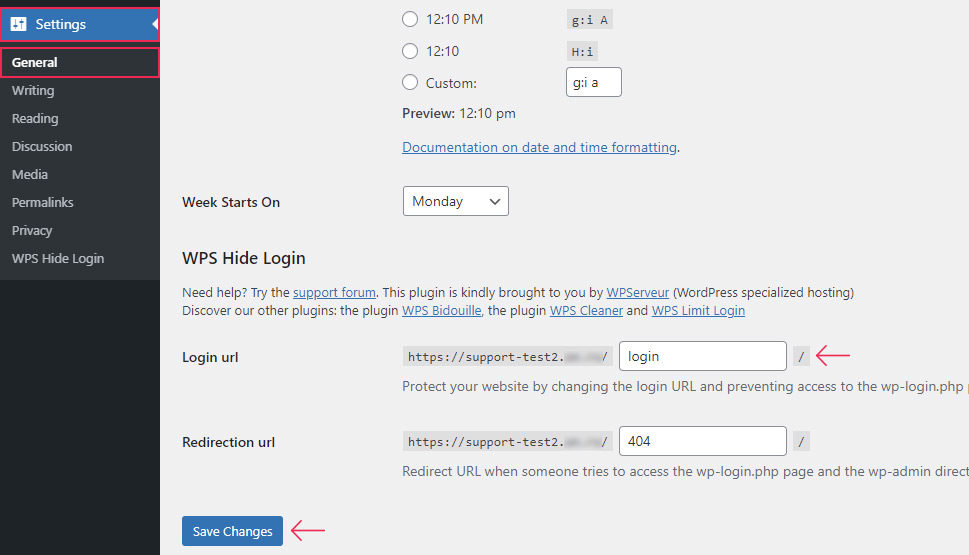
In this section, you can change both the login and redirection URL, i.e. their respective endings. As a safety measure against brute force attacks, it’s enough to change the login URL from the default login to something else. Once you’ve done that, press the Save Changes button to change your login URL.
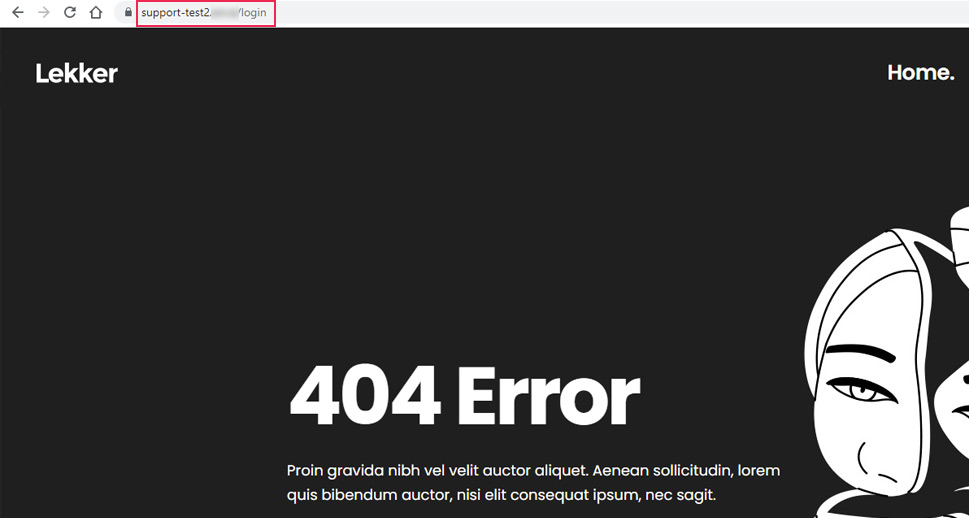
Please note, you will remain logged in after completing the URL change. However, if you log out and try to log back in by accessing the default WordPress login URL (your-website-url/login, your-website-url/wp-admin, or your-website-url/wp-login.php), you will see a 404 screen instead. But, if you’ve also changed the redirection URL earlier, then you will see the page you selected for it instead.
With it, you have completed the first and most important step in prevention against brute force attacks.
Before concluding this section, we wanted to share a tip—if you get locked out of your dashboard and forget what your new login URL is, don’t worry. Simply disabling the WP Hide Login plugin via FTP will reset the WordPress login URL to its default value. To learn how to do that, check out our article on disabling plugins when locked out of WP-Admin.
One of the most effective ways of improving your website’s security against brute force attacks is to use strong and unique WordPress credentials. This includes using unique usernames and, more importantly, longer and harder-to-crack passwords.
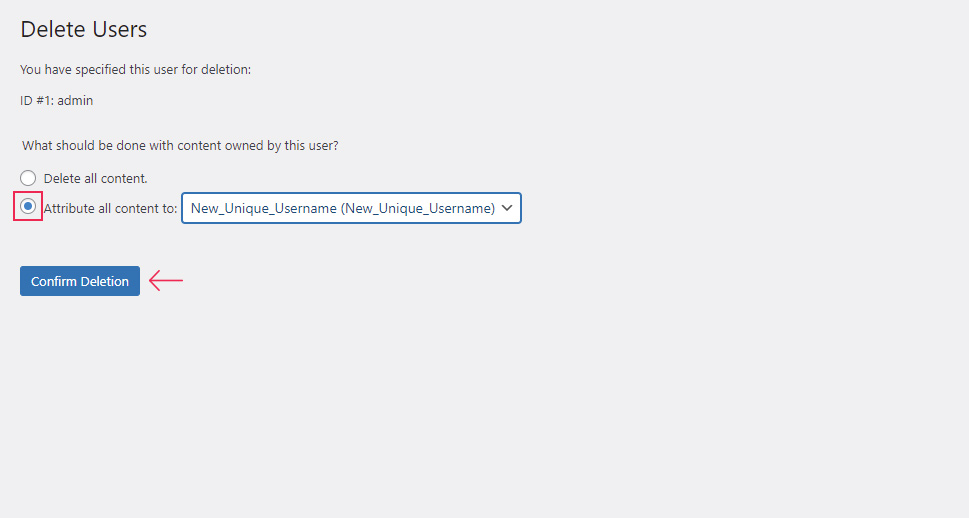
First of all, you shouldn’t use the default WordPress username (admin) for your administrator account. Therefore, if you are the site admin, you should consider changing your username. This can be done directly within the site’s database. Alternatively, you can use the appropriate dashboard option in the Users section to add a new user with administrative privileges and give it a unique name. After doing that, make sure to delete the other administrative account which has the admin username. Don’t forget to attribute all the content to your newly created administrator account.
As for the password, you should increase its strength by replacing your less secure passwords with more complex ones. This includes using longer passwords with lowercase and uppercase letters, numbers, and special symbols (such as & _ } !, and so on). Also, avoid using existing vocabulary words (e.g. password), or words directly related to your personal life (family member’s name, date of birth, pet name, etc.), as well as existing keyboard patterns (e.g. qwerty or 123456). For obvious reasons, you should also avoid using the same credentials across different applications. As creating sufficiently complex passwords can be challenging, there are online tools like the strong password generator that can help you.
Finally, you should improve how you store your passwords to reduce the possibility of them getting stolen or of you simply forgetting them and ending up locked out of your dashboard. There are a few technological tools available to help you with this as well. To that end, we suggest finding a suitable password manager, after strengthening your password.
As we mentioned earlier, WordPress doesn’t offer any default mechanism to limit login attempts. This makes WordPress sites more appealing targets for hackers’ brute force attacks. They can use scripts and bots to quickly test tens of thousands of possible passwords, without WordPress trying to block them after the first few. This persistence presents a danger even to strong, complex passwords.
Therefore, the next layer of security that you should engage is to limit the number of failed login attempts. This should be accompanied by temporarily blocking the IP address that has exceeded that limit. This will, for a certain amount of time, deny access to the website to anyone trying to log in with incorrect credentials. As a result, this will make the hackers’ efforts to brute-force their way significantly more time-consuming. Moreover, it might even dissuade them from attempting further brute force attacks, as it will no longer be practical.
You can limit login attempts in WordPress by using a plugin such as Limit Login Attempts Reloaded. Its features include configuring the maximum number of login attempts and the duration of the ban if all the attempts are unsuccessful. It also has logging of blocked attempts and blacklist capabilities, allowing you to keep track of who attempted to log in and to blacklist those that tried brute force attacks.
This plugin also includes a safelist capability, which can help you in case of accidental lockdowns. So, if a legitimate user makes a typo or misremembers the credentials, you can un-ban anyone that got locked out by mistake. These are some of the reasons why the Limit Login Attempts Reloaded plugin is our recommendation for implementing an additional layer of protection against brute force attacks. To learn more about installing and using this plugin, we suggest reviewing our article on limiting login attempts.
Adding two-factor authentication is another great way of guarding the backend of your site from hackers. As the name implies, the two-factor authentication creates an additional layer of security by adding a second identification test. For example, this could include a verification code that is sent to the users via SMS or email. Then, anyone trying to log in would also need access to those codes, making a security breach significantly more difficult. Just like the previous method, this can be implemented using a suitable WordPress plugin. You can find more information about it in our article on adding two-factor authentication.
HTTP authentication is another way of adding a layer of protection, on the server level, to your login page. With it, every time a user tries to access your login screen, a new sign-in form will appear, with separate credentials. And users will be granted access to the WordPress login screen only after correctly inserting the proper authentication credentials to the sign-in form.
You can enable this additional HTTP authentication within your hosting control panel. For us, that was cPanel. If you’re using a different control panel, you should ask your hosting provider for the equivalent set of instructions. With that being said, let’s take a look at how HTTP authentication can be enabled.
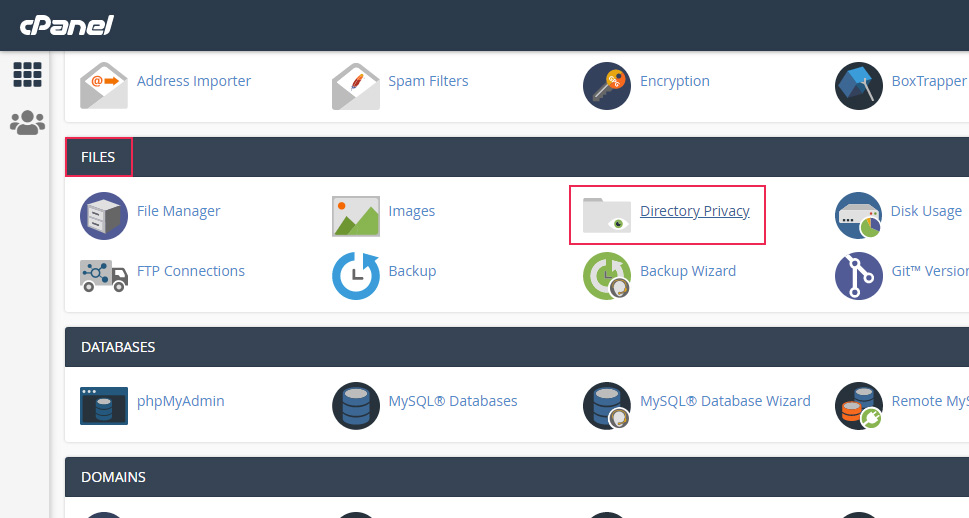
First, log in to cPanel using your cPanel credentials and click on the Directory Privacy option, located in the Files section.
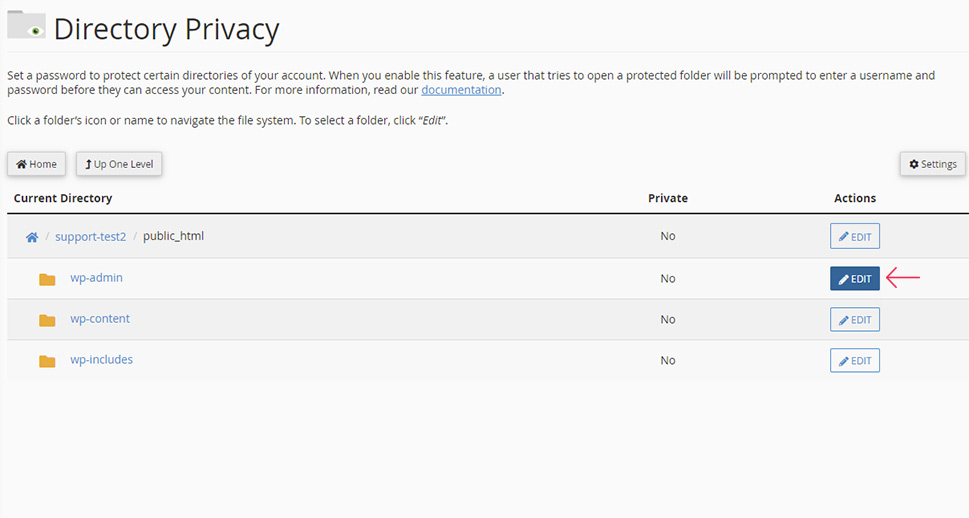
In the next window, locate your website directory and click on it. Then, navigate to your root WordPress subdirectory, often called public_html. You will see three folders within it: wp-admin, wp-content, and wp-includes. Since we want to protect the login screen, we will make the wp-admin directory private. As such, click on the Edit button next to the wp-admin folder to change its privacy settings.
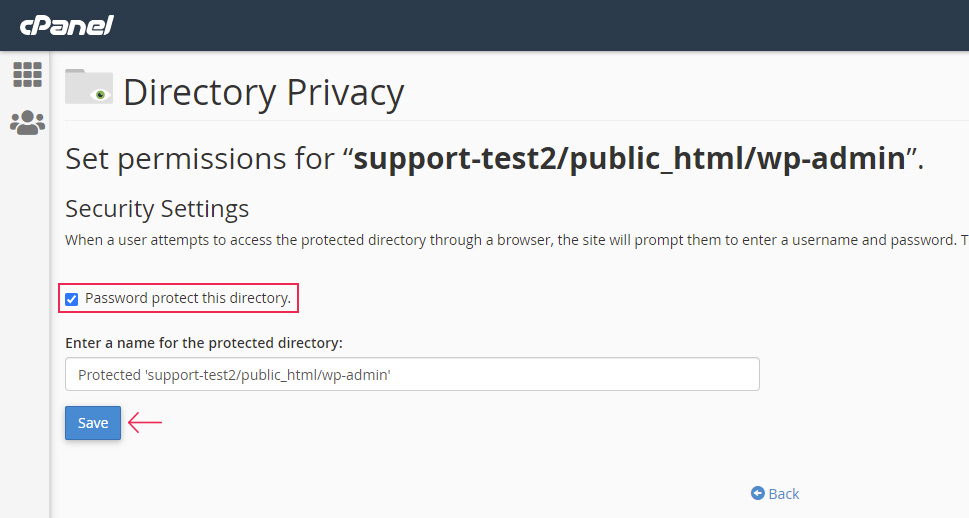
On the following screen, tick the checkbox next to the Password protect this directory option, which will also display the name of the directory that will be protected. If you clicked on the right Edit button, the wp-admin folder will be the one shown as selected. To confirm this change, press the Save button below.
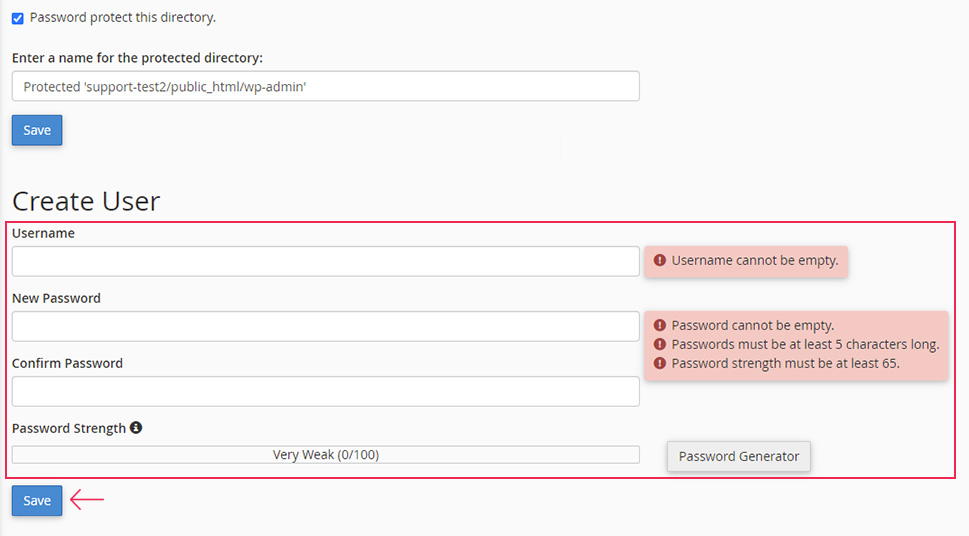
Briefly after, you will see a success message stating that the access permissions were changed. Press the Back link to return to the previous screen. There, you will see the second part of this setup, where you will need to create a user. To do so, insert a username and password of your choosing in the appropriate fields and click on the Save button when you’re done. You should try to use strong credentials here as well.
Shortly after, you will see a success message that the user has been created. Then navigate to your login screen and verify that all is well. We advise using a different browser or the incognito mode in your current browser for testing. However, it’s just as likely you’ll get an error at this point. It happened to us as well—we got the ERR_TOO_MANY_REDIRECTS error.
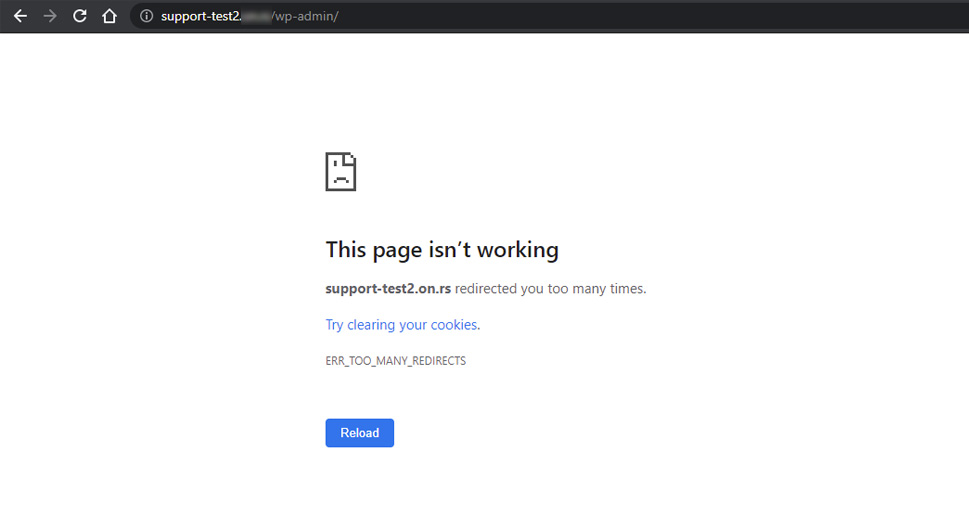
Luckily, solving the error in this specific case is rather simple. The troubleshooting process has already been described in an article on the official WordPress Support page. Anyone interested in exploring a more coding-intensive approach to fighting against brute force attacks will find the whole article well worth the read. As WordPress support explains, you only need to add the following line of code into your .htaccess file to solve this issue:
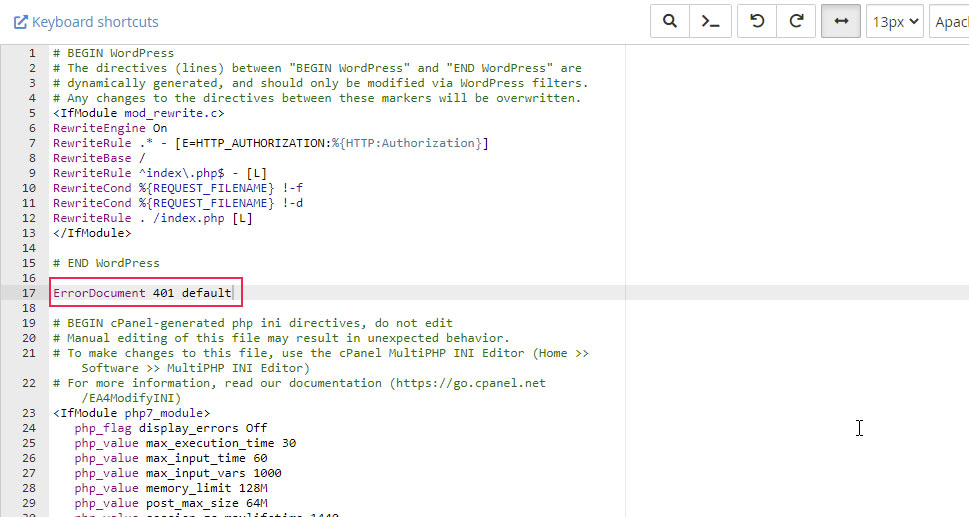
ErrorDocument 401 default
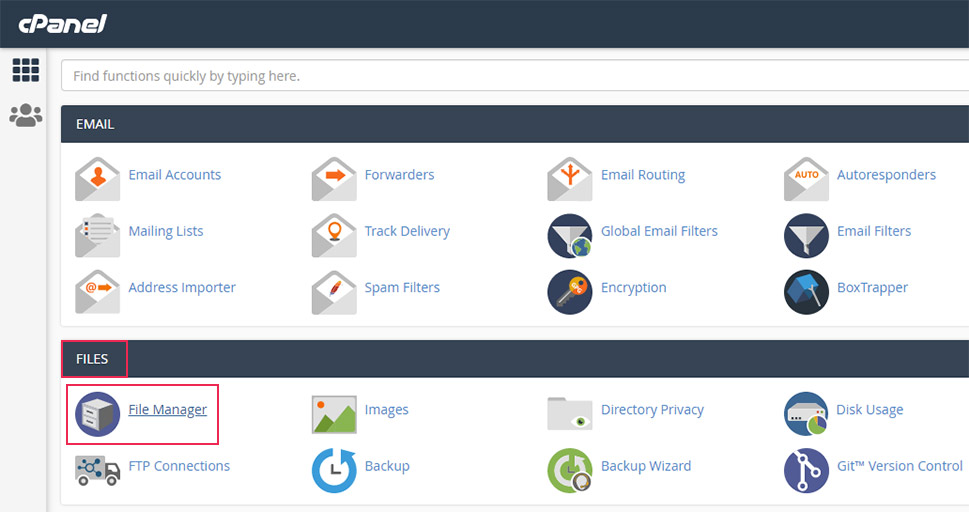
To do this, return to the cPanel’s main screen and click on the File Manager option, located in the Files section.
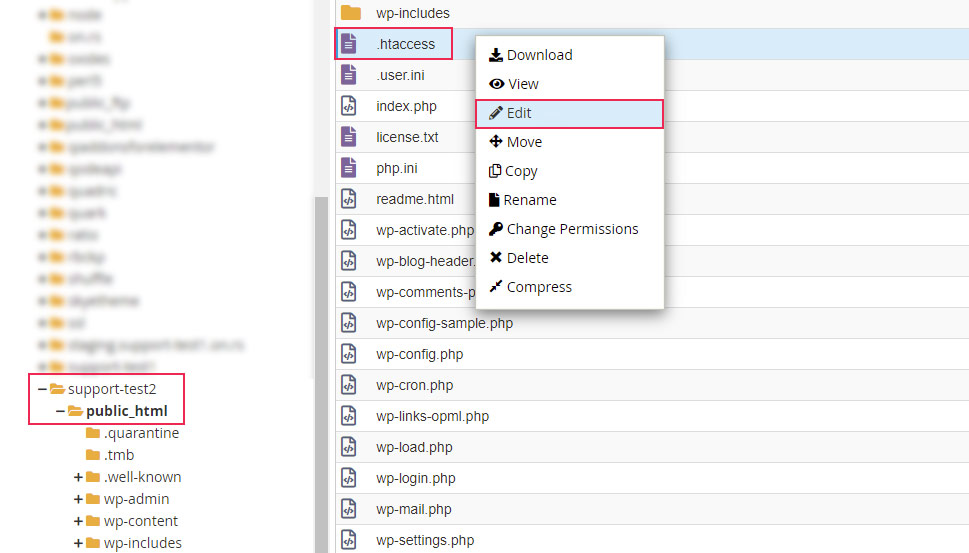
Then, navigate to the root WordPress directory of your website, locate the .htaccess file, right-click on it and select the Edit option.
This will open cPanel’s native editor, which will allow you to edit the file. Simply add the line of code shown earlier below the # END WordPress comment, and click on the Save Changes button in the upper-right corner of the screen.
When you’ve done that, reload the page that was showing the error. Instead of the login screen, you will see the new HTTP authentication feature that you just enabled. Now you will be prompted with a sign-in window where you need to insert the appropriate credentials before you can proceed to the WordPress login screen.
As most WordPress users know, a quality security plugin can greatly reduce the threat of hacking attacks, including brute force ones. The best WordPress security plugins offer a wide range of security-enhancing methods, some of which we’ve already covered in this article. These include generating and pushing for strong passwords when creating new users, malware scanning, two-factor authentication, firewalls, audit logs, IP blacklisting and whitelisting, and many more. As such, a reputable WordPress security plugin can take the brunt of brute force attacks to safeguard your site. Still, for optimal security, we advise combining a security plugin with some of the other methods from this article.
As the most popular content management system currently, WordPress is powering the majority of the Internet. One of the reasons for its great success lies in its constant improvement, both in functionalities and any security vulnerabilities that are discovered in the meantime. As such, one of the best general pieces of advice for improving the overall security of your WordPress website is to update it regularly. Otherwise, hackers might decide to exploit some of the known security vulnerabilities that you haven’t patched against. To prevent this, you should keep all aspects of your website up to date by updating the WordPress core files, plugins, and themes.
Another great piece of advice for improving your website’s security involves using a firewall. Firewalls allow you to filter the traffic your website gets, and detect anyone malicious. With it, you can block any IPs that are deemed suspicious, as well as impose geoblocking, i.e. blocking all IPs from a given location. Usually, firewalls are bundled within every quality security plugin, as they are an integral part of decreasing malicious influences on your site overall. They can also be included within the hosting packages offered by certain hosting providers. As such, you should consult your hosting provider about implementing a firewall or finding a suitable WordPress security and firewall plugin.
Regularly making backups is one of the key steps to keeping your website safe and intact. Having backups safely stored will give you peace of mind when you encounter any issues. Those could be issues with custom code compatibility, failed updates of plugins, themes, or WordPress core files, and even hacking threats. You can make backups using a WordPress plugin or backup your site manually.
If you haven’t done so already, we advise you to find a quality backup plugin and use it regularly. Likewise, you should make it a habit to routinely scan your website for malware. This will help you identify any known security vulnerabilities that your site has and which you should address.
In the unfortunate case that you fall victim to a brute force hacking attack, you can use a backup to restore your website. Then, log out any other logged-in users and change the admin user password to block the hacker from further accessing your site.
As a final method against brute force attacks, you can block malicious IPs. If your website is undergoing repeated failed login attempts from specific IP addresses, you should consider blocking those addresses. But first, you should check that these attempts aren’t coming from verified users who are simply misremembering their credentials. If that turns out to be the case, you can whitelist them.
Both IP address blacklisting and whitelisting can be done using custom code or with a suitable security or firewall plugin, as we mentioned before.
While blacklisting IPs is, theoretically, less effective than the methods we mentioned previously (as a hacker can simply use a different IP address), it reduces further hacking attempts as it makes them more time-consuming. And if you experience numerous brute force attacks coming from a certain country or region, you should consider geoblocking instead of blocking singular IP addresses.
Before you opt for something more drastic like geoblocking, you should weigh the pros and cons of this decision. We suggest you implement it only if it won’t cost you a great number of visitors from that country or region. If you decide to use it, you should investigate WordPress malware plugins to help you with the process.
Final Thoughts
Brute force attacks are one of the simplest forms of hacking attacks. They target the login screen of your website by repeatedly trying to guess your credentials and gain access to the website’s backend. Even if they are unsuccessful, these attacks can be harmful in other ways, such as crashing your server. This is why it’s important to employ multiple layers of protection against them. And in this article, we covered the most important methods of guarding your site against WordPress brute force attacks.
Some of the suggestions we shared include using higher security credentials, changing the default WordPress login URL, limiting the amount of failed login attempts, and blocking any IPs that often break this limit, and more. We invite you to improve your site defenses as much as possible by using a combination of the methods we suggested to protect it against brute force attacks. Also, just in case, we recommend you bookmark this article for future use as well.
