How to Easily Optimize Your WordPress Database

The database stores all of a website’s information. This includes the content of all pages and posts, information on themes and plugins, and various other settings, options, and relational data. Any site that has been around for a while has likely accumulated database bloat along the way.
Besides taking unnecessary storage space, database bloat can hurt a website’s performance and any processes that are run in the backend. As such, optimizing your WordPress database by removing any unnecessary data can help your website run more efficiently. In this article, we will discuss all the ways your database can accumulate unnecessary data and how to optimize it accordingly. If you’d like to skip to any specific part of the article, just click on one of the links below:
There are a lot of benefits to optimizing your WordPress database. The most obvious ones include having your server run more efficiently and improving your website’s performance. As a result, your website’s visitors will have a better experience while browsing through your content, which can lead to increased engagement and higher conversions.
Besides that, there are other benefits to consider. An optimized database is a must for users who have limited storage space in their hosting plans. And, if you plan on migrating your website to a different server, you should optimize your database as some migration plugins put a storage limit on the amount of data you can migrate.
Now we’ll take a quick look at all the ways database bloat gathers on your website to help you understand what you need to remove. This includes unnecessary post revisions, auto-draft versions of posts and trashed posts you don’t need, spam, trashed and unapproved comments, expired transients, pingbacks, and trackbacks, leftover or unoptimized database tables, and leftover data. We’ll give a brief overview of what each of those is below.
Post revisions were introduced way back in the WordPress 2.6 update. They represent previous versions of your updated posts and drafts that you can revert to. However, since all this data is stored inside your database, it can quickly pile up. As such, restricting the number of revisions that are kept within the database or completely removing them can help reduce the size of your database.
Items in the trash can also make a large portion of the database bloat. Unless restored, those items will remain in the trash for 30 days before they are permanently removed. As such, if you are running an active website, your trash could be full of items, so much so that even permanently removing them in bulk could take a lot of time and effort.
If comments are enabled on your website, you almost certainly experienced issues combating spam either from real users or, most often, bots. Luckily, WordPress allows you to combat this issue to some degree. This is done by unapproving a comment, trashing it, or by marking it as spam, to remove it from being publicly visible on the website. However, those comments will still be stored in the database, adding to the existing database bloat. You can choose to permanently remove them, which will somewhat reduce that database bloat.
Transients allow WordPress developers to store data with an expiration date, which would otherwise slow your website if loaded on every page load. In that sense, they serve a similar purpose to the browser cache. However, after transients expire, you should remove them to expunge that unnecessary data from your database and to see the real result on your website, if you are testing a functionality, for example.
Pingbacks and trackbacks are a WordPress feature that has, for the most part, become less popular nowadays. If you’re using them, deleting the ones in your database is a way to optimize your WordPress database and remove the bloat. However, if you don’t know what pingbacks and trackbacks are or want to learn more about them, check out the article we linked above. Once you’re aware of all the pros and cons, you can decide whether to use them in the first place or not.
Some plugins may add additional tables to your database and fill it with relevant data. However, deactivating and deleting those plugins won’t necessarily delete those additional tables as well. This can end up dragging down your website and making it slower than it should be. As such, it is important to optimize your database from time to time by removing those unnecessary, leftover tables. Since MySQL relies on relations between the data, simply removing something from one table could result in orphaned data. This is data that was related to whatever you deleted; such as getting stuck with the database tables of a plugin you removed. You will need to delete any orphaned data to reduce the size of your database and optimize its performance. This includes the orphaned post, comment, and relationship metadata.
Furthermore, you can reorganize the existing data, so that it takes up less storage space and can be accessed more efficiently. This is done by using the Optimize table option within phpMyAdmin or an equivalent plugin option that relies on it.
Qode Themes: Top Picks
View Collection


How to optimize your WordPress database
With a clearer picture of all the benefits of optimizing a WordPress database, we can explore how this is actually done. As with most of our guides, we’ll describe two methods for you to choose from—using plugins or using the manual approach. Before we start, tinkering with the database can potentially harm your website, so we highly recommend making a database backup beforehand. Making regular database and website backups is good practice in general. With that being said, let’s begin.
Given the abundance of WordPress plugins, it is quite easy to find one suitable for almost any purpose. When it comes to optimizing your WordPress database, you can look for plugins built primarily for database optimization or those designed for improving the performance of your website as a whole. We opted to look in the latter category and picked WP-Optimize as the plugin that we’ll use in this article.
The WP-Optimize plugin is a very versatile performance-optimization plugin. It specializes in three areas: cleaning and optimizing the database, optimizing images, and page caching. It is a freemium plugin, with the premium version unlocking further features like multisite support, sophisticated scheduling, WP-CLI support, lazy loading, and premium support. As for the database optimization options, it allows you to remove all the unnecessary data and unused tables, as well as schedule optimization weekly while retaining data from a set period. The plugin’s interface is very intuitive and it helps you track the storage statistics of your database and the savings you can achieve.
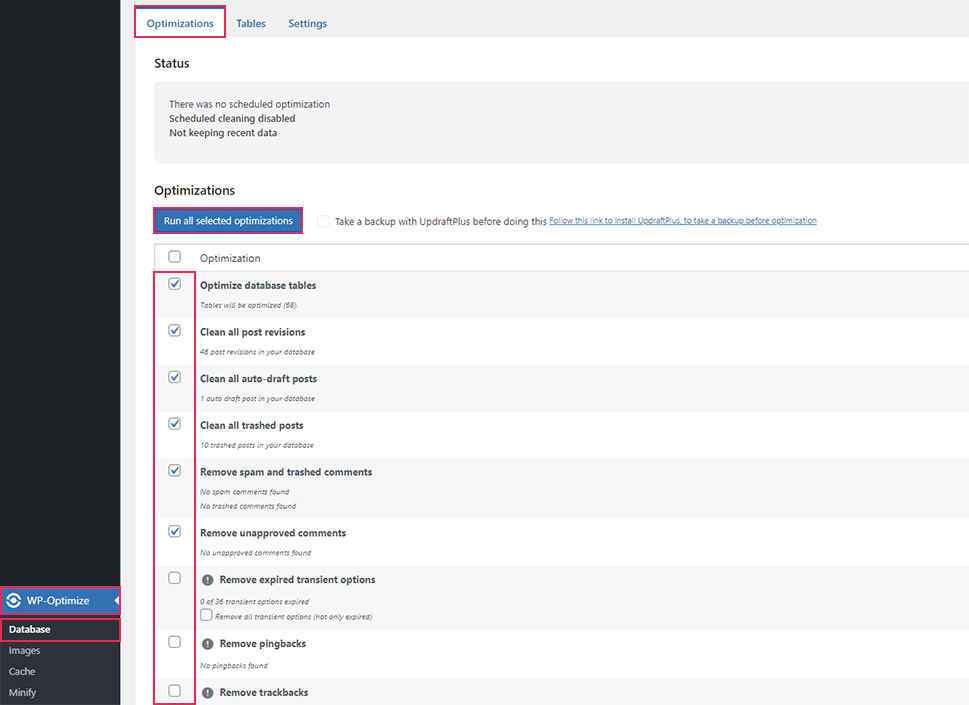
After installing the plugin, navigate to WP-Optimize > Database to examine all the database-related settings. In the main section of your screen, you will notice three tabs: Optimizations, Tables, and Settings, with the Optimizations tab open by default. Although we’ll cover all three tabs, we’ll focus on Optimizations in particular.
In the Optimizations tab, you will see all the possible optimization actions you can perform over your tables and data. Some of those actions will be preselected, while others will have a warning sign next to them. The warning sign will be accompanied by the following warning message at the bottom of your screen:
“Items marked with this icon perform more intensive database operations. In very rare cases, if your database server happened to crash or be forcibly powered down at the same time as an optimization operation was running, data might be corrupted. You may wish to run a backup before optimizing.”
Therefore, if you haven’t done so already, you should make a database backup before going any further.
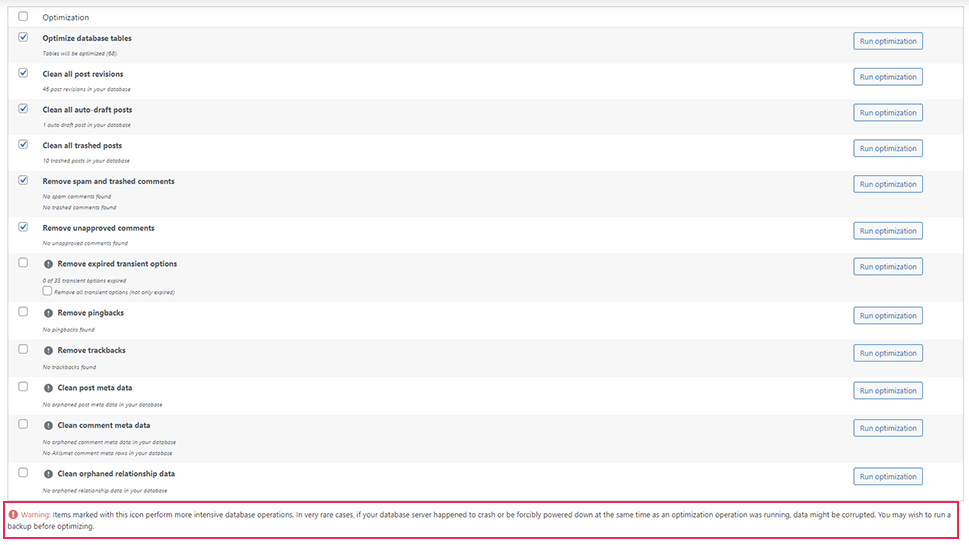
Each of the optimization actions listed by the plugin will have an explanation accompanying it, showing how relevant they are to your database (e.g. how many trashed posts you have for deletion). Then, you can select the actions you want to perform by ticking the checkbox next to each option. To finish, press the Run all selected optimizations button near the top of the Optimizations tab. Alternatively, you can choose to perform one optimization at a time, by pressing the Run optimization button located in each row.
With that, you will perform the majority of the available optimization options. However, there are two tabs remaining for us to explore.
In the Tables tab, you will see an overview of all your tables. The tables that were added by a plugin will show which plugin they belong to. The two columns that you should pay special attention to are the Overhead and the Actions. The Overhead represents the unnecessary data inside a table, which we removed by optimizing the database tables. While the Actions allow you to delete a table. This option is available only for tables that correspond to plugins that are either deactivated or even uninstalled on your website. For deactivated plugins, the notice next to the plugin table will state inactive, while for uninstalled plugins it will say not installed.
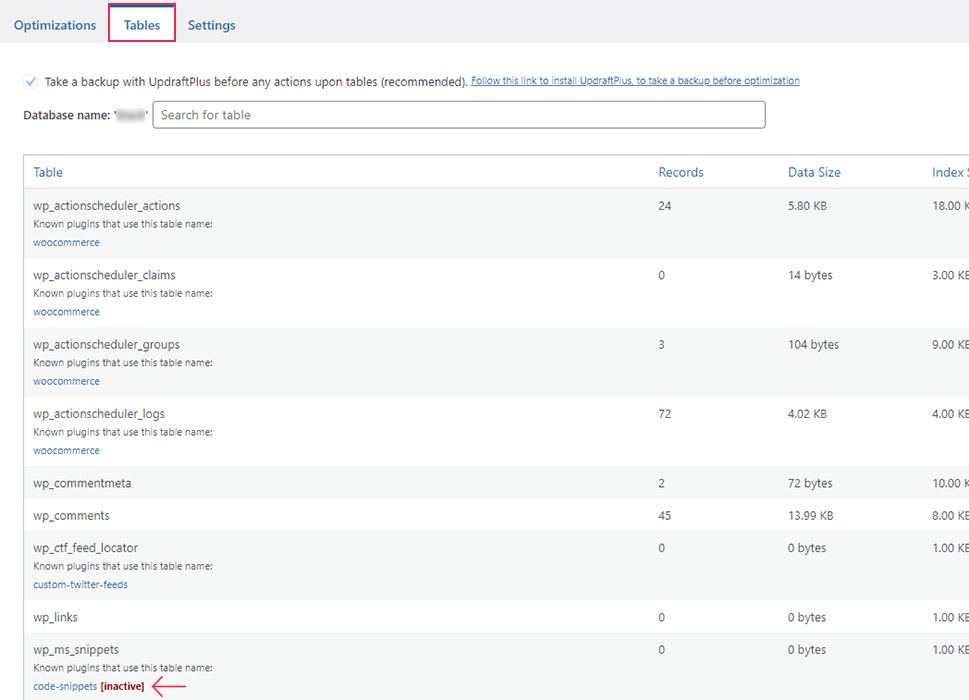
You should review all the plugins that are currently deactivated on your website and remove the ones that you don’t plan on using again. This will also go towards improving the performance of your website. Once you’ve done that, the status of the associated table will change, as you can see in the screenshot above. To fully uninstall a plugin, you will need to remove the leftover table(s) by pressing the Remove button located within the same row. After pressing the button, you will be prompted with a popup window asking you to confirm your selection. Read the warnings carefully. If you are sure you want to remove that table, tick the I confirm checkbox and press the Remove the table button, which will appear below.
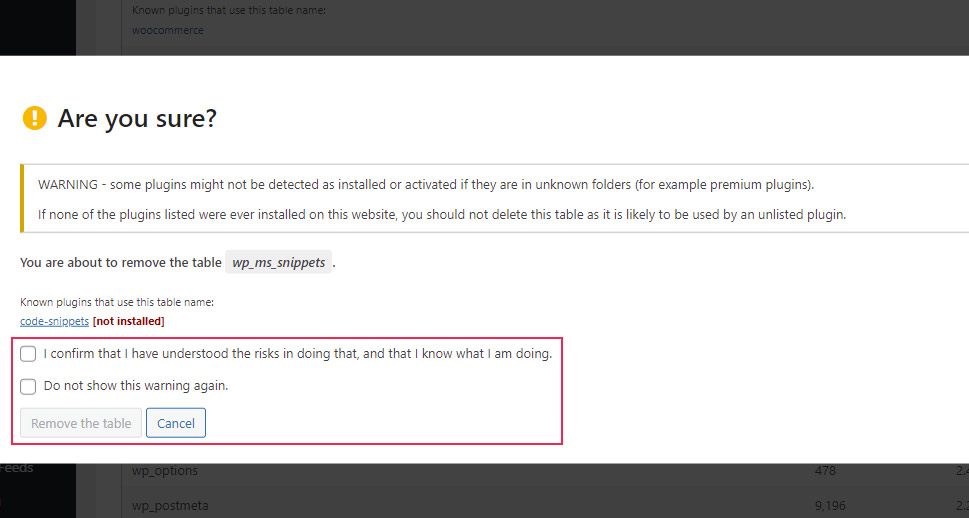
The selected table will be removed shortly after.
As for the Settings tab, this is where you can enable scheduled clean-ups and manage what data is being retained based on the date it was created. Select what actions a scheduled clean-up will perform and its timeframe (the default setting is weekly). As for the actions, the choice includes most of the actions offered in the Optimizations tab. After you select all the settings you want, you can click on the Save settings button below to save them.

Besides using a suitable WordPress plugin, there is another way to properly optimize your WordPress database. It involves using database-altering queries and limiting some built-in WordPress features by editing the wp-config.php file. In the process, you will be able to achieve most of the functionalities provided by the plugin we mentioned above. However, this optimization method should be done carefully and it is most suitable for intermediate-to-advanced WordPress users. As a safety precaution, we again recommend making a database backup before proceeding to do any work on the database.
-
Requirements for manually optimizing the database
Before we jump into the methods for optimizing the database, we wanted to make an overview of the things you need to know to perform them properly. We dedicated this section to the overview as keeping it separate will make it easier for readers to come back to it later. As an added benefit, it will let us avoid any repetitiveness later in the article.
Editing the wp-config.php file
The wp-config.php file is one of the core files within a WordPress installation. It is used to connect your website with its database and it allows the user to enable some important server settings for their website. By editing this file, you can enable some database-optimizing features.
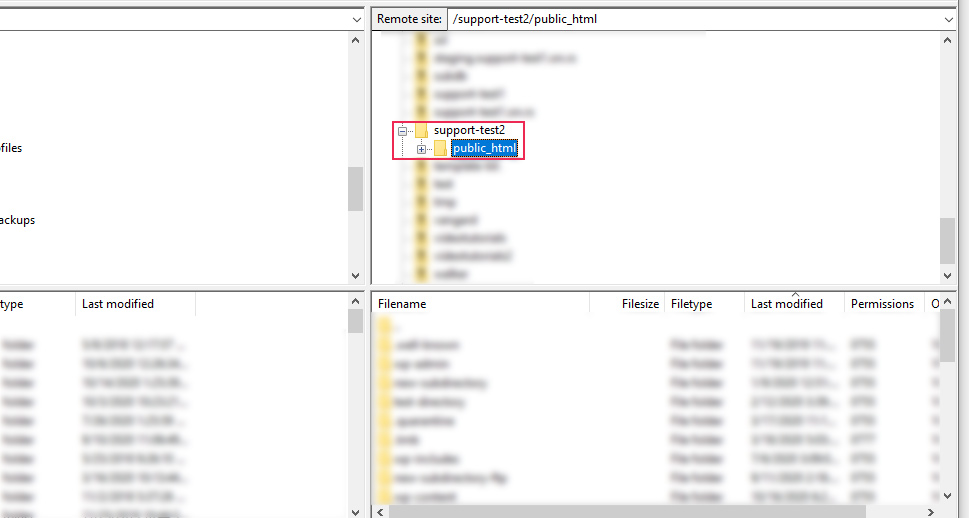
To open the wp-config.php file, you would need to first connect to your server using your FTP credentials and to navigate to the root WordPress directory, often called public_html.
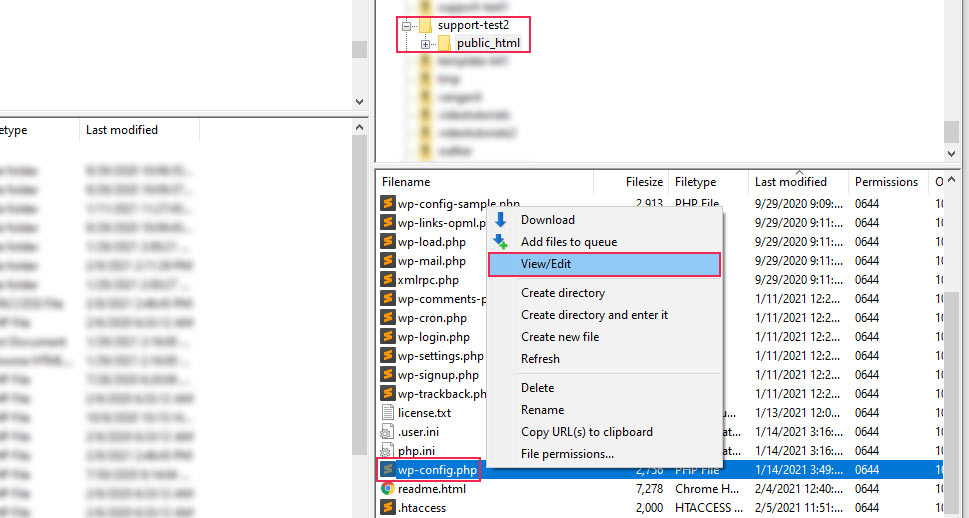
Then, within that directory, locate the wp-config.php file, right-click on it, and select the View/Edit option.
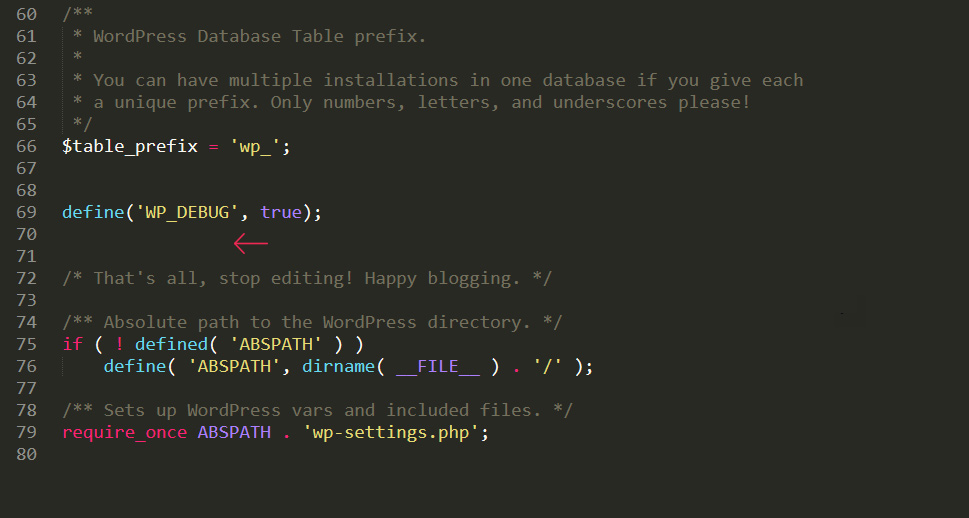
Next, open the file using your preferred text editor and scroll down. Any code line(s) that you plan on inserting should be added above the /* That’s all, stop editing! Happy blogging. */ comment line.
After editing the file, you should save the changes and upload it back to your server to override the file currently there.
Finding the name of your database
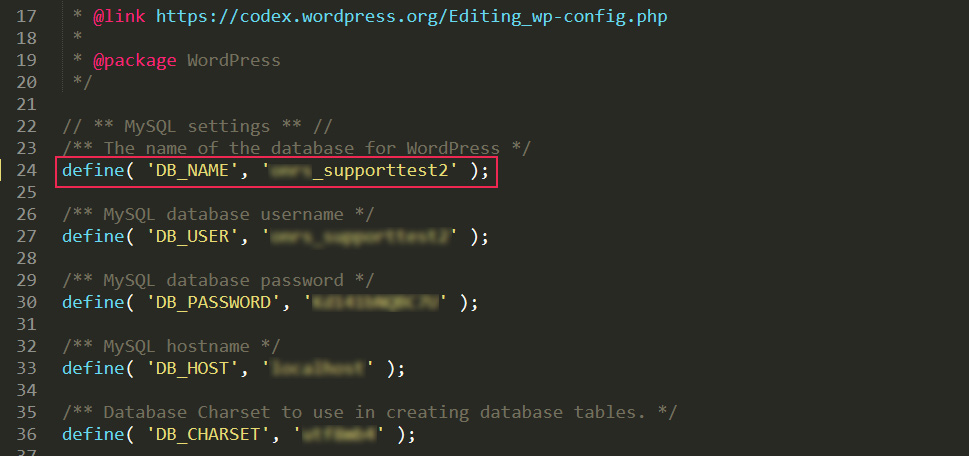
You can find a lot of valuable information on your database in general by reviewing your wp-config.php file. To find your database name, you simply need to look at the MySQL settings section found near the top of the wp-config.php file. As we noted above, you will need to select the View/Edit option to access the file. Then, look for the following line of code:
define( 'DB_NAME', 'your-database-name-goes-here' );
You’ll find your database name in place of the ‘your-database-name-goes-here’ value.
Running a MySQL query
Queries are a type of structured command a user makes to interact with a given database. With them, you can retrieve data that matches an expression, insert new data, delete tables, rows, or fields, and much more. The most obvious and straightforward way of optimizing a database is by running adequately constructed queries.
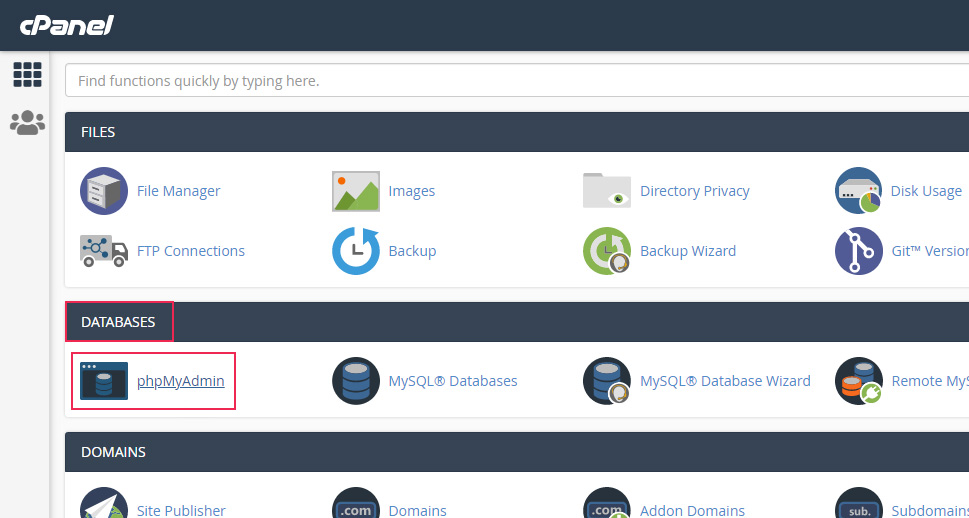
To run a query, you must first open the phpMyAdmin application. To do so, log in to cPanel using your credentials and click on the phpMyAdmin option located in the Databases section.
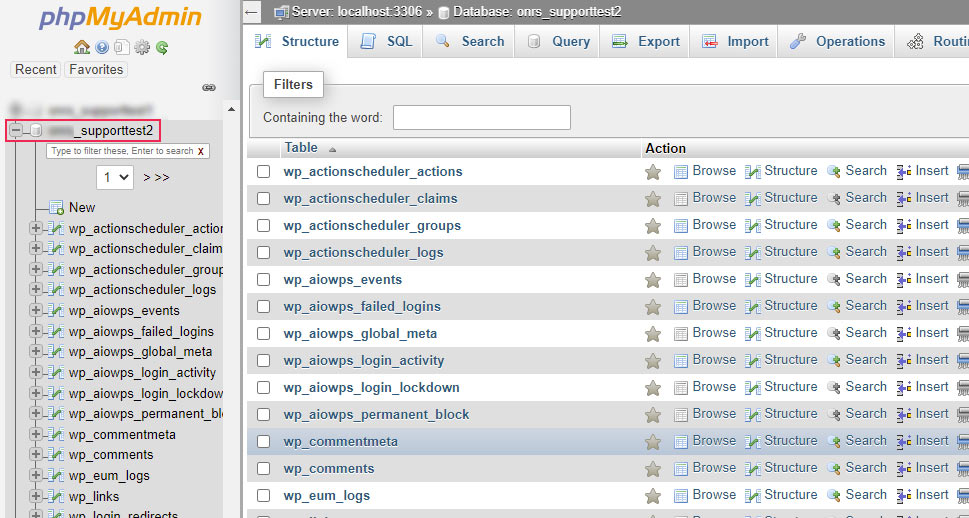
The phpMyAdmin application will open shortly after. Locate your database among the list of databases on the left and click on it to open.
To run a query, switch to the SQL tab that is located near the top of your screen by clicking on it. Then, insert your MySQL query in the top section. After inserting it, you will notice two buttons below. Pressing the Simulate query button will allow you to perform a dry run of the query and see how many rows would be affected. Pressing the Go button will simply perform the query.
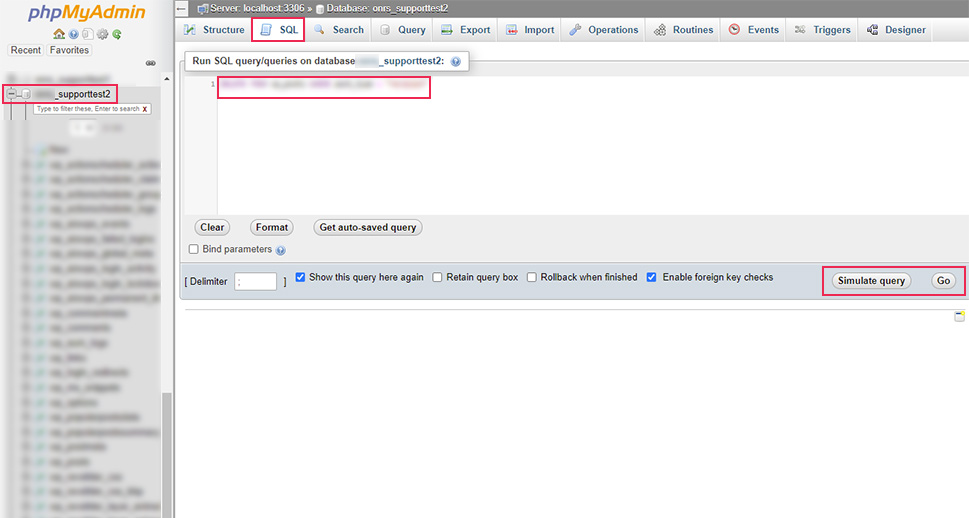
Generally speaking, performing a dry run first is the recommended option, especially if you don’t feel comfortable running the query straight out.
Apart from that, we need to stress that you should carefully adjust the names of the appropriate tables in the query if your default WordPress prefix has been changed. For example, if the query contains the wp_posts table, you should replace it with yourprefix_posts. Make sure to replace the yourprefix part with your current database prefix.
-
Methods of manually optimizing the database
Once you have a grasp on all the requirements, let’s take a look at the methods you can use to manually optimize your database. Since you will be altering the content of the database using those methods, we’ll warn you again about making a database backup beforehand, to prevent losing your data.
Performing database table optimization
To perform this database optimization method, you will need to log in to cPanel or a similar hosting control panel. Next, click on the phpMyAdmin option located in the Databases section.
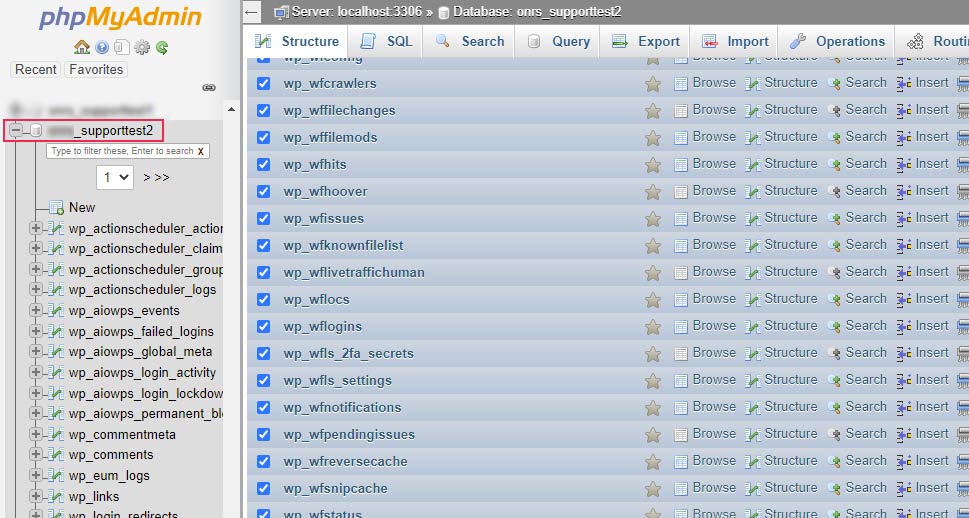
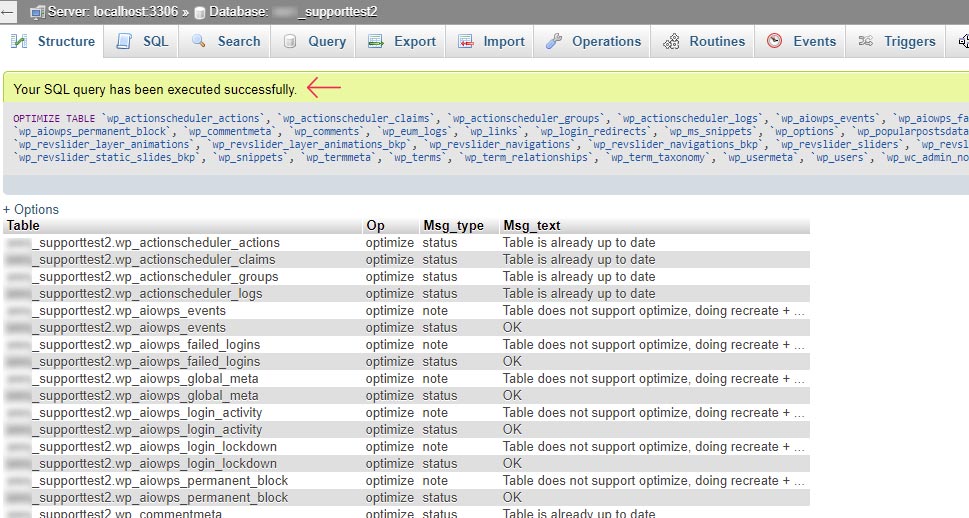
Find your database from the list of databases on the left and click on it to open. Then, select all the tables by clicking on the Check all link located near the bottom of the main section. After that, choose the Optimize table option from the dropdown next to the link.

You will need to wait a bit for the database tables to be optimized. Once it’s done, you will see a success message similar to the one shown below.
Deleting post revisions
To reduce the number of post revisions bloating your database, you can insert the following line of code into the wp-config.php file.
define( 'WP_POST_REVISIONS', 3 );
This snippet of code will reduce the number of revisions stored in your database to the most recent three for each post. If the database currently contains more revisions than that, the older ones will be deleted. You can adjust the number you use from three to any that you find suitable. However, you should know that this setting will work only for newer posts, those created and revised after adding the code snippet, and won’t work on your older posts.
If you want to completely remove all current post revisions, you can use the phpMyAdmin application to run the following query in your database:
DELETE FROM wp_posts WHERE post_type = "revision";
On the other hand, you can disable future post revisions altogether by inserting the following snippet of code in your wp-config.php file:
define( 'WP_POST_REVISIONS', false );
Generally speaking, we advise against completely removing the revisions feature, as it could be a useful fallback. Especially if you lose connection or experience server issues, or any other type of WordPress error, while editing your posts.
However, if you are concerned by the number of revisions, you can simply increase the autosave interval from the default 60 seconds to 360 using the snippet given below:
define('AUTOSAVE_INTERVAL', 360);
This snippet has to be inserted inside the wp-config.php file. Knowing what it does, you can adjust the number from 360 (seconds) to something more in line with your needs.
Deleting unapproved, trashed, and spam comments
For this method, we have three snippets to share. Each represents a different query you can run on your database using the phpMyAdmin application.
To remove all the comments that have been marked as spam, use the following query:
DELETE FROM wp_comments WHERE comment_approved = 'spam';
To remove all trashed comments, use this query:
DELETE from wp_comments WHERE comment_approved = 'trash';
And, if you want to remove all the unapproved comments, you can use the query below:
DELETE FROM wp_comments WHERE comment_approved = '0';
Removing items in the trash
There are two ways you can remove items from the trash. The first is to reduce the default period for keeping a deleted item in the trash before it gets permanently removed.
This is done by inserting the following line of code to your wp-config.php file:
define( 'EMPTY_TRASH_DAYS', 5 );
It will reduce the default number of days that items are allowed to stay in the trash from 30 to 5 days. You can change this number and increase or decrease this time limit as you see fit. It’s also possible to set the number 0, which will disable the trash functionality completely. However, we don’t advise it, as you wouldn’t be able to restore any accidentally deleted posts if you disable the trash.
However, as we mentioned earlier, there is another method you can use to remove the trash. It involves removing all the items that are currently in the trash by running this simple query:
DELETE FROM `wp_posts` WHERE `post_status`="trash";
This is done within your website’s database using the phpMyAdmin application.
Deleting leftover tables
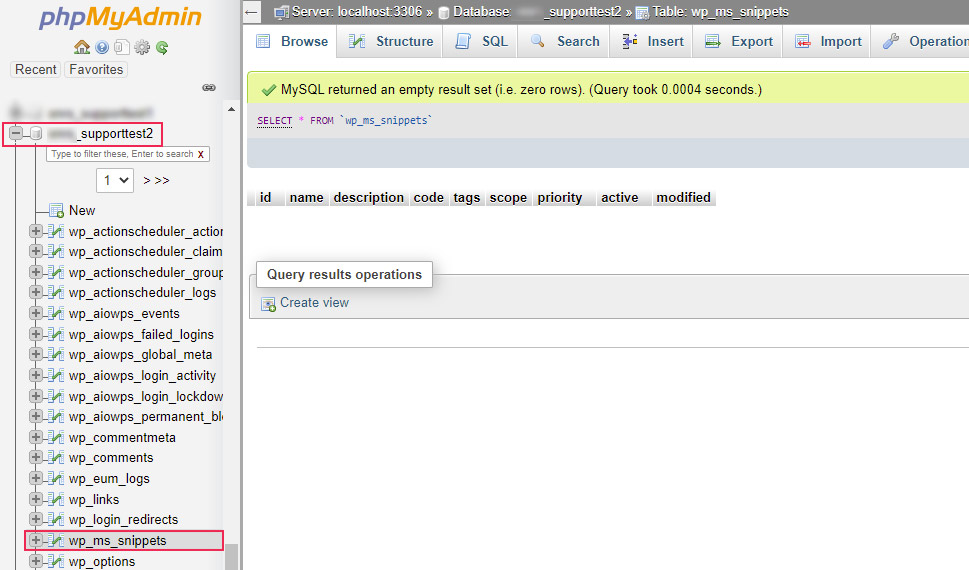
To delete a leftover table, you will need to log in to cPanel with your cPanel credentials and click on the phpMyAdmin option, located within the Databases section.
After opening your database on the left, click on the leftover table you wish to remove. Unlike the WP-Optimize plugin, your database won’t indicate the leftover table(s) as the plugin’s interface did. However, most often, the table(s) you need will be named similarly to the plugin that was removed from your website. This will help you narrow down your search significantly.
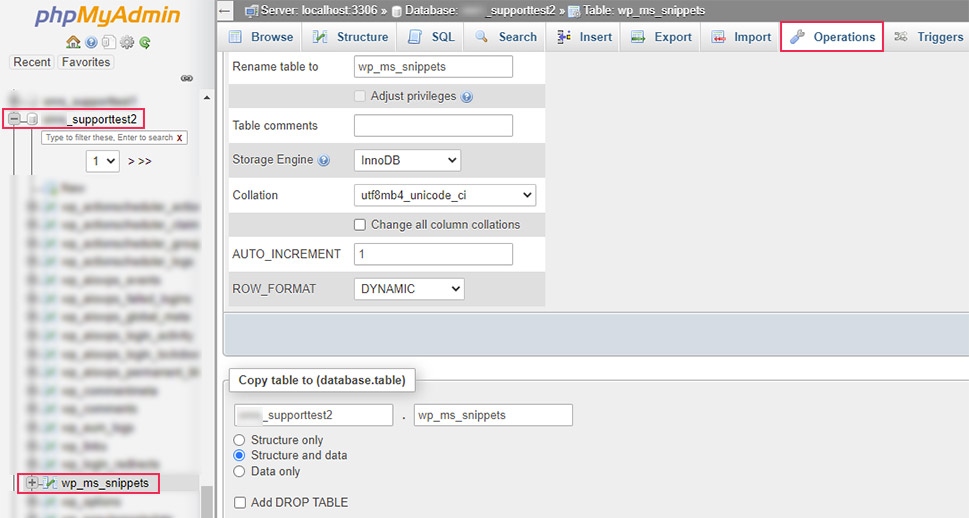
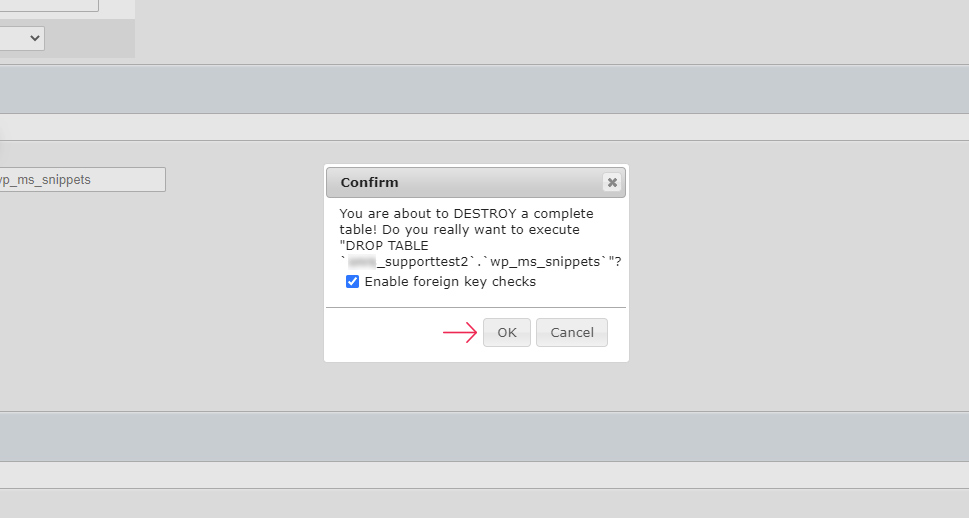
After clicking on the appropriate table, you’ll need to open the Operations tab in the section near the top of the screen. Then, click on the Delete the table (DROP) link below to remove the table.
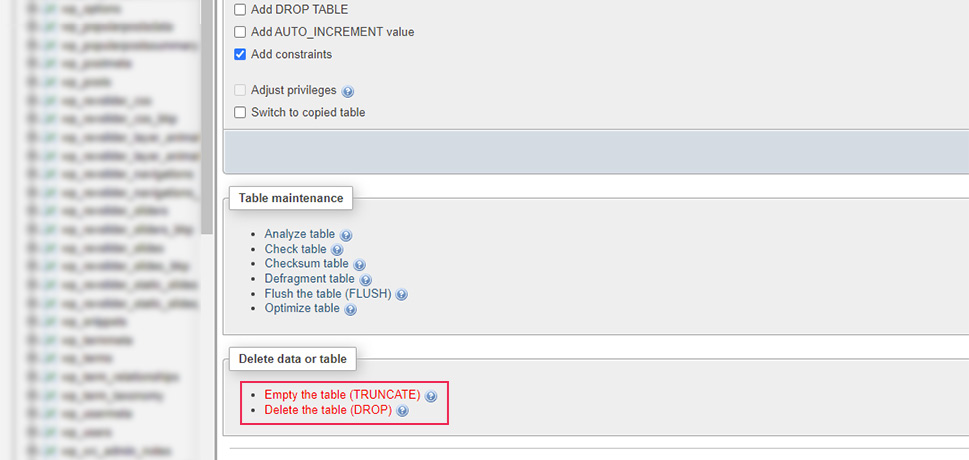
At this point, you will be prompted to confirm your choice. If you are sure you want to permanently remove this table and all its content from your database, press the OK button. The process will be done shortly after.
Removing orphaned data
In this section, we will show you the queries you can use to delete orphaned posts and comments metadata. However, with these queries, you won’t have the option of using the Simulate query button as they aren’t written in a way that triggers the button display. Instead, you can use the two COUNT queries we included below:
SELECT COUNT(pm.meta_id) as row_count FROM wp_postmeta pm LEFT JOIN wp_posts wp ON wp.ID = pm.post_id WHERE wp.ID IS NULL;
And:
SELECT COUNT(*) as row_count FROM wp_commentmeta WHERE comment_id NOT IN (SELECT comment_id FROM wp_comments);
The first query counts the number of rows within the wp_postmeta table, which don’t have a valid post ID. This correlates to not having a valid ID within the wp_posts table. The second query counts the number of rows within the wp_commentmeta table, which have comment_ids that don’t exist within the wp_comments table. By using the two COUNT queries above, you can simulate the outcome of performing the DELETE queries given below.
To delete the leftover post metadata, use the following query:
DELETE pm FROM wp_postmeta pm LEFT JOIN wp_posts wp ON wp.ID = pm.post_id WHERE wp.ID IS NULL;
And, to delete the leftover comment metadata, use the following query:
DELETE FROM wp_commentmeta WHERE comment_id NOT IN (SELECT comment_id FROM wp_comments);
These DELETE queries are designed to delete the rows within wp_postmeta and wp_commentmeta tables that don’t have a valid or existing ID when cross-referenced with the wp_posts and wp_comments tables.
Final Thoughts
An optimized database is essential to keeping a WordPress website efficient and fast-performing. Database bloat is a very common issue and one that can be tackled in various ways. Most WordPress users may opt for the simplest method and use the options provided within a plugin such as the WP-Optimize. However, more advanced users can employ technical solutions to improving and optimizing the various aspects of the database. The method you decide to use is up to you. With the explanations provided in this guide, we are confident that you will be able to optimize your WordPress database quickly and efficiently.
Finally, don’t forget to make a database backup beforehand as it will ensure no lasting consequences happen to your website if anything goes wrong. And, since every action within the WordPress dashboard leaves a footprint in the database, getting into the habit of regularly optimizing your database is highly recommended.
