How To Make a WordPress Database Backup Manually

WordPress stores all the information and changes you make to your website within its central database. This database, consequently, becomes an integral part of the backup process which allows you to protect and store changes to your WordPress site. This way you can always be prepared with a working version of the database should anything happen to the live version.
You can backup the database manually or using a WordPress backup plugin. In this article, we will show you how to create a copy of the database manually. However, if you prefer using plugins, we suggest you first explore the top backup plugins on the market.
There are multiple ways to make a manual WordPress backup of your database. A couple of them utilize your hosting’s cPanel functionalities, namely the access to phpMyAdmin and your database. The other way requires you to use the Backup Wizard, an automated functionality provided by some hosting packages.
How to Backup WordPress Database Using phpMyAdmin
To start the backup process, you need access to the database. If you’re working on a live server, you will either have to contact your hosting provider or access your hosting’s cPanel. If you choose the second option, navigate to phpMyAdmin.
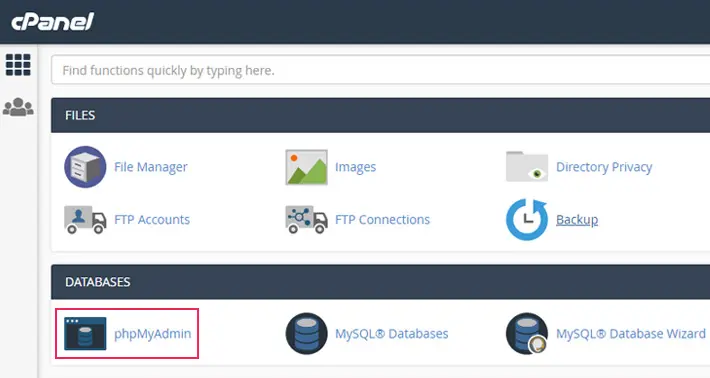
If you’re working on a local server (while you’re developing your website, for example), go to the designated dashboard for your chosen local server application. For the purposes of this article, we will be using XAMPP and accessing it via the control panel. This is a program that will let you work with WordPress locally, so if you are curious, you can learn more about installing XAMPP for you. Once you access it, press the admin button for MySQL.

You will be redirected to the phpMyAdmin dashboard page within your default browser.

On the left-hand side of the page, you will see a list of your databases. Select the one you need. This will open an overview of its tables.
Don’t be confused if the prefix for the tables is different. WordPress sets “wp_” as the default prefix, but there are a few ways to change this table prefix within your database.
When you choose the database you want to backup, click on the Export tab. You can choose the Quick or Custom export methods. If you’re not familiar with this process, go with the Quick export method.

Leave the format as SQL and click the Go button. This will start the download of the database file with the .sql extension. Save it to a local file and you will have a database WordPress backup on hand.
If you’re a more experienced WordPress user, you can choose the Custom export method. With this type of export, you’ll be able to save a lot more options from the database. This is why the Custom export method is recommended for larger websites that have robust settings and dozens of WordPress plugins.

If you want to customize the settings for your backup version, here are some of the options that will come in handy.
Firstly, the custom export option allows you to choose the tables you’d like to incorporate into the backup file. For example, if you have a WordPress plugin that is not particularly important to the functionality of the website, you might want to exclude it from the backup process as it would make the file unnecessarily bulky. This is a practical decision if you intend to make regular, perhaps weekly or even daily, WordPress backups. Any storage space that you could save using this option will greatly improve and speed up the backup process.
The second section of the Custom export feature is Output. This is a set of options that enables you to fine-tune how the backup will be packaged. In other words, you can choose a custom name for the file, its character set and the way you’d prefer it to be compressed. For example, it is helpful to change the file name template to include the date and time stamps. This will allow you to easily navigate through them within the chosen directory. This template is constructed as follows:
@DATABASE@__%Y-%m-%d_%H-%M-%S
The names of the created files will consist of the database name, followed by two underscores – the year, month, day, and time of the extraction separated by dashes.
Other options include exporting tables separately and setting a limit to the size of the tables. Unless you have a clear idea of how you want your backup file to look like, do not change the default values. However, if you’re going to backup your WordPress site often, take some time to learn more about these customizing options. It will make the process easier and quicker.
When you choose the optimal setup for your backup, click on the Go button and the file will be downloaded to your computer. Make sure to create a proper folder for all of the WordPress backups for better organization.
Qode WordPress Themes: Top Picks
View Collection


How to Backup WordPress Database Using the Backup Wizard
The entire process to backup WordPress can be partially automated with the use of the Backup Wizard feature that is provided with some hosting packages. Once you navigate to your hosting’s cPanel, you can choose between the Backup or Backup Wizard features.

Both of these are extremely simple and will result in the same backup file as the previous method. However, this method of backing up WordPress offers less autonomy over the backup options and process.
If you opt for the Backup functionality, all you have to do is find the name of the database you’d like to backup and click on it. The file download will start and you can store it.
If you opt for the Backup Wizard, you will have slightly more customization options compared to the Backup functionality. Once you click on the Backup Wizard, you will open a three-step process screen. The first step prompts you to choose to either backup or restore a previous backup. Click on the Back Up button.

In the second step, you get to choose the type of backup you’d like to perform. You have a choice between a full and partial backup of the website.

If you go with the partial option, you can select the Home Directory, MySQL Database, as well as Email Forwarders and Filters backup options. If you’re not familiar with the differences between these options, use the MySQL Database option. It will allow you to back up the database.
If you choose the Full backup option, you will be able to backup your website files as well. This will result in a complete backup of your website. However, if you’d like to exclude some of the parts of your website, here are brief explanations of the available options.
The Home Directory option stores any files from your server’s directory that you have ownership over.
The MySQL Databases option is the one we have covered in this article. It stores all of the information saved within the database. You select the database in the MySQL Databases menu and save it in the local folder as a .sql file.
The Email Forwarders and Filters backup option stores configuration for all email forwarders and account-level email filters created for your domain name. However, it only stores the domain’s account-level email filters from the /etc/vfilters/$domain file that does not include the user account-level email filters.
Final Thoughts
With this guide, you can understand the different methods used to optimize and create a backup of your website’s database. Using this knowledge you will have fewer issues with the sudden crashes of themes, plugins or servers. This means you’ll avoid unwanted scenarios of going offline and being unavailable for users – issues that can seriously affect your website performance and search engine rankings. Keep this tutorial in your bookmarks and rest assured that your website and all of the changes are stored safely.
