How to Add a User to the WordPress Database via phpMyAdmin

Losing access to a website’s dashboard has happened to every WordPress user that takes part in website creation at least once. Most often, it’s a matter of a forgotten password. In that case, you can easily recover the password using the recovery email or by changing it directly in the database.
However, in other, less frequent cases, regaining access to the dashboard can be quite a problem. Admin accounts are impacted the most by this, as they have the most privileges. These other reasons for losing access to the dashboard include accidentally deleting the user account or your website getting hacked, which can result in some accounts, including your only admin account, being deleted.
It’s also possible that you only had one admin account tied to your previous webmaster, whose departure left you unable to log in to your admin dashboard or any of your non-admin accounts.
Knowing how to add a WordPress user via phpMyAdmin can come in handy in those situations. This is particularly relevant for adding admin accounts and as such, they will be the main focus of this article. However, we will also show you how to add accounts with default (non-admin) user roles should you need to do so outside of your dashboard.
Qode Themes: Top Picks
View Collection


How to add a user to the WordPress database via phpMyAdmin
Since we already touched on why it would be useful to know other means of regaining access to your dashboard, let’s now delve into how to do it. To be able to apply our suggested methods, you will need to have access to your web hosting control panel. We will be using cPanel in our examples.
In the following section, we will show you how to add a WordPress user via phpMyAdmin and how to assign them admin privileges. We will also discuss how the process will differ if you wanted to assign other, non-admin privileges. Since this guide requires you to edit your database directly, making a backup of it beforehand is highly advisable.
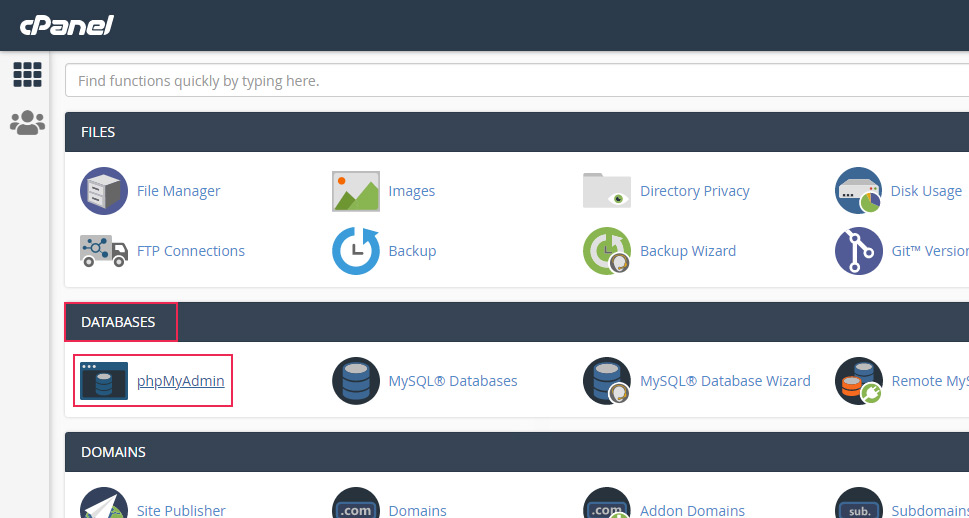
First, connect to cPanel using your cPanel credentials and click on the phpMyAdmin option, located in the Databases section near the top of your screen.
Having clicked it, phpMyAdmin will open in a separate tab. Find your database in the menu on the left and click on it to open, then find the wp_users table and click on it.

Before we go any further, we should quickly address two issues you might run into while performing the steps outlined above.
-
Not knowing your database name
If you have forgotten your database name, you shouldn’t worry—it is stored in the wp-config.php file. To find it, you only need to take a look at the wp-config.php file and search for a line of code that specifies your database name.
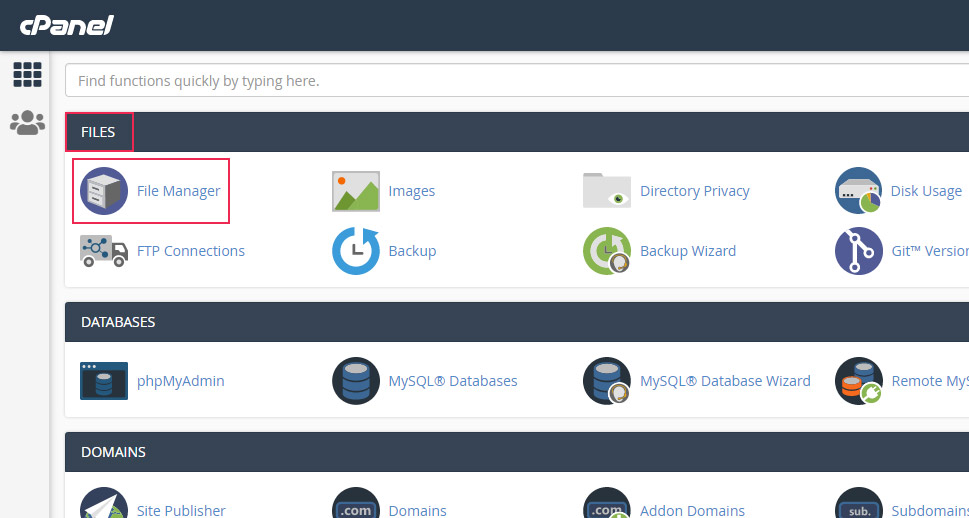
To do so, return to the main view of your server control panel and click on the File Manager option located in the top section of your screen.
In the tab that opens, find your website and navigate to its root WordPress directory, often called public_html. Afterward, locate the wp-config.php file, click on it, and select the View option from the dropdown.

This will let you see the content of the wp-config.php file. Within the section containing MySQL settings, which is located near the top of the file, look for a line of code that has your database name. It will be in the following form:
define( 'DB_NAME', 'your-database-name-here' );
The part with ‘your-database-name-here’ will be replaced with the actual name of your database.

-
The database prefix has been changed
Some users can decide to change the default WordPress database prefix (which is wp_) for security reasons. If that’s the case with you as well, you should look for the database table called yourprefix_users, instead of wp_users. Please note, the part with yourprefix_ will be replaced with your custom prefix. Knowing your database prefix is very important and will be mentioned several times throughout the article.
With that being said, we can continue with our guide on using phpMyAdmin to add an admin WordPress user. After accessing the users table, you will be placed within the Browse tab. Click on the Insert tab in the top section of your screen, instead.

To add a user, you will need to fill out the values of the columns shown on the Insert tab. Let us briefly cover what those are:
– ID – unique number assigned to a user when it’s created,
– user_login – username for the user you wish to create,
– user_pass – password for the user you wish to create,
– user_nicename – a name that the user will be referred by,
– user_email – email for the user you wish to create,
– user_url – user’s URL if they have a site or social media profile they wish to link,
– user_registered – the date when the user is created,
– user_activation_key – key used for authentication when resetting the password,
– user_status – a number determining the user’s status (currently deprecated), and
– display_name – the name of the user that is displayed on the website.
To add a new user, you will need to fill in the following fields: user_login, user_pass (while selecting the MD5 encryption function), user_nicename, user_email, user_url, user_registered, and display_name. When you’re done adding the required information, press the Go button below.

Other than the options we mentioned, we have left the others set to their default values. Of the three remaining options, the ID is the most important and will be automatically generated after the user has been created.
Wait until the creation process finishes; you will see a success message similar to the one shown below.

Afterward, click on the Browse tab to access it once more. Here you can see the ID of the newly created user; you will need this information for later, so make sure you memorize it. In our case, it was 17.

Then, return to the main screen of your database and click on the wp_usermeta table to access it. As we mentioned previously, if you changed the default WordPress database prefix (wp_), then you should look for the table named yourprefix_usermeta.

Next, click on the Insert tab. You will see a screen similar to the one below, with two sections where you need to add data.

This is the final and most important step—assigning a user role to the newly created user. All the steps we described so far will be the same when you create any new user, no matter the role it will have. Now let’s take a look at how you can assign admin privileges to your new user.
In the first section, add the ID you previously memorized as the value of the user_id column. Then set wp_capabilities as the value of the meta_key column. Finally, add the following code as the value of the meta_value column:
a:1:{s:13:"administrator";b:1;}
If you have changed the database prefix, then you would also need to change the wp_ part in wp_capabilities to match your custom prefix.

Afterward, scroll down to the second section. Add the user_id once more, set wp_user_level as the value of the meta_key, and insert 10 as the value of the meta_value column. Then, press the Go button to assign admin privileges to this new user.

Shortly after, you will see a success message in the form of the query that was run thanks to the data you inserted.

Afterward, you can log in to your website with the new username and password you created and regain access to your website if you lost it before. You can use this new administrator user as you see fit, including using it to recover your previous admin account.
How to add a user with a non-admin user role to the WordPress database via phpMyAdmin
As we mentioned before, the process of creating any user is the same in phpMyAdmin. The only difference between an admin and any other user role is the data inserted in the wp_usermeta table.
Therefore, we suggest you review the previous section first to learn how you can create a user. You can follow the same steps up to the part with accessing the wp_usermeta table. At the point when you access the wp_usermeta table, you should switch to the Insert tab. You will see a view similar to the one below, showing two subsections.
In the top subsection, you should insert the ID of the user you created as the value for the user_id column. Also, type in wp_capabilities in the value field of the meta_key column.
Then, scroll down to the bottom subsection and insert the ID of your user in the value field of the user_id column. Set wp_user_level in the value field of the meta_key column. If you followed along for the part of this article that described assigning an admin user role, then you probably noticed that the steps we are taking are the same. This is because different user roles are assigned to users based on the inputs in the meta_value fields associated with wp_capabilities and the wp_user_role meta_keys, respectively. Below, you can see the input for those fields for all default non-admin user roles.
-
Subscriber
wp_capabilities:
a:1:{s:10:"subscriber";b:1;}
wp_user_role:
0
-
Contributor
wp_capabilities:
a:1:{s:11:"contributor";b:1;}
wp_user_role:
1
-
Author
wp_capabilities:
a:1:{s:6:"author";b:1;}
wp_user_role:
2
-
Editor
wp_capabilities:
a:1:{s:6:"editor";b:1;}
wp_user_role:
7
Let us explain this in more detail using an example.
If we wanted to assign the subscriber user role to our new user, we would insert a:1:{s:10:”subscriber”;b:1;} into the value field of the meta_value column, which is directly below the wp_capabilities meta_key value. Also, we would insert 0 in the value field of the meta_value column, which is directly below the wp_user_role meta_key value. Afterward, press the Go button to finish the process.

If you followed all the steps correctly, the success message should follow shortly.

All the remaining user roles are assigned similarly, by using the appropriate wp_capatibilites and wp_user_role values given above.
Final Thoughts
Knowing how to create a WordPress user with phpMyAdmin is a handy skill. It’s especially valuable when you are unable to create users within your dashboard or if you need to recover your account but the usual methods have failed you. Even though this knowledge is most valuable when it comes to creating users with admin privileges, it can also serve with creating users with different user roles. So, to use phpMyAdmin to add a user, all you need to do is follow this article and you’ll be done in a matter of minutes.
