How to Disable All Plugins When Locked Out of WP-Admin

Deactivating plugins within the WordPress dashboard is a very simple task that is performed often, requiring only a button press. However, if you are locked out of your admin area, this task becomes far more challenging. There are various reasons as to why you could be locked from your admin area. However, the majority of those reasons that would require you to disable plugins at the same time, come down to troubleshooting website errors. Those errors can include the white screen, syntax error, compatibility issues with other plugins or themes, login redirect issues, and more. Therefore, knowing how to disable plugins using means other than the default ones can prove quite valuable. We created this article to show you several ways how you can disable plugins in WordPress:
Qode Themes: Top Picks
View Collection


How to disable all plugins when locked out of WP-Admin
Since the reasons as to why knowing other ways of disabling plugins are quite obvious, we will proceed straight into explaining the methods you can use. In this article, we will show you three different approaches to disabling plugins in WordPress—via FTP, with the File Manager option within cPanel, and using phpMyAdmin.
It goes without saying that if you want to disable all plugins via FTP, you would need to have and know how to use an FTP client. If you aren’t confident working with FTP, we suggest doing a bit of research before you proceed.
When you’re ready, connect to the server using your FTP credentials. Navigate to the root WordPress directory (often called public_html) and click on the wp-content folder found within to open it.

Then, locate the plugins folder, right-click on it, and then select the Rename option from the dropdown menu.

Rename the plugins folder however you like. We suggest adding an indicative suffix to the original folder name, such as folder_name.deactivated or folder_name.old. By doing so, you can easily keep track of the folders you renamed, which can come in handy if you need to rename multiple folders.

By renaming the plugins folder, you will deactivate all plugins that were previously active on your website. If you had an issue with logging into your dashboard that was caused by one of your active plugins, it should no longer be present. In that case, you should now be able to log in to your WordPress dashboard using your credentials. Then, if you navigate to Plugins > Installed Plugins, you will see a similar screen to the one displayed below.

It shows that you don’t have any active plugins and that all plugins you have previously installed don’t exist. However, you shouldn’t be worried—this simply means that WordPress can’t find the individual plugin folders. This is the result of renaming their parent folder, the one that was originally named plugins.
Next, you can go back to your FTP client and restore the plugin folder’s original name, i.e. return it to plugins. Afterward, go back to the Installed Plugins section of your dashboard where you will see all your plugins.

All the plugins will be deactivated by default. Then you can activate them one by one until you find the plugin that caused your issues. To clarify, the specific plugin whose reactivation causes the error to reappear is the one at fault. Once you’ve found the faulty plugin, you can rename its folder via FTP the same way you did with the plugins folder. In the screenshots below you can see an example of a disabled plugin where we used Akismet for the showcase.


Disabling a specific plugin that is causing issues will enable you to regain control of your WordPress dashboard once more. Afterward, you can refer to the plugin’s authors for help with solving the problem.
To disable all your plugins via cPanel, first connect to cPanel using your credentials. Then click on the File Manager option, which is located in the Files section near the top of your screen.
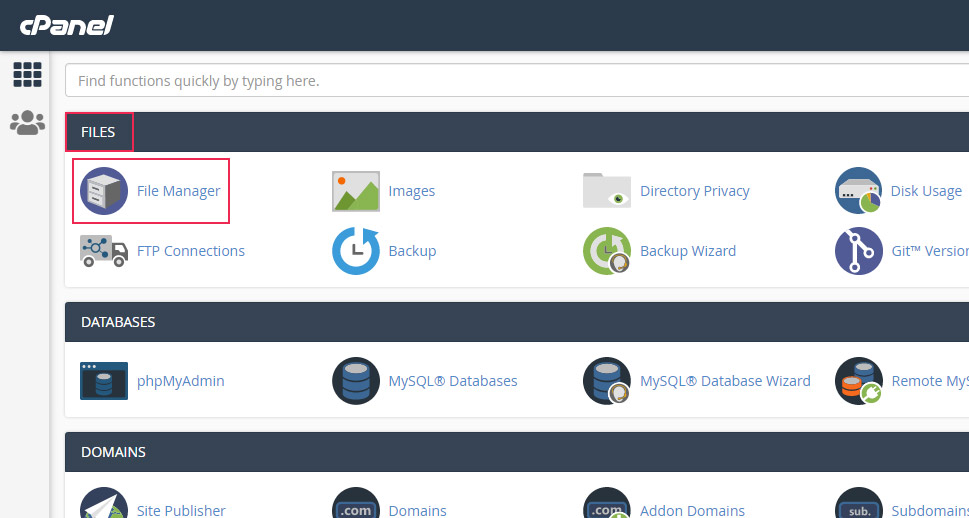
The file manager will open a separate tab. In the left section of that tab, you should locate your website and its root WordPress directory (often called public_html). Then, click to open the wp-content directory found within your root directory.

Next, locate the plugins folder in the main section of the screen, right-click on it, and select the Rename option from the dropdown.

In the following popup window, rename the plugins folder. We suggest keeping the original name and adding a suffix like .deactivated for example. By using an indicative suffix you can easily keep track of what was done and to which folder. After entering a suitable new name, press the Rename File button.

This will deactivate all previously active plugins on your website. Therefore, if you were experiencing login issues due to one of the active plugins, they will be gone now and you will be able to log back in to your WordPress dashboard using your credentials. When you navigate to Plugins > Installed Plugins, you will see a screen similar to the one shown below.
As we mentioned previously, you shouldn’t be worried about your plugins as their files and folders are still on the server. WordPress is reporting that the plugins are missing simply because there is no longer a plugins folder as the parent folder. But, after you return the folder to its original name—plugins—all previously installed plugins will appear in the Installed Plugins section. They will remain deactivated, though.
Afterward, you can activate plugins from your dashboard. If you are trying to solve a login error, reactivate them one by one until the error re-appears. The plugin you activated last before the error re-appeared is the culprit behind your issue. Once you’ve found the faulty plugin, rename its folder via cPanel the same way you did with the whole plugins folder. Then you will be able to log in to your WordPress website once more.


Afterward, we suggest asking the plugin’s authors for help with solving the issue.
Usually, the two methods we described above are used more often as they are easier to execute. However, there is a third and a bit more complex, method you can use. In the following section, we will explain how you can disable plugins using phpMyAdmin as well. Since it requires you to edit a column within the options table of your database, we suggest making a backup of your database beforehand. Then, proceed as described below.
To access phpMyAdmin, you would need to connect to cPanel using your cPanel credentials first. Then, click on the phpMyAdmin option found within the Databases section near the top.
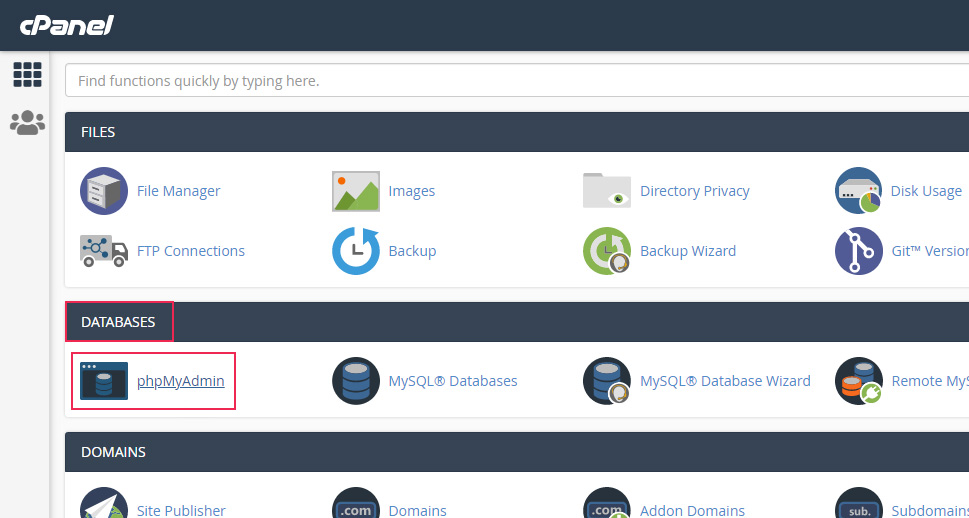
In the new tab that opens, locate your database and click on it to see all the tables located within. Find the wp_options table and click on it to get access to all the columns inside it.

There are two important points we need to mention before we proceed. Firstly, if you aren’t certain what your database name is, don’t worry. You can easily figure it out by examining the wp-config.php file. To do so, return to the previous tab in cPanel and click on the File Manager option located in the top section of your screen.
This will open a new tab, where you should search for your website in the list on the left. Click on it and navigate to its root WordPress directory, often called public_html. Then, in the main section, locate the wp-config.php file, click on it, and select the View button.

The content of the wp-config.php file will open in a separate window. Locate the MySQL settings near the top of the file and look for the following line of code:
define( 'DB_NAME', 'your-database-name-here' );
The part with ‘your-database-name-here’ will be replaced with the actual name of your database.

Now that you figured out your database name, you will be able to accomplish the steps we outlined above to disable your WordPress plugins. However, if you changed the default database prefix for security purposes, you won’t be able to find the wp_options table. Instead, you should look for yourprefix_options, where the yourprefix_ part will be replaced with the prefix you set. Having said that, let us continue.
Within the options table, locate the active_plugins field and click on the Edit button next to it. As a side note, you should consider showing more than the default 25 rows. You can change this by selecting the option for showing the number of rows, which is located near the top. Showing 50 or 100 rows per page while using the option for filtering rows will help you find the active_plugins field more quickly.

Then, replace the text currently located in the option_value box with a:0:{} and press the Go button.

A short time after, you will see a message like the one shown below stating that the change was successful.

By completing the steps above, you will have deactivated all active plugins on your WordPress website. Therefore, if you had a login issue, which was caused by one of them, it will be gone now. As such, log in to your WordPress dashboard using your credentials and navigate to Plugins > Installed Plugins. In there, you will see a screen similar to the one shown below.
The only thing that remains now is to pinpoint the exact plugin that caused the error. To do so, activate the plugins, one by one, until the error re-appears. The plugin that you activated last in that process will be the one that caused the error.
To deactivate it, go back to your cPanel view and click to edit the active_plugins field using the same method we described above. As an example, we will deactivate the Akismet plugin, but using this method you can deactivate any of your plugins.
Firstly, the input will start with a: followed by a number that represents the number of active plugins. Following that, you will see curly brackets, which contain plugin-related data. That data includes, in that order, the numbering index of the plugin (starting from 0), the length of the string, and the string that represents the relative path of the main plugin file. The data ends with a semicolon (;).

To disable a plugin, you would need to do the following:
– delete the data of the plugin you wish to disable,
– reduce the number of active plugins by 1, and
– adjust the indexes of all remaining plugins after the one whose data you deleted by reducing them by one.
In our case, it means we had to change this input:
a:12:{i:0;s:19:”akismet/akismet.php”;i:1;s:36:”contact-form-7/wp-contact-form-7.php”;i:2;s:31:”envato-market/envato-market.php”;i:3;s:27:”js_composer/js_composer.php”;i:4;s:53:”powerlift-bmi-calculator/powerlift-bmi-calculator.php”;i:5;s:23:”powerlift-core/main.php”;i:6;s:53:”powerlift-instagram-feed/powerlift-instagram-feed.php”;i:7;s:49:”powerlift-twitter-feed/powerlift-twitter-feed.php”;i:8;s:23:”revslider/revslider.php”;i:9;s:23:”timetable/timetable.php”;i:10;s:27:
“woocommerce/woocommerce.php”;i:11;s:24:”wordpress-seo/wp-seo.php”;}
into the following:
a:11:{i:0;s:36:”contact-form-7/wp-contact-form-7.php”;i:1;s:31:”envato-market/envato-market.php”;i:2;s:27:”js_composer/js_composer.php”;i:3;s:53:”powerlift-bmi-calculator/powerlift-bmi-calculator.php”;i:4;s:23:”powerlift-core/main.php”;i:5;s:53:”powerlift-instagram-feed/powerlift-instagram-feed.php”;i:6;s:49:”powerlift-twitter-feed/powerlift-twitter-feed.php”;i:7;s:23:”revslider/revslider.php”;i:8;s:23:”timetable/timetable.php”;i:9;s:27:
“woocommerce/woocommerce.php”;i:10;s:24:”wordpress-seo/wp-seo.php”;}
When you’re done, press the Go button.

Needless to say, each case will be different as users have different plugins installed. Therefore, make sure to carefully follow the three necessary steps given above. A short time after, you will see a success message similar to the one shown below.

You will be able to log in to your WordPress dashboard afterward. And, if you navigate to Plugins > Installed Plugins, you will see that the targeted plugin was indeed deactivated.

But, most importantly, you will have successfully regained control over your WordPress dashboard and pinpointed the source of the issue that locked you out. To finish up, you should contact the authors of that plugin for help in solving the problem.
Final Thoughts
Knowing multiple ways of disabling plugins can often be helpful. This is especially the case while troubleshooting errors that prevent you from logging in to your dashboard or those that break your website. In this article, we carefully covered three different ways you can use to disable plugins in WordPress that don’t require admin dashboard access. The choice is now yours. Whether you’ll use an FTP client, the cPanel, or phpMyAdmin depends on your preference and the tools you have at your disposal. Whichever one you choose, we are certain you will be able to disable your plugins quickly and efficiently following the instructions we outlined.
