How to Properly Uninstall a WordPress Plugin
After installing WordPress and picking your theme, the first thing you have to do is decide which plugins you’ll use to help with the development of your website. During site development, you will likely install a large number of plugins so you can see which ones cover the options you need and suit your website. But, when you’ve determined which plugins you’d like to keep, it is very important to properly uninstall the plugins you’ll no longer use. This is done to prevent them from interfering with the operation of your site.
In this article, we will show you what to look out for when uninstalling WordPress plugins, as well as how you can to properly delete them so that they are thoroughly removed. To do that, we will cover the following topics:
Why Would You Need to Uninstall a WordPress Plugin?
One of the advantages of WordPress is the availability of numerous plugins, both premium and free, that you can quickly and easily add to your WordPress website. Plugins can provide additional functionality as well as supply new features for your site. However, this means they also take control over parts of your site.
Although plugin developers try to make their products safe and secure, unforeseen circumstances can happen. A good rule of thumb when picking plugins is to use those that are updated regularly and to avoid ones that haven’t been updated in a while.
Also, plugins that you no longer use, and haven’t updated in a while, pose a potential threat and can put your site at risk. And keeping plugins you don’t need increases the size of your site’s backup file. Since you should make backups regularly, this means longer processing times for both backup file creation and potential site restoration.
Therefore, just as you install plugins you need for site development, it’s equally important to properly delete any plugins that you no longer plan to use.
Before we show you how to properly remove WordPress plugins, let’s take at the difference between deactivating and uninstalling plugins.
Most people, when they want to stop using a plugin, just deactivate it using the Plugins option on their WordPress dashboard. Deactivating a plugin without permanently deleting is a useful option if you are debugging or fixing an issue. Deactivation lets you keep whatever settings you made, so you will be able to use them again when you reactivate the plugin. But sometimes, the deactivated plugins are never used again, which means they stay a part of the WordPress installation. However, deactivated plugins become inactive, they aren’t automatically removed.
So, even when you deactivate a plugin, it can still do damage to your site. For example, hackers can use it to run malicious code. Especially if you haven’t taken any security measures such as installing a good security plugin like Wordfence or Sucuri. Moreover, you will still receive notifications about updates for the deactivated plugins on your WordPress installation, unless those plugins are premium ones that came bundled with the theme.
As you can see, there are a lot of reasons to always delete plugin(s) that you no longer plan to use. However, you should keep using deactivation when you want to temporarily disable your plugin(s).
Uninstalling a plugin means that you not only remove it from your WordPress installation, but you also delete all its files and the information on it kept in the database.
How Do You Uninstall a WordPress Plugin?
The process of removing plugins can be quite simple, depending on the plugin you want to uninstall. In this article, we will take a look at two ways that plugins can be removed. The first method is perhaps the easiest—it can be done simply via the admin dashboard—whereas the second requires the use of an FTP account.
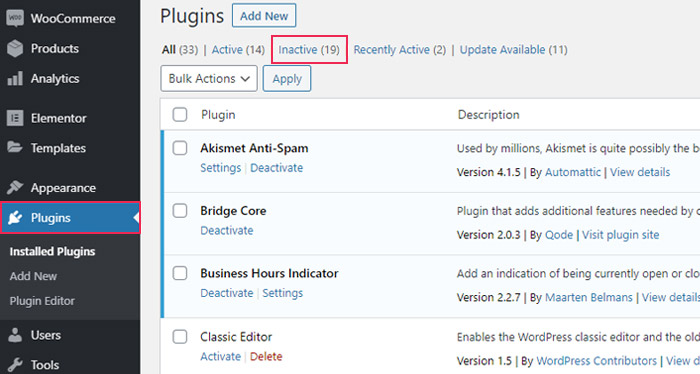
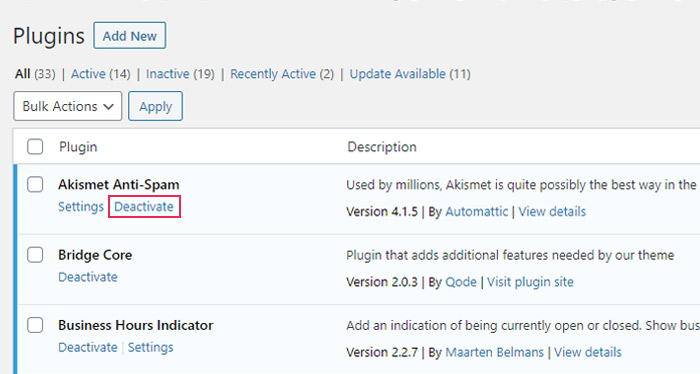
WordPress lets you delete any plugin quickly and easily using only the dashboard. You need to go to Plugins > Installed Plugins and select the Deactivate option next to the plugin you want to remove. We will show you how that’s done using the Akismet Anti-Spam plugin.
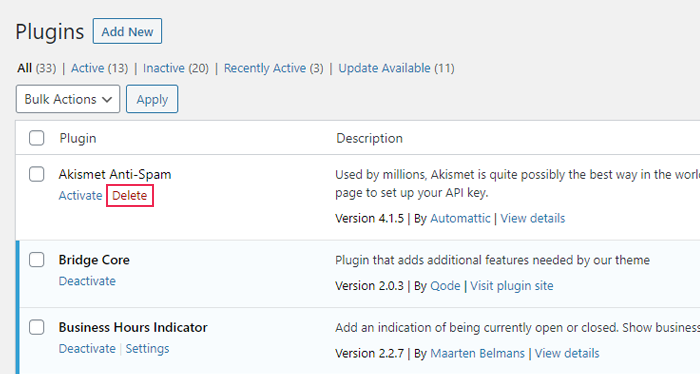
Once you’ve deactivated the plugin, you need to click on the Delete option to properly remove it.
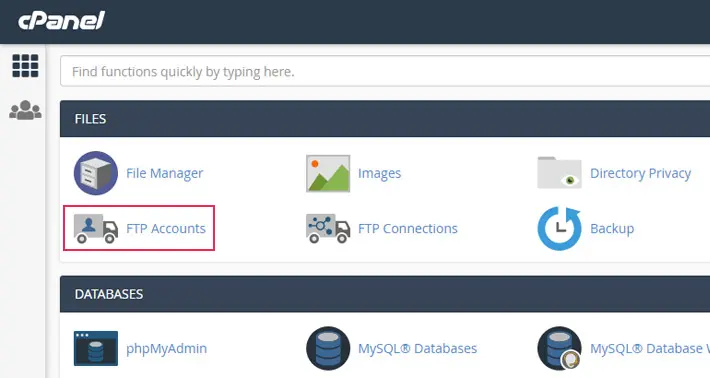
The second way you can use to properly remove a plugin is by using an FTP account. Before you can try using this method you need to have or create an FTP account.
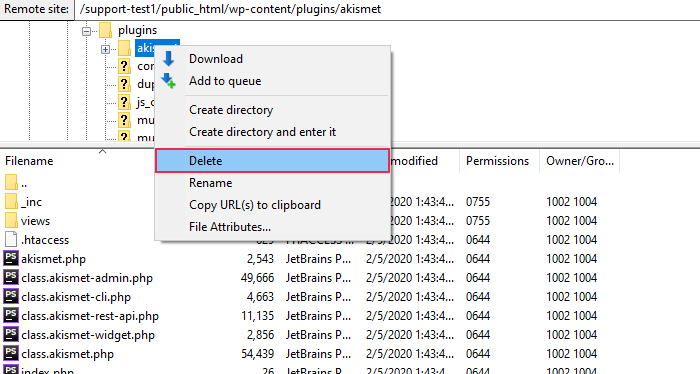
To start, you need to connect to your server using an FTP client—we will be using FileZilla in our example. Locate your live site root directory and then navigate to the wp-content/plugins folder. In there, find the folder with your plugin name, right-click on it and select Delete from the dropdown.
Both these methods—using the dashboard and using an FTP client—are very simple to implement. However, in some cases, they are not enough to thoroughly remove a WordPress plugin from your website.


Usually, removing plugins using one of the two methods described above is sufficient to completely delete the plugin from your WordPress site. But, some plugins store files outside of their designated folder located under wp-content/plugins. As such, those files might not be deleted when you uninstall the plugin.
The plugins that most commonly store data outside their designated folder are:
-
Form plugins
-
Caching plugins
-
SEO plugins
-
Security plugins
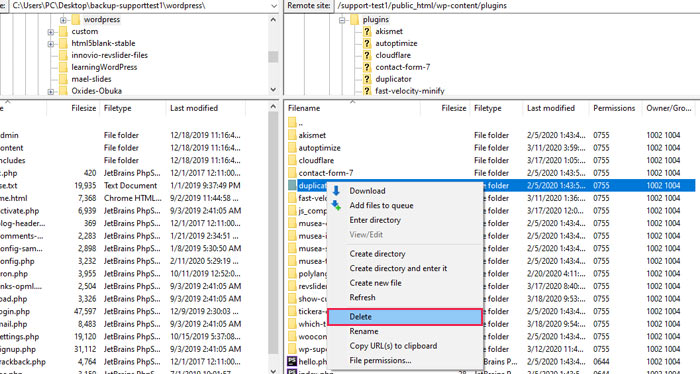
You can check for leftover plugin files and delete them using FTP. When you connect to the server, you should first check the wp-content folder since most plugins will store their data there. However, there are exceptions. For example, the Duplicator plugin stores data in a folder located in the root or the public_html folder of your site. So, to remove the Duplicator plugin, you need to go to the root folder, locate the plugin folder, right-click on it and select Delete from the dropdown.
Of course, before you delete any data from the server, you should make a backup of your files just in case.
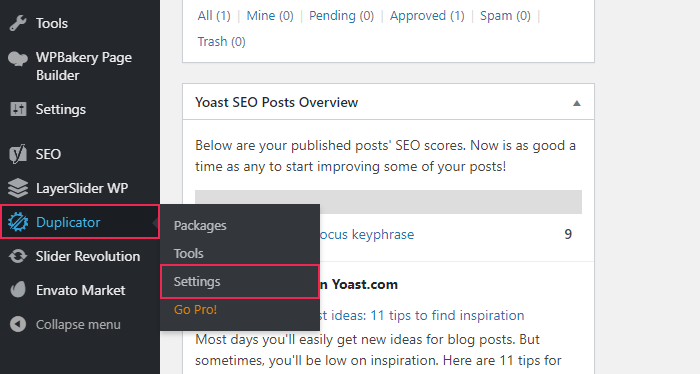
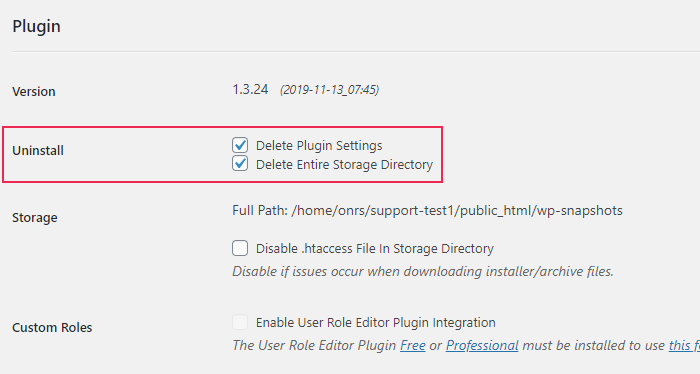
Some well-developed plugins include an option in their settings that allows you to remove them completely and you can use it as an alternative to FTP. The Duplicator is one of them. In the screenshot below, you can see that under Settings, in the Uninstall section, there are the options to Delete Plugin Settings and to Delete Entire Storage Directory.
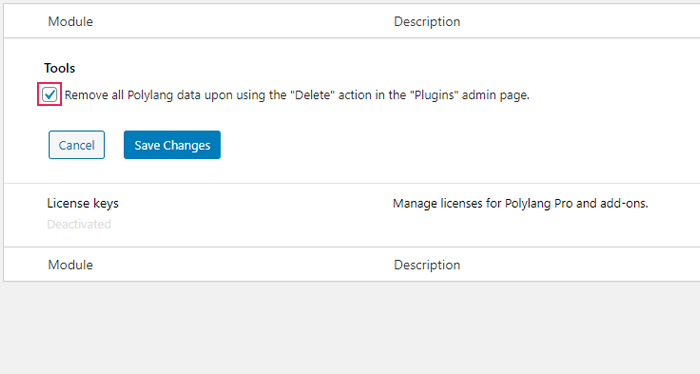
Another plugin that boasts this feature is Polylang. You can find its data removal option under Settings, in the section regarding Tools.
Since there is a wide variety of plugins on the market, each might offer different options for uninstallation or require different approaches. So you should always check a plugin’s documentation or contact its developer(s) to find out how to properly delete it from your WordPress website.
Many plugins use shortcodes that get added to the posts and pages you create. So, if you decide to deactivate or uninstall a plugin that uses shortcodes, those shortcodes will continue to appear on your pages. This means visitors will be able to see bits of code without any function or content.
To stop these non-functional lines of code from showing on your site and to avoid them affecting the layout of your pages, you need to delete the shortcodes you used on your pages before or immediately after deactivating the plugin. You can do that manually, by going from page to page, or using code. Since using code is quicker and more efficient, we’re going to show you how to do that by yourself. You need to add this line of code to your theme’s functions.php file:
add_shortcode ('pluginshortcode', '__return_false');
Keep in mind, you will need to replace pluginshortcode with the actual shortcode tag generated by the plugin. And after entering this code, and deactivating the plugin, all the shortcodes belonging to that plugin will no longer be visible on your site.
We will show you how this works by using the Contact Form 7 plugin as an example. After deactivating the plugin, a shortcode like this will keep appearing on the page:

So, to stop it from showing up, you need to add the line of code we mentioned above to the functions.php file. Make sure to set the appropriate shortcode tag from your plugin. In our example with the Contact Form 7 plugin, the edited file would look like the screenshot below.

Having said that, if you are planning to use a plugin that you’ve deactivated again in the future, you will need to remove this code from the functions.php file so the plugin can function as it should.
Some plugins can add data to a WordPress database by creating new tables. In those cases, uninstalling the plugin can result in its data and tables remaining in the database. So, after deleting a plugin, you should clean the database to avoid weighing it down unnecessarily or increasing the size of its backup file.
There are a couple of ways to clean a database. One is by using a database table cleanup plugin and the other is by manually removing the data/tables using the phpMyAdmin option on your hosting account.
Regardless of which method you choose to use, we advise you to make a backup in advance. You can back up your entire website or back up the database only. In any case, you should never make any changes to your database without having an up-to-date backup.
When it comes to database-cleaning plugins, there are plenty of options, both free and premium, that you can try. They function by letting you search the database tables then choosing and deleting specific ones. However, in this article, we will address how you can clean the database using the phpMyAdmin option and show you the step-by-step process below.
Cleaning your database using phpMyAdmin means cleaning it manually. Using this method will let you clear the database thoroughly, as some plugins create tables with names similar, but not necessarily the same, to their own. We will show you how this process goes by completely removing all data related to the Yoast SEO plugin since it doesn’t include a data removal option with its uninstallation. Before we proceed, we should mention that we’ve checked Yoast’s documentation and how to uninstall this plugin from a website. Checking the documentation in advance is simply good practice so we advise you to use it as well. Alternatively, contact the plugin author to see how you can properly remove their plugin and its data from your site.
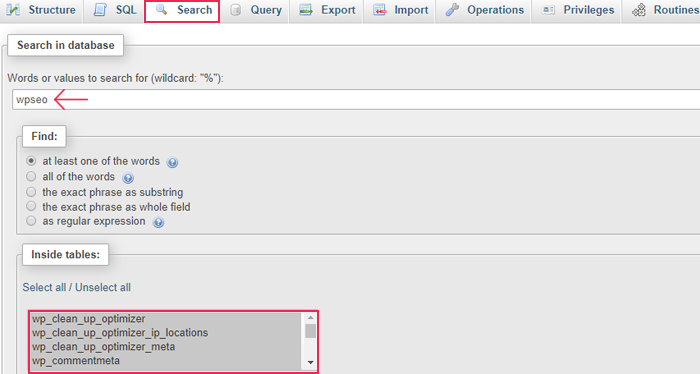
The first step after removing the Yoast SEO plugin on your WordPress dashboard is to log in to your hosting account and open the phpMyAdmin option. Next, find the database belonging to your website and click on the Search tab. Once there, enter wpseo into the search field, make sure to check the option at least one of the words and, under that, select all tables. Then press Go to start the search.
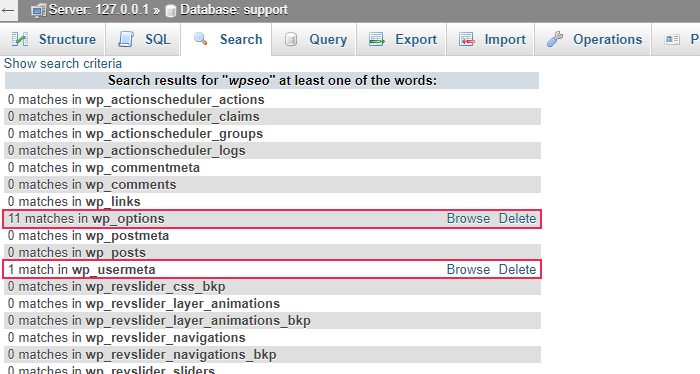
The search results will show matches from all selected tables. In our case, for Yoast, the matches were found in the wp_options table, the wp_postmeta table, and the wp_usermeta table. From the results list, you can click on each table to browse the search results and delete all columns containing the word wpseo.
Open each table (wp_options, wp_postmeta, and wp_usermeta) that contains a match for the search result (wpseo), so you can filter them. Simply type in wpseo in the field Filter rows. This helps you narrow down the search results and make sure that you won’t delete something you need by accident. After that, select the table columns from the filtered result, highlight them, and click on the Delete button underneath them.
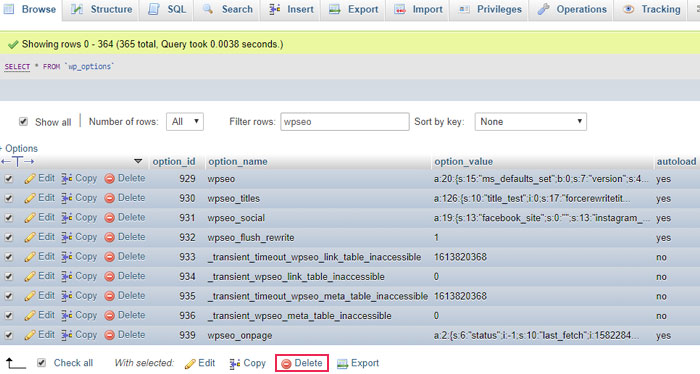
Again, it is very important you first filter the columns from each of the tables matching wpseo and delete only the ones that appear in the filtered search result.
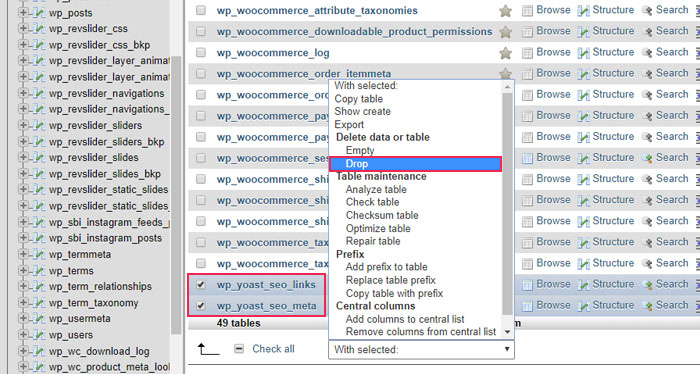
When it comes to Yoast, this plugin creates two additional tables that you need to delete. Those are the database tables with yoast in their name (wp_yoast_seo_links and wp_yoast_seo_meta). Select them both, right-click and, to delete them, pick Drop from the dropdown menu.
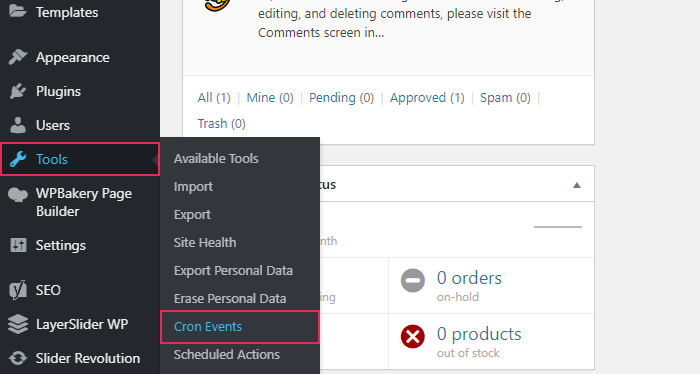
Now, the final thing you need to do to make sure Yoast SEO is thoroughly removed is to clear the Cron job, if there is one running alongside the plugin. The easiest way to clear and delete a Cron job for a plugin you want to remove is via the free plugin WP Control.
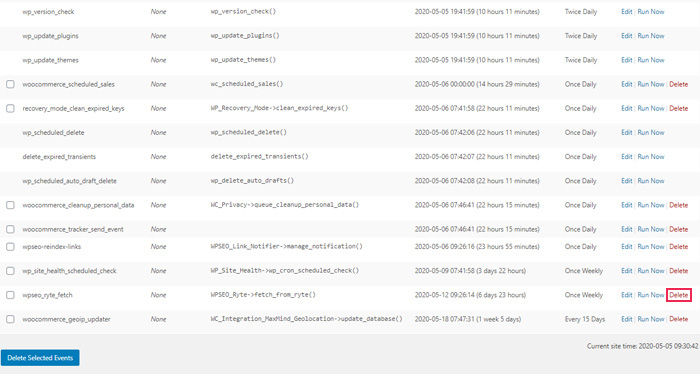
Cron is a Unix/Linux software utility frequently used to schedule commands or scripts running in the background of a web server. A Cron Job is the actual task that is used to periodically run commands at designated times, dates, or intervals. Those are usually repetitive commands that are automated to save time. In WordPress, this is managed by WP-Cron, which is used to simulate the operating system Cron.
In our example, the Yoast SEO plugin uses a Cron job called wpseo_ryte_fetch (in older versions, this was called wpseo_onpage_fetch). You can delete it using the WP Control plugin. Locate the Cron Events option under Tools and then tick the Cron Job you want to remove from the list. To finish up, use the Delete option in the same row or press the Delete Selected Events button.
This completes the process of deleting Yoast from your WordPress website. Also, it shows you how the process of cleaning the database after removing a plugin should go. Keep in mind, this example used Yoast because of its specificity, so other plugins will require you to modify the approach somewhat.
Final Thoughts
We hope that you now have a clearer idea of how you can properly uninstall WordPress plugins that you no longer want to use. Of course, the details of the removal process can differ among plugins and so we advise you to always check the plugin documentation first and get more detailed information on how to completely remove it from your WordPress installation.
