How to Troubleshoot WordPress Errors: Beginners Guide

There are various reasons why, in the last few years, WordPress has become the best platform for website creation. It is a very beginner-friendly environment, with well-coded features and functionalities which are constantly being improved, and with a multitude of themes and plugins that you can choose from that customize it. But, as with any piece of software, it is not infallible, and running into errors is normal. This makes learning the basics of WordPress error troubleshooting vital to maintaining any WordPress website.
Although this may seem difficult or complicated at first glance, having even a basic understanding of the WordPress troubleshooting process could save you a lot of time and headaches. That is why we created this comprehensive beginner’s guide to troubleshooting WordPress errors.
However, as there are a lot of WordPress issues that can occur, you should know that it’s impossible to cover them all in one article. Instead, we will introduce you to the most important troubleshooting steps and the reasons why they are taken. With this knowledge, you will be able to tackle most WordPress errors on your own.
If you’d like to skip to any specific part of the article, just click on one of the links below:
Qode Themes: Top Picks
View Collection


Before we start
This guide is intended to provide you with an overview of the most important troubleshooting steps. With them, you will have a good basis for troubleshooting any WordPress error. Some of the steps that we cover can be applied to any issue, while others only address a specific subset of problems.
We have also taken into consideration that some steps are difficult to perform if an error has caused you to lose your access to the admin dashboard. As such, those steps will have two versions of instructions—one if you have access to the admin dashboard, and the other if you don’t. Finally, as many troubleshooting steps require the use of FTP, you might want to study up on it before going further.
One of the most important initial steps in troubleshooting various WordPress errors is creating a backup of your website. If you have access to the admin dashboard, you should create a backup using a backup plugin. Otherwise, you should create a manual backup of your website.
You should make it a habit to create regular backups of your website and store them in a secure location, as they can be the easiest way of solving any issue. Meaning, you can simply restore a website backup from the time when the error wasn’t present.
Even if you aren’t able to use a website backup now, you should create one before doing any of the troubleshooting steps mentioned below. That way you will have a backup to fall back on if you run into any additional problems or unforeseen complications during the troubleshooting process.
In some cases, the issue you were experiencing is already gone, but you aren’t aware yet. This happens when you are loading a page or post from the browser cache. This could also mean you won’t properly see the results of the troubleshooting steps you have taken. Furthermore, your browser cache can cause issues with login forms, which includes denying you access to the admin dashboard.
You should always clear your browser’s cache while troubleshooting, as it will ensure that you are seeing the latest version of your pages. To show you how the process works, we will explain how to clear the browser cache in Chrome.
To start, click on the three dots in the top right corner of your screen, which will open the menu. Then, hover over the History option and press the new History suboption that appears. This will open the History page. You can also do that by typing in chrome://history in the address bar.

Then, find and click on the Clear browsing data option on the left.

The popup window that appears will have two tabs—Basic and Advanced, with Basic opened by default. Within it, you need to choose the time range and the type of data you wish to delete and then click on the Clear data button. If you want to have more control over what you are deleting, you can switch to the Advanced tab and perform the same steps there.
You can also start clearing your cache with a keyboard shortcut. If you’re using Windows, press Ctrl + Shift + Delete to open the Clear browsing data popup and if you’re using Safari on Mac, press Command + Alt + E.

Once you’ve cleared your cache, open one of your pages to see if the issue has disappeared. If not, try to clear other forms of cache as outlined below.
The same issues that we mentioned in the previous section can occur if you don’t clear other forms of cache related to WordPress sites—plugin, CDN, and server cache. After clearing the browser cache, you need to clear these as well to see the latest version of your pages. Clearing all forms of cache is good practice which you should apply after each of the steps we describe below. This will help you ensure that the results you’ve gotten after performing the steps are valid.
-
Clearing plugin cache
If you are using a caching plugin, make sure to clear its cache and then check whether the issue has gone away. Most caching plugins will have an easily accessible option or a set of options for that purpose. For example, the W3 Total Cache plugin has its cache clearing options in the admin bar, accessible both from the frontend and the backend.
To clear your cache with the W3 Total Cache plugin, log in to your WordPress admin dashboard. Then, hover over the Performance option, and select Purge All Caches from the dropdown menu.

Another example of a handy caching plugin is the WP Fastest Cache. With it, you will be able to clear the cache both from the frontend and the backend of your website.
To clear your cache using this plugin, hover over the Delete Cache option located at the top in the admin bar, then select the Clear All Cache option from the dropdown menu that appears.

Afterward check one of your site pages to see if the issue has gone.
-
Clearing CDN cache
Although very rarely, CDN caching issues can happen nonetheless. This is why purging the CDN cache is sometimes required to show the newest version of your site. Some caching plugins provide an option to integrate your CDN with them, so you might be able to clear the CDN cache using the plugin options. Keep in mind, this depends on which plugin you are using as they can have differing options.
In our case, with the W3 Total Cache plugin, the process involves navigating to the Performance section in the menu and selecting the CDN option. At the top of the screen, there are buttons for purging single objects or purging all cache. Press the button that will purge CDN completely and then check one of your pages to see if the error is gone.

-
Clearing server cache
Finally, if the issue is still present after clearing all other forms of cache, you should try to erase the server cache as well, provided the option to do so is enabled on your server. You will need to address your hosting provider and ask them to clear any server caching. Once they’ve done that, you should check the status of one of your pages to see if your WordPress error is gone.
If the issue isn’t caused by caching, you should investigate the second most likely reason—plugin conflict. Depending on how they were coded, some WordPress plugins could conflict with other plugins, your current theme, or even the WordPress core files. To determine if this is what’s causing the problem, you should deactivate your plugins and check the website afterward. However, this process can look different depending on whether you have access to the admin dashboard or not.
If the error you are experiencing still allows you to access the WordPress admin dashboard, you should navigate to Plugins > Installed Plugins. This will provide you with an overview of all your installed plugins. Then, start deactivating your plugins, one by one. To do this, press the Deactivate button next to each plugin.

After you deactivate a single plugin, reload the page where you were observing the status of the problem. Repeat the same process until you’ve gone through all your plugins. If the issue disappears, it means that the last plugin you deactivated before the error vanished was causing it.
In this case, we advise asking the plugin authors for further help. Also, to speed up their troubleshooting process, you should send them the error log, as it can indicate which part of the plugin code led to the error.
However, if the issue you’re experiencing has locked you out of the admin dashboard, you will need to find an alternative way of disabling your plugins. For more instructions on how to do that, you can check out our article on disabling plugins when locked out of WP-Admin.
Just like plugins, the theme you are using could be causing an issue because of a conflict in the code. You should investigate this by enabling a default WordPress theme instead of your current one and then checking your website.
How you proceed from here depends on whether you have access to the admin dashboard or not. We will show you both approaches below. Please note that you need to have a default WordPress theme installed on your website for both troubleshooting methods. If you don’t have a default WordPress theme installed, you will need to install a theme from the WordPress theme repository first. Then, you can perform the steps described below.

To switch to a default theme from the admin dashboard, navigate to Appearance > Themes and locate the default WordPress theme that you installed on your website. Hover over it and press the Activate button to switch to it instead of your current theme.

You should be able to see a success message stating that the new theme has been activated shortly after. Then you can examine your website to see if the issue has been resolved.

If the issue disappears after switching themes, it confirms that the theme you were using caused the problem. In that case, you should reach out to the theme authors for help.
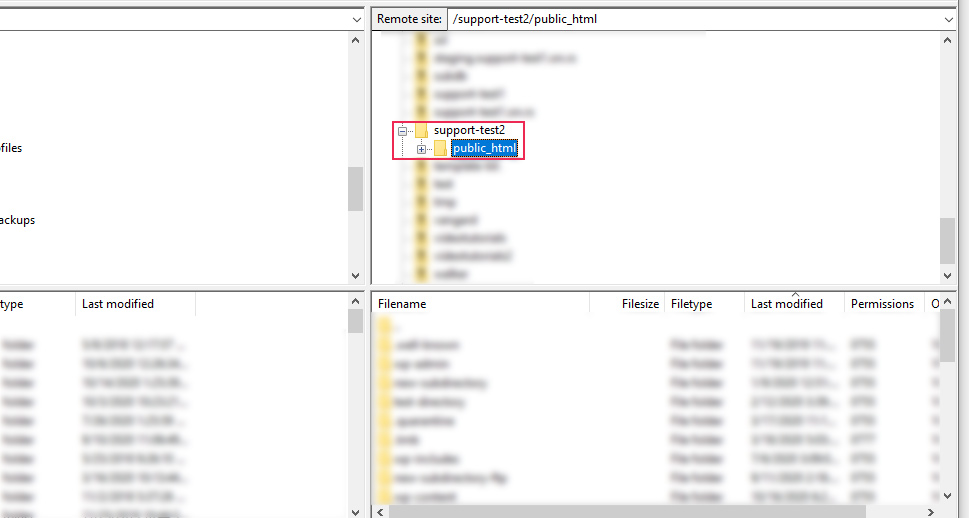
However, if you aren’t able to access your admin dashboard, you will need to perform this troubleshooting method via FTP. To deactivate your current theme using FTP, connect to your server with your FTP credentials and locate the root WordPress directory, often called public_html.
Then, navigate to the /wp-content/themes/ directory, right-click on the folder of your current theme and select the Rename option.

To clarify, renaming your current theme will deactivate it, and the default WordPress theme you installed will be activated in its place. Once you rename your theme, you should try to log in to your dashboard, and check if the issue persists.

If activating the default WordPress theme resolved the error, then you’ve established that the theme you were using is behind the issue. In that case, you should contact the theme’s authors for assistance. Supplying them with an error log is also a good idea as it can speed up the time it takes for the issue to be resolved.
WordPress uses an SEO-friendly URL structure (i.e. permalinks) to give addresses to all content on your website. That structure can be modified within the Permalinks option of the admin dashboard or by using a plugin. But these changes might not get configured properly or simply aren’t saving, which could lead to 404 errors across your website, as well as some login or redirect issues. Luckily, this can often be solved by refreshing the permalinks.
If you’ve recently changed a permalink slug using a third-party plugin, theme options, or WordPress permalinks options, then refreshing your permalinks is highly recommended.
The process is simple—navigate to Settings > Permalinks and click on the Save Changes button in the lower-left corner of your screen.

Then, check your website to see if the issue is still present.
One of the key server files, .htaccess lets you enable URL redirections, restrict access to certain IP addresses, increase server resources, and do a lot more besides. Because of its importance, having a faulty .htaccess file can lead to numerous errors, such as login redirection errors, the 404 error, and the internal server error.
Therefore, you need to check whether a corrupted .htaccess file is to blame for the issue you’re experiencing. The easiest way to check is by backing up this file and then recreating the default .htaccess file before examining your site for the issue. If you notice that the error is gone, it means that your .htaccess file was causing the problem.
As the .htaccess file is a hidden server configuration file, you need to select the proper option(s) for viewing hidden files in your chosen FTP client to be able to see it. In FileZilla, you can do so by clicking on the Force showing hidden files option, located in the Server tab.

Then, navigate to the root directory of your WordPress site, often called public_html. Within it, find the .htaccess file, right-click on it and select the Download option.

Save this file in a secure location, as it will serve as your backup .htaccess. Then, delete the same file from your server by right-clicking on it and selecting the Delete option.

Afterward, if you can log in to your admin dashboard, navigate to Settings > Permalinks and press the Save Changes button at the bottom. This will create a new default .htaccess file.
However, if you aren’t able to log in to your admin dashboard, you can restore the default .htaccess file by creating a new file within the root WordPress directory and adding the following code to it.
# BEGIN WordPress
# The directives (lines) between "BEGIN WordPress" and "END WordPress" are
# dynamically generated, and should only be modified via WordPress filters.
# Any changes to the directives between these markers will be overwritten.
<IfModule mod_rewrite.c>
RewriteEngine On
RewriteRule .* - [E=HTTP_AUTHORIZATION:%{HTTP:Authorization}]
RewriteBase /
RewriteRule ^index\.php$ - [L]
RewriteCond %{REQUEST_FILENAME} !-f
RewriteCond %{REQUEST_FILENAME} !-d
RewriteRule . /index.php [L]
</IfModule>
# END WordPress

Once you’ve created the default .htaccess file, you should check your website to see if this solved the error. If it hasn’t, upload the backed-up version of the file to its old location on the server, which will override the newly generated file. Then proceed to the following troubleshooting step.
Similar to an incorrect permalink structure, incorrect WordPress and site addresses could lead to 404 errors, too many redirects, and a host of other common WordPress issues. As such, you need to update these addresses every time you move your website, either from HTTP to HTTPS or otherwise. This step requires you to check your website’s URLs and change them if needed.
Checking and changing your WordPress and site addresses can be done in several ways. The easiest one is to do it manually directly from the admin dashboard. If you have access to the admin dashboard and can change the addresses that way, you should try to do so. First, log in to your dashboard using your admin credentials and navigate to Settings > General. Update the WordPress Address and the Site Address fields by typing the new addresses and press the Save Changes button at the bottom.

Then, revisit your website to check if the issue has been resolved. If you aren’t able to log in to your admin dashboard, you should try one of the more technical approaches to updating WordPress URLs instead.
In some cases, your issues could be caused by an incomplete WordPress update, which occurred because of server timeouts, memory issues, or other reasons. A problem can also arise if you’ve edited the WordPress core files (which we advise against), or if those files are corrupted for any other reason. You can test for this by reinstalling WordPress core files and inspecting if the issue resolves itself afterward.
To reinstall WordPress core files from the admin dashboard, navigate to Dashboard > Updates in the upper left corner of your screen. If your website has the latest WordPress version, you will find the Re-install Now button there. Click on the Re-install Now button and wait until the installation process is finished.

If you aren’t able to login to your admin dashboard, you will need to try other means of reinstalling WordPress core files. As with every troubleshooting step so far, you should check your website after reinstalling WordPress to see if the issue is still present.
On the other hand, the issue could also be caused by custom code. WordPress users can choose to add some additional CSS, JS, or PHP code snippets to improve their site’s existing features or to add new ones. However, that code could conflict with the code of the active theme, plugins, or even WordPress core files. It’s also possible that the custom code you add has a syntax error that caused the issue. If the problem was caused by a syntax issue, you should check the code for missing semicolons (;) and opening and closing brackets or tags. But, if the problem occurred because of a code conflict, you’ll need to investigate all conflicting codes.
In either case, you can perform simple troubleshooting to determine whether any of the code you added is causing you problems. To do so, remove all the code that you inserted and check your website afterward.
If this solves the issue, you’ll know the error was caused by some faulty code you inserted. Then, you can decide to stop using that code on your site or you can carefully review it, find the faulty part, and correct it.
WordPress debugging is one of the most important tools for troubleshooting WordPress errors. It’s not enabled by default, so you’ll need to enable it yourself. This is done easily by editing a small line of code inside the wp-config.php file. If you enable debugging, all the errors and warnings will be shown on your website. The error messages will point to specific files and lines of code, which can help you pinpoint the source of your issue.
To enable WordPress debugging, connect to your server using your FTP credentials and navigate to your root WordPress directory, often called public_html.
Then, locate the wp-config.php file, right-click on it, and select the View/Edit option.
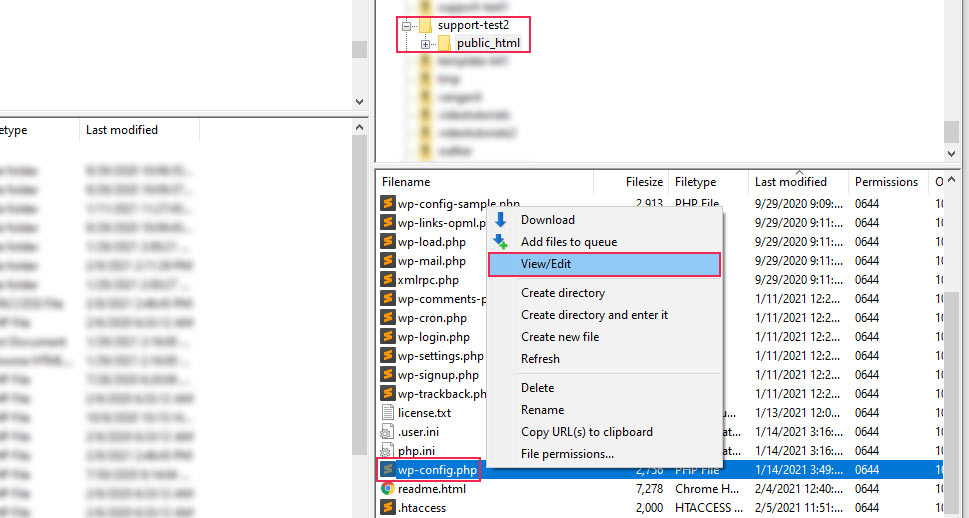
Open the file using your preferred text editor and insert the following line of code above the /* That’s all, stop editing! Happy blogging. */ comment line:
define('WP_DEBUG', true);

If the WP_DEBUG variable was already present but set to false, you only need to change it from false to true.
Afterward, save the changes you made and upload the file back to the server, which will overwrite the file that’s currently there.
Then, open one of your site’s pages and review the error messages that are shown on the screen. If they point to a file within your theme or plugin, make sure to let the authors who developed it know about the error. And, if the error messages point to a piece of code you added, make sure to review and correct it accordingly.
If you’ve performed all the previously described steps but had no luck in solving the issue, it might mean that the problem was caused by some malware or by a hacking attack. In that case, you need to scan your website for malware.
If the scan finds malware inside the files of some of your plugins or your theme, you should notify their authors and ask them to clear it. On the other hand, if the scan points to one of the WordPress core files, you should reinstall them if you haven’t already done so in an earlier step. Furthermore, since some premium security plugins offer support and malware removal, you should consider installing one as well.
Even though we have mentioned asking for help this several times already, it bears repeating. If, while running through these troubleshooting steps, you establish that the fault lies in some of your plugins or even your theme, you should contact their authors for help. In some cases, after contacting the plugin or theme authors, you might need to contact your hosting provider to perform additional server configurations. They can help you with things like increasing server resources or even malware removal, if necessary.
Asking for professional help should be your next go-to if the steps we suggested in this article didn’t manage to solve the problem. You might be an old hand at opening support tickets, or this might be the first time you have to do it—in either case, you can take a peek at our guide on how to properly ask for support to get the best results.
Final Thoughts
This beginner’s guide is designed to provide you with the approaches and techniques you can use to approach solving any WordPress error. We have taken the time to carefully discuss the basics of WordPress troubleshooting so you’ll be equipped to tackle issues on your own. Even if these steps don’t immediately solve the problem, they can help you narrow down its cause. That way, if you have to reach out for help from technical support or developers, you’ll significantly reduce the overall troubleshooting time.
