Where Does WordPress Store Images on Your Site?

One of the many advantages of WordPress is that it has a very beginner-friendly system for uploading and managing media files, especially images. This allows users to quickly alter their website’s visuals and create completely different looks and effects. Images play an important role in every WordPress website, and users and site owners alike should learn more about this subject to be able to make the most of their images.
One of the major questions that pop us is—where are WordPress images stored? In this article, we will try to shed some light on where and how WordPress stores uploaded images as well as share a few tips on how the default WordPress image organization can be changed. Besides that, you can expect some mention of other topics that are related to media files in general, as well as topics that are specific to images, such as adding new image sizes in WordPress.

Qode Themes: Top Picks
View Collection


Understanding where WordPress stores images
In this article, we will be focusing on the two aspects that are part of every media file in your media library. The first is where media files are stored on your server, and the second is how WordPress stores the relevant data about those files inside your database. We will also cover a few other, similar topics related to media files that can prove insightful to a wide range of WordPress users. Let us begin.
Where and how does WordPress store images by default
If you ever uploaded an image to your media library and accessed its page later, you might have noticed something very specific in how the file URL of that image was created. The file URL, in most cases, will have the following format: website-name/wp-content/uploads/year-number/month-number/image-name, with both the year and month written numerically.

This is because WordPress stores uploaded media files inside the uploads folder, which is located within the wp-content directory. You might find various other subfolders within the uploads folder; the precise content of the uploads folder can vary from user to user, but media files uploaded within a certain year will be placed in a subfolder with that year’s number.
The uploaded media files will be divided into additional subfolders, titled with the number of the month when they were uploaded. For example, if an image was uploaded during June 2020, its file URL would be website-name/wp-content/uploads/2020/06/image-name. That is the example you can see on the screenshot above.
To further illustrate this concept, we will explore the content of the uploads folder using a demo website as an example. Since following along with this requires using FTP, we advise brushing up on your knowledge of it before going any further. Once you’ve done that, you can proceed as described below.
To access the uploads folder, you would need to connect to your server first, using your FTP credentials. Then, navigate to the root WordPress directory of your website, often called public_html.
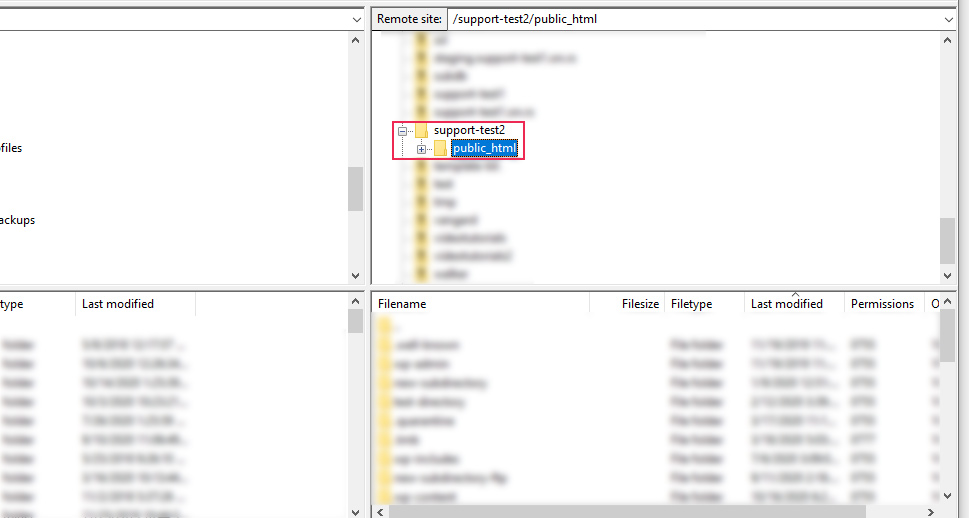
Next, navigate to the wp-content directory and locate the uploads folder within. Then, click to open it and explore its content. As you can see from the screenshot below, this folder could have several different subfolders. Those could be made by some of the plugins you have active on your website or even by your theme. In some cases, the uploads folder can contain images that aren’t placed within any of the available subfolders. We will touch on this case later in the article. Finally, the uploads folder will contain subfolders titled by years, which we’ll be focusing on.

WordPress stores and classifies all uploaded media files into a year and month folder structure based on when the respective files were uploaded. By opening one of the year folders, you will encounter a number of subfolders with month numbers for their names. These month subfolders will contain various images that were uploaded during that month.
If you glance at the screenshot below, you will also notice that each image in the month folder has several additional versions. Each version has its dimensions as part of the image title.
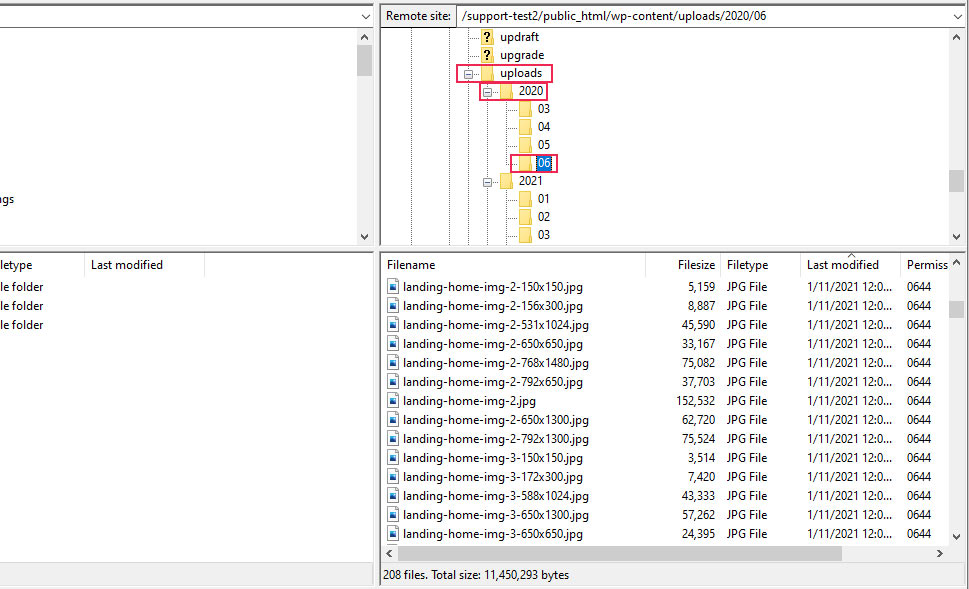
These represent duplicates of an image that was originally uploaded and then used to create versions of all the registered image sizes available on the website. WordPress will create those image-size versions every time an image is uploaded to the media library, provided the original image is larger than the registered image size. This is done by either cropping or downsizing the original image, based on how the image size was registered. And this is all done automatically. Though this might seem like a strange feature, it exists so that your website can use the optimal image version for each screen size, which improves your overall website speed.
However, the number of images on your server could quickly add up. While WordPress has its default image sizes, your theme or plugins could add new ones, leading to an image pile-up and slowing down your site. At this point, you might be tempted to start manually removing the image sizes you think aren’t needed, but we advise against that.
Deleting images manually can be quite time-consuming and it can result in broken images across your website if you accidentally delete an original image. Therefore, it’s best to use a suitable plugin for this purpose. Plugins like Regenerate Thumbnails can regenerate all your images (i.e. delete the image size versions that are no longer supported on your website) as well as create sizes that might be missing. We covered this topic in our article on additional image sizes in WordPress, and you can find detailed instructions on regenerating your images there.
Now that you have a better grasp of where WordPress stores uploaded media files on the server, we can take a look at how WordPress keeps track of them in your database.
First of all, WordPress stores all the information regarding uploaded media files in the wp_posts table. Within it, the uploaded media files have attachment as their post_type value. And if some of those media files are added to pages, posts, or custom post types, WordPress will also store their metadata inside the wp_postmeta table.
Please note, if you changed the default WordPress database prefix (wp_), then your tables will have slightly different names. So, you will have tables named yourprefix_posts and yourprefix_postmeta, where the yourprefix part represents the new prefix. Having said that, we can move on and explain how to access the appropriate database tables below.
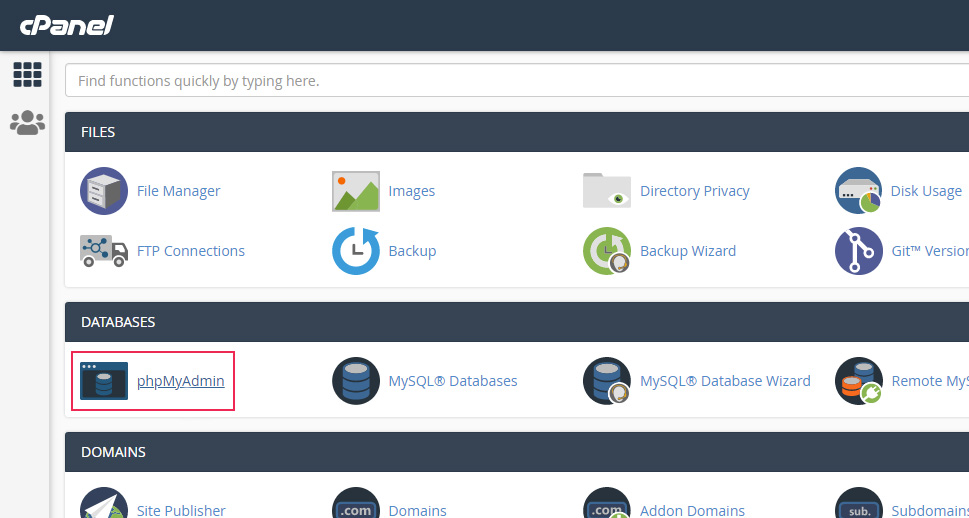
To access your database, you will first need to use the phpMyAdmin application. Start by logging in to the control panel provided by your website hosting. We will be using cPanel to show you the steps. However, if your hosting provider uses a different kind of control panel, you can ask them for advice on how to implement the steps described below. With that being said, let us begin.
First, log in to cPanel using your credentials and click the phpMyAdmin option, located within the Databases section.
If you are working in a localhost environment, you can access phpMyAdmin by adding phpmyadmin to your server name (e.g. http://localhost/phpmyadmin/). Depending on which port you are using, the URL could contain the port number, as well. To learn more about how local installations work, you can check out our articles on installing WordPress with WAMP, MAMP, and XAMPP. With that being said, let us continue.
Once you open phpMyAdmin, locate your database name and click to access it. If you aren’t sure what your database name is, you can examine your wp-config.php file first. Then, proceed as described below.
After you access your website’s database, you will need to look for the wp_posts table that we mentioned earlier. Then, since all uploaded media files have attachment as their post_type value, you can use it to filter all the rows and show only attachments. To do so, insert the word attachment in the Filter rows option near the top and review the main section of your screen. Each row will contain relevant data regarding a specific media file that’s been uploaded.

Similarly, you can find relevant metadata regarding the same uploaded images (or media files, in general), by opening the wp_postmeta table and examining its rows. For example, the _wp_attached_file shows the relative path to the image, and the _wp_attachment_metadata contains most of the relevant metadata for that image and all its versions created in different sizes.

This concludes our section on how WordPress stores the uploaded images by default.
As you were able to see, the uploaded images are stored inside the uploads folder, while their data is stored inside your database, in the wp_posts and wp_postsmeta tables. Therefore, if you opt to delete some images, you have to both delete them from the server and remove the corresponding database rows that reference those images. In the case you fail to do both, you may experience some issues with your website.
If you only delete the files from your server, it may leave a lot of broken images on your website as the references that point to those images inside your page and post content will still be in your database. Likewise, if you only delete an image’s references, you will be unable to access that image via your admin dashboard, even though it and all its versions will exist in the uploads folder on your server. Furthermore, having leftover data or leftover files will mean your website is not optimized.
Because of how WordPress stores images, you need to perform both parts of the image deletion process if you want to properly remove an image from your website. The easiest way of doing so correctly is by deleting the original image using the Delete permanently button within the admin dashboard.

Changing the organization of your WordPress images
Now that you understand where and how WordPress images are stored by default, we can consider if this can be changed and in what way. In the sections below, we will focus on the server-side of things; more precisely, on the possibility of altering the file and folder structure within the uploads directory.
First of all, the default year/month folder structure is set thanks to an option within Settings > Media, which is enabled for all WordPress users by default. To understand what that option is, navigate to Settings > Media and scroll to the bottom of the page. In the section called Uploading Files, you will see an option called Organize my uploads into month- and year-based folders, which will be checked by default. To alter this option, uncheck it and press the Save Changes button below.

By doing this you will disable the default WordPress organization of uploaded media files. Any media files you upload from then on will be placed directly inside the uploads folder. However, the media files that were already uploaded will remain in their year/month subfolders within the uploads folder.
The same principle applies if you change your mind and enable the year/month organization again. The media files that were uploaded before will remain within the uploads folder, while the rest will follow the default year/month WordPress folder structure once again. This is one of the reasons why you may see images within the uploads folder.
For users who remove the default year/month folder structure, the question arises whether there is a way to create a more meaningful folder structure for classifying uploaded media files. Sadly, this is not possible within the default functionalities provided by WordPress, at least not yet. However, there are WordPress plugins that you can use for help. One example of that is the FileBird plugin which allows you to sort media files within folders created in the admin dashboard.
The FileBird plugin allows you to virtually organize your media files into a nested folder structure. The media files can be easily dragged and dropped into newly created folders, while also allowing commands like moving files in bulk and deleting folders in bulk.
However, these media files will remain within the uploads folder and still follow the year/month option as this plugin doesn’t affect file URLs. It only allows you to create an elaborate file and folder structure within the Media > Library section of your dashboard. With this structure you can categorize your media files using an intuitive user interface. As a result, you will have an easier time locating the right image and adding it to your website’s content.
The plugin also has other features like RTL support, a search function, and a contextual menu similar to the one you would use on your computer. With that being said, let’s look at the steps you need to know to be able to use it.
After installing the plugin, navigate to Media > Library and examine the Folders section, which will be next to the WordPress dashboard menu. Within this section, you will see all your files sorted into the Uncategorized folder at the start. You will be able to create new folders to sort those media files by pressing the New Folder button at the top.

Then, choose a name for the new folder and press the Save button to create it.

The new folder will appear on the left and you will be able to drag and drop your uploaded media files into it from the All Files folder. You can drag and drop media files one at a time or select multiple files simultaneously by ticking the checkbox next to each and then dragging and dropping them in bulk into the newly created folder.

The plugin allows you to create additional subfolders by clicking on the previously created folder and then pressing the New Folder button to create a subfolder. Then you only need to add the files you want to it.

Final Thoughts
WordPress offers a beginner-friendly way of uploading and reviewing all media files using the Media > Library section. However, there is a lot behind the WordPress media library that isn’t widely known by users. Such as, where are WordPress images stored? In brief, the images are stored within the uploads directory on the server and they follow a year and month-based folder structure. Additionally, the images that are stored there are duplicated in various sizes thanks to WordPress default options and, potentially, your theme and plugins as well. WordPress also stores relevant data on uploaded media files within the posts and postmeta database tables. Hopefully, this article has helped you to see some of the deeper connections between the WordPress file and database structure and the uploaded media files as well as answer the question of where WordPress images are stored.
