How to Edit the WordPress wp-config.php File

The wp-config.php file is a core file within your WordPress installation. It is used to define a lot of different configurations without which WordPress would not be able to function at all. This file is used primarily for defining the constants used to connect to the database of your website, however, it is much more versatile than that. In this article, we will cover some of the constants and settings you can use within the wp-config.php file and how you can edit it to implement these.
Before Editing the wp-config.php File
Before we delve into editing the wp-config file please note that even a small mistake could cause problems with your installation. To avoid any issues with this, we strongly recommend that you make a copy of your wp-config.php file, backup your website files, and backup your database as well. We also strongly recommend that you do not edit the file within Word, Google Docs, or any other word processing application since these applications make formatting changes that can cause errors within PHP files.
Another pothole to look out for is the fact that all of the settings within the wp-config file are written in a specific order and changing that order may cause unexpected issues. Also, any code that you would like to include must be added above the following line:
/* That's all, stop editing! Happy blogging. */
How to Access wp-config.php
Even though this file is crucial to the operating of WordPress itself, it is worthwhile to note that it does not come with the default WordPress package. Instead, the package contains the wp-config-sample.php file. Once you complete the famous 5 minute WordPress installation, after adding the database information, WordPress will generate this file for you. However, if you ever want to change these settings down the line of your website development you can do so by editing the wp-config file.
To edit it you need to access your theme’s files. For these purposes, you could either enter your hosting’s cPanel or access the files using an FTP client. We will be showing you the steps necessary to edit the files via the FileZilla FTP client. In order to be able to do so you will first need to setup and learn to use the FTP client on your computer.
Once you have connected to your files via your chosen FTP client you can open the wp-config file by navigating to the root folder of your WordPress installation, right-clicking the file and selecting View/Edit from the dropdown.
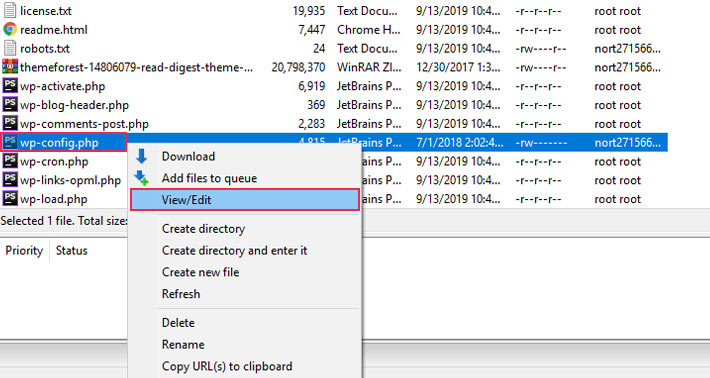
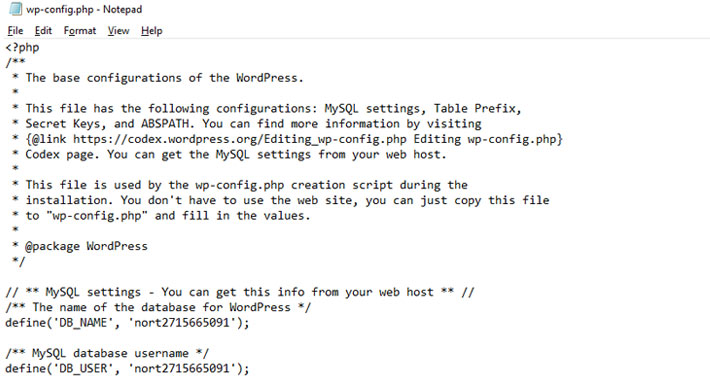
The FTP client will now download the file to your computer and open it within a text editor such as Notepad. It should look like so:
As previously mentioned you need to find the following line within the file:
/* That's all, stop editing! Happy blogging. */
and add the changes above it.
A Summary of Possible Changes and Settings Within the wp-config File
There are many options, settings, and constants that can be set using this file. The most important ones, which coincidently are written at the very top of the file are the MySQL Database Settings.
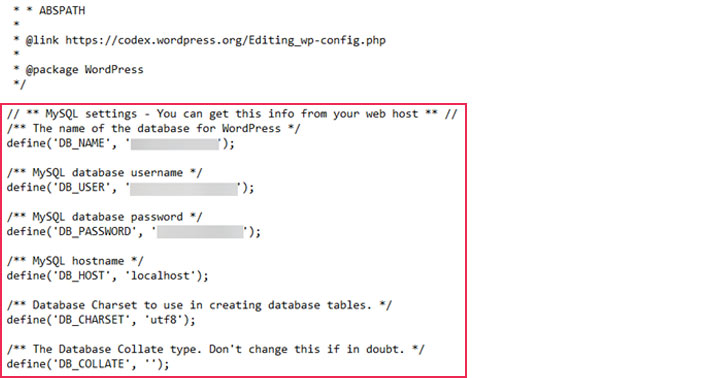
Within the highlighted lines of code above the wp-config file sets the following:
-
Database Name: define( ‘DB_NAME’, ‘database_name_here’ );
-
Username to access the database: define( ‘DB_USER’, ‘username_here’ );
-
Password for the above username: define( ‘DB_PASSWORD’, ‘password_here’ );
-
Name of your database host: define( ‘DB_HOST’, ‘localhost’ );
-
Charset for creating database tables: define( ‘DB_CHARSET’, ‘utf8’ );
-
Database Collate type: define( ‘DB_COLLATE’, ” );
The following eight settings are authentication keys and salts. These are security features that WordPress uses. The keys are used for security checks, and the salts are used for hashing passwords.
-
define(‘AUTH_KEY’, ‘put your unique phrase here’);
-
define(‘SECURE_AUTH_KEY’, ‘put your unique phrase here’);
-
define(‘LOGGED_IN_KEY’, ‘put your unique phrase here’);
-
define(‘NONCE_KEY’, ‘put your unique phrase here’);
-
define(‘AUTH_SALT’, ‘put your unique phrase here’);
-
define(‘SECURE_AUTH_SALT’, ‘put your unique phrase here’);
-
define(‘LOGGED_IN_SALT’, ‘put your unique phrase here’);
-
define(‘NONCE_SALT’, ‘put your unique phrase here’);
When the WordPress installation is run the security and salt keys will be generated automatically, but you can change them anytime, adding any arbitrary string using the syntax above.
Along with these options, using the wp-config.php file, you could also activate some features for developers such as activating Debug mode by adding the following line of code into the wp-config file:
define( 'WP_DEBUG', true );
This option will allow WordPress to show errors and warnings if there are any within the files, which in turn will help you in debugging the theme and plugin files.
The WP_DEBUG option has a flaw, it forces WordPress to show errors and warning on all pages, even if viewed by your users. It is not good practice to let your users see these errors so instead of using only the above-mentioned line you can set WordPress so that it logs these messages into one or more files on your servers, keeping these hidden from the view of your users. In order to do so, you will need to add the following code:
define( 'WP_DEBUG', true );
define( 'WP_DEBUG_LOG', true );
define( 'WP_DEBUG_DISPLAY', false );
@ini_set( 'display_errors', 0 );
To briefly explain these lines and how this feature works. With the first line, you enable the WP_DEBUG mode. Then, by using WP_DEBUG_LOG and by setting it to true you can force WordPress to store messages into a debug.log file. Now, with only these two settings we still have the issue of the user being able to see the error messages on pages. To change this you need to define WP_DEBUG_DISPLAY to be false. This way you hide the messages from the screen. Finally, by setting the value of PHP variable display_errors to 0 the error messages won’t be printed to the screen at all. Since the wp-config file is never loaded from the cache it is a good practice to override the php.ini settings for this same reason and make sure that no messages will go through.
Qode WordPress Themes: Top Picks
View Collection


For even more in-depth options you can use
define( 'SCRIPT_DEBUG', true );
in order to load the uncompressed versions of scripts and make debugging even easier.
You could even change the allocated server resources if they are lacking in a particular field. If that is the case you may receive a message such as:
Fatal error: Allowed memory size of xxx bytes exhausted
In this scenario, it would be best for you to edit the php.ini file and set the correct server resources there. However, if for some reason you do not have access to it you could set the WP_MEMORY_LIMIT from the wp-config file by using
define( 'WP_MEMORY_LIMIT', '128M' );
and setting the limit an acceptable number. If needed, you can set a maximum memory limit, as well, with the following statement:
define( 'WP_MAX_MEMORY_LIMIT', '256M' );
Another very useful security feature that gets overlooked is the ability to force the admin to upload content and attachments over an SSL connection if the servers are using one. You can achieve this with the following command:
define( 'FORCE_SSL_ADMIN', true );
You can find more information about Administration over SSL within the WordPRess Codex.
Final Thoughts
This article should have provided you with the necessary knowledge and understanding of the wp-config.php file and how to properly utilize and change it. Please remember to always make copies and backups of your WordPress installation and database before editing the wp-config file in order to preserve valuable progress.
