How to Reinstall WordPress

Even though WordPress is quite flexible and easy to use, on occasion it may report errors that are puzzling even for the most experienced users. In those cases, reinstalling WordPress core files can be a valid means of troubleshooting. Needless to say, this shouldn’t be your go-to step for solving WordPress errors. You should only consider reinstalling WordPress after you’ve exhausted the more common troubleshooting methods for an error. Also, in case your site was a target of hackers, restoring your WordPress files to their original state could save you a headache, as well as valuable time. Both reasons are very valid for reinstalling WordPress while keeping site content. However, there are times when you want to purposefully remove the website content while reinstalling WordPress files. This will give you a clean slate, allowing you to rebuild your website from scratch in a completely different manner.
Whatever reason you might have for reinstalling WordPress, we made sure to cover both the methods that preserve and those that remove website content. Before we delve them, it is imperative that you backup your site, either manually or using a backup plugin. Even if you don’t need a backup, making one anyways in case things go wrong. When you’ve done that, we can proceed to explore the steps for reinstalling WordPress:
Methods for reinstalling WordPress while keeping website content
Reinstalling WordPress can be done in several ways that range in difficulty. In the sections below, we covered both the user-friendly and the more advanced methods. You should examine them all and determine which one to use based on the error you are facing as well as the level of confidence you have in your WordPress skills. The methods described in the following section preserve the website content and they do not affect your theme and plugins in any manner. If you also want to remove your WordPress content completely, then skip to the section after this one. Additionally, if you don’t feel comfortable reinstalling WordPress, either with or without content, you can always ask your hosting provider for help.
The most user-friendly method of reinstalling WordPress core files involves using the admin dashboard. The advantage, apart from being the easiest to implement, is that it only takes a couple of seconds. However, you need to have access to the dashboard to use this method. If the error you are experiencing prevents you from accessing the dashboard, we suggest using one of the other methods of reinstalling WordPress files described below.
To reinstall WordPress, navigate to Dashboard > Updates in the upper left corner of your screen. If you already have the latest version of WordPress, there will be a notice about that as well as the button Re-install Now. Click on it and wait until the installation process is complete.

In case you’re using an older version of WordPress, you will see an Update Now button instead of the Re-install Now button.
In case you are unable to access your dashboard, reinstalling the WordPress core files via FTP is your next best option. It requires you to manually perform the same actions the native WordPress installer performs automatically.
The first step is to navigate to the WordPress downloads page and download the latest version of WordPress. During the writing of this article, the most recent version was 5.4.2. Depending on when you are reading this, your version might differ.

After the download has finished, find the zipped file in your Downloads folder and extract it somewhere on your computer. This will create a folder simply named wordpress which will contain the extracted files. If you don’t want to delete or override your current themes and plugins, remove the wp-content subfolder found within. To do so, simply locate the subfolder named wp-content, right-click on it and select the Delete option from the dropdown menu. As simple as this might sound, it is important not to neglect this step before moving forward with the process.

The method we are currently describing requires the use of FTP to complete the remaining steps. In case you aren’t familiar with it or just want to brush up on your knowledge, we suggest reviewing an article on the use of FTP first. It also covers installing and using an FTP client like FileZilla. This is the FTP client we will be using in the following steps.
When you’re ready, connect to your server using your FTP credentials and navigate to your root WordPress directory, often called public_html. The structure of the files and folders on your server will be given on the right side of your FTP client, while the local structure of your computer will be given on the left.
From your local files shown on the left, locate and open the previously mentioned subfolder named wordpress and select all files within it. To do so, first left-click on one of the files or folders and then press the keyboard shortcut to select all items. For Windows, that shortcut is CTRL + A, while for Mac the shortcut is Cmd + A. In both cases, the plus sign is only there to show that the keyboard buttons need to be pressed simultaneously. Right-click on any of the selected files and select the Upload option from the dropdown menu that opens.

Afterward, you will be prompted with a message stating that a Target file already exists in your root folder. Choose the Overwrite option and tick the checkbox next to Apply to current queue only. Then, press the OK button below.

After that, the only thing that remains is for the file upload process to finish. Have some patience, as it might take a couple of minutes.
WP-CLI or WordPress command-line interface is a very useful, open-source command-line tool designed to tackle common WordPress tasks. Those tasks include installing WordPress core files, plugins, and themes, adding or removing posts, categories, or other data, doing a database search and replace, and more.
This tool is geared more towards developers, so if you feel in over your head, feel free to skip this section. Using any of the other options for reinstalling WordPress is equally valid and will accomplish the same goal. However, if you do wish to use WP-CLI, you will need to install it first. As some hosting providers already support WP-CLI, you can also contact your hosting provider regarding installation and determine if you have it installed already. After the installation, you must carefully review the list of commands before proceeding. As WP-CLI and its commands aren’t the main focus of this article, we will only suggest a single line of commands for reinstalling core WordPress files.
wp core download --skip-content --force
To clarify, these commands replace every step you would have done in any of the previous reinstalling methods. The wp core download part downloads the WordPress files, the –skip-content part makes sure not to override themes or plugins while the –force part forces the overriding of the remaining files.
Qode Themes: Top Picks
View Collection


How to Reinstall WordPress and completely remove website content
Reinstalling WordPress without saving the website content is a lot simpler than you might think. It requires three steps: database clearing, removing all WordPress files (including themes and plugin files), and reinstalling the core WordPress files once more. But, this is not something that should be done lightly. Make sure that you genuinely want to delete your whole website before proceeding any further. In case you change your mind later, you should be able to restore your website using a previously saved backup. Restoring a backup can be done manually or using a plugin. However, if you delete your site and don’t have a backup saved, then you will have to build it from scratch all over again.
The first step in this process is optional, as you can simply create a new database during the 5-minute WordPress installation. However, some hostings have a limit on the number of databases you can use congruently, which could make clearing or dropping (deleting) the current database a necessity rather than an option. We will show you two different methods for database clearing. But, we must caution you again about what you are about to do as clearing or deleting the database will cause you to lose all content from your site. Therefore, taking the time to back up your database first can be a good idea.
-
Clearing the database using a plugin
One of the many benefits of WordPress is the multitude of plugins for almost any purpose. That includes plugins for database clearing or resetting. Simply by searching with a keyword like reset either on the official WordPress page or using the admin dashboard’s plugin search you can find several database resetting plugins.

The database reset process is rather similar for all the plugins mentioned shown in the screenshot above. We chose to use WP Database Reset for this article. After you install the plugin, navigate to Tools > Database Reset. Click on the Select All Tables option at the top and insert the security code you’re given at the bottom. If you want to preserve the users you previously created, after selecting all tables, you can select the remove option next to users and usermeta tables.
Afterward, and only if you perfectly comfortable with losing all your website content, press the Reset Tables button.

-
Dropping the database using PHPMyAdmin
Different hosting providers can offer different control panels that simplify the hosting process for website owners. While the control panel interfaces can differ, they all contain database administration options and tools. Within cPanel, which is the control panel we’ll be using, those options are located in the Databases section. After locating the section, click on the MySQL Databases option.

Before we proceed to the database dropping (deleting) steps, we should consider why using cPanel might be better than using a regular WordPress plugin. The plugin is the more common, user-friendly, option but it can’t help you if you are unable to access your WordPress admin dashboard. Moreover, if you are using wordpress.com as your hosting solution, it has a list of incompatible plugins. There are several types of plugins that can’t be installed or used on wordpress.com. Database alteration plugins are one such category, so make sure to consult the list to see if your chosen plugin is compatible.
With that being said, let us move on to the database clearing steps. After finding and opening the MySQL Databases option within cPanel, a list of databases will appear in the Current Databases section. You will need to find your site’s database within that section. If you aren’t sure about your website’s database name, you can find it in the wp-config.php file located in your root WordPress directory. Also, if the list of databases is long, you can narrow it down by searching with a keyword. Simply type in a part of your database name and press the Go button. Afterward, when you find the database, and if you are sure that’s what you want to do, you can click on the Delete option found in the same row as your website database.

You will be prompted to confirm your choice in the window that opens. Click on the Delete Database button to finish the steps.

The process should be very quick and, when it’s complete, you will get a success message confirming database deletion.

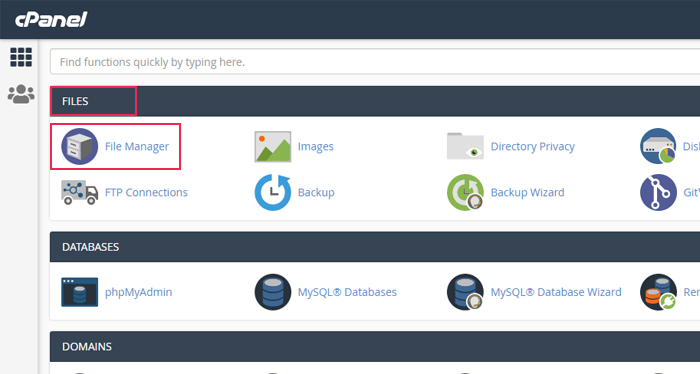
If you have already deleted the database, the only thing that keeps you from having a blank slate is the WordPress files on your server. To delete them as well, click on the File Manager option within the Files section.
A new window will open, showing all the domains you have on the server in the area on the left. Locate your site’s domain and open the root WordPress directory, public_html. Select all files and folders within by clicking on the Select All option near the top.

However, if you don’t want to delete all files and folders within your root WordPress directory, you can deselect some. To deselect a file or a folder after having selected them all, simply hold the CTRL key (Cmd for Mac) and click on the file or folder you want to keep. This is very important if you have made subdirectories or other types of subfolders that you wish to keep. After you decide which files to keep and which to delete, right-click on the selection and then choose the Delete option.

You will be prompted with a popup asking for confirmation. If you are sure, press the Confirm button to finish deleting your WordPress files.

The process is rather quick. Depending on if you decided to delete everything or save some subdirectories, the result will either be a blank public_html directory or one containing only the subdirectories you chose to save.

After you clear/drop the database and delete all files, the only thing that remains is to reinstall WordPress from scratch. This is the famous 5-minute WordPress installation. This process isn’t hard and can use a step-by-step guide on how to install WordPress if you need to. In case you only cleared the database in one of the previous steps and didn’t delete it, you can reuse it in the installation process. However, if you deleted your original site database, you’ll need to create a new one.
When you’re done with all of that, you’ll have a clean new website where you can install themes, plugins, and add new content as you see fit.
Asking your hosting provider for help
If you’re not confident about using the methods listed above or if you prefer having a professional do the reinstallation, you can reach out to your hosting provider. Your hosting provider can offer help with various issues you might face, so it is never a bad idea to ask them. First of all, they can try to help with the error that prompted you to consider WordPress installation as a troubleshooting step. If the issue is too difficult to solve directly, they can assist with creating and restoring backups, as well as reinstalling WordPress.
Final Thoughts
Any WordPress owner, no matter the knowledge level, might at some point need to reinstall WordPress for their site. Whether it’s to solve a daunting error or simply to give their website a new look, knowing how to quickly reinstall WordPress could save you a lot of trouble. We hope this comprehensive guide showing multiple approaches with their pros and cons will help you if you decide to reinstall WordPress. Take care to follow the steps closely and don’t forget to make a backup before starting. You can also bookmark this article for any future occasions when you might need it.
