How to Create Links in WordPress (With Best Linking Practices)

In the digital world, the importance of links cannot be emphasized enough. Not only do links represent some of the essential elements of website navigation, they are also a cornerstone of your SEO efforts since they can help your site rank better on search engines.
This time around, we will talk about the importance of links, show you different ways in which you can add them to your WordPress site, and share some of the best linking practices that will help you get noticed by both people and search engines. Here’s what we’ll cover:
A link (or a hyperlink) is a clickable element on a page that leads users to other pages. It can come in the form of a text, a button, or an image. When it comes to links on your website, we can differentiate two types of links – internal and external (outbound) links.
Internal links are links that, when clicked on, lead to another web page on the same domain. As such, these types of links have the power to increase the time users spend on your site, thus having a positive impact on your website’s authority and boosting your ranking on search engines.
Moreover, your internal links also play an important part in your website’s navigation structure. This can also help search engines crawl and index your site better since crawlers will follow the links to other pages during this process. In addition, properly spreading internal links throughout your content can also help users navigate to different pages of your site quickly and efficiently. Naturally, since clicking on more links will help users discover more of your content, all this can lead to more user engagement, and by extension, more conversions and sales for your business.
On the other hand, external links lead users to pages on another domain. These are often links that offer some additional information to your visitors and therefore add more value to your site. Since Google also ranks sites based on credibility and expertise, these types of links can also contribute to a higher ranking.
In short, it’s important to include both types of links to your website’s content since they can boost your online visibility and help improve your website’s UX.
Now that we’ve established some of the key reasons why your website links are important, we will talk about all the different ways you can add them to your WordPress site.
When it comes to adding links to your blog posts or pages, WordPress is the platform that allows you to do so extremely easily. First things first, you need to go to Pages/Posts >> Add New, or to add a link to an existing page or post, click on it to access its edit screen.
If you’re using the Gutenberg editor, you need to select the text you wish to add the link to (this part of the text will become your anchor text) and hit the Link button.
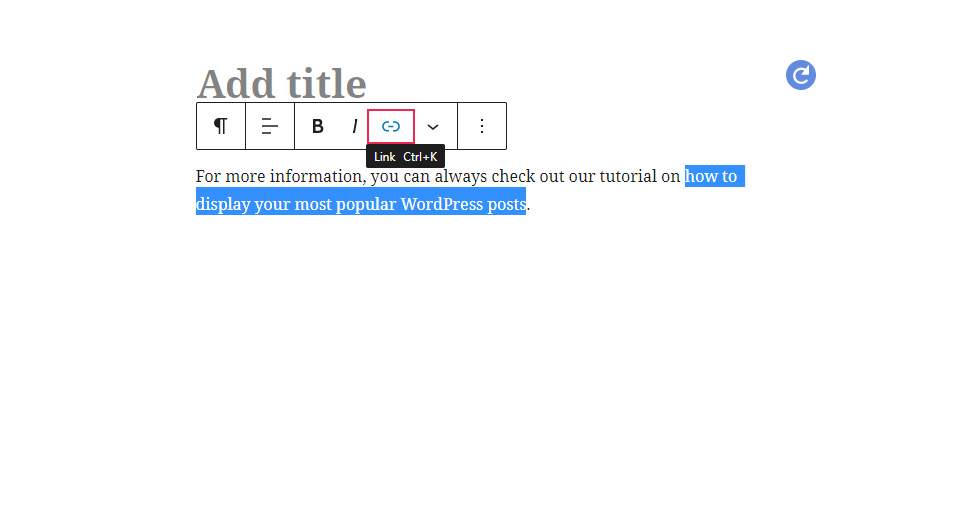
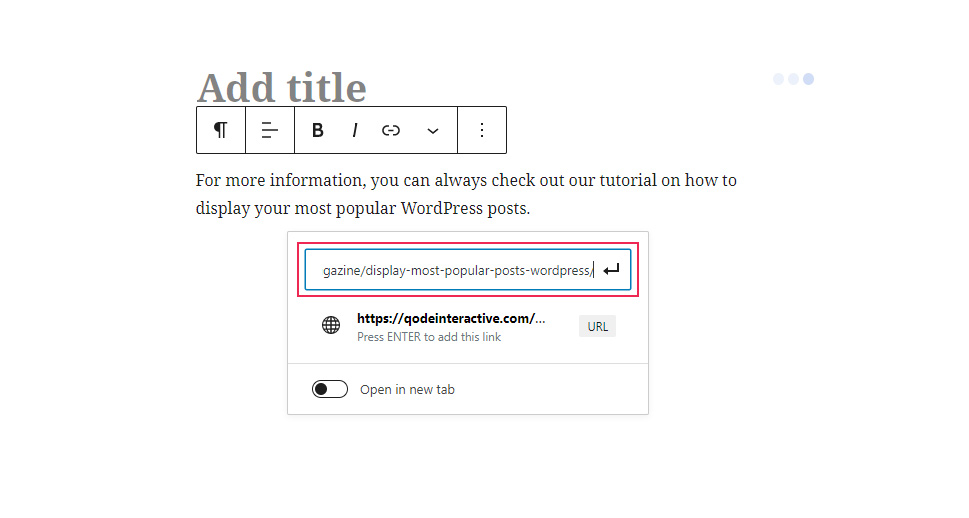
A new box will pop up where you will be able to enter the URL of your link.
Click the Submit (arrow) button or press Enter and you’re all set.
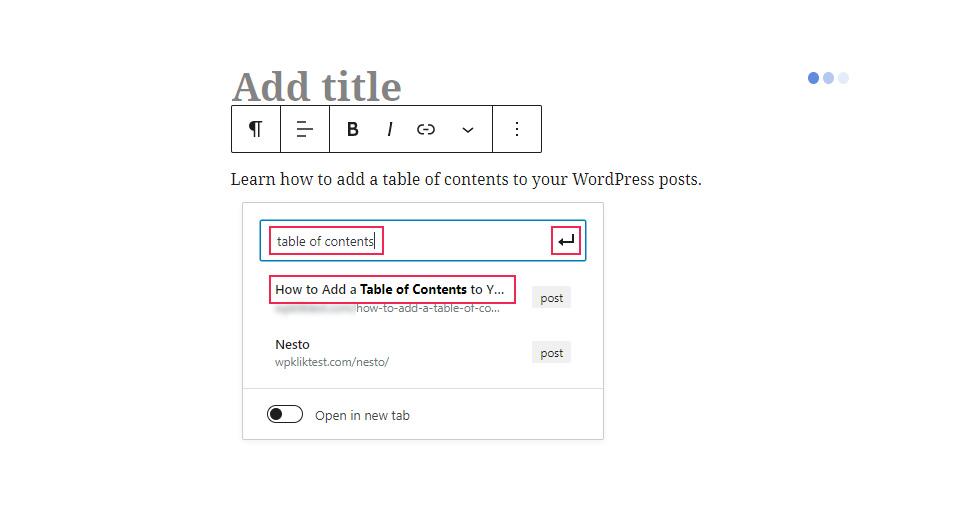
If you want to insert the URL from your own site, you simply need to enter a few words from your title and WordPress will find the URL for you. Select the title of the page or post you want to insert and hit the Submit button.
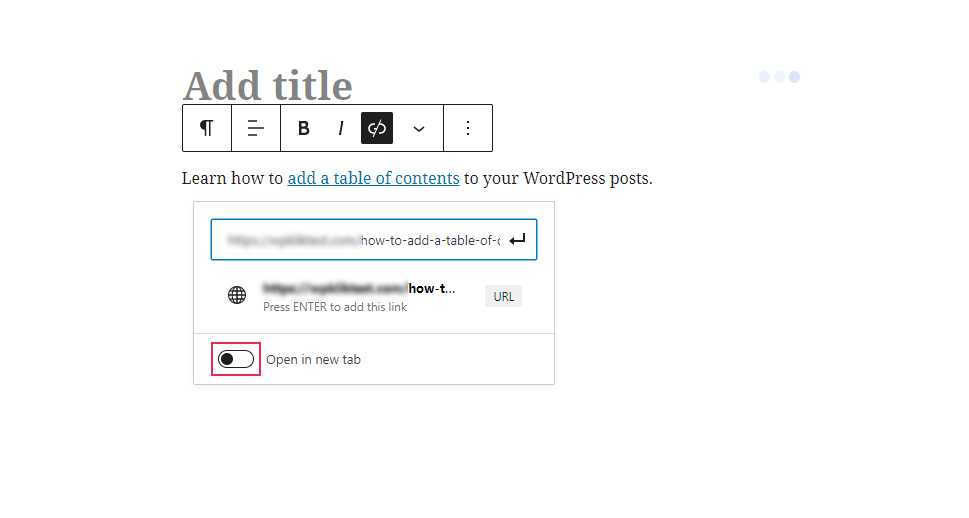
Also, if you want to open your link in a new tab, simply switch on the toggle button.
If you’re using the Classic editor, you need to select the text you plan to use as your anchor and click the Insert/edit link button, as shown in the picture:
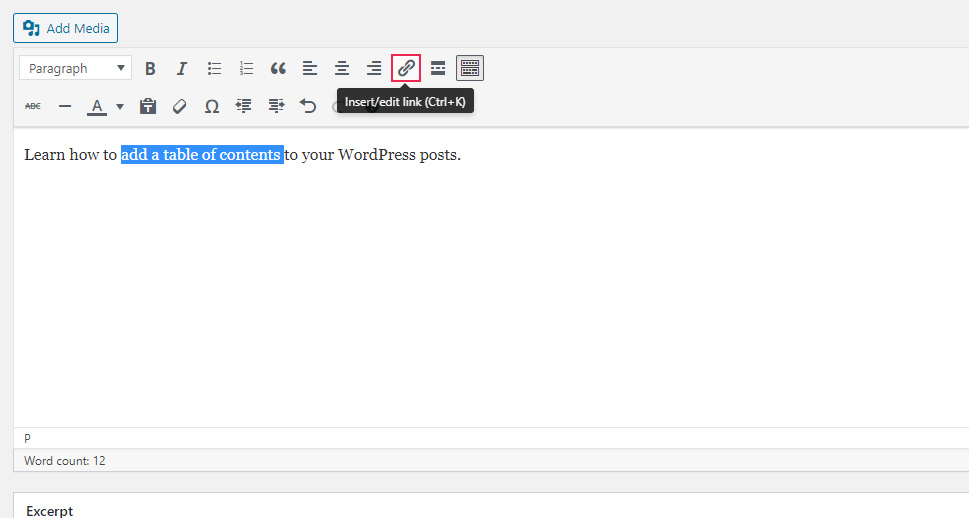
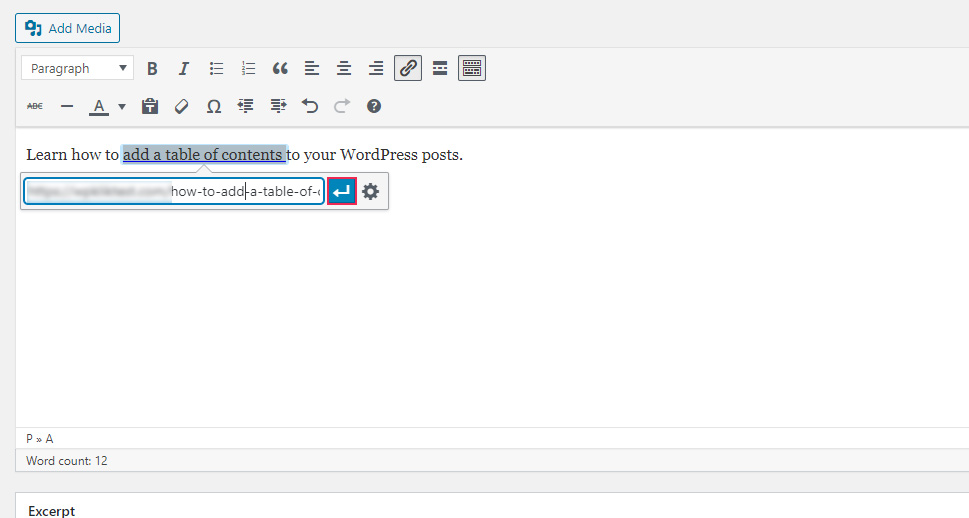
Now simply copy and paste your URL or enter a word or two from the title, find it among the existing URLs, and hit Apply (Enter).
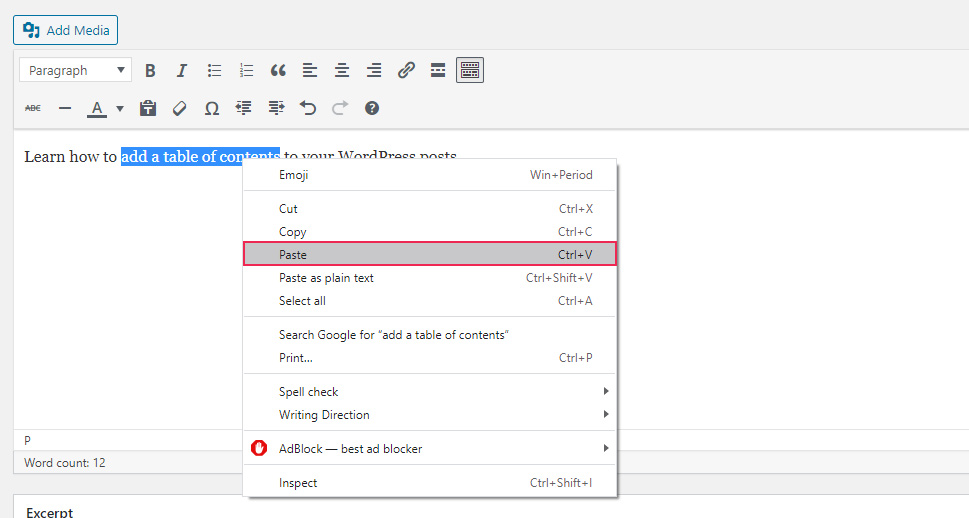
Alternatively, you can add your link both in the Gutenberg and Classic editor by pasting the URL directly onto your anchor text. To do this, copy your URL and simply select your anchor text. Then, right-click and select the Paste option.
In addition to your page or post content, you can also add links to other parts of your website. Depending on your theme, you have a choice of several predefined widget areas you can add widgets to, and you can use those to place your links. For example, widgets like a basic Text widget will allow you to easily add any of your links as you would on a page or post. We have to note, however, that there are also some widgets (like the Popular Posts widget, for example) that automatically show links for you when you insert them into your desired area, which means you won’t have to do anything else other than add these widgets wherever you need them.
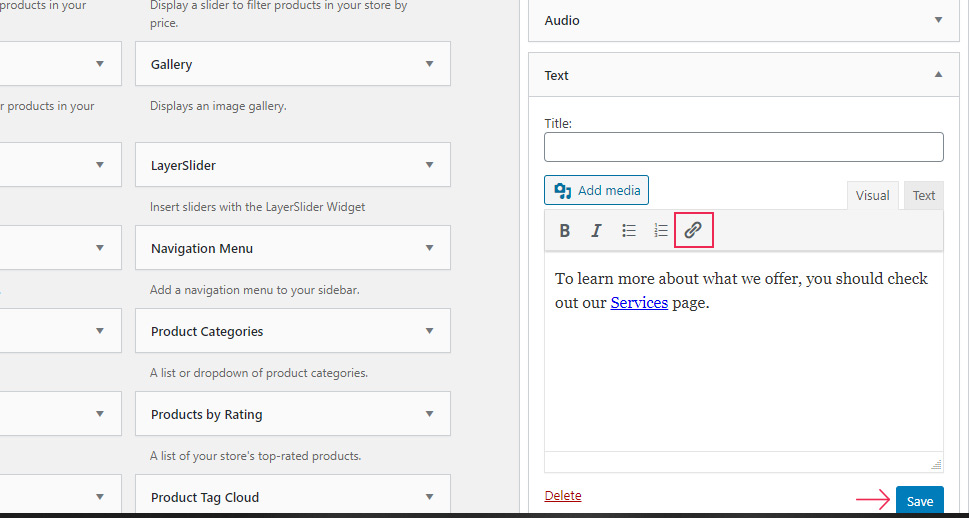
To add a link in the Text widget, head to Appearance >> Widgets and simply insert the Text widget into any widget area of your choice.
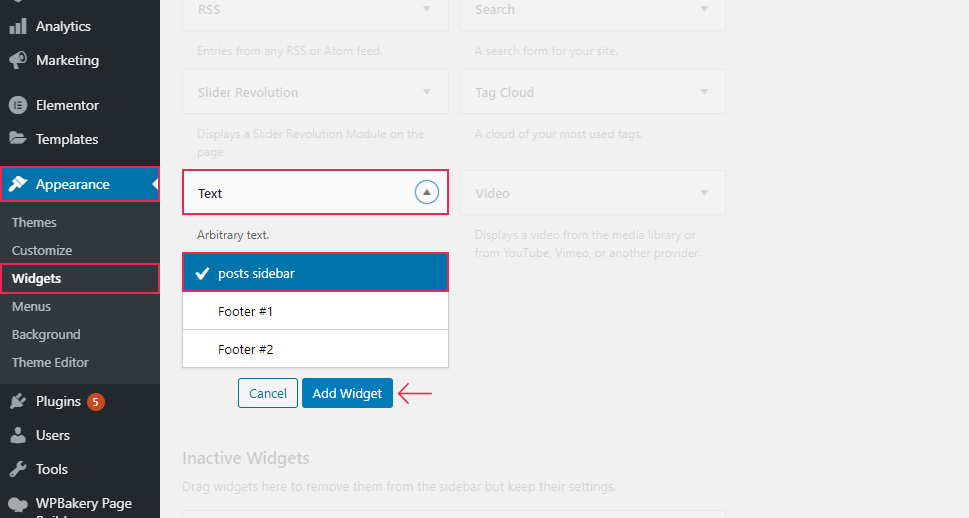
Then, enter your text and add a link to it in the same way as on the page or post. Hit the Save button once you’re done.
What’s also great about WordPress is that it comes with a user-friendly drag and drop system which allows you to create a navigation menu with ease.
To add links to your menus, go to Appearance >> Menus. If you don’t have a menu already, you can create one by giving it a name, selecting all the pages you want to add to your menu, and clicking the Add to Menu button.
You can also easily move your menu items up and down to arrange them in any way you want.

If you’re adding a page located on your site, WordPress will automatically add a link to all the posts and pages you added to your menu. However, if you want to add any link outside your website, you should select the dropdown on the left called Custom Links and enter the URL and the link text you want your link to have. Then, simply hit the Add to Menu button.
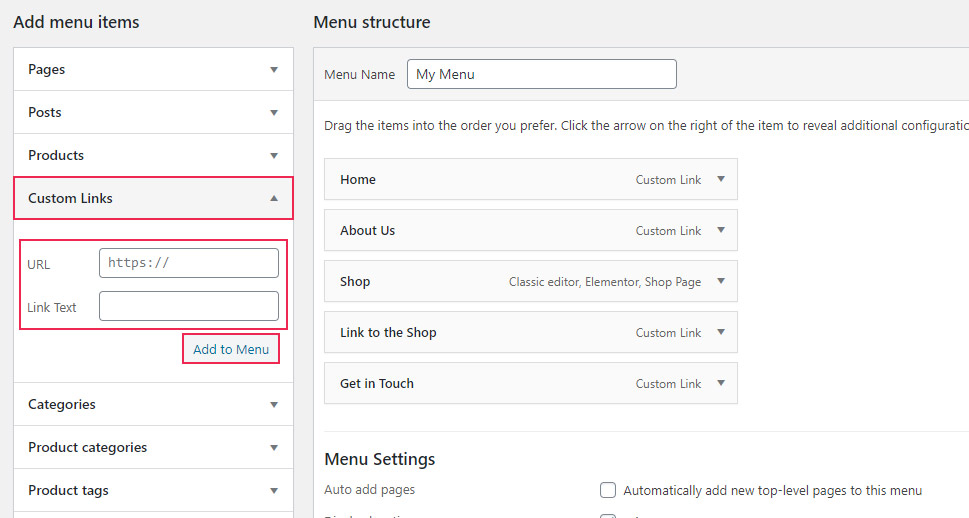
Of course, you should click on Save Menu for your changes to take effect.
If you want, you can also allow users to see the original title of the page or post you linked to when they hover over the anchor. Another useful thing that you can include is a nofollow tag. This tag tells search engine crawlers not to follow a certain link, which you deem irrelevant or even harmful for your SEO score. For example, you can use this tag for some of your external links, if they don’t lead to reputable websites that will increase your link juice. Or, you can use them for affiliate links, links in comments, suspicious websites and so on.
To add a nofollow tag, you will need the help of a plugin. For doing this in the Gutenberg editor, we recommend using the help of the Yoast SEO plugin.
When you install the plugin and activate it, you just need to go to the desired page/post, select the text you want to add the link to and click the Link button in your editor.
Once the link box opens, you will see the option to make the link nofollow.
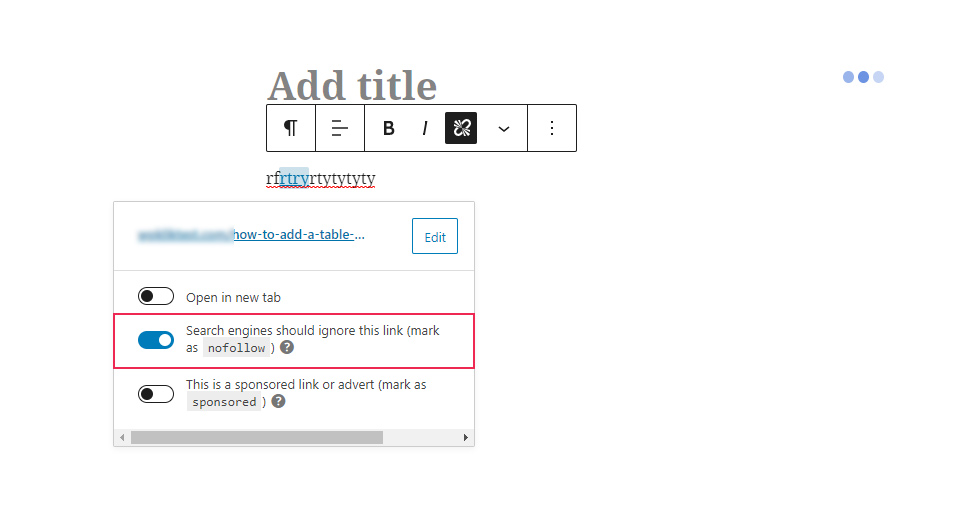
For Gutenberg, you can also either install a plugin like All in One SEO Pack (it allows you to add a title, nofollow, as well as noopener and noreferrer tags) or use the help of an HTML code.
To use the latter option, you should insert your link to the block editor first, then click on the three vertical dots in your block and choose the Edit as HTML option.
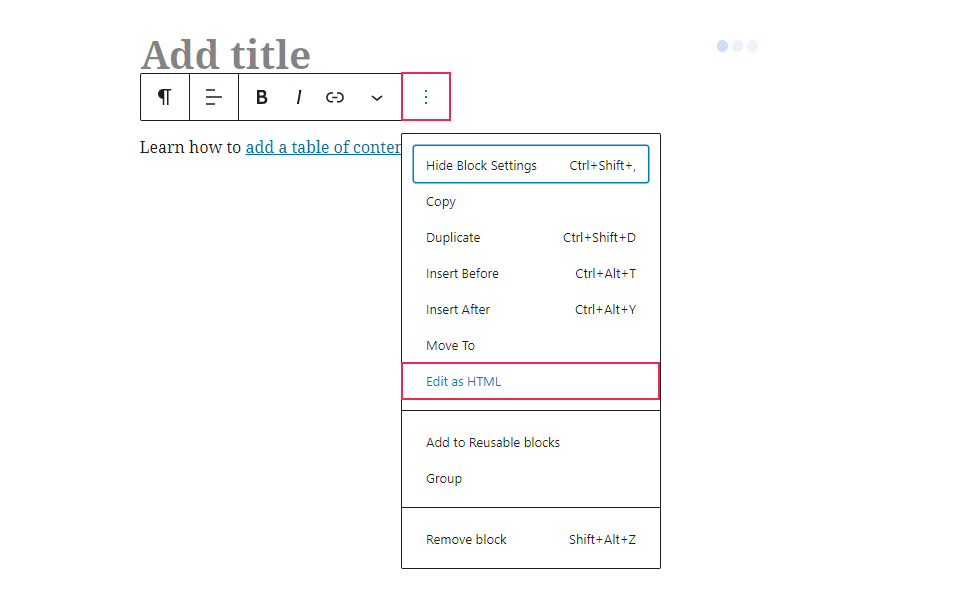
Then, you can add a title and/or a nofollow attribute to your link before the >title</a> part (in our case, the title is >add a table of contents</a>):
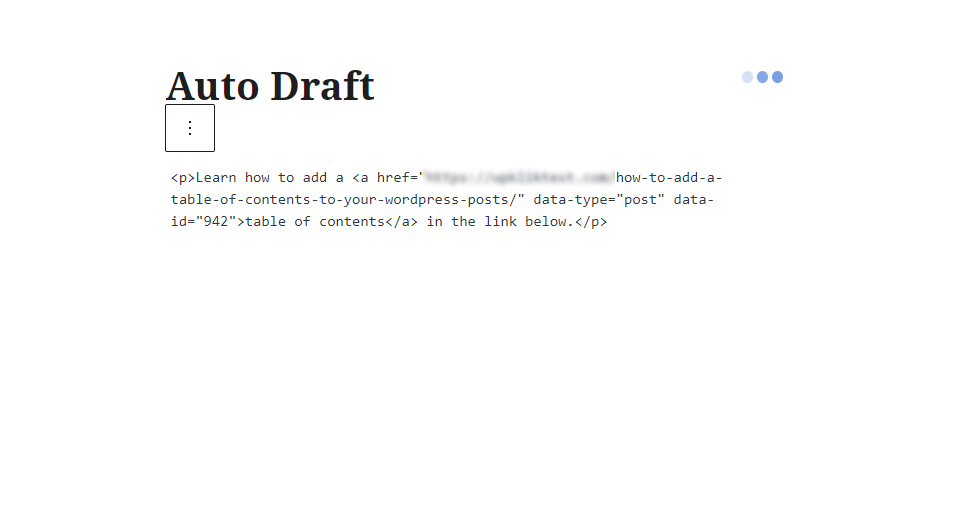
Here’s what you should add to your code:
title="Your Title" rel="nofollow"
Of course, you can add your own title under the quotation marks (after title=), while the rel=”nofollow” part should always remain the same.
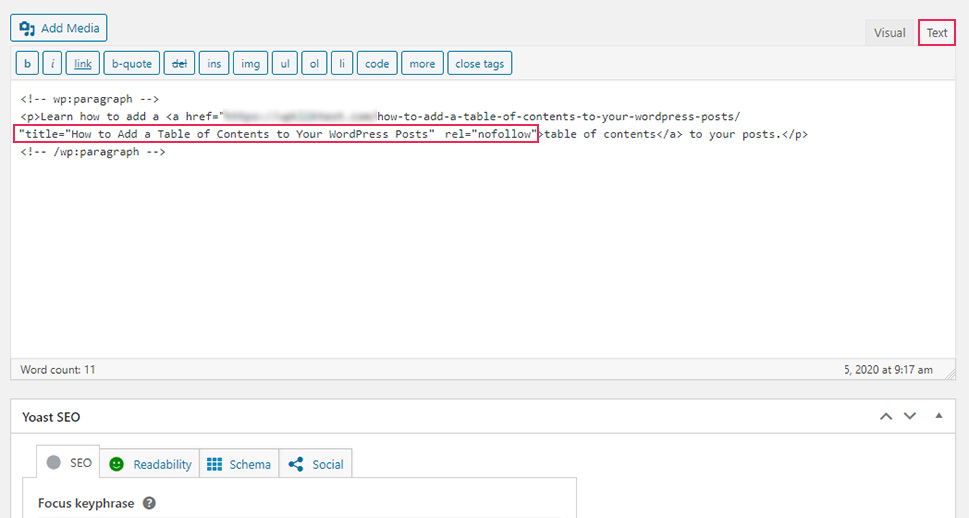
To add your title and the nofollow tag in the Classic editor, switch to the Text tab, find your link, and then simply add the same code there. This is what it should look like:
Buttons are another important element of website navigation that can help boost engagement and conversions on your site – especially if you have products to sell or offer any type of service. There are a few different ways in which you can add buttons in WordPress, but one of the most convenient ways to do this is to use a Gutenberg block.
Click the (+) icon in your page/post editor, and find and select the Buttons block that you can find in the search field.
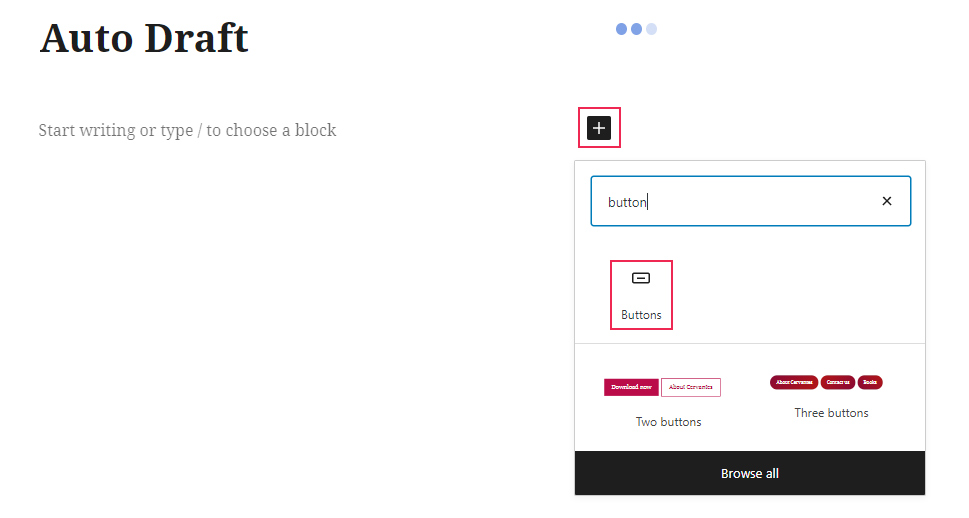
Then, you can insert your text in the area intended for your button.
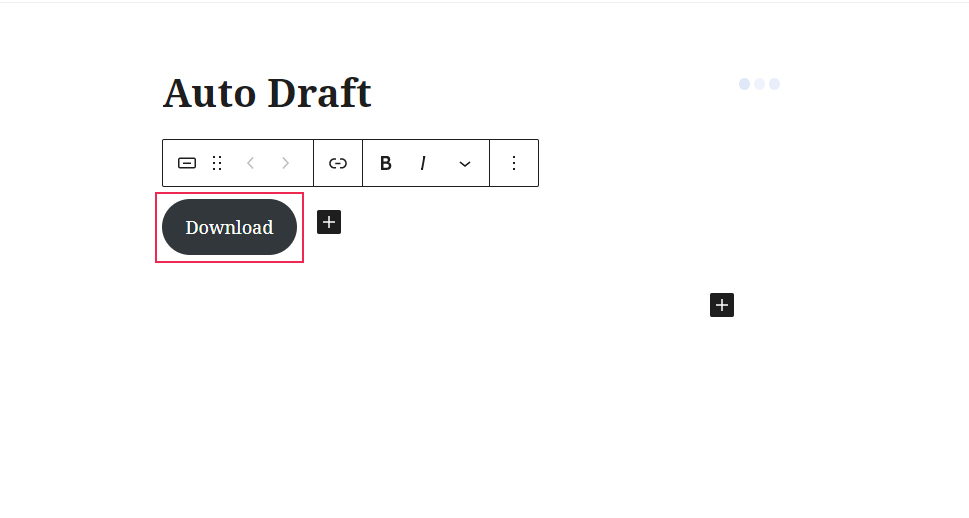
You can also change the button’s alignment, make the text bold or italic, and/or choose from additional rich text controls such as Strikethrough, Inline Image, etc.
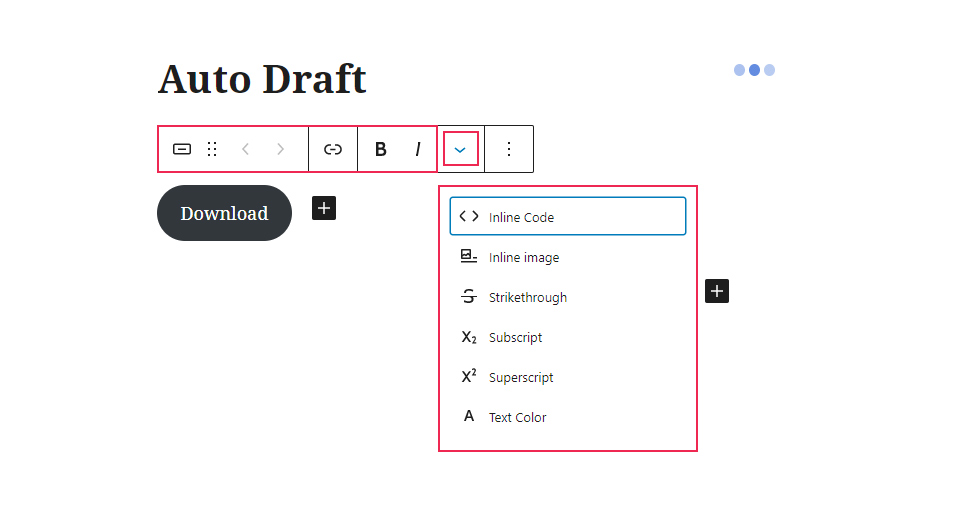
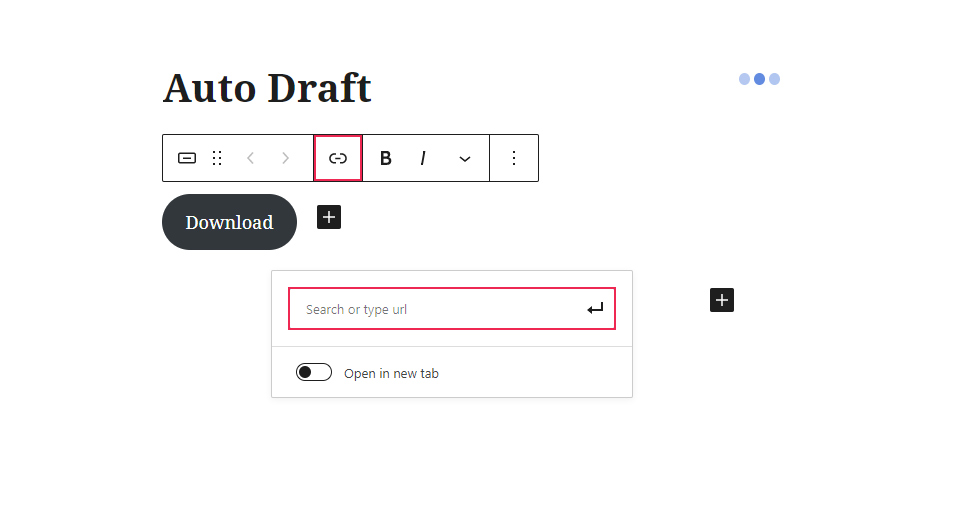
By clicking the Link button, you will make a box appear where you will be able to enter your URL. Additionally, you can set the link to open in a new tab.
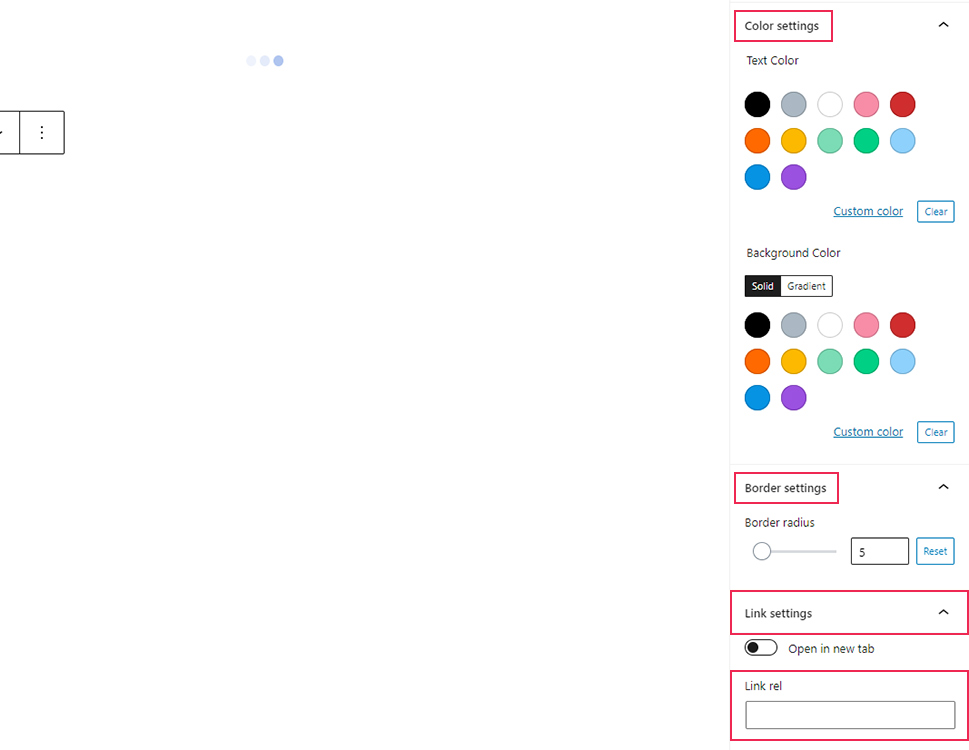
You can also configure some additional button settings (such as color settings, border settings, etc.) in the Block tab on the right side of the screen. Also, In the Link settings dropdown, you will be able to insert the ‘nofollow’ attribute (in the Link rel box).
In case you’re using the Classic editor, we recommend that you install and activate the plugin called Forget About Shortcode Buttons.
Then, in your post editor, you should click the Insert Button icon located on the right side of the toolbar.
Once you click on it, a popup will appear allowing you to customize your button, change its colors, add text, icon, mark the link as nofollow, etc. Of course, you will be able to insert your URL as well.
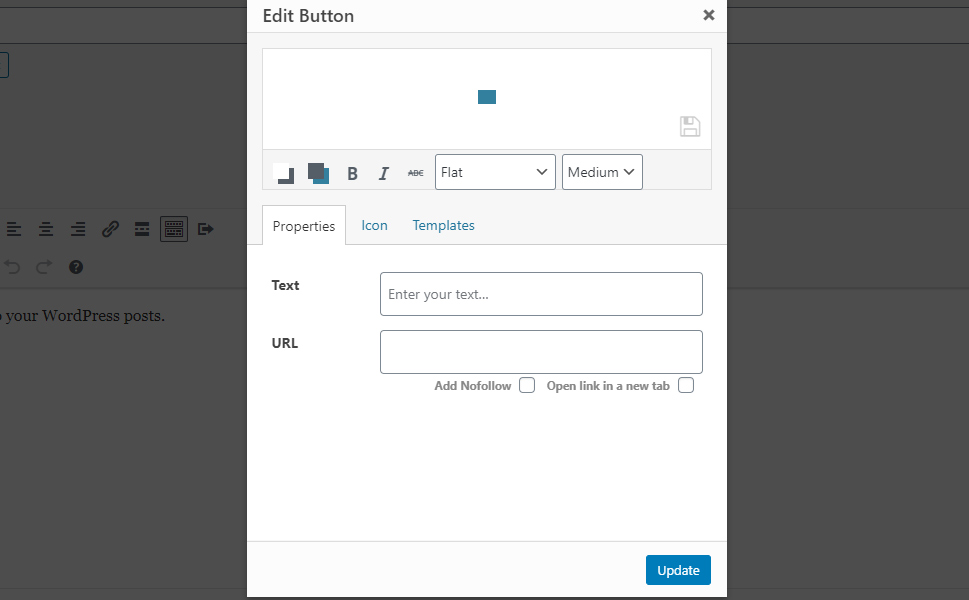
Make sure to click on Update once you’re done with editing your button.
If you want to embed specific types of linked content in your WordPress page or post (which will show some other details such as an excerpt, an image, a timestamp, etc.), you can easily do so by simply pasting the URL of the content you want to embed directly into the content editor. Just make sure that the link is placed in its own line from within the editor and not added to any text as a clickable link.
For example, to embed a tweet, simply find its URL and, once pasted into the editor, it will render like this:
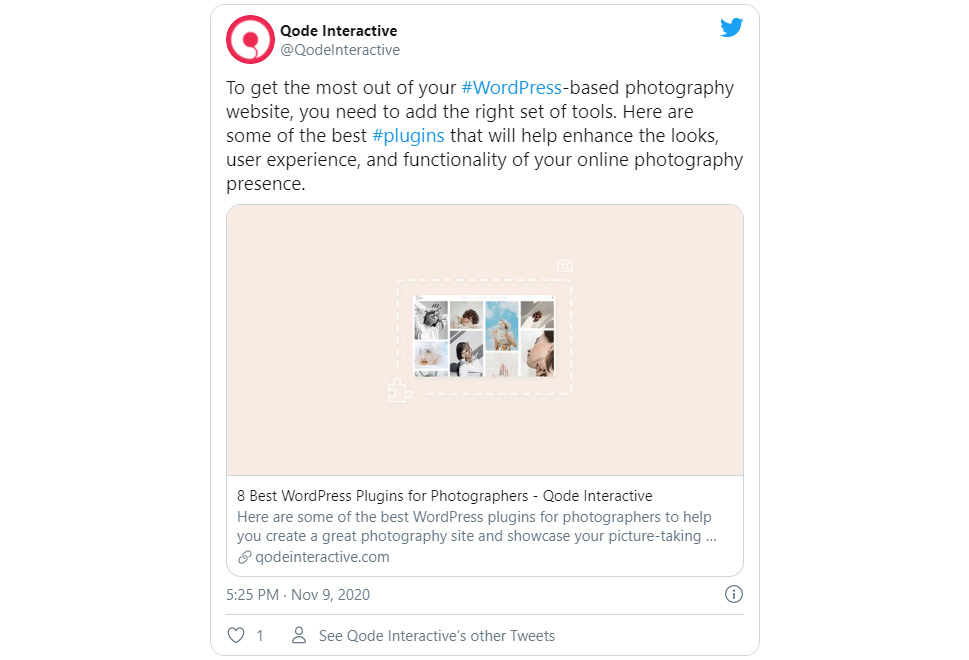
This is especially useful if you want to embed linked content from social networks like Twitter or Instagram, embed YouTube videos, and many others.
Sometimes, you may need to add a link manually, using an HTML code. This is useful if you want to further customize the look and behavior of your links, add an HTML widget, or even if you need to edit your link directly in your theme file (we recommend using the child theme for this last one).
And while we’ve already demonstrated some ways in which you customize your links using HTML in both editors, there is another particularly easy way to do this in Gutenberg.
You just need to find the Custom HTML block in the editor and click on it.
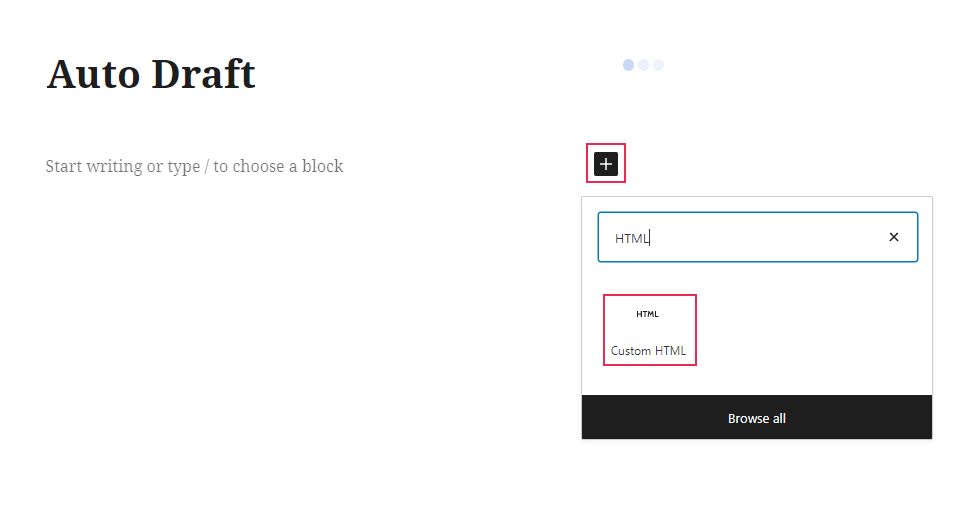
Copy and paste the following code in the HTML box:
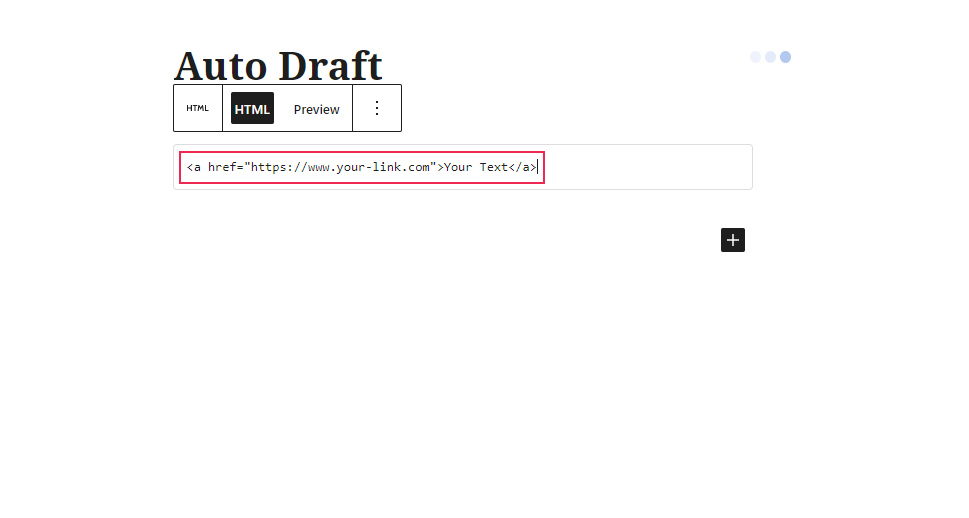
Click on Preview to see what your link will look like on your page/post.
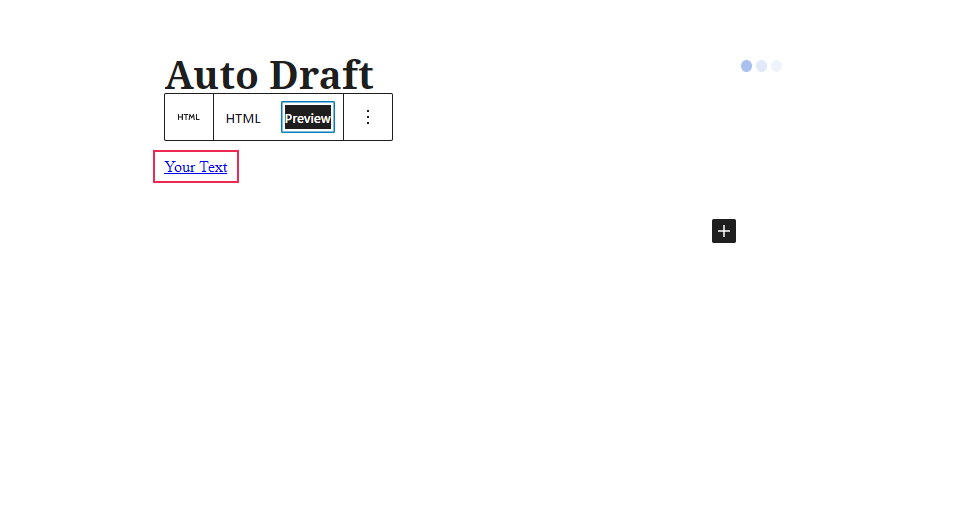
Now, you should go back to the HTML tab and change the URL to the one you want to use. You should change the words “Your Text” in the same manner, as this will be your anchor text.
If you wish to add a link title, this is how you can incorporate it into your code:
<a href="https://www.your-link.com" title="Your Title Goes Here">Your Text</a>
Of course, you should change “Your Title Goes Here” accordingly as well.
To set the nofollow tag, simply add rel=”nofollow”:
<a href="https://www.your-link.com" rel="nofollow">Your Text</a>
To get your link to open in a new tab, just add target=”_blank” to your code:
<a href="https://www.your-link.com" target="_blank">Your Text</a>
Finally, if you want, you can add all these tags at the same time:
<a href="https://www.your-link.com" title="Your Title Goes Here" target="_blank" rel="nofollow">Your Text</a>
Write a Concise but Informative Anchor Text
If you ask us, this one is a no-brainer. The better your anchor text, the easier it will be for search engines to understand what the page you’re linking to is about. Plus, your users will also be able to swiftly navigate through the content that interests them.
According to Google’s SEO Starter Guide, your anchors should be able to provide a basic idea of the page you’re linking to while keeping it as concise as possible. Try sticking to a few words or a phrase that best describes your page while making sure that it naturally fits with the rest of your content. You should also include some of the most relevant keywords of the page or post you’re linking to, especially when you’re adding internal links. That being said, you shouldn’t go overboard when implementing your keywords either. It’s best to aim for some middle ground – this means trying to avoid an excessive number of keywords while making sure that your anchors look natural, concise and informative.
Make Your Links Easy to Spot
No matter what types of links you’re adding to your site, you should ensure that the formatting of your links is always easily noticeable. There are many different ways to do this – you can underline your text, change its color, and even make its appearance change upon hover. Whichever type of formatting you go for, just make it easy for users to differentiate between your regular and anchor text.
Place Your Links Higher On Your Page
If you put up your links somewhere at the beginning of your page, users will be able to access some of your pages immediately, which can actually help reduce your bounce rate. And since clicking on different links allows users to spend more time on your site, this can signal to search engines that the pages your visitors are clicking on are valuable. Of course, that is not to say that you shouldn’t place your links throughout the rest of your page. Still, we recommend adding a link or two close to the top of your page, if possible.
Link Strategically From Your Homepage
More often than not, a homepage will be the place that contains the most links on a website. Plenty of users will also head straight to your homepage expecting to find more information related to you and/or your business. You should take advantage of this and include as many internal links into your homepage as possible – of course, as long as you make sure that the navigation on your homepage is organized in a clean, intuitive and user-friendly manner.
For example, linking to your blog from your homepage (either by adding a navigation link that leads to your blog posts page or linking to some of your most commonly used blog categories) can send authority to most of your blog posts. The same goes if you have an online store page (you can simply link to your shop page, or include links to your most popular product categories), your services, etc. Also, if it makes sense, you should include some of your CTA links (like Buy, Download, or Subscribe buttons) as well, since these types of links can help increase your conversions.
Link to Your Most Important Pages
As we already mentioned in the beginning, linking to another page located on your site sends link authority to that page, which can contribute to better page ranking on search engines. To boost your internal linking strategy, you can always use the help of some online SEO tools (such as aHrefs, for example) to find the pages on your site that have the most link authority. Then, you can simply link from those high-authority pages to those that you want to get better ranks.
Make Sure Your Internal Links Are Labeled as Dofollow
We also mentioned the use of the nofollow tag and explained how you can add it to your external links. When it comes to most of your internal links, however, you should stick to using dofollow instead. This is a common-sense strategy since, in this way, your search engines will be able to count your links as part of your website’s authority when it comes to ranking.
That being said, all links have a dofollow status by default unless you change it. Still, there are some plugins for managing external and internal links (like the WP External Links plugin, for example) that add a nofollow tag to external links automatically. These types of plugins can also have a setting for making internal links nofollow that can be enabled for some reason, or you can switch it on by accident. So, we recommend checking if any of your plugins add a nofollow tag to your internal links, just in case.
Stay Relevant
While it is important (and recommended) to place various links throughout your content, you should stick to adding relevant links only. For example, if you have a post about adding images to your WordPress site, relevant links would be those that lead to your posts about resizing images, adding an image gallery, or any other article related to the topic of images in general, and not to posts about, say, typography or analytics.
Of course, this rule should apply to both internal and external links. Since the primary purpose of adding external links is to add more value to your content, it’s only logical to also include external links that provide more info related to the topic at hand in some way.
Link to Reputable Sources
When adding external links to your site, you should make sure to only include sources that are considered reliable and well-respected in your niche. Linking to sites that can be regarded as unprofessional or have some clickbait elements to them can actually cause more harm than good when it comes to your online reputation, and by extension, your search engine results. And once your site is listed as bad by Google, changing its reputation can be more challenging than you might think.
Final Thoughts
Links are crucial elements of your navigation that can bring many benefits to your website. Internal links can define your website’s structure, they can help your users get around more easily, and increase your ranking on search engines. When done properly, external linking can also improve your website’s authority and overall reputation in your niche.
As you could see from our detailed guide, WordPress provides many different ways to add links to your site, including adding links to your pages, posts, widget areas, navigation menus, and so on. You can also easily add elements such as buttons, include link titles and nofollow tags, and even embed linked content to your site if you want to. Just make sure to follow our detailed instructions and try sticking to some (if not all) of the linking practices we mentioned above. By doing so, you will be well on your way to gain more link authority, more user engagement, and ultimately, more success in your industry.


