How to Add HTTPS and SSL to Your WordPress Website

A growing number of websites have been making the switch from HTTP to HTTPS protocol to increase security. HTTPS (Hypertext Transfer Protocol Secure) is a combination of two protocols: HTTP and SSL/TSL (Secure Socket Layer/Transport Layer Security). SSL encrypts all information (passwords, credit card information, and more) that are exchanged on your website, adding an important layer of protection. This makes HTTPS protocol mandatory for any eCommerce business and strongly recommended for any type of website that collects users’ information.
Apart from the secure transfer of information, there are other reasons why adding SSL to your site is beneficial. They include the prevention of malware infection, better long-term SEO ratings, and higher website loading speed.
Although you can’t go wrong with switching your website to HTTPS, there are plenty of ways things can get complicated with transferring to the new protocol – even for the more experienced WordPress users. This comprehensive guide was created to help both beginners and experienced site admins with adding HTTPS and SSL to WordPress websites. Carefully follow these steps and you will have a prized green padlock of security in no time!
If you’d like to take a shortcut to any specific part of this article, simply use one of the links below:

An SSL certificate enables data encryption and site authentication. This assures the site visitors of your credibility and provides security for any information shared between a user and your website. Obtaining an SSL certificate is a prerequisite for the HTTPS moving process.
SSL certificates can be free or paid. Some hosting providers offer free SSL certificates in batch with domain hosting subscriptions. Begin by consulting with your hosting provider about the option to activate a free SSL certificate, either host-granted or a third-party certificate such as Let’s Encrypt. Your hosting provider might also offer some advice on acquiring a high-quality paid SSL certificate.
One of the important differences between various SSL certificates is the number of domains and sub-domains they can secure. Single certificates cover a single domain or sub-domain, wildcard ones cover a domain and all of its sub-domains, while the multi-domains cover multiple domains and all of its subdomains.
SSL certificates can be self-signed as well. To be recognized as safe by browsers, they have to be generated by a trustworthy third-party organization, also known as a certificate authority (CA). Self-signed certificates that aren’t verified by a CA will be marked as not secure, which defeats the purpose of an SSL certificate. Moreover, certain browsers can block these sites during the loading process. This is why it is best to avoid using self-signed SSL certificates.
Qode WordPress Themes: Top Picks
View Collection


Before you proceed, we strongly recommend that you backup your WordPress site. You can do it manually, or you can ask your hosting provider for help.
With the site backed-up, you can safely proceed. We will show you two methods of changing your site from HTTP to HTTPS. The first option is using third-party SSL plugins. This method is more suitable for less-experienced WordPress users. The second option is more challenging, as it requires manual editing of files and URLs. This method is suitable for more experienced WordPress users. If you are not well-versed with programming yet insist on using this method to add HTTPS, we strongly recommend that you hire a developer to help you with the process.
Using SSL plugins
Since there are many WordPress SSL-related plugins, we can’t use all of them. For the purposes of this article, we will go over some of the more popular solutions. You are free to test or recommend other plugins as well – if you have time, let us know about your experiences in the comment section!
One of the top-rated, user-friendly SSL plugins is Really Simple SSL.
To install this plugin, navigate to Plugins and press Add New. Search for the plugin and click on Install Now.

Then, open Plugins > Installed Plugins, review the notice carefully and click on the Go ahead, activate SSL! button.

At this point, you will probably have to reconnect to your WordPress dashboard.
Really Simple SSL plugin handles all the steps of HTTPS activation relatively well. One of the problems that may appear with this plugin is a mixed-content issue caused by leftover links using the HTTP protocol. Really Simple SSL plugin has a built-in feature called a mixed-content fixer that deals with this issue to some extent. However, keep in mind that this feature will not be able to change some HTTP assets (images, CSS and JS) and hardcoded HTTP links inside your .css and .js files.
To check if your site has the mixed-content fixer, navigate to Settings > SSL and click on the Configuration tab. Make sure that a mixed-content fixer is enabled/detected on your front-end and then you’re ready to move to the next step.

Before the test, clear your browser cache and purge the cache with your caching plugin. Using other browsers and/or an incognito window within the current browser will have the same effect.
Start by reviewing your site, one page at a time. If the icon next to the page URL is a (green) padlock for all the pages (as seen in the screenshot at the beginning of the article), proceed to the Additional steps section of this article.
If the icon next to the page URL is the letter “i”, meaning Info or Not secure, you’ll need further troubleshooting to fix the mixed-content errors.

This type of error can also occur when you’re manually adding HTTPS and SSL to your website, so we gathered all of the troubleshooting advice into a single Testing and solving the mixed-content error sub-section.
Manually moving to HTTPS
Although the manual move is more challenging, it is also more effective. It optimizes the whole process so you can address all the changes your website needs. There isn’t a significant technical difference between this and the plugin-based method, as both seek to create the same results. However, the manual method is more demanding because it requires small, focused changes to your website.
This method also requires the use of plugins, but the combination of manual and automatic edits is what makes this method a more efficient way to switch your site from HTTP to HTTPS. So let’s begin.
-
Updating the General Settings of your site
General settings that are important for this process are the Site and WordPress Addresses. Site Address is the URL visitors have to type to access your site’s frontend. Your WordPress Address is the location of your WordPress folders and files. Since you want the location of your files to be secure and to enable the visitors to access your secure URL, changing both addresses is the first step.
Navigate to Settings > General and update your WordPress and Site Address to HTTPS. Once you update them, don’t forget to click on Save Changes in the bottom left corner.

This action will change only two addresses. The URLs of your content (pages, posts, attachments…) will remain unchanged, so you need to take additional steps to update them.
Also, when you’re switching your site to HTTPS, it is important that both the search engines and site users access the right page. You will enable this by adding 301 (Moved Permanently) redirection to any insecure or no longer valid links.
-
Changing content links
The most important step in the HTTPS switching process is to update all the links inside your database. You can do this manually by executing MySQL queries or with the help of WordPress plugins.
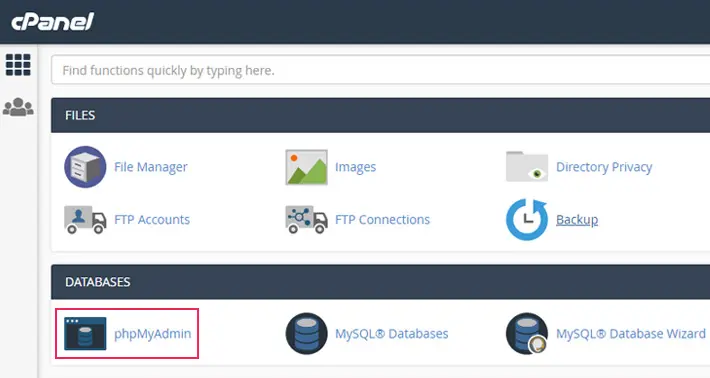
If you want to do it manually you will have to access your database. If you are using cPanel, navigate to Databases and click on phpMyAdmin.
If you aren’t using cPanel, consult with your hosting provider for guidance.
For the locally-hosted sites, we suggest using the XAMPP control panel, where you need to click on the Admin button next to MySQL.

Navigate to the left side of your phpMyAdmin dashboard and select a database by clicking on it.


Now, click on the SQL tab near the top of your browser window.

Before you proceed, make sure you backup your database, as any editing mistakes could be costly. Then, add the following code, while making sure to properly replace both URLs (without trailing slashes at the end). Click on the Go button, located in the lower right corner.
UPDATE wp_posts SET post_content = REPLACE (post_content, 'http://site-url.com', 'https://site-url.com');


When you get a green message near the top of your window stating X row(s) affected, you will know the change was successful.

The purpose of the code/query above is to change all instances of the http://site-url.com to https://site-url.com inside the content of all your posts. Similar codes can be created for changing the URLs found in custom fields for posts and users.
UPDATE wp_postmeta SET meta_value = replace(meta_value,'http://site-url.com','https://site-url.com');
UPDATE wp_usermeta SET meta_value = replace(meta_value, 'http://site-url.com','https://site-url.com');
The following code is optional and should be used cautiously.
UPDATE wp_posts SET guid = replace(guid, 'http://site-url.com', 'https://site-url.com');
Let’s elaborate why.
GUID is a column inside the wp_posts table and stands for Globally Unique Identifier. WordPress uses it when generating RSS feeds, as a constant that determines whether two posts are the same. For example, it will determine if one post was created from the other by changing the title, URL or parts of the content. This prevents your website from showing the same posts twice. If you change the GUIDs, all post duplicates will appear as new, separate posts and will be shown in your readers’ feed.
Therefore, it is strongly recommended not to change the GUID column. There are exceptions to this rule, such as switching domains or site development.
If you want to use plugins to change content links, keep in mind that these tools require slightly more tech-savviness compared to plugins like Really Simple SSL. These tools offer a more targeted edit.
In this article, we decided to include two of these laser-focused plugins – Velvet Blues Update URLs and Better Search Replace. You can use them separately or in combination.
You can find the Velvet Blues Update URLs plugin by navigating to Plugins > Add New. Enter a keyword and click on Install Now.

Navigate to Tools > Update URLs. In the Step 2 section, choose which URLs to update.

You can add Better Search and Replace plugin the same way.

When you install and activate the plugin, navigate to Tools > Better Search Replace and click on the Search/Replace tab.
Insert the HTTP:// and HTTPS:// version of your URL (or just HTTP:// and HTTPS://) in the Search for and Replace with fields, respectively. You also get to choose which database columns the search/replace query gets to run and get the option of a test run.

We’re almost done, but there are still some things you shouldn’t overlook if you want a safe and complete switch to HTTPS. These small updates will significantly improve your website’s performance. If they seem too challenging, you could find a developer to help you out.
-
Update your property on Google Search Console
Google Search Console offers tools that can greatly improve your site’s performance. Those tools can enhance your SEO ratings, help troubleshoot issues on mobile and produce crucial reports regarding the usage of your site (most viewed pages, keywords, countries of your site users, etc.).
To avoid lagging performance and incomplete reports, it is important to update your property after switching the site to HTTPS.
Navigate to the Google Search Console, choose a property type and insert your site’s URL.

You have to verify the ownership of the site/property. There are two property types: Domain and URL prefix. Domain type handles all of subdomains and HTTP and HTTPS site versions. However, it has only one verification method – DNS verification.
The URL prefix property type allows multiple verification methods that are easier to perform. However, it handles HTTP and HTTPS property separately.
Choose the property type best suited to your needs and level of knowledge.

-
Update your sitemap
A sitemap offers a more structured way for search engines to interpret your site. It is an XML file designed for search engine bots, rather than humans. That file lists the pages your site contains and recent changes to these pages. Using a sitemap, search engines and crawlers can easily crawl and index your site.
Therefore, if your site was changed to HTTPS, it is important to update your sitemap file and notify the Google Search Console about it. Some SEO plugins might update the file automatically, while others require creating the site map file once more.
After you create the new sitemap file, log in to Google Search Console. Click on Sitemaps and paste the URL of the new XML file to the Add a new sitemap bar.

-
Update site URL on Google Analytics
Google Analytics is the most popular web analytics service. It gathers and analyzes user activity data (e.g. bounce rate, number of sessions and its duration), website speed-related info (e.g. average page load time and average server response time), eCommerce-related data (e.g. number of transactions and revenue) and much more. If you want to keep receiving this data, it is important to update the site URL on Google Analytics after the SSL change.
To update the site URL, click on the Admin section and select Property Settings. Find the Default URL setting, click on the part of the URL noting the protocol and select https:// from the dropdown.

-
Update the URL in your CDN
CDN stands for content delivery network and it is an important factor for your website’s speed, especially for sites with high traffic rates. CDN, however, should not be confused with your hosting, as CDN should only be used for serving static site resources: CSS and JS stylesheets and images.
Thus, updating URL(s) in your CDN is also mandatory after switching to HTTPS protocol. As the process depends on the particular CDN, we suggest that you refer to your CDN provider for further instructions.
Solving common WordPress SSL errors
Even though the process of switching to HTTPS is quite straightforward, some SSL errors might occur. Luckily, in most cases, those errors aren’t difficult to solve. We put together a list of the more common issues that can arise, as well as a detailed set of instructions on how to solve them. As always, making a backup of your website beforehand is a good idea, and we advise you to do that before proceeding.
In this section, we will show you what to do if the icon next to your page URLs keeps displaying the letter “i”, which means Info or Not Secure. One of the most common SSL issues is when a WordPress site is showing as not secure despite having a valid SSL certificate. It means your website is experiencing so-called mixed content errors.
Mixed content errors happen when there are resources that are still loading over HTTP instead of HTTPS. You can have an SSL certificate enabled on your website but some resources like images and CSS and JS stylesheets can still be requested with their old URL with HTTP. Since these page assets are loaded over the HTTP protocol, they are impeding the website from being fully secure despite having a valid certificate. Because of this mixed content, users might get warnings that their connection is not fully secure.

Solving the mixed content errors manually can seem challenging, but the process can be broken down into three stages, which we will fully cover below. Make sure to clear the browser cache after each of the steps taken, to ensure you are seeing the latest version of your website. The same goes for the plugin cache if you are using a caching plugin.
The first step is to change the two WordPress URLs, meaning your WordPress address and your Site address. Simply put, the WordPress address is the location of your WordPress files and folders, while the Site address is the address a visitor has to type to see your website. In most cases, these two addresses will be the same.
To change the addresses from HTTP to HTTPS, log in to your admin dashboard and navigate to Settings > General. Then, change your WordPress and Site Address from HTTP to HTTPS protocol.

The next step requires you to change all the content links from HTTP to HTTPS. This can be done by writing queries and running them directly inside your database using PhpMyAdmin, but this requires extensive coding knowledge. So, we will show you a less demanding approach—using a database-altering plugin. An example of a database-altering plugin is the Better Search Replace plugin we mentioned earlier in the article.
After installing this plugin, navigate to Tools > Better Search Replace. From the Search/Replace tab, in the field named Search for, insert the HTTP version of your website URL. Then, in the field named Replace with, add the HTTPS version of your website URL. Make sure to insert your valid website URLs. Then, select all tables and press the Run Search/Replace button while making sure that the option Run as dry run? is checked.

If you perform a dry run, you will be able to see how many entries will be affected.

Afterward, you should repeat the process to change the content links from HTTP to HTTPS. Don’t forget to uncheck the Run as dry run? option this time so the changes are made. Then, re-check your website. If your site is listed as Secure that means the error is fixed.
However, if the status next to your website URL still shows the message Not secure, it is most likely that there are still leftover HTTP links within the files of your theme or plugins, making the site insecure.
You can find the list of leftover insecure links by inspecting the site within your browser’s developer console or by examining it on the Why no padlock website.
For the first option, view any page, right-click inside its content, and click on Inspect. You can also run this test by pressing F12 on your keyboard while you’re on the page.

Then, click on the Console tab. This tab shows the errors present on your website. Look specifically for the ones that contain the words Mixed Content.

Alternatively, you can paste your page URL to Why no Padlock, confirm you aren’t a robot, click on Test Page and wait a couple of moments for the error report.

When you create the list of unsecured links, you can update them. These HTTP links could be located almost anywhere, including your posts, theme files, and the plugins you are using. For the most part, these errors should already be solved with the use of plugins. However, hard-coded links coming from HTTP sites may be trickier to change.
To solve this issue, you need to locate these links first. While browser-inspecting your page, click on the three vertical dots in the bottom-left corner of the screen.

Click to open the Search tab.

To see the content of the Search tab, drag it upwards.

Insert the insecure link in the search bar, press Enter on your keyboard and click on the result(s) to review the code.

Edit the hardcoded link using a text editor.
In case this link is part of the theme or plugins, consult with its authors for additional assistance. Ask your theme authors first by carefully explaining the issue and sending the report you got on Why No Padlock.
If the mixed content issue still appears after the help from your theme authors, it means that the issue is likely due to a plugin you installed. To pinpoint the faulty one, you will need to deactivate all your plugins, one by one, while checking your site. After deactivating a plugin, clear the cache and review your website URL status. If it changes from Site not secure to Secure, it means that the plugin you just deactivated is the culprit. When you’ve determined which specific plugin caused the issue, consult its authors for help. Explain all the troubleshooting steps you tried up to that point and provide them with the mixed content report for reference as well.
Insecure links within theme options or widgets must be removed. If you have insecure links within theme options, check the theme documentation for specific instructions. When removing insecure links from the widgets (Appearance > Widgets), pay special attention to text widgets, which may contain insecure links added using HTML code.

Update the insecure links one at a time, always making sure to clear/flush your cache and review the pages afterward.
Additionally, we will include instructions on how to solve the same errors using Elementor. This page builder makes this process much easier.
Start by updating your site address URL via the Elementor options. Navigate to Elementor > Tools and click on the Replace URL tab. Insert your old (with http://) and new site address (with https://) and click on the Replace URL button.

Continue by recreating your CSS files. Navigate to Elementor > Tools and click on the General tab. As the final step, click on the Regenerate Files button.

Another error you might encounter is the NET::ERR_CERT_INVALID error. Its name relates to the message shown in Google Chrome when it occurs. Depending on the browser, the content of the error messages can vary. But they warn about the same issue for the most part—that the connection isn’t private and users can be a target of attackers.

The error message is displayed when the browser doesn’t accept a website’s SSL certificate. There could be quite a few reasons for it, but the most likely are the following:
-
The SSL certificate has expired
-
The SSL certificate is issued for a different domain or subdomain
-
The authority that issued the certificate isn’t recognized as trustworthy by the browser
To solve the error, you will need to contact your SSL certificate provider. If the certificate is included in your hosting package and installed by your hosting provider, we highly advise that you contact them.
However, before contacting professional support, you can also test for some of the less obvious reasons. This might sort the issue out or it could help you gather comprehensive information to help your hosting provider. These tests include changing the type of your internet connection, updating your Chrome browser and PC, resetting your Chrome settings, and updating the date and time of your PC.
We will cover all the tests mentioned above in greater detail. Please note that for the changes to take effect, you need to restart your device after running each test.
If you are using a public WiFi network, disconnect from it and try using a more stable and secure connection such as a private LAN connection, for example.
Having an outdated browser version could also be one of the reasons for the error. Additionally, frequently updating your Windows OS will ensure that you don’t have issues with Google Chrome, in terms of performance or otherwise.
To update the Chrome browser, navigate to chrome://settings/help in a new tab. Chrome will check your current version and whether a newer version is available. If a newer version exists, it will perform the update process automatically. When it finishes updating, you will be notified to relaunch the browser by pressing the Relaunch button, which will finish the update process.

Additionally, restoring Chrome settings to their default state might prove useful in solving this error. To do so, click on the three dots in the top right corner of your screen and then click on the Settings option.

Scroll to the bottom of the window that opens and press the Advanced button.

Scroll once more to the bottom until you reach the section called Reset and clean up. Within it, find and click on the Restore settings to their original defaults option.

Then confirm your choice by pressing the Reset settings button in the popup that opens.

You can also update your Windows OS. To do this, click on the Start button and search for the term update by typing it in. In the matching results, find and click on Check for updates.

A new window will open, called Windows Update. From there, click on the Check for updates button.

If any new updates are available, your PC will download and install them. However, this process can take some time, so we advise you to have patience and run the update during your off-hours.
Another potential cause of SSL issues is having the incorrect date and time set on your computer. This can “trick” your browser into believing that your SSL certificate has expired. Therefore, to avoid problems, you should set the correct date and time on your PC. You can do this by right-clicking on the date and time settings in the bottom right corner of your screen. Then choose the Adjust date/time option from the menu that opens.

In the following window, locate the option named Set time automatically and switch it to On. Then, close the window.

Keep in mind you should check if the issue persists after each of the suggested tests. If it still appears, contact your hosting or SSL certificate provider about renewing or reinstalling your SSL certificate.
Status codes, like the 500 Internal Server Error or the 403 Forbidden Error, indicate if an HTTP request was completed or not. These status codes are 3-digit numbers, divided into five categories based on the number they start with. The ones beginning with a 3 relate to redirection. Specifically, the 301 status code means that the page you are looking for was moved permanently to a different location.
You should add 301 redirects to your site when changing domains or moving to HTTPS. However, WordPress doesn’t automatically redirect HTTP requests to HTTPS after enabling SSL. Such behavior has to be forced by using a plugin or inserting code. The Really Simple SSL plugin can enable 301 redirects, but you can also do it by editing the .htaccess file using FTP.
To edit the .htaccess file, connect to your server using your FTP credentials and navigate to your root WordPress directory, often called public_html. Look for the file named .htaccess within it. Make sure to enable the options for viewing hidden files within your FTP client, to be able to find the file. Once you locate it, right-click on it, and select the View/Edit option in the dropdown.

Open the file using a text editor and, right after the #END WordPress line, add the code shown below.
<IfModule mod_rewrite.c>
RewriteEngine On
RewriteCond %{HTTPS} off
RewriteRule ^(.*)$ https://%{HTTP_HOST}%{REQUEST_URI} [L,R=301]
</IfModule>

If your hosting provider uses Nginx web servers, add this code in your nginx.conf file instead.
server {
listen 80;
server_name example.com www.example.com;
return 301 https://example.com$request_uri;
}
Important note: replace all the instances of example.com in the code with your actual site URL.
Save the changes made to the file and upload it back to the server to overwrite the current .htaccess file.
Even if you have an SSL certificate, it won’t automatically be active in your WordPress admin dashboard. To force the security protocol onto the admin area, you need to make a small edit inside your wp-config.php file via FTP.
Connect to your server using your FTP credentials and navigate to your root WordPress directory, usually called public_html. Locate and right-click on the wp-config.php file. Then, choose the View/Edit option in the dropdown menu.

Open the file using any text editor and scroll down to the space directly above the /* That’s all, stop editing! Happy blogging. */ line, then insert the code given below in that space.
define('FORCE_SSL_ADMIN', true);

In some cases, simply by inserting that line of code into your wp-config.php file, you might get a Too Many Redirects error. In other words, it means that your website is put in an infinite redirection loop.
To solve it, you need to add the following line directly below the one you just added:
if (strpos($_SERVER['HTTP_X_FORWARDED_PROTO'], 'https') !== false)
$_SERVER['HTTPS']='on';

After adding both pieces of code, save the changes made to the file and upload it back to the server, thus overriding the wp-config.php file found on the server.
This solution will work for all websites powered by an Apache server. To solve the same error on NGINX servers, you will need to add the following code to your nginx.conf file.
server {
listen 80;
server_name _;
if ($http_x_forwarded_proto = 'http'){
return 301 https://$host$request_uri;
}
}
If you are not sure what server configuration your hosting provider is using, you can reach out to them and ask before attempting this step. And if the error persists after this, you should attempt one of the troubleshooting steps for the Too Many Redirects error.
Final thoughts
If you followed these steps, your website should be up and running with its new HTTPS protocol. If any issues arise later on, this guide should help you solve them quickly and efficiently. Don’t forget to run regular checks and pay attention to your website’s security, as cyber safety is no longer just a matter of preventing attacks – it is also an important factor in your site’s ranking and credibility.
