How to Set Up Free Shipping in WooCommerce

Shipping is an important aspect of any eCommerce store since it has the potential to make or break the customers’ decision to make their purchase. Namely, according to some free shipping statistics, a whopping 73% of people are more likely to buy an item if it comes with free shipping instead of shipping charges. Therefore, including free shipping into your WooCommerce store can be a great strategy to boost the success of your eCommerce business.
In this article, we will talk about all you need to know about WooCommerce free shipping. This includes everything from its benefits and best free shipping options to the specific steps you need to take to set up free shipping on your WooCommerce-powered website.
We will cover:
Free shipping means your customers won’t have to incur any shipping-related costs, i.e. the costs related to getting the purchased goods from the retailer to the customer via a proprietary or a third-party carrier service. It means they won’t pay for anything other than the price of the goods they purchased.
Needless to say, this is an attractive and convenient way to capture the attention of customers, get them to buy more, and keep the old ones coming. Also, by allowing free shipping on your online store, you can help reduce cart abandonment in general and increase your chances of selling more products. It’s quite simple – no one likes additional charges when buying products. So, once potential customers see that the products they’re interested in have no extra charges, they’re more likely to go for that purchase.
There are also other ways in which you can use free shipping to your advantage. For example, you can set free shipping with extended delivery for regions that are a significant distance away. This can lower the need to ship items too quickly and can even allow you to find agents who offer a smaller price for their shipping services. Or, you can offer free shipping only to those customers who add a specific amount of items to their cart (more on that later). This will help bring additional profit to your online store and ensure that you don’t lose any money in the process.
eCommerce WordPress Themes
View Collection


While free shipping can be a great way to get more customers to buy more products from your store, it means you have to pay the shipping costs yourself, which can be expensive if you don’t have a solid shipping strategy in place. We are going to list some of the best ways to implement free shipping to your WooCommerce store and balance out your expenses at the same time. Of course, which strategy you will go for depends on your specific circumstances. Check out some of the available options:
-
Free shipping on all product orders – this is, by far, the simplest way to offer free shipping to customers. However, it comes at the risk of impacting your profit, which means you need to measure the overall effects it could have on your income first. For example, if your items have small dimensions or don’t have much weight in general, you may consider adding free shipping on all of them.
-
Shipping included in the product price – this method is used by many retailers. Basically, you take the shipping price into account and then increase the price of your product to some extent to accommodate your expenses. You can also measure the sales volume you would need to balance out your profits and calculate your product price accordingly.
-
Minimum order free shipping – as we’ve already briefly mentioned above, free shipping with the minimum order means your customers will have to meet certain order conditions (i.e. add a certain number of products to the cart until they reach a certain price) to get access to free shipping. By doing so, you can get them to buy more products, which can only boost your profit and balance out your shipping expenses as a result.
-
Free shipping to specific countries – as certain long-distance locations are more expensive in terms of shipping, you can limit your free shipping offers to local customers only. You can either offer free shipping to customers from your country and/or to those from other neighboring countries.
-
Free shipping on specific products – this is an excellent strategy you can use on items that aren’t that popular (or any items you wish to attract attention to) to increase their chances of being purchased. Of course, when doing so, you have to take profit margins into account so as not to suffer any losses.
-
Free shipping on combined products – this is another great strategy that can help boost your purchases. It’s pretty simple – you just need to offer free shipping for a matching set of products. For example, if your customers want to buy a laptop, they will get free shipping if they also buy a laptop case.
All in all, there are many ways in which you can implement free shipping into your WooCommerce store. You just have to make sure to choose the method that best benefits both you and your customers.
We’ve established that adding free shipping to your products can reduce the overall cart abandonment on your WooCommerce store. It can encourage your customers to complete their purchase as there will be no extra costs aside from the items they plan to buy.
Luckily, setting up free shipping in WooCommerce is extremely easy to do. We’re going to show you how to set up free shipping on all products, on a single product, as well as for orders over a set amount and even for WooCommerce coupons.
Setting up Free Shipping on All Products
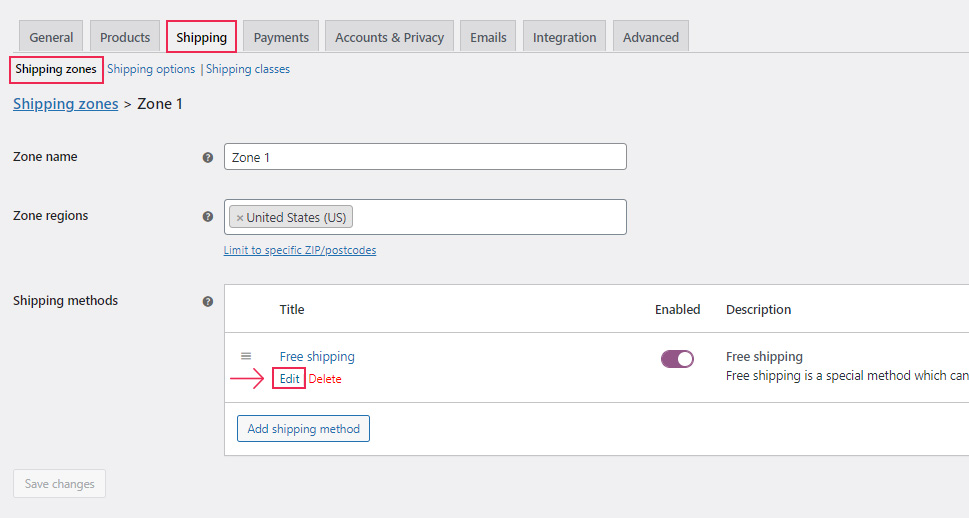
To assign free shipping to all products, head to WooCommerce >> Settings. Then, choose the Shipping >> Shipping Zones tab.
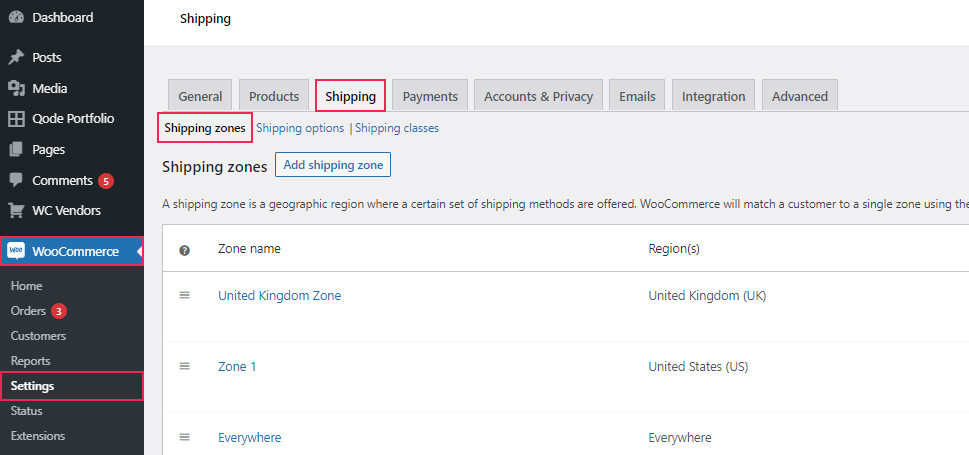
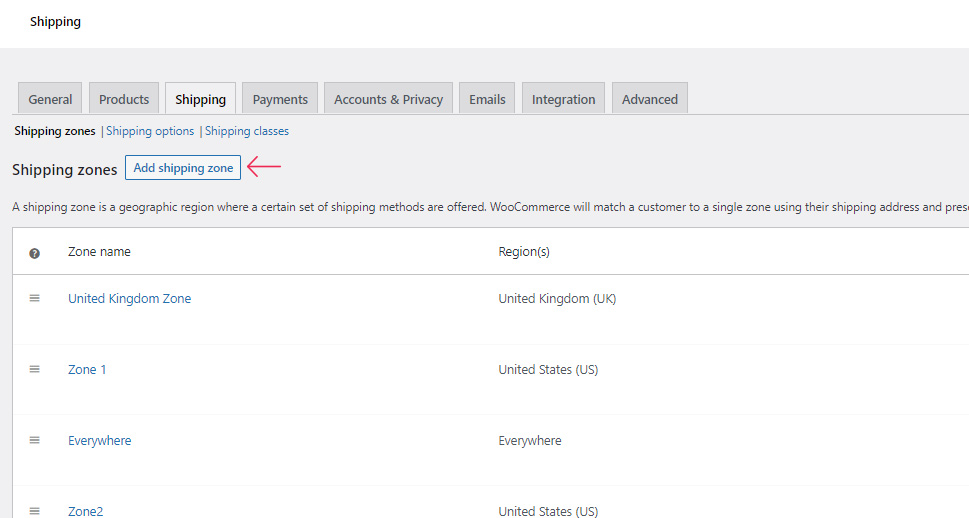
Once there, click on the Add shipping zone button to add a new shipping zone. Or, you can set up free shipping for the already existing zone, if it works for you, by clicking on Edit (located right below the zone name).
You then need to insert the zone name, zone regions, and finally, select the preferred shipping method.
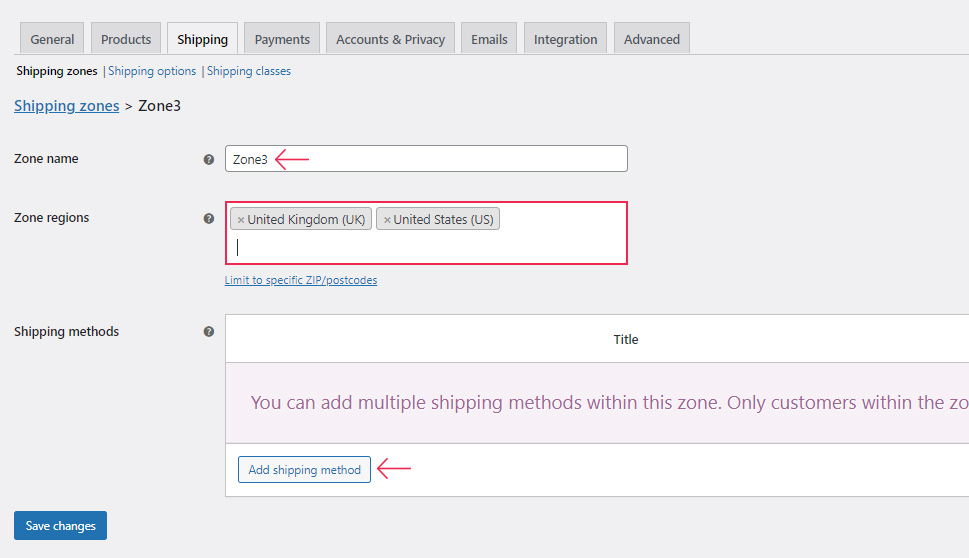
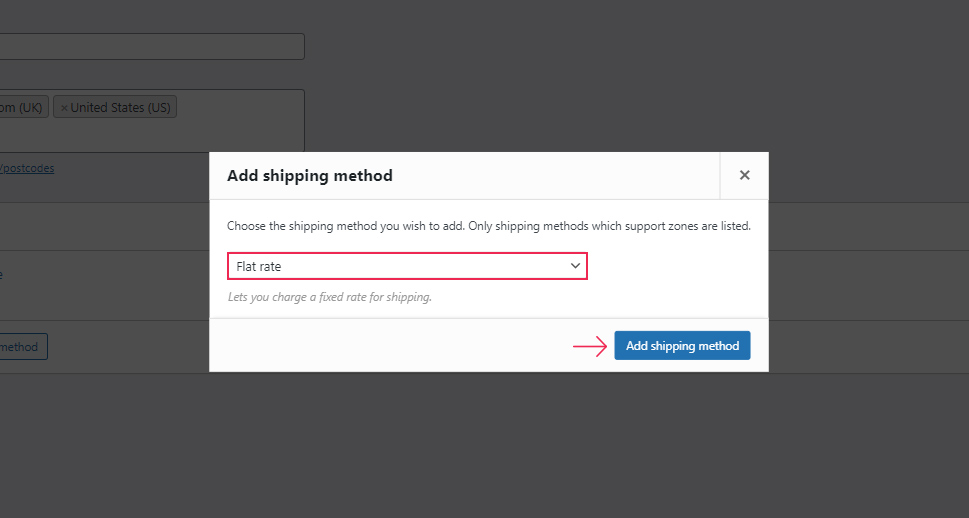
For the latter, you should click on the button called “Add shipping method”. Then, simply choose the “Free shipping” option from the popup menu.
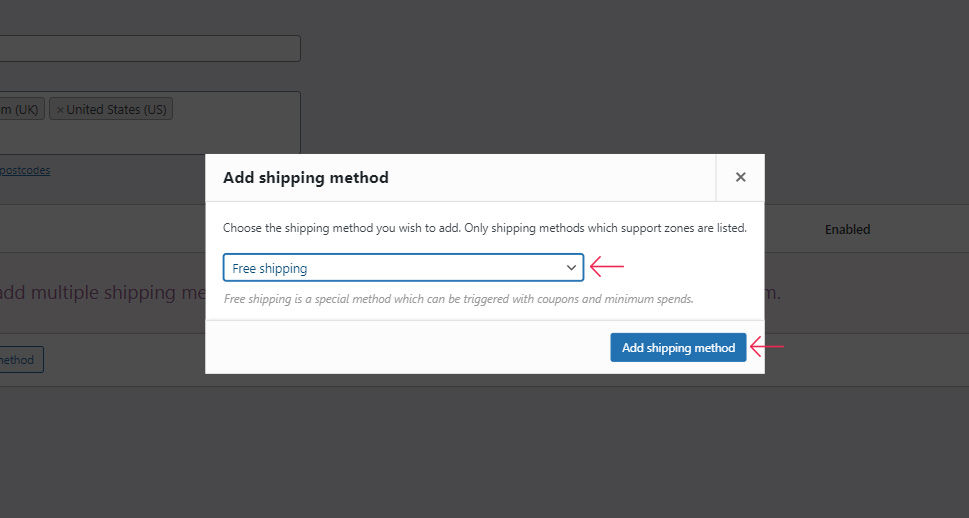
Hit the “Add shipping method” button and then save your changes.
By doing so, the customers from the zone you’ve selected will get access to the free shipping method for all the products they purchase.
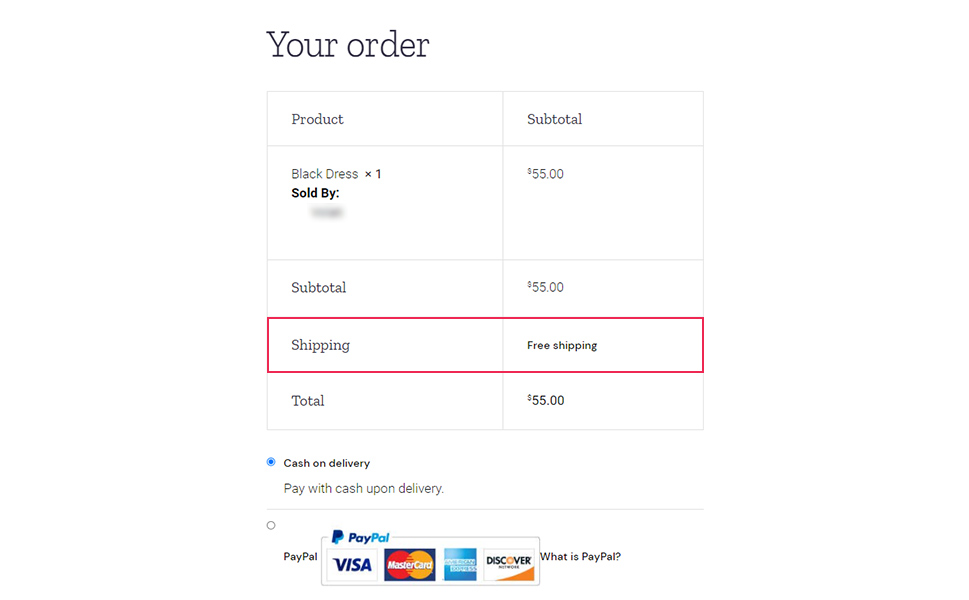
Here’s the end result on the Checkout page:
Setting up Free Shipping on a Single Product
Now, WooCommerce doesn’t come with the ability to assign free shipping to a single product by default. So, if you want to do this on your WooCommerce store, you have to either install a plugin or use the default flat rate shipping method first and then add/assign different shipping classes to your product/s of choice. The latter method (that includes assigning the shipping classes) can be particularly useful if you want to assign different types of shipping to products with different categories.
We will show you all the steps required to assign free shipping to single products with the help of the flat rate/shipping class method.
First things first, you need to create a shipping class for a specific product. Say that you want to create different classes for products that belong to different categories. For example, you may want to apply free shipping to products that are inexpensive to ship, while still applying shipping charges to any other product category (handmade bags, for example).
To demonstrate this properly, we will create two different shipping classes – one for handmade bags, the other for free shipping.
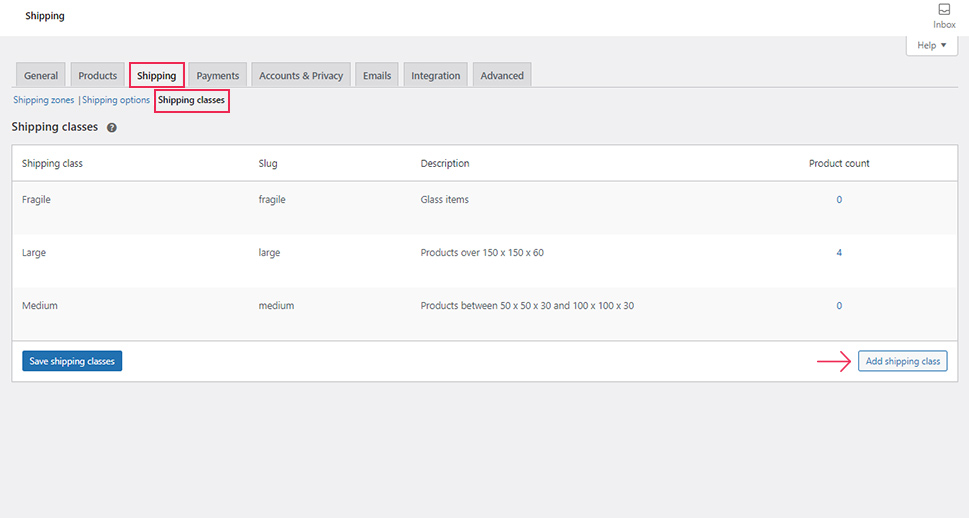
Select the Shipping tab once again in your WooCommerce settings. Then, choose the Shipping classes tab and click on “Add shipping class”.
You will be able to assign a shipping class name, slug, and a short description.
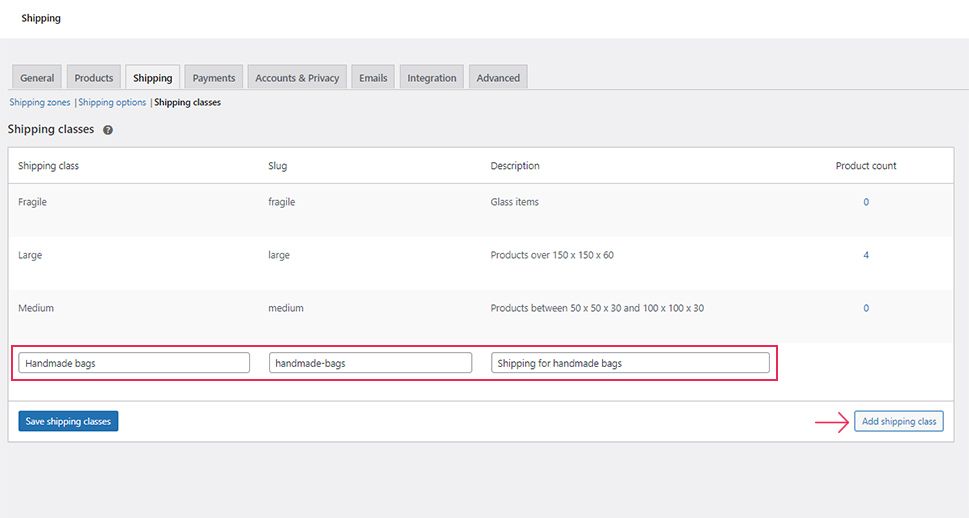
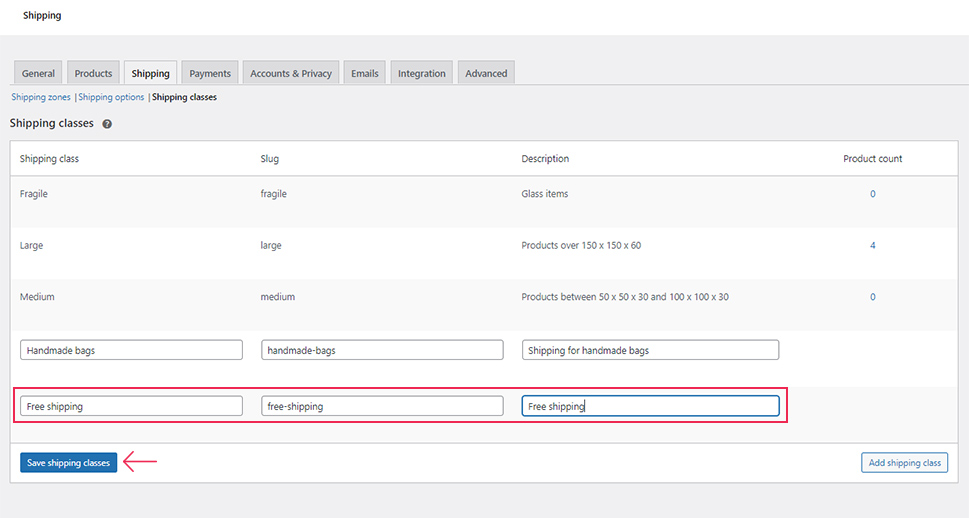
Hit the “Save shipping classes” button once you’re done with adding your class/es.
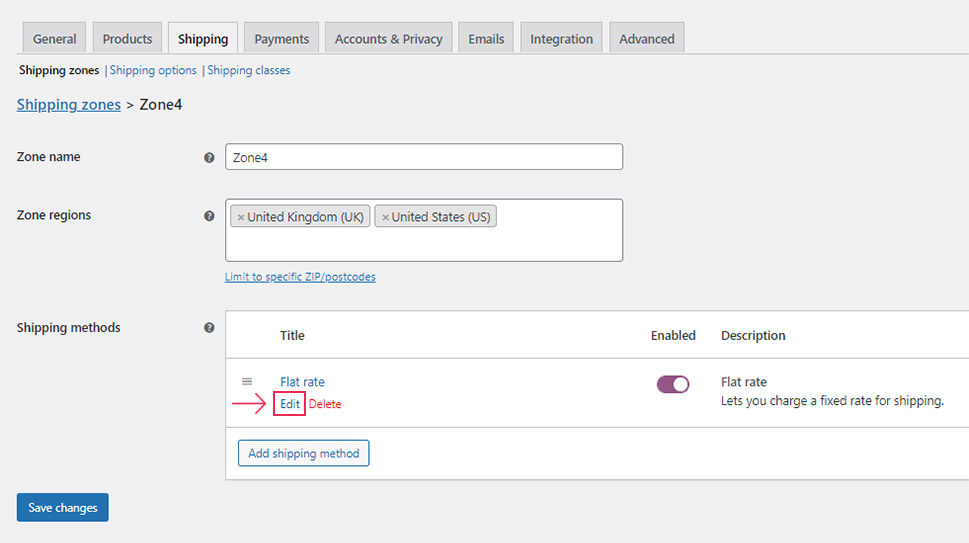
Next, you should set the shipping rates in your shipping zones. Hit the Shipping zones tab and select (or create) your desired shipping zone.
Then, you need to assign the Flat rate to your shipping method. You can do this by hitting the Add shipping method button and selecting Flat rate, then clicking on “Add shipping method”.
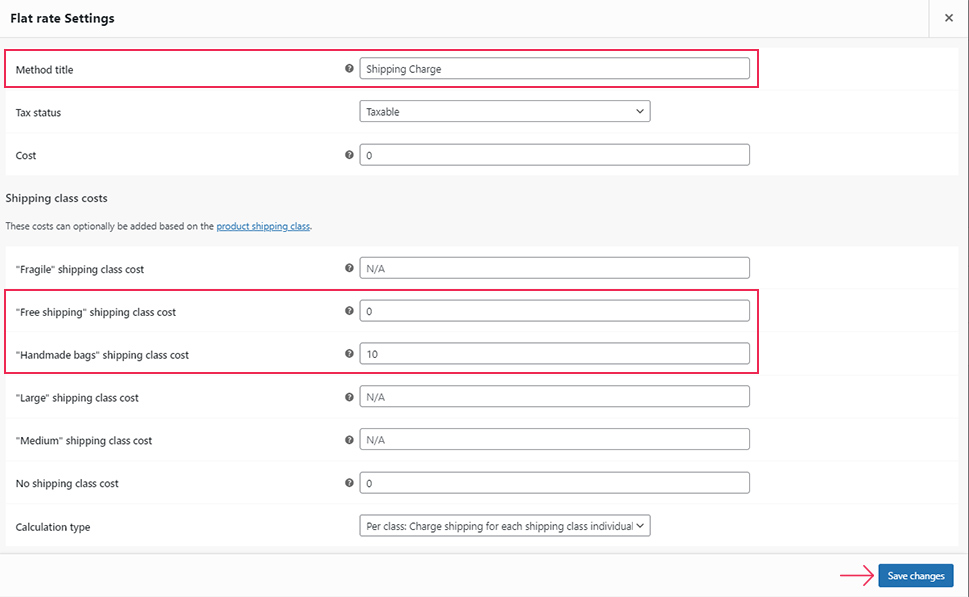
Click the Edit button to configure the flat rate settings. This will open a new window allowing you to customize your title, tax status, costs, and so on.
We’ve changed our “Flat rate” title to “Shipping Charge”. Also, we’ve entered the value 0 for the Free Shipping class cost and value 10 for the Handmade Bags class cost.
Click on Save Changes when you’re done.
Finally, you can assign specific shipping classes to your product/s of choice.
Go to Products >> All Products and hit the Edit button located below the product you wish to assign the free shipping class to.
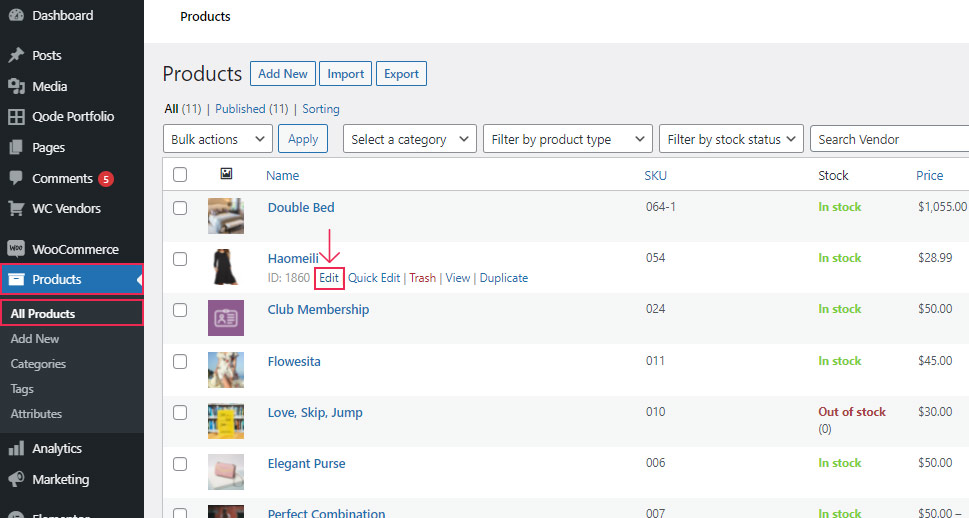
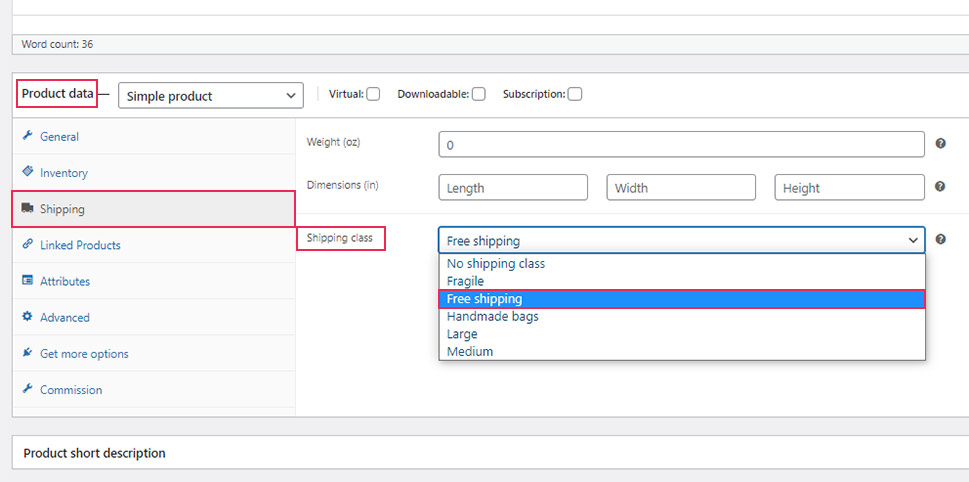
Find the Product data metabox, expand it and click on the Shipping tab. Then, simply choose “Free Shipping” for your Shipping class.
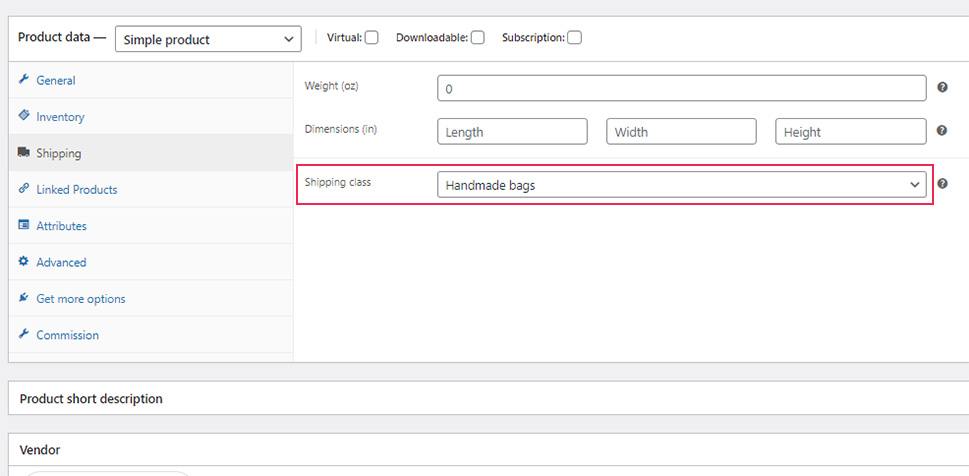
We’ve assigned the “Handmade Bags” shipping class to a different product (that falls under the handmade bags category), which means this product will include certain shipping fees, unlike the former product which will have free shipping.
Make sure to hit the Update button for all the changes to take effect.
Another way in which you can add free shipping to a single product is to use the help of a shipping plugin. While there are great shipping plugins for WooCommerce out there that will be able to help you out with this task, we recommend using the popular WooCommerce Advanced Free Shipping plugin as it is specifically made to add free shipping options on single products.
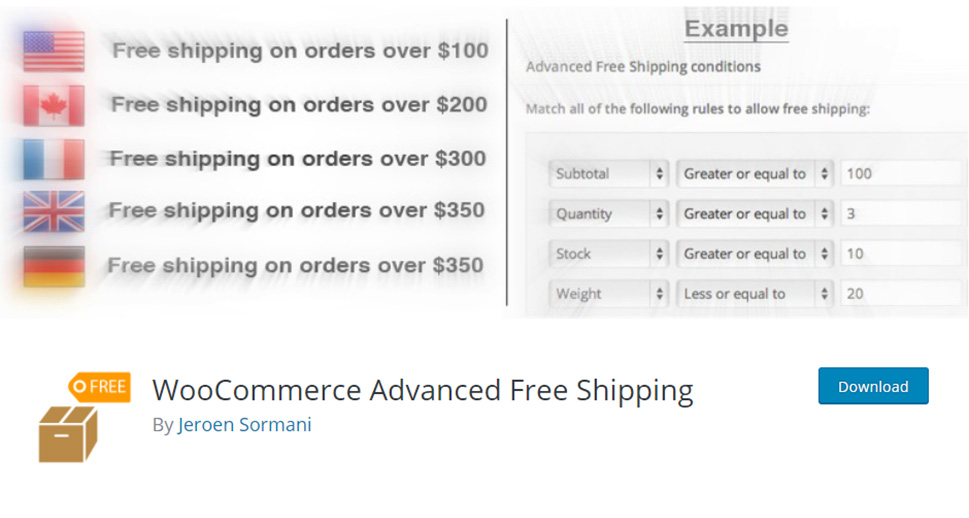
In addition, you will be able to determine your own rules that will indicate when and under which circumstances free shipping will become available to customers. You will get to easily set up a free shipping rate for multiple user roles, set many default shipping conditions according to quantity, country, zip code, category, weight, volume, value, etc.
Setting Up Free Shipping for Orders with a Minimum Amount
To add free shipping for a specific order value, you need to choose the shipping zone first. Once again, you can add your own shipping zone if you don’t have one already. To do this, go to the Shipping zones tab (located in WooCommerce >> Settings >> Shipping) and hit the Add shipping zone button.
Then, click on Edit under the free shipping method (that you’ve previously set up) and then enter your title in the Title field. We’ve named ours “free shipping with a minimum order amount”.
Next, in the “Free shipping requires…” field, choose the option called “A minimum order amount”.
Then, simply enter the minimum amount number that your customers will need to spend to get to use the free shipping option.
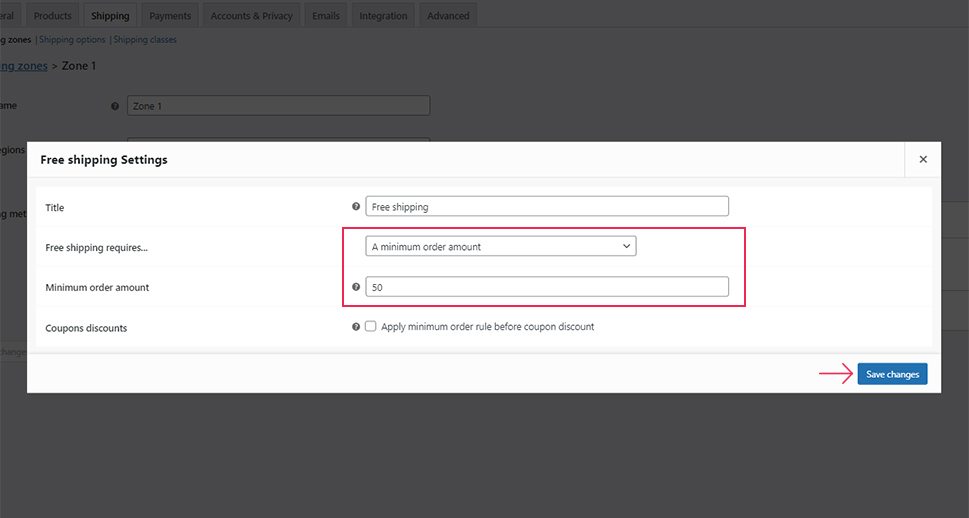
Hit the Save Changes button when you’re done and that’s it. Now, your customers will have access to free shipping once they spend the minimum order amount you’ve set.
Setting Up Free Shipping in WooCommerce Using Coupons
Adding coupons to your WooCommerce store is another great way to attract the attention of potential customers. You can amplify the effectiveness of coupons even further by offering free shipping to go along with them.
Before you begin, you need to go to WooCommerce >> Settings >> General. Once there, make sure to mark the checkbox named “Enable the use of coupon codes”.

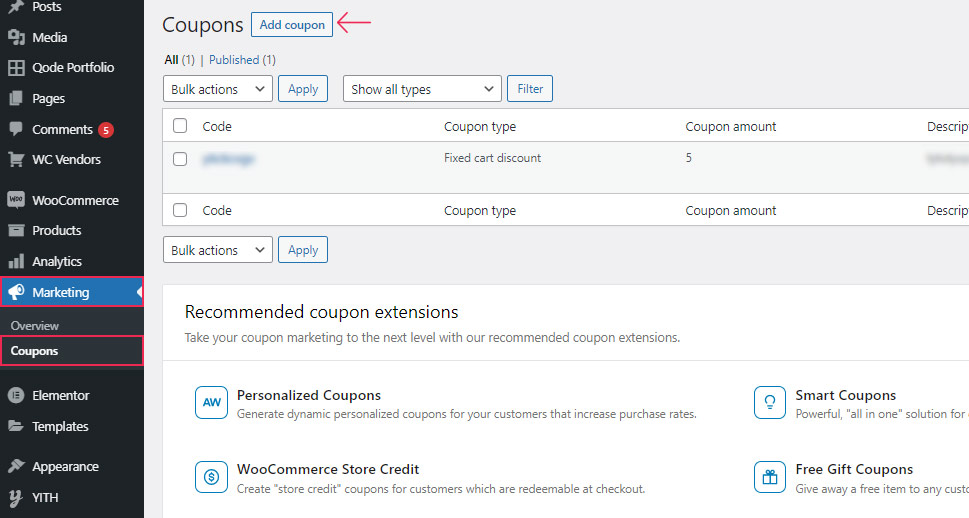
Then you can proceed to add a new coupon by going to Marketing >> Coupons and hitting the Add Coupon button.
For more information, we suggest that you check out our article on how to create and schedule WooCommerce coupons.
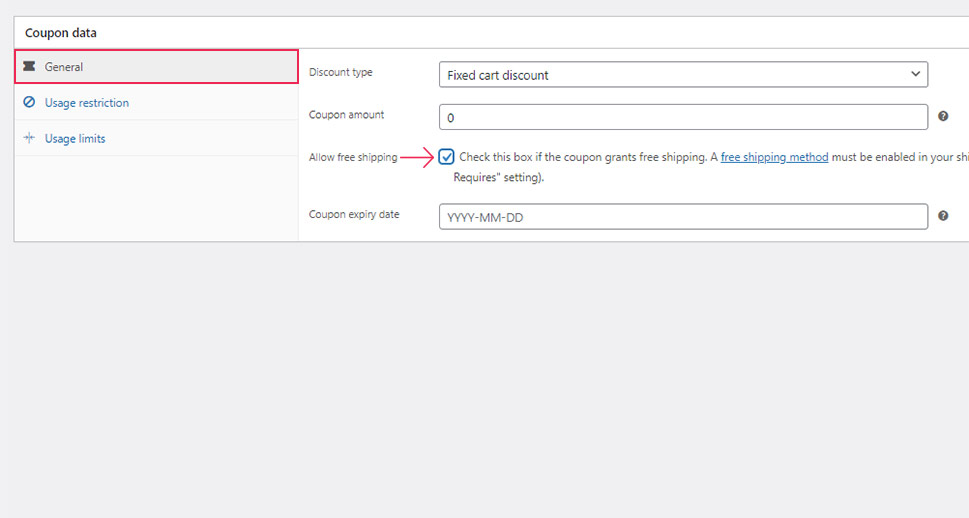
To set free shipping for your coupon, you need to access the General tab and make sure that the “Allow free shipping” checkbox is selected.
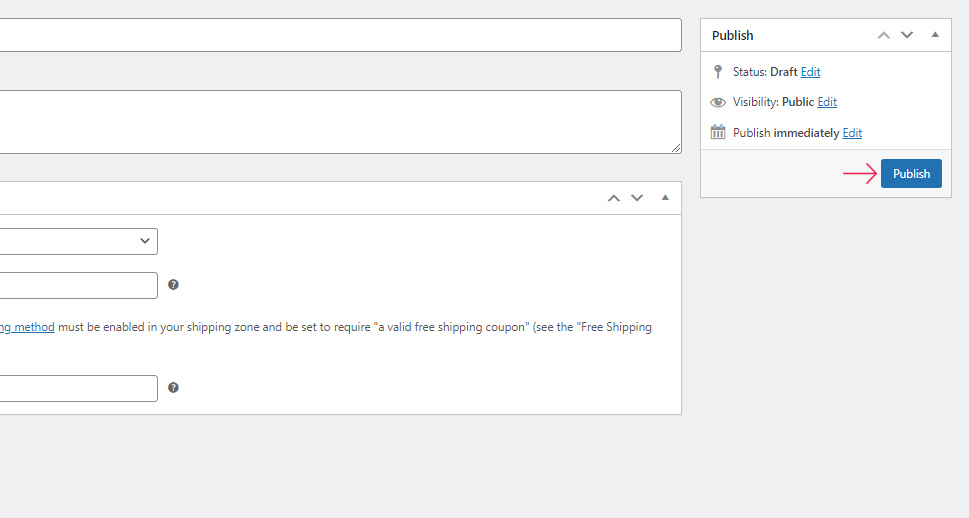
Hit the Publish/Update button when you’re done and that’s it – you’ve added free shipping to your coupon.
Conclusion
Free shipping is an excellent way to encourage your customers to buy products from your online shop. It can help reduce cart abandonment, boost your sales, and bring more success to your WooCommerce store as a whole. Luckily, WooCommerce allows you to incorporate this useful strategy into your online store in various ways. You will be able to set up free shipping on single and all products, easily set free shipping for orders with a minimum amount, and even enable free shipping on your coupons. You just need to follow our instructions carefully, and you will be all set in no time.
