How to Add Image Credits in WordPress

With image plagiarism being a real and frequent internet problem in the past years, proper image crediting has become more important than ever. Just like you would protect your image property by, say, inserting image watermarks to your site, adding image credits to pictures that don’t belong to you is just as, if not even more, necessary nowadays. By doing so, not only do you give well-deserved shout-outs to their legitimate owners, but you also protect yourself from running into any potential legal troubles.
This time around, we’ve decided to explore the topic of image credits and talk about how to properly add them to your WordPress website. In addition, we will explain further why you should include credits on images in the first place, as well as mention some of the potential issues you can run into if you don’t.
Stay tuned as we cover:
Qode Themes: Top Picks
View Collection


When it comes to images that are being put up on the web, all of them have copyright protection. In other words, you can’t use images created by other respective owners unless they give you their approval for it. And this applies to all images – no matter if they have visible copyright announcements set in place or not.
Now, even though many image owners allow their work to be used without giving any credit, a lot of them still demand that you use their images under certain conditions only. This usually applies to pictures under the creative commons (cc) license, which means you are required to provide appropriate image credits where needed, i.e. the name of the creator. Sometimes you should also insert specific links that usually lead back to the original image source. In that case, you should make sure to comply with their requests not only to respect the copyright law itself but also to do so out of respect for all their creative work and efforts. In that way, you avoid running into any legal issues with these image owners and also remain considerate by giving attribution where it’s required.
So, long story short, you should always look whether the original image creators oblige you to add credits when using their images. By doing so, you can avoid facing some grave consequences, like being sued for violating copyright laws and losing money and even your brand reputation in the process.
Thanks to the highly flexible Gutenberg block editor, adding image credits on your WordPress site is quite simple. In other words, you don‘t have to install any plugin to do this. Using the built-in image block functionality that comes with Gutenberg will be more than enough.
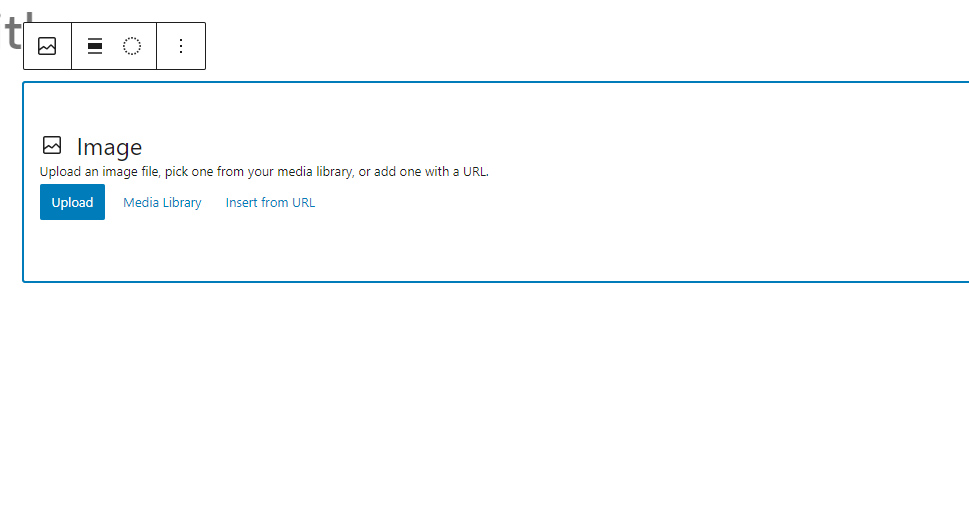
After you head to the desired page or post edit, you need to add your image to it first. You can easily do this by hitting the (+) (“Add block”) button and finding an image block.

Then, click on the Upload button and add the image you want. You can either use the image from your computer or add the one that’s already located in the media library.
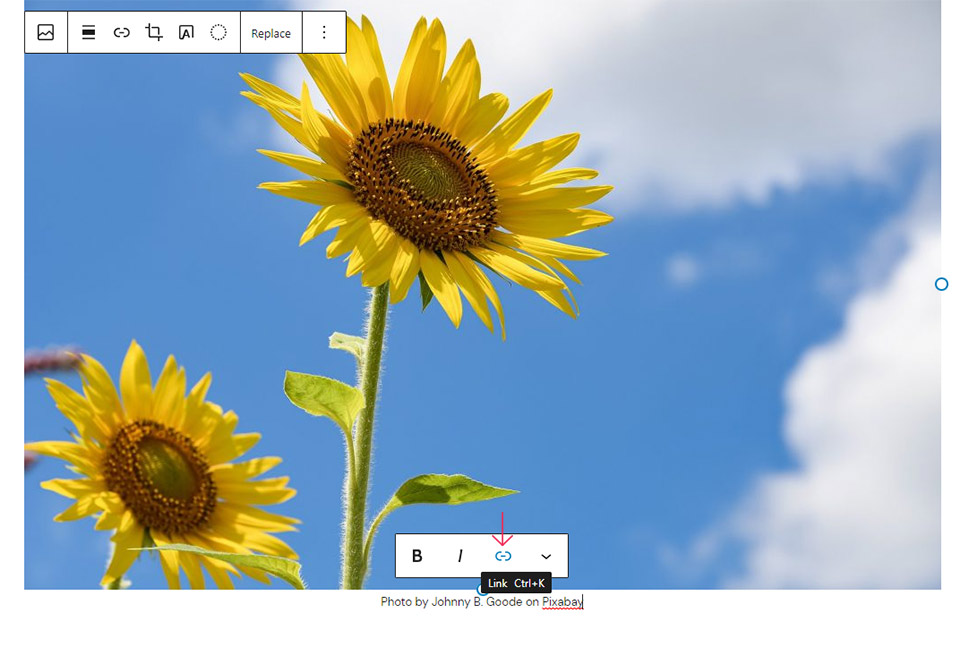
Right after inserting your image, you will see that it instantly shows up in your page/post editor. Underneath this image, you will be able to see the text called “Add caption”. You can use this caption to add the appropriate photo credit to your image.

Simply insert the credit text (located in the caption field) and see if the image owner also requires you to add a link that leads to the original source. If yes, you should include that in your caption as well by using the “Link” button.
And that’s it. Just make sure to hit the Update/Publish button after you are finished with adding your image credit and editing the rest of the page/post.
If an image does not have licensing or credit information, then more often than not, this means that you can’t add this image to your site. Credit and licensing information on websites that contain downloadable images are typically available on the download page of the image itself. Oftentimes, the owners of these images expect users to leave proper credit and/or add a link back to the original source.
That being said, there are also many great stock photo sites you can use to find all sorts of images that you will be allowed to use completely for free, with no attribution required. For example, Pixabay is one such website that has a license that allows you to use and modify its images completely for free. However, even though attribution is not necessary, it is still more than welcome.
You can see that the license and credit information on Pixabay is located right below the download button. In addition, you can click on the link called “Pixabay License” to learn more about the license information itself.

Finally, even though there are certainly plenty of great stock sites out there, finding a photo that will best fit with the subject of your content and its overall tone and style can be a challenging and arduous process. Still, you can greatly speed things up by using a plugin for finding stock photos. Many of these plugins will allow you to find photos directly from your dashboard.
In Conclusion
Images are always a great way to enhance the visual appearance of your site and capture the attention of your visitors. That being said, you can’t always put up any image that’s available on the web. With constant plagiarism and legal issues that threaten website owners left and right, giving credit where that credit is due has become more important than ever. Luckily, adding image credits in WordPress is easy as it can get thanks to the practical Gutenberg image block. Just follow the instructions we shared with you above, and you’ll be able to quickly add credits to any picture using the image block’s “Add caption” option.
And one final note before we go – no matter what website you end up using images from, make sure to always read the license information carefully to see whether adding proper credits is a requirement or just a welcome act of appreciation. By doing so, you can only prevent your website from running into any legal issues that have the potential to hurt your business and brand reputation in the long run.
