How to Add a Search Bar to Your WordPress Menu

There is no overestimating the importance of a search function for your website. Even if your website is remarkably easy to navigate, your visitors might still have a little trouble finding what they want. It’s up to you to give them a hand. And you can do it if you add a search bar to your WordPress menu.
WordPress itself has a default search functionality. However, you may be dissatisfied with it, or you might want to include functionalities it doesn’t come with.
A functional search bar is a feature that’s often integrated in themes. This includes our own premium WordPress themes. For the purposes of this article, we’ll be using the Bridge theme to demonstrate how to add a search bar to your site. However, please note that the options for adding a search bar may vary, depending on the theme you’re using. And in case you’re not using one of our themes at all, we’ll also cover how to add a search bar to your site using a plugin. Here’s what we’ll cover:
Good search functionality is one of the pillars of good user experience. Only a few things are more annoying for visitors than failing to find what they’re looking for, quickly and easily.
There’s a lot that can be done to improve the search. For instance, you can add live Ajax search for a faster, interactive search experience. You should certainly consider adding the autocomplete search feature, too. If you’re running an eCommerce website, you can set up the search filters for your products. Finally, you can even completely remove the search feature from your WordPress website.
But in terms of improving the usability and navigational experience of your website, you can also consider the best locations for placing your search bar.
By default, since the search bar is a widget, WordPress only allows you to add it to your widget-ready areas. These are dependent on the theme you’re using and you’re limited by those options, unless you know how to make custom widget areas.
An excellent location for the search bar is the navigation menu. Search is, after all, an important part of the website navigation, and placing it in the menu is a natural choice and a logical place where your visitors will look. The navigation menu is located at the top of the page, and the users will be able to find the search easily and instantly, which will, in turn, increase engagement and reduce the bounce rate.
If you feel like your website can benefit from placing the search bar to your WordPress menu, read along to discover two ways to do it.
Adding a search bar to your website using Bridge is very easy.
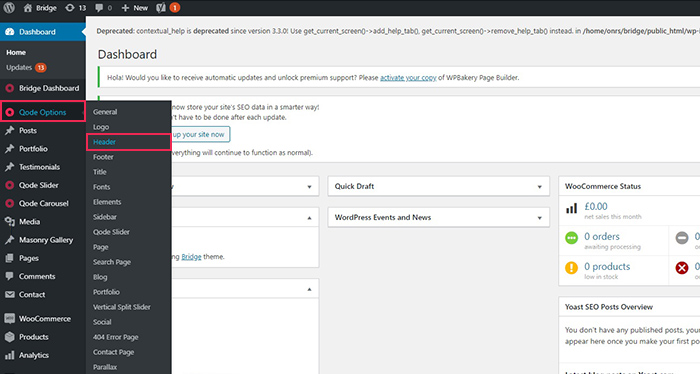
First navigate to Qode Options > Header.
Once you have found the Header screen, click the Qode Search button in the bottom bar, and you will be taken to the search switch. You will need to enable it.
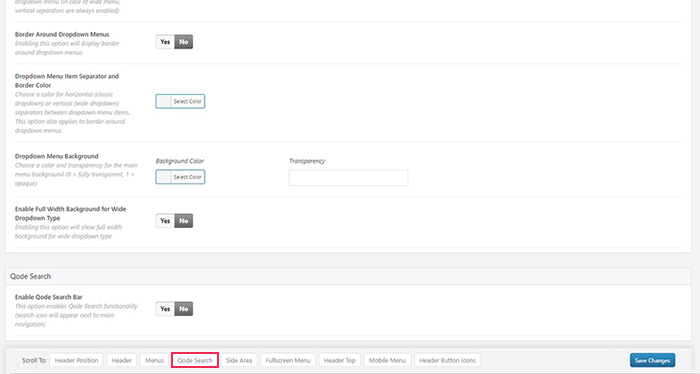
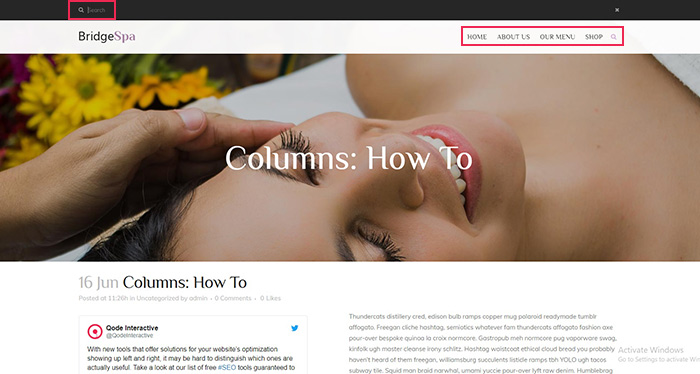
Having enabled the search bar, all you need to do is Save your changes. Now, when you visit your site from the frontend, you will see the search icon in the header. Clicking on it will open the search bar at the top.
We also have a video tutorial with detailed instructions on how to easily add a search bar to the menu of our Bridge theme, as well as how to configure it to match your website design and functionality preferences. Check it out below.
As you can see, in just a few short steps, you will have helped your visitors sort through your content and find what they were looking for.
In case your theme doesn’t come with an inbuilt search functionality, adding a search bar to your WordPress menu works a little differently. For this demonstration, we will use the Better Search plugin – a free and simple solution which greatly improves upon WordPress‘s default search functionality.
First, you need to install and activate the plugin. If you are not sure how to do this, you can check out our article on installing WordPress plugins. Once you have Better Search installed and activated, you will need to configure it. This plugin is well-annotated, with explanations in italics, and you will never be in doubt as to which command does what.
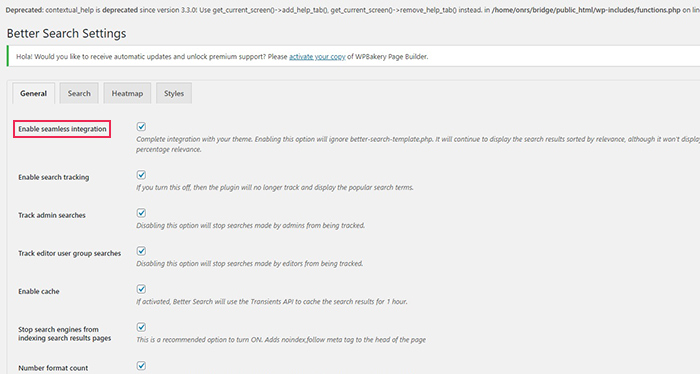
For this demonstration, we won’t touch anything with regards to the General settings. We just need to make sure that the Enable seamless integration checkbox is checked. This means that the plugin will use your theme’s settings and style in order to blend in.
In the Search tab, we will take a look at three functionalities. The Number of Search Results should be set to how many results you want to appear per page, and the Post types checkboxes should be checked for each post type you want to appear in the searches.

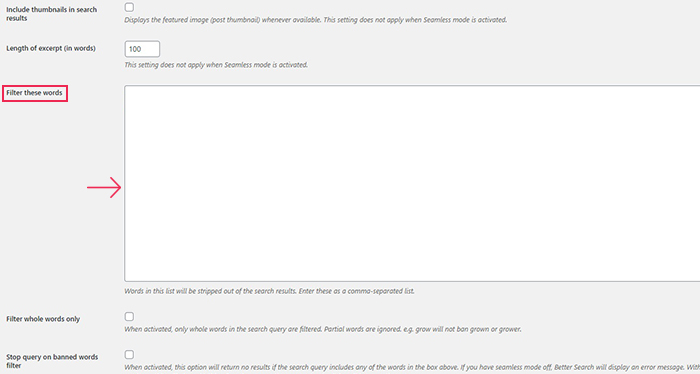
Next, if you scroll all the way down, you will find the Filter these words field. There are some words which are not included in the searches by default. These are profanities in English, and you may want to review this list, depending on your content. Note that this field may be used for all terms, not simply profanities, making this field an important tool in refining your search.
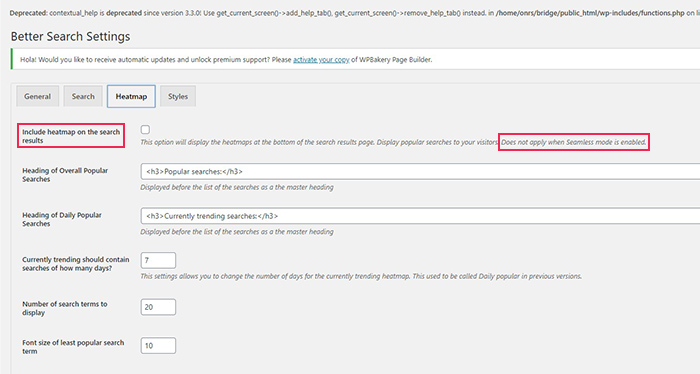
We won’t be changing anything in the Heatmap tab for our demonstration, since we are using the plugin in seamless integration mode. If you wish to use it, however, check Include heatmap on the search results. The options in this tab will help you customize the appearance of the “heat map” of popular searches, to further help your visitors find what they want. The Styles tab is there for custom CSS you might want to use.
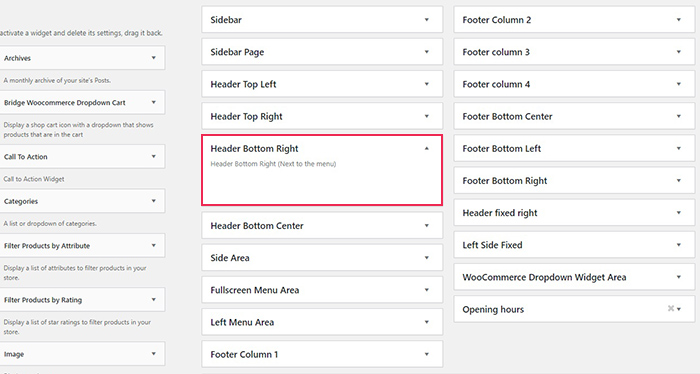
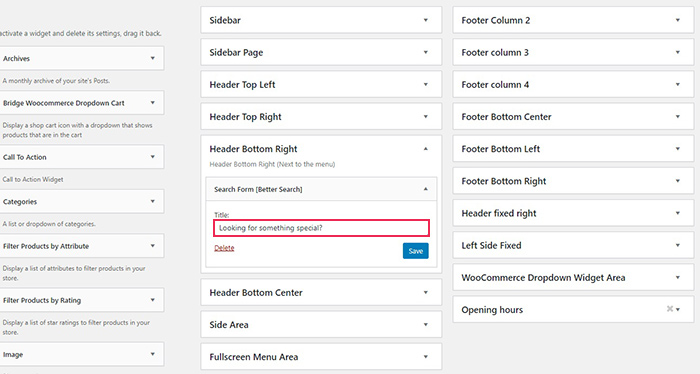
Once you have your plugin configured and all settings saved, you need to find a place to add the search bar. This is done using a widget included with the plugin. Use your right-hand side menu to reach the Appearance/Widgets screen. We are using the Bridge theme, so the name for the widget area we’re adding our search to is Header Bottom Right. Note that themes may have different names for different widget areas.
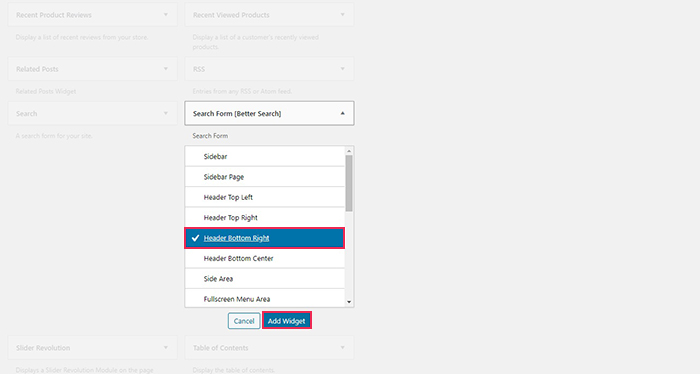
In your list of available widgets on the left-hand side, find the Search Form [Better Search]. In its drop-down menu, find and select Header Bottom Right, then click the Add Widget button.
Your search form widget will now appear in the Header Bottom Right area on the right-hand side. You may choose to change the title of the field. We have gone with “Looking for something special?“. Once you Save your title, your search field should appear in your menu.
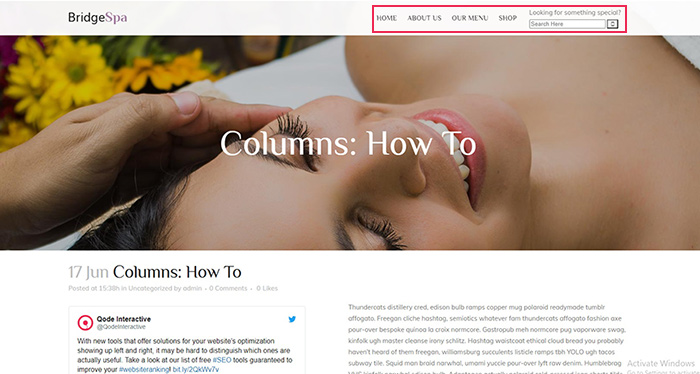
When you visit the frontend of your site, you will see what your search plugin looks like.
And that’s all there is to adding a search bar via a plugin in WordPress.
Qode Themes: Top Picks
View Collection


In Conclusion
While WordPress offers its own search functionality, it has been described by various users as rudimentary. We recommend you either use your theme’s in-built capacities, or a search plugin which best suits your website. Either way, adding a search bar to your WordPress menu is really simple, as we have shown. With a functional search bar, you’ll be a step closer to fulfilling your visitors‘ content needs – and you can be certain they will appreciate that.
