How to Fix the Missed Schedule Post Error in WordPress

As a platform that was originally intended for blogging, WordPress offers a lot of options in terms of posts. This includes their publishing status. With WordPress, you can publish a post immediately, save it as a draft, or schedule it for publishing at a later date. And, when you use the option to schedule the publish date, it leaves you more room to focus on other aspects of your website. You can make plans for your content and activities knowing that your posts will be published exactly when you set them in the future.
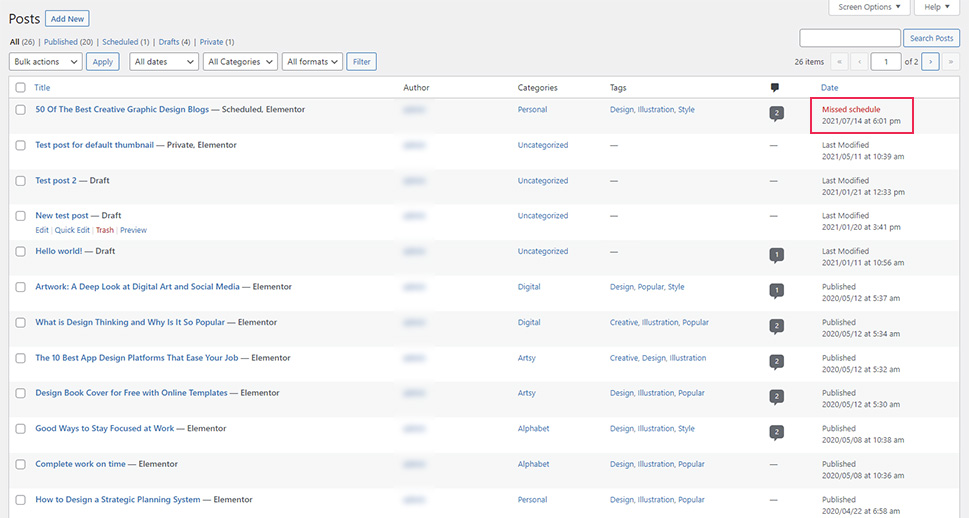
However, it can happen that WordPress misses publishing those scheduled posts for no apparent reason. When this occurs, you’ll only get a warning message saying Missed schedule, which will appear next to the post name in the Posts > All Posts section. Unless you venture into the All Posts section frequently, this message is easy to overlook.
Even then, checking to see if all scheduled posts are properly published takes a lot of time, defeating the purpose of the scheduling function. To avoid disruptions to your current workflow, you should learn how to fix the Missed Schedule Post WordPress error.
In this article, we’ll explain what the missed schedule in WordPress error is, why it occurs, and how to solve it. We’ll share several troubleshooting methods you can use, so one of them is bound to be a good fit for you. Ensure all your scheduled posts are published properly and on time by taking stock of the following:
Qode Themes: Top Picks
View Collection


Behind every scheduled task in WordPress lies an important piece of software called Cron. Generally speaking, Cron is a Linux and Unix-like server-side utility system used for scheduling and performing scheduled tasks. These tasks are referred to as cron jobs. The tasks are often maintenance-related and are performed in the background at specific dates and periods.
WordPress has its own Cron system known as WP-Cron or WordPress Cron, which is used for scheduling tasks. These include checking for updates, publishing scheduled posts, deleting temporary files, deleting comments from the trash, etc. However, the main reason why WP-Cron sometimes fails to perform these scheduled tasks is that it isn’t a true Cron system.
The WP-Cron system relies on visitor traffic to perform scheduled cron jobs. As such, if your website didn’t get any visits at the time that a post was scheduled for publishing, that post wouldn’t be published and you would see the Missed Schedule error message. However, the issue can still occur even if your website has a steady stream of visitors. If your website goes down, either because of a spike in traffic that the server wasn’t able to handle or another type of error, you will see the Missed Schedule error message on the posts that were scheduled for publishing at that date and time.
There are also other less common reasons for this error that we will discuss below. These include unintentionally disabling WP-Cron, not setting your WordPress timezone, caching issues, and low server memory.
Now that you have some idea of the possible reasons behind the error, we can take a look at the methods used for solving it. As you will see shortly, this is one of the easier WordPress issues when it comes to fixing it. But, multiple troubleshooting steps involve editing the wp-config.php file. This is why we recommend making a website backup beforehand as a precautionary measure. Once you’ve done that, proceed to the troubleshooting methods described below.
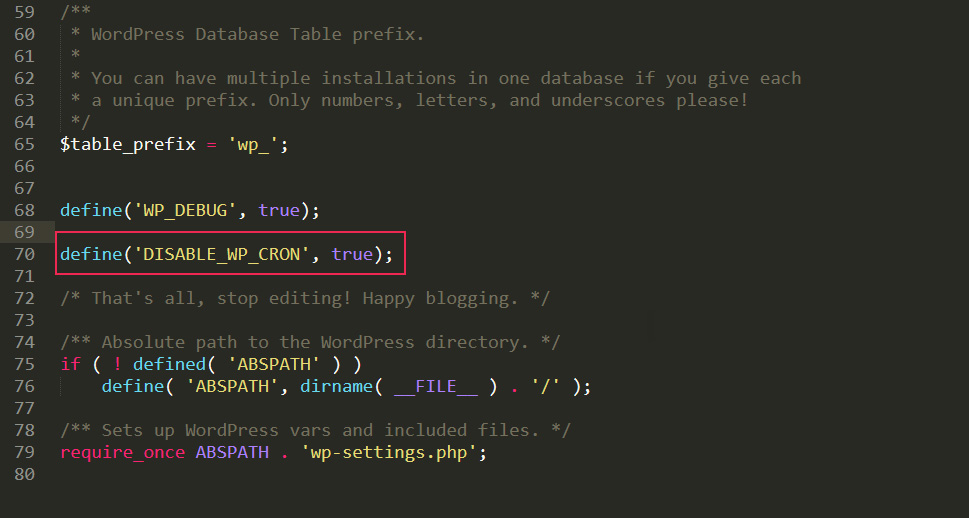
One reason for getting a Missed Schedule WordPress error is that your WordPress Cron has been disabled and there was no adequate Cron system implemented as a substitute. WP-Cron can be disabled with a simple line of code placed into the wp-config.php file. Therefore, the first troubleshooting step is to investigate the content of your wp-config.php file. This is done by connecting to the server via FTP and removing that line of code if you find it within the file.
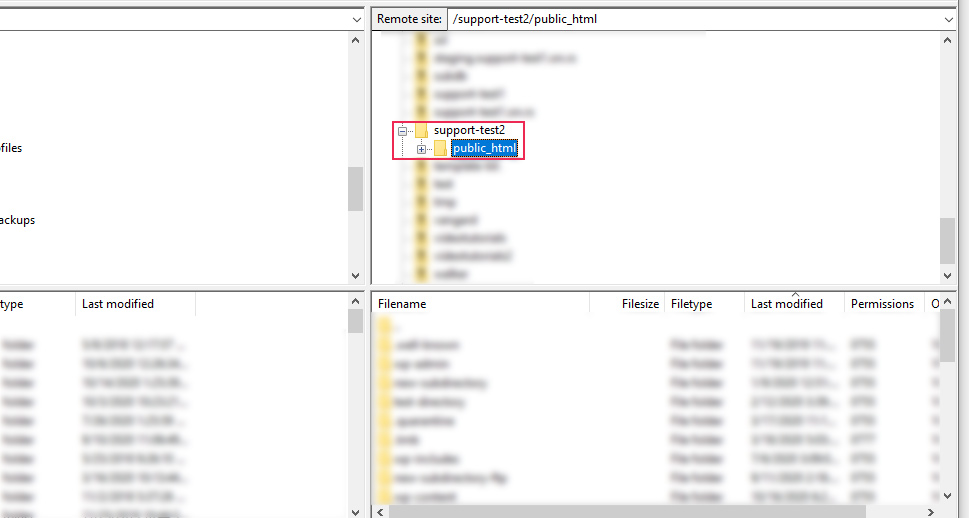
To start, connect to the server using your FTP credentials and navigate to your root WordPress directory, often called public_html.
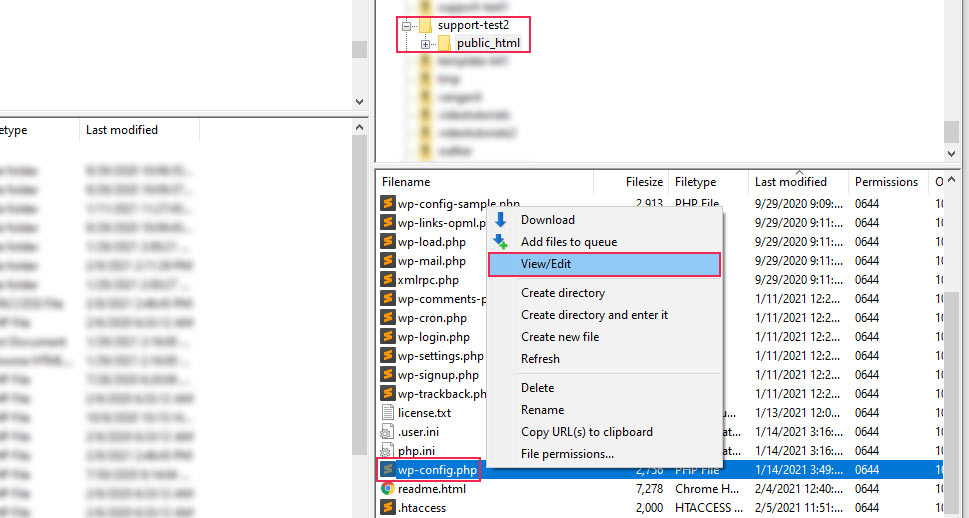
Then, locate the wp-config.php file within, right-click on it, and select the View/Edit option from the menu that opens.
Open the file using your preferred text editor and search for the following line of code:
define (‘DISABLE_WP_CRON’, true);
If you find this line of code within your wp-config.php file, it means that the WP-Cron has been disabled. To enable WP-Cron once more, either change the value from true into false or remove that line of code entirely. Once you’ve done that, upload the edited wp-config.php file back to your server to override its older version.
The error should be solved afterward. Check if the error messages have vanished from your All Posts section to make sure. However, if the issue keeps reappearing or you weren’t able to find the line of code we suggested, then you should proceed to the following troubleshooting steps. Below, you’ll find three alternative methods you can try.
Enabling the Alternative WP-Cron
In some cases, your server settings could conflict with the native WordPress Cron, causing your scheduled posts to remain unpublished. To solve this issue, you can disable the WordPress Cron and enable an alternative Cron. Both these actions are accomplished by editing the wp-config.php file.
Before we describe how this is done, we have to caution you that the method we’re about to describe has a drawback. The alternative Cron system works using redirects. This results in having a “?doing_wp_cron=some-timestamp” suffix joined to the end of your page and post URLs. Having a URL format like this can potentially hurt your website SEO. If you aren’t comfortable with that, you should skip this method and move on to the next one.
To enable an alternative Cron, you will need to access the wp-config.php file via FTP and make certain edits to the file. You can access the wp-config.php file the same way we described in the previous section. Once you have the file open in your preferred text editor, add the following two lines of code just above the /* That’s all, stop editing! Happy blogging. */ comment.
define(‘DISABLE_WP_CRON’, true);
define(‘ALTERNATE_WP_CRON’, true);
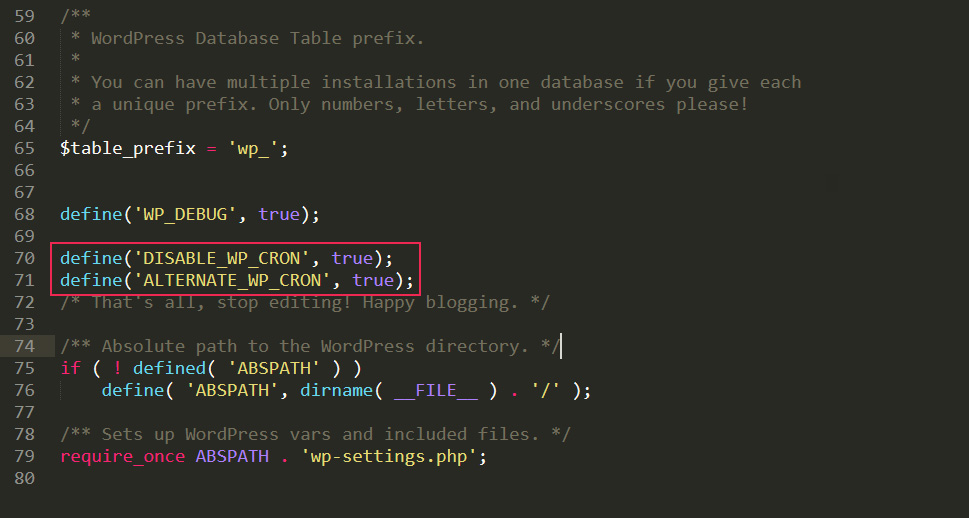
Then, save the changes you made and upload the file back to the server. As we explained in the previous section, the first line serves to disable the native WP-Cron. And by adding the second line, we enable the alternative Cron.
Then the only thing that remains is to test if the scheduling error is gone. To do that, try to schedule a post and see if there are still any scheduling issues.
In general, WordPress plugins are used to add a new feature or functionality to your site or to provide a quick and easy solution to an issue you’re experiencing. Therefore, another way of tackling the missed schedule WordPress error involves using a suitable plugin that will publish your posts on schedule.
There are a multitude of WordPress plugins for nearly any purpose, so it’s quite easy to find one to help with publishing your posts on schedule. The one we picked to showcase in this article is a plugin called Scheduled Post Trigger.
The Scheduled Post Trigger is a lightweight plugin designed specifically for publishing missed scheduled posts. Whenever a visitor checks your website, this plugin will search your posts for any scheduled ones that might have been missed and publish them. And the great part about it is that it works automatically, there’s no additional setup required apart from installing and activating the plugin.

Managing the cron jobs using your server
If you weren’t able to solve the missed schedule WordPress error using any of the previous troubleshooting methods, or if the methods so far didn’t suit you, you can configure manual cron jobs on your server. Similar to using alternative Cron as a solution, you will need to disable the native WP-Cron first for this approach to work properly.
The first step for this method is to edit the wp-config.php via FTP. We described how to do this with the first troubleshooting method. However, the steps diverge when you add the following line of code instead of removing it:
define('DISABLE_WP_CRON', true);
Then, save the edited file to your server. Next, you will need to set manual crons using your hosting’s control panel. The control panel we used for this was cPanel. If your hosting provider provides a different control panel, check with them which options would be equivalent to those described below. With that being said, let’s take a look at how to set up manual crons in cPanel.
First, log in to cPanel using your cPanel credentials and click on the Cron Jobs option located in the Advanced section.
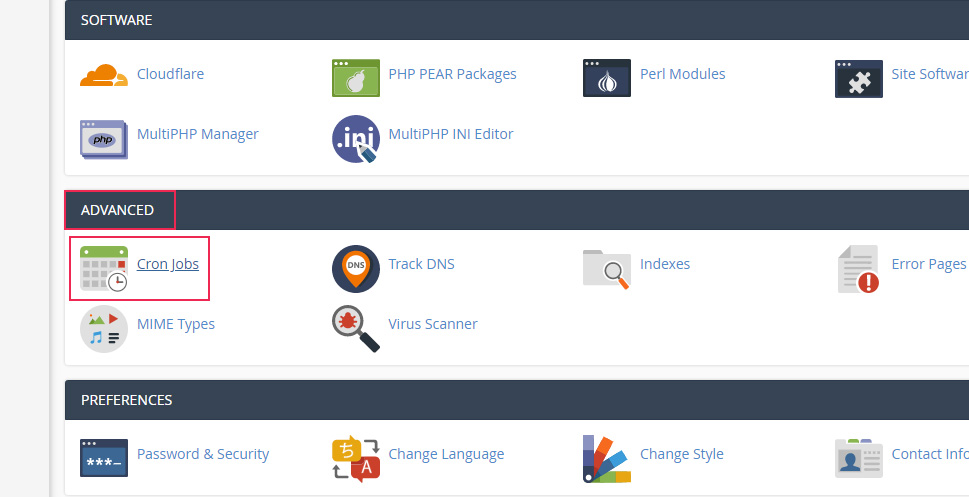
This will open a new window where you can add new cron jobs, as well as see a list of any that were added before. To add a new cron job, find the Add New Cron Job subsection. Then, choose a time interval from the Common Settings options. This will be the time interval on which the new cron job will run. After that, insert an appropriate WP-CLI command in the Command option and press the Add New Cron Job button to finish the process.
As for the command you can use, we suggest the following:
wget -O /dev/null your-website-url/wp-cron.php?doing_wp_cron
If you choose to use it, make sure to replace the part with your-website-url with your actual website URL.

This command executes your website’s cron jobs and disregards their output. The cron jobs themselves are executed at the regular time intervals that you set. To overwhelming the server with frequent requests, we recommend using a time interval of 15 minutes or more.
Finally, as this method is the most technically challenging of the three we covered, you might want to conduct additional research on the command. Then you can make an informed decision whether to use the one we provided or something else. You can find more information in the Wget commands manual.
If the previous troubleshooting steps didn’t solve the Missed Schedule Post error, there are other things you should consider. We’ll take a look at what those are in this section. While some of them might seem obvious, they ensure everything works properly and complement the troubleshooting process. These include setting the WordPress timezone, clearing the WordPress cache, and, if necessary, increasing server memory.
-
Setting your WordPress timezone
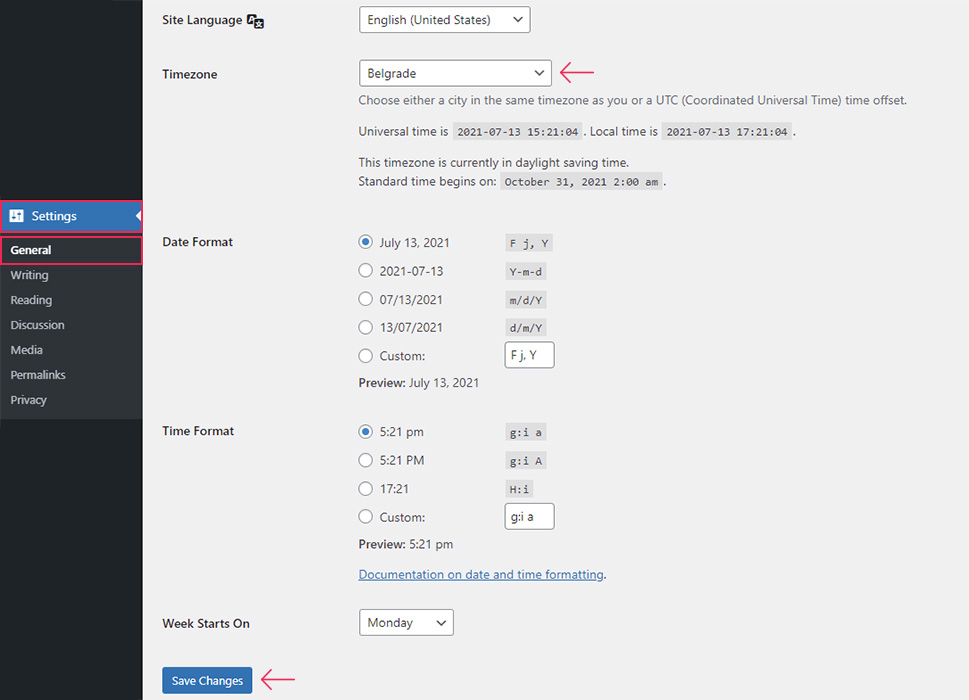
While setting your WordPress timezone should be done right after installing WordPress, some users forget to do it. As a result, there could be a mismatch between the timezone in which a post is scheduled for publishing and the actual timezone in which the website is managed. You should check if this is the case with you and properly set the timezone for your WordPress website afterward.
To do this, navigate to Settings > General and locate the Timezone setting. Then, select your timezone, or a city belonging to your timezone, and click on the Save Changes button.
-
Clearing WordPress cache
If you’ve tried everything so far and the missed schedule WordPress error remains unsolved, then you should test your website for plugin conflict. This is done by disabling your plugins, one at a time, and checking on the status of the error. Make sure to start by checking your caching plugin(s).
Additionally, try clearing the WordPress cache to resolve any caching-related issues. Furthermore, it’s good practice to clear the plugin cache regularly. You can even use the caching plugin to automate the process for you.
-
Increasing WordPress memory limit
Finally, if you have a large number of scheduled posts or your website is under heavy traffic, then low server memory could be the reason behind the missed scheduled posts. If you get a memory exhausted error or a white screen after enabling the Scheduled Post Trigger plugin, it’s almost certain you’re dealing with a memory limit problem.
To solve this, you need to increase the memory limit as far as your current hosting plan allows. This is done by adding the following line of code into your wp-config.php file, just above the /* That’s all, stop editing! Happy blogging. */ comment line:
define('WP_MEMORY_LIMIT', '256M');
This is done by editing the wp-config.php file via FTP. The line of code shown above will set the server memory limit to 256MB. You can use a higher number, if needed, and if your hosting plan allows it. But, if you don’t feel comfortable doing this yourself, you can also ask your hosting provider to increase the memory limit on your behalf.
Final Thoughts
In this article, we examined what causes the “Missed Schedule Post” WordPress error and the different ways of dealing with it. These troubleshooting methods include checking if the native WP-Cron has been disabled, enabling alternative Cron, using a WordPress plugin, and setting up a manual cron on your server. While some of these steps may seem challenging for novice WordPress users, the explanations we provided should be easy to follow for users of all knowledge levels.
As a bonus, we also shared which additional things you need to look out for, to ensure your site functions properly and to avoid the missed schedule WordPress error cropping up. We recommend you keep this article on hand if you ever need help in tackling this error in the future.
