What Is a WordPress Cron Job and How to Use It
Scheduling events in WordPress is as equally valuable as in real life. For example, specifying a date and time when a post is to be published while you are away is just one of many examples of the importance of scheduling. With WordPress sites, scheduling is managed with the help of WordPress Cron jobs.
In this article, we’ll dig deeper into the subject of WordPress Cron jobs and Cron jobs in general to answer the following questions:
Cron, or the system Cron, is a Linux and Unix-like utility system. It is typically used for scheduling and performing scheduled tasks on a server. These tasks run in the background at a specific date, time, and time interval. Each task is referred to as a Cron job and, in most cases, they are maintenance-related. Automating these tasks will save you a great deal of time.
WordPress uses a system called WP-Cron. The tasks it tackles include checking for updates, deleting the comments from the trash, scheduling posts to be published, or performing a predefined website backup using a backup plugin, and more. However, WP-Cron is somewhat unreliable because it’s run only when a page (either frontend or backend) loads. This could be a problem if you have a period with a low amount of site traffic, as it might leave some scheduled tasks unexecuted. We will explore this in more depth in the section on deactivating the WP-Cron system.
Qode Themes: Top Picks
View Collection


The easiest way to manage your WP-Cron jobs is by using an appropriate WordPress plugin. The one that we used for this article and found very handy is WP Crontrol. After installing the plugin, navigate to Tools > Cron Events, to see all currently scheduled Cron jobs (or Cron events), sorted into a list.
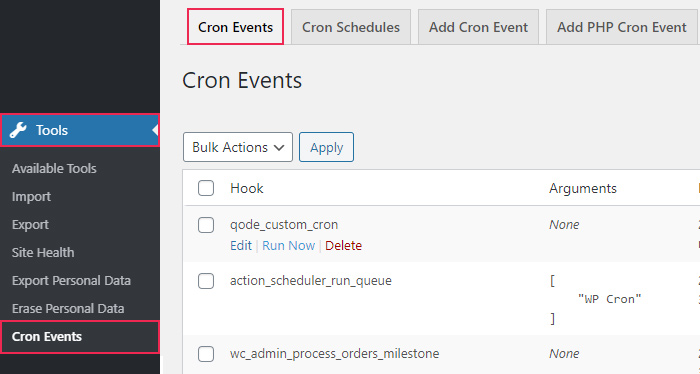
The list contains all the Cron-relevant data: the hook and action name used to create a WordPress Cron job, its arguments displayed in a JSON encoded array, and the recurrence and time of the next Cron job run. Hovering over a single row within this list gives us additional options. So you can edit, run, or delete a Cron event.
Before we proceed to show you the process for managing Cron events, we’re going to share a few tips about appropriate hook names. Hook names are written lowercase and, in case of multiple words, separated by an underscore. Also, the names should be clear and concise so that you can tell the hook’s purpose at first glance. Finally, we strongly advise that you create hook names with a unique prefix. This practice prevents the code of other plugins or themes from overriding them unintentionally. If you take a look at the list of hook names in the image above, you can see several different prefixes. The “wp_” prefix denotes default WordPress Cron jobs and “woocommerce_” marks the Cron jobs belonging to the WooCommerce plugin. Likewise, we use the “qode_” prefix to distinguish our custom WordPress Cron job that we’re using as an example for this article.
Now let’s take a look at how to add, edit, or delete a Cron event in WordPress.
In this section, we will explain how you can add, edit, and delete WordPress Cron jobs using the WP Crontrol plugin. Also, we will describe how to add custom time intervals for added flexibility. However, as you will have to edit the functions.php file in the process of making a WordPress Cron job, we strongly suggest making a backup of your WordPress website beforehand.
How to add a WordPress Cron job
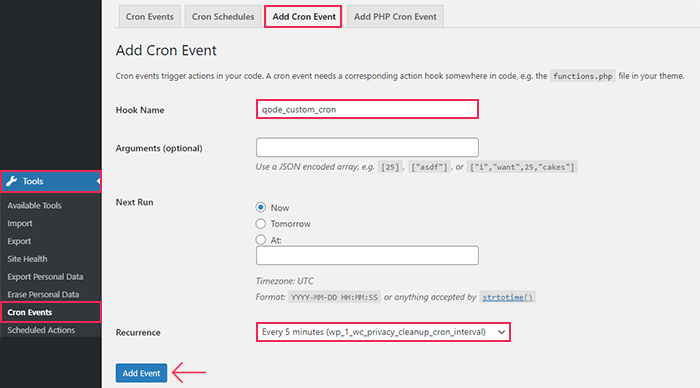
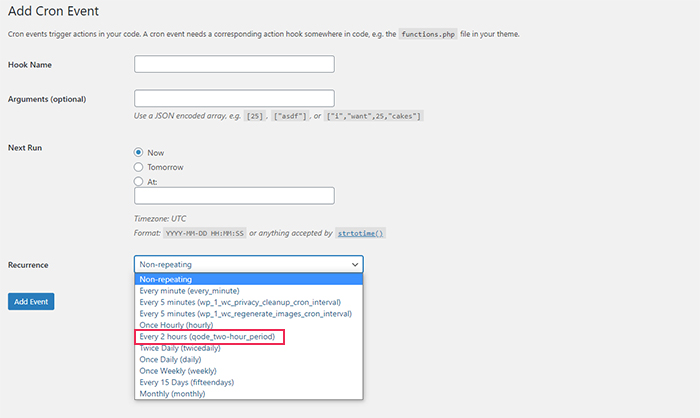
To add a new WordPress Cron job, navigate to Tools > Cron Events and click on the Add Cron Event tab. Insert a hook name and choose a recurrence period (whether an event will be repeating or not). If you choose to have a recurring event, the options for the recurrence period are: every minute, every five minutes, hourly, twice daily, daily, weekly, every 15 days, and monthly. We will also discuss how you can add your custom recurrence period.
As for the other options, you can add a JSON encoded array of arguments and schedule when the next run of the Cron event will be. After you’ve filled all the options, press the Add Event button.
This will create the WP Cron job, so next, you need to add the appropriate code telling it what to do. You need to insert that code at the bottom of your functions.php file. In general, the code that you need to add is relatively straightforward and can be summarized by a pseudocode snippet given below.
function name_of_the_callback_function() {
// some code here
}
add_action( 'name_of_the_cron_job_hook', 'name_of_the_callback_function' );
Now that we introduced the steps involved, we can take a look at them in detail. Alongside them, we will examine the code we used for our example Cron job.
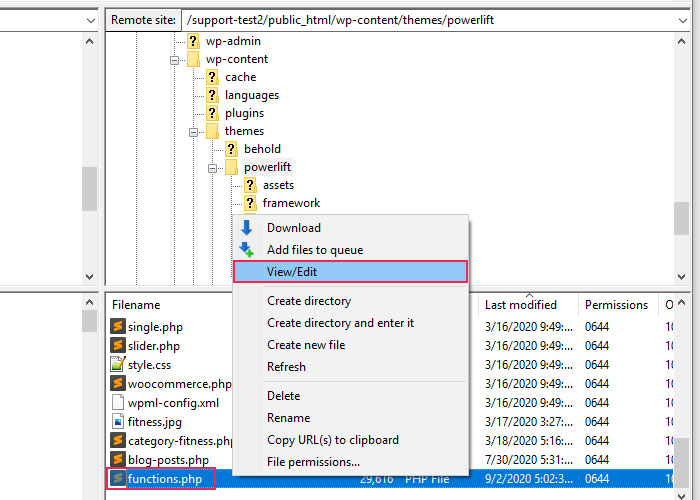
First, connect to your server using your FTP credentials and navigate to your root WordPress directory, often called public_html.

Then, navigate to the /wp-content/themes directory and click on the folder of the theme you are currently using to open it.

Once there, locate the functions.php file, right-click on it, and press the View/Edit option from the menu that appears.
Open the file using your preferred text editor and scroll to its bottom. There, you should insert the code we have included below.
function qode_custom_cron_mail() {
wp_mail( '[email protected]', 'Testing a cron event', 'This is an automatic WordPress email for testing a cron event.');
}
add_action( 'qode_custom_cron', 'qode_custom_cron_mail' );
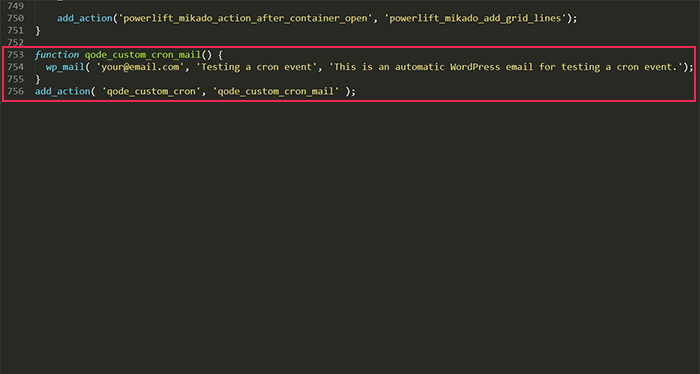
Make sure to use an actual email address you have access to instead of [email protected], so that you can properly test the Cron event. Afterward, save the changes you made and upload the file back to the server, thus overriding the existing one.
We will briefly cover the code used above.
Thanks to the add_action() function we can assign which function is executed when a specific hook is triggered. We made sure that the first argument of that function is the same hook name as the WordPress Cron job we created earlier. And the second argument is the qode_custom_cron_mail() function which we also defined. That function simply sends an email using the default WordPress mailing function wp_mail().
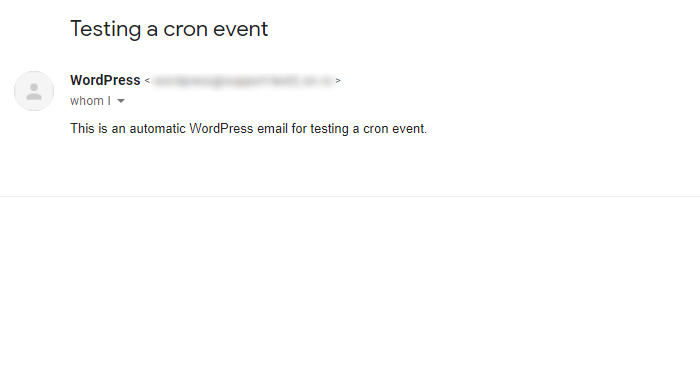
Therefore, when our custom Cron job is triggered, an email is sent to [email protected]. That email will have the title Testing a cron event and its content will be This is an automatic WordPress email for testing a cron event.
To verify this, you only need to check the inbox folder of the email you used. If you aren’t able to find the email, make sure to check the spam and trash folders as well. After finding the email, the testing process is over.
How to edit a WordPress Cron job
In this section, we will discuss how you can edit a scheduled WordPress Cron job. However, if you are editing a plugin-specific Cron job, you should contact its authors and check the plugin documentation first. Some plugins depend on Cron jobs to run smoothly, so checking before making any changes will help you avoid unforeseen website issues.
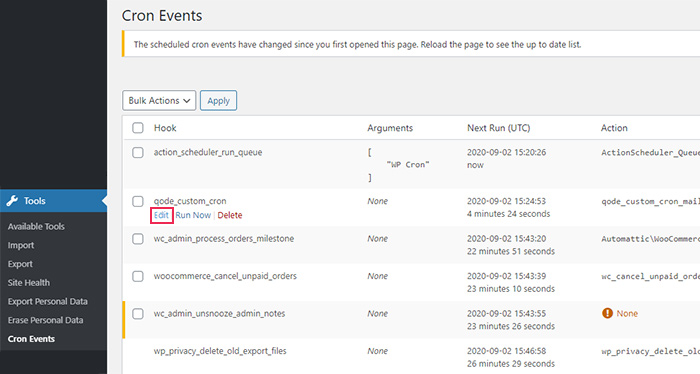
To edit an existing WordPress Cron event, you should navigate to Tools > Cron Events. Locate the Cron event you wish to edit, hover over it and press the Edit option to edit it.
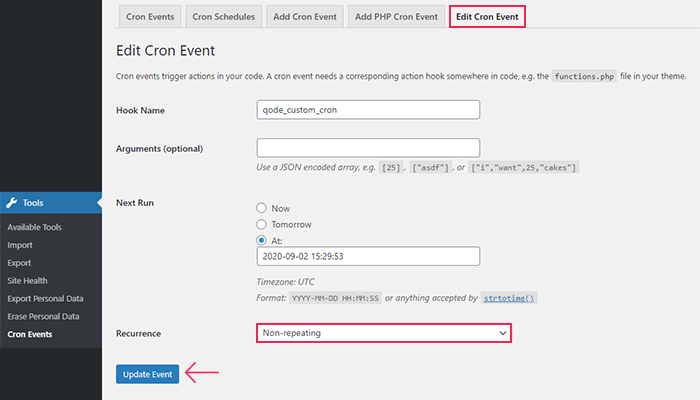
Change the parameters to suit your needs and press the Update Event button when you’re done. For our example, we only changed the time occurrence from every five minutes to non-repeating, but you can change all the parameters if you need to.
Sometimes, you might want to be more flexible and set a different recurrence period than the default ones offered by WP Crontrol. Fortunately, this plugin includes the option of adding a custom period. Let’s examine how to do so.
To add a custom time scheduling period, navigate to Settings > Cron Schedules and scroll to the bottom of the page. Within the Add Cron Schedule subsection, insert the information about the internal name, the time interval, and which name to display. After you insert this information, press the Add Cron Schedule button below.
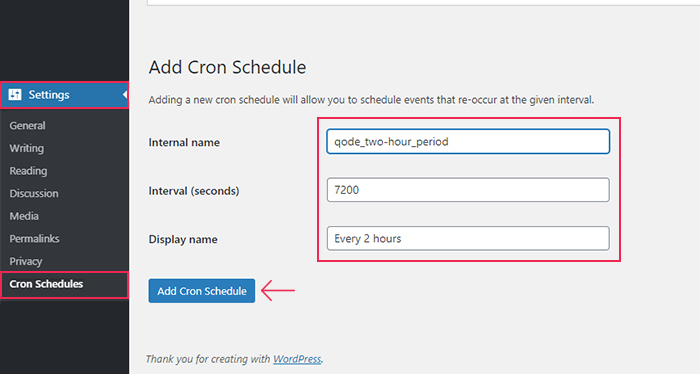
This creates a new custom period that you can use when adding a new WordPress Cron job or while editing an existing one.
How to delete a WordPress Cron job
In this section, we will show how to delete a WordPress Cron job. First, we must warn you not to delete any default WordPress Cron jobs—those with the prefix “wp_”. Removing one of them may cause issues with basic WordPress functionalities.
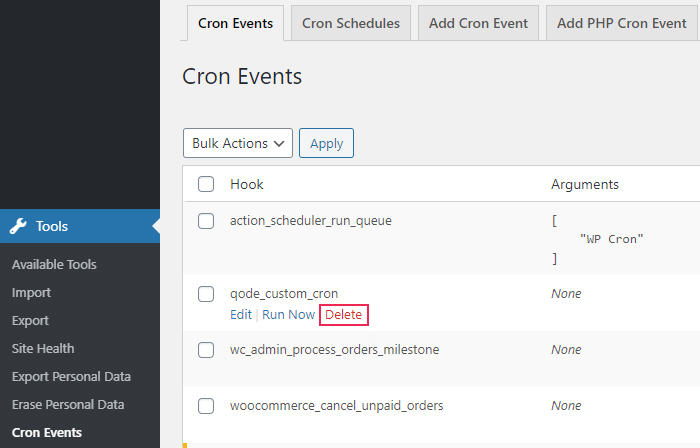
With that being said, to delete a WP-Cron event you need to navigate to Tools > Cron Events. Locate the Cron event you wish to delete, and hover over it. Consider once more if you wish to delete the event, as there won’t be a confirmation button before it’s removed. Once you are sure that you want to delete the Cron event, press the Delete option next to it.
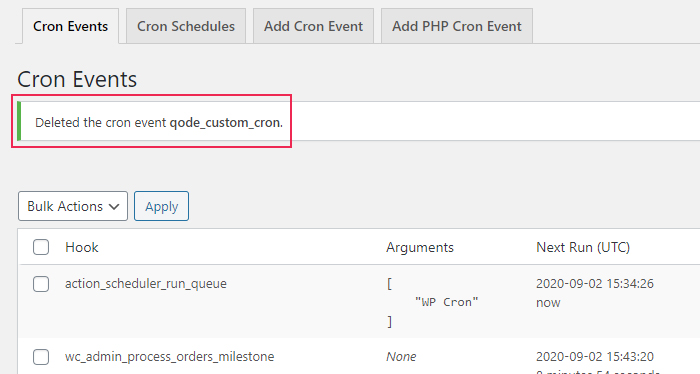
This will immediately delete the WordPress Cron event, and you will see a confirmation message, as shown in the image below.
Afterward, you will have to access the functions.php file via FTP and delete or comment out the code that “told” the Cron job what to do. You can follow the same steps for using FTP that you used to add the code earlier.
While WP-Cron gives you the ability to schedule events, the fact that they can be executed only after someone visits your website can cause a certain set of issues. Websites with a lower traffic rate could have their scheduled events skipped because of it. However, websites with higher traffic rates aren’t exempt from issues, either. For example, if your website has numerous simultaneous visits, multiple instances of the same WP-Cron jobs could be needlessly running at the same time. And, as popular and high traffic websites tend to have a high amount of plugins installed, it can take a toll on your server resources and your website speed.
Therefore, you might want to deactivate WP-Cron and use the system Cron instead. We will show you the steps for working with the scheduling process in the sections below. Keep in mind, those steps can vary depending on your hosting and require you to understand Linux commands. Because of that, we strongly suggest asking your hosting provider to do it on your behalf. With that being said, we can proceed to the actual steps.
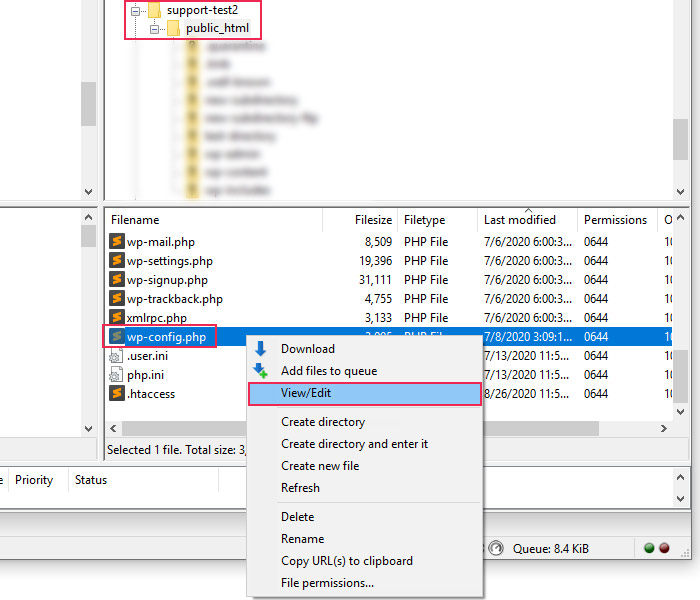
First, connect to your server using your FTP credentials and navigate to your root WordPress directory, often called public_html.
Within it, find the wp-config.php file, right-click on it, and press the View/Edit option.
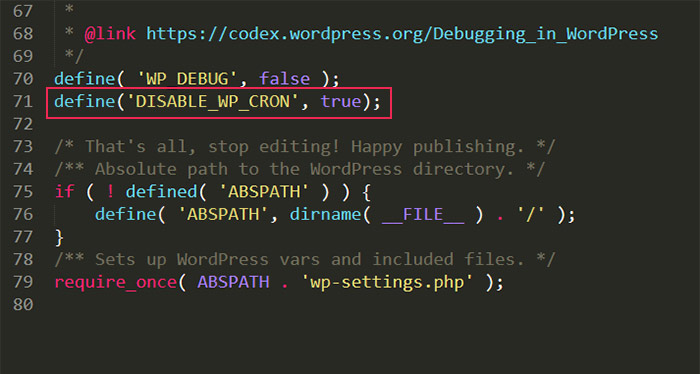
Then open the file in the text editor of your choice and insert the following line of code:
define('DISABLE_WP_CRON', true);
It should be placed directly above the /* That’s all, stop editing! Happy publishing. */ line of code.
This will disable WP-Cron from running automatically on every page load. Instead, we can program it to run directly by making a web-request to our wp-cron.php file.
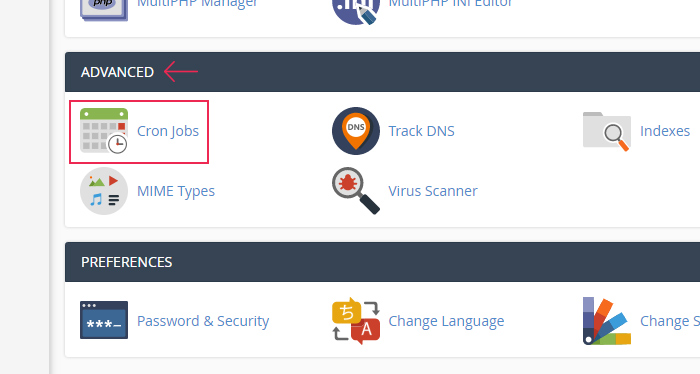
To do so, log in to cPanel using your cPanel credentials and scroll down. Locate the Cron Jobs option within the Advanced section and click on it.
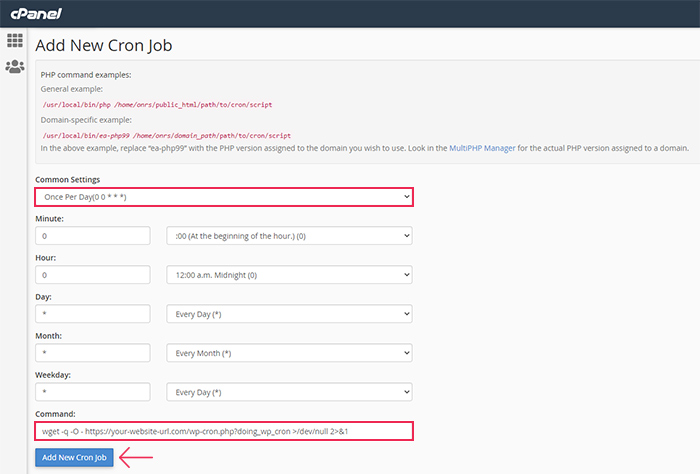
In the window that opens, scroll down a bit to the Add New Cron Job section. Choose the recurrence period from the list of Common Settings and insert the following in the Command field:
wget -q -O – https://your-website-url.com/wp-cron.php?doing_wp_cron >/dev/null 2>&1
Make sure to use your actual website URL instead of the https://your-website-url.com placeholder. When you’re done, press the Add New Cron Job button.
The command we used relies on the GNU Wget utility. As this is quite an advanced subject that requires further study we suggest you review the Wget manual, to learn about all the available commands.
Regarding the command we used, the >/dev/null 2>&1 part at the end can be omitted. It only serves to disable email notifications regarding the scheduled Cron job, so you can opt to leave it out.
Final thoughts
Being able to automate and schedule certain tasks related to your website can be immensely helpful. Using a WordPress Cron job, you can be sure that you won’t forget to run a routine task or that you won’t run late with one. Moreover, they will save you time so you can dedicate it to developing your site, using tools to optimize your SEO, or simply sitting back and relaxing. We hope this article showed you that there’s no great mystery to Cron jobs and that they are relatively easy to manage. So you can get back to more demanding tasks and leave the simple stuff for Cron to handle.
