How to Download Your Entire WordPress Media Library

WordPress has become the most used content management system (CMS) in recent years thanks to various reasons. Among other things, those reasons include its beginner-friendly interface, the availability of themes and plugins, and a constantly improving list of features. However, one feature that hasn’t been implemented yet is the option to quickly and easily download all the media files you added to your media library.
Having this option would mean that every WordPress user who wants to transfer all the uploaded media files from one website onto the other can do so directly. This would be very useful for anyone who wants to create a staging website or a website for testing new updates, or simply wants to make a new website using existing brand-approved media files. Furthermore, the downloaded media library can serve as a backup of the media files in case compatibility issues with image-editing plugins crop up and end up distorting the images in the process.
Despite its obvious usefulness, this feature is currently not a part of WordPress. In fact, to download your images, you need to navigate to each image at a time and use its URL to manually download it. This would be extremely time-consuming for anyone with a sizable collection of media files on their website. Fortunately, there are some workarounds you can use to download your complete WordPress media library and they include:
Qode Themes: Top Picks
View Collection


Before we begin
Now that you have some ideas about the situations that would require you to download all your media files, let us explore how to do so. In this section, we will consider the different options for downloading your entire WordPress media library—using a suitable WordPress plugin, an FTP client, or the File Manager option within cPanel.
More precisely, we will explain how you can download the folder that contains the media files (i.e. the uploads folder) using those three options. Moreover, this folder might contain additional files and subfolders created by different plugins, depending on which ones you have installed on your site. As such, after downloading the uploads folder, you might need to browse through its content to find the appropriate subfolders that contain the media files you were after. However, that depends entirely on individual plugin use and site content, so we will focus on the methods of downloading the uploads folder, which will be useful for everyone.
Since there are a lot of quality WordPress plugins available, finding one to help you download your WordPress media library is quite easy. You can search either for plugins that enable you to download or export media files specifically or you can look for backup plugins that allow you to control what parts of your website you can back up. If you decide to use a backup plugin, you can choose to back up only the uploads folder, which will allow you to download your entire WordPress media library in the process. We’re going to show you how that’s done using the UpdraftPlus plugin.
UpdraftPlus is one of the most popular backup plugins with over 3 million active installations at the moment. It is a freemium plugin that provides its users with a very beginner-friendly method for making website backups, which can later be restored in a couple of minutes.
The plugin also allows users to customize the process by specifying which parts of the wp-content directory you want to back up. This exact feature is what made us use it for our article. Alongside that, the free version of this plugin allows you to store the backups on Google Drive, Dropbox, Amazon S3, and several other locations. The premium version unlocks extra features like additional storage locations, the option to clone and migrate websites with Migrator, multisite compatibility, incremental backups, premium support, WP-CLI support, and others. However, for downloading the media files, you don’t have to commit to the premium version of the plugin as the free one still provides the necessary options.
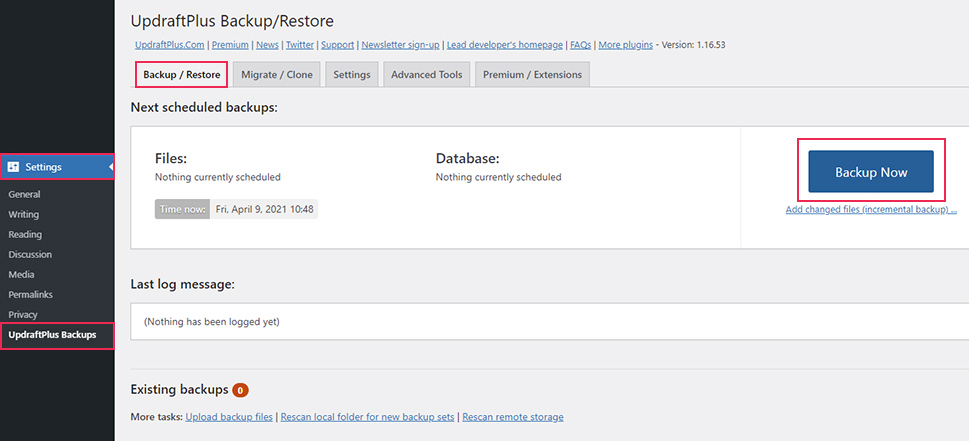
After installing the plugin, navigate to Settings > UpdraftPlus Backups. Then select the first tab called Backup/Restore and click on the Backup Now button found within.
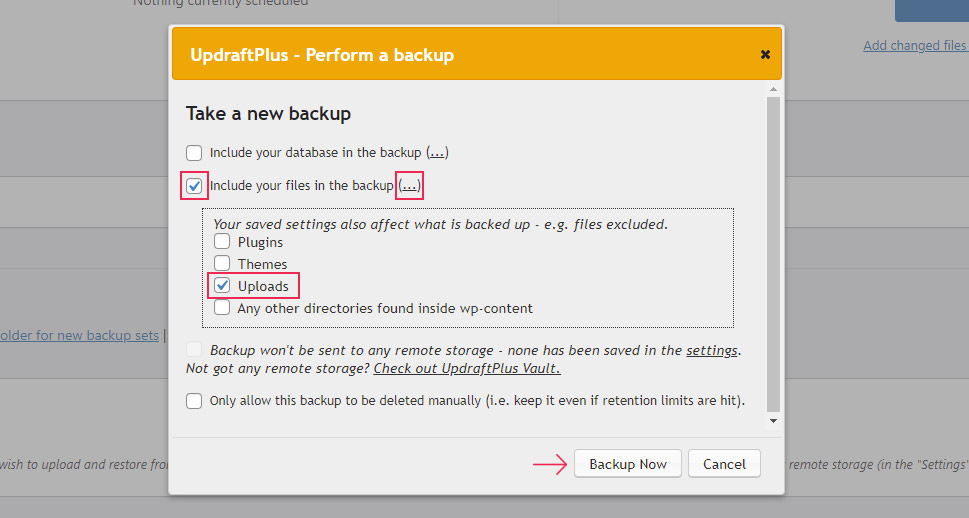
In the popup window that opens, make sure that you only select the uploads folder as the one you want to backup. To do so, exclude the database from the backup by unchecking the Include your database in backup option. Then, make sure that the Include your files in the backup option is checked instead, and press the ellipsis symbol next to it to see more options. From the backup sub-options that appear, make sure only the Uploads one is checked. Finally, click on the Backup Now button found at the bottom of the popup window to make a backup with your chosen settings.
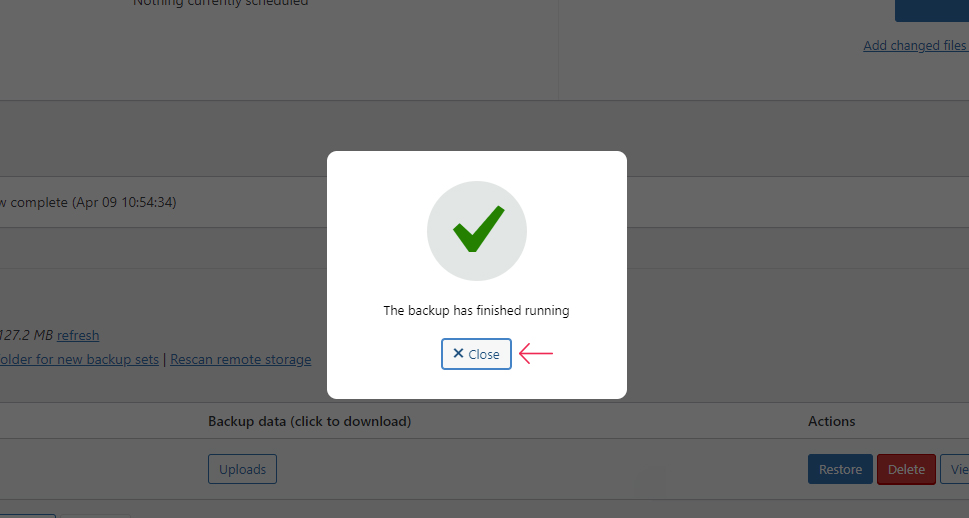
This will start the backup process, which you will be able to track by examining the progress bar that appears on the screen. Once it’s done, you will see a success message similar to the one shown below. To remove it, just press the Close button at the bottom.
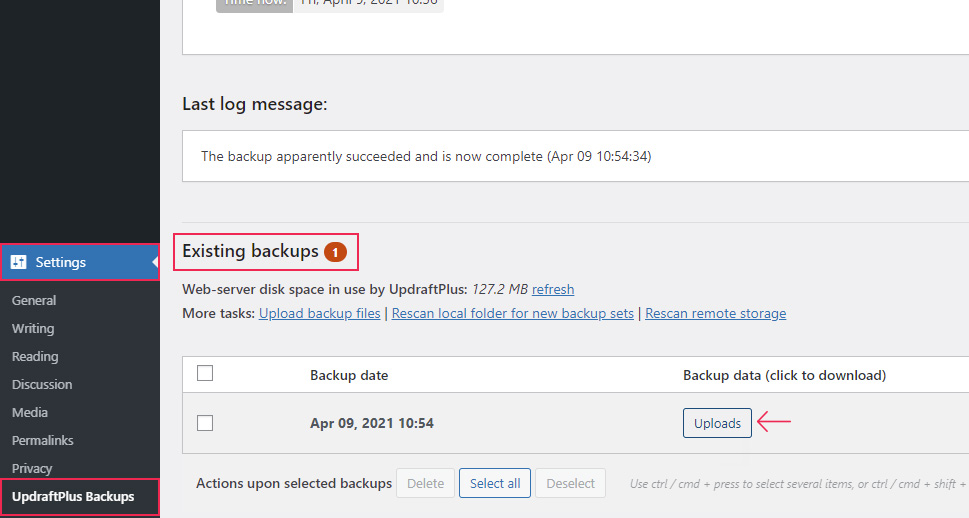
Now that you have a backup of the uploads folder, the only thing that remains is to download it to your computer. To do so, locate it in the Existing backups section, which is at the bottom of the Backup/Restore tab. Then, click on the Uploads button belonging to that backup.
This will create two new options—Download to your computer and Delete from your web server. To download your media file backup, click on the Download to your computer button.
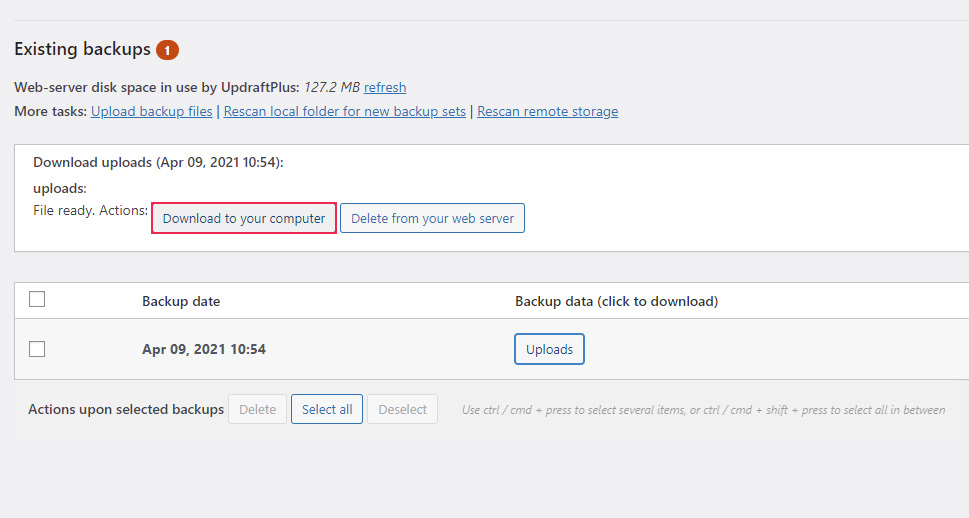
Afterward, you will have to wait a bit for the file to download, but that shouldn’t take long. The result will be a zipped file with your media library, which will most likely be located in your Downloads folder. From there, you can extract it wherever you need to and edit the individual files according to your needs.
Hosting providers often provide their users access to control panels. These allow users to manage the various aspects of web hosting using the graphical interface of that control panel and the tools provided within. One of the more commonly used control panels is called cPanel, and that’s the one we’re using in the explanation below. We will show you how to use its File Manager tool to access and download the uploads folder from your server.
You can follow along with the instructions given below if you also have access to cPanel. In case you don’t have access to it, you can ask your hosting provider for the appropriate login information. Also, if your hosting provider isn’t using cPanel at all, we advise asking them for help instead. They will be able to provide you with the equivalent set of steps to the ones we’ll be using. So, whichever control panel your hosting provider has, it should include the options for downloading site files, or in this case the uploads folder.
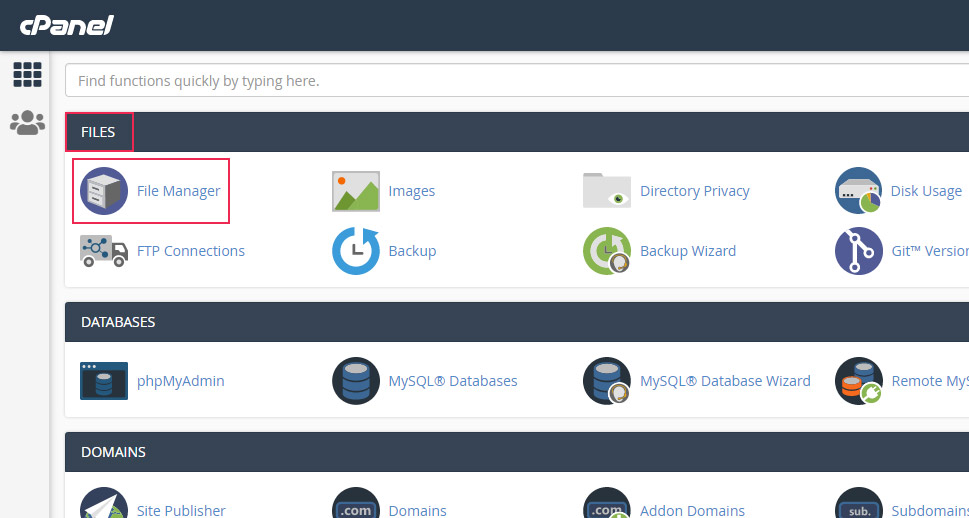
To download the uploads folder, first, log in to cPanel using your cPanel credentials. Then, click the File Manager option, located in the Files section.
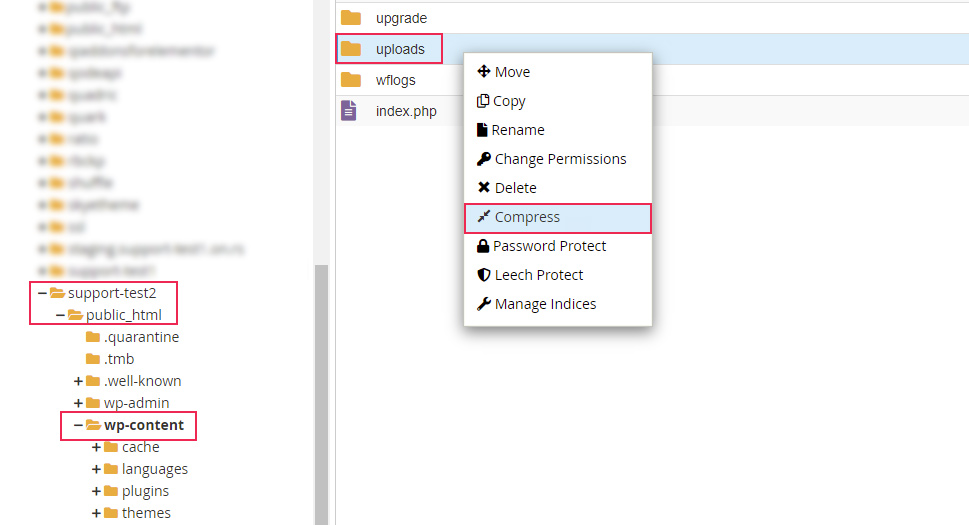
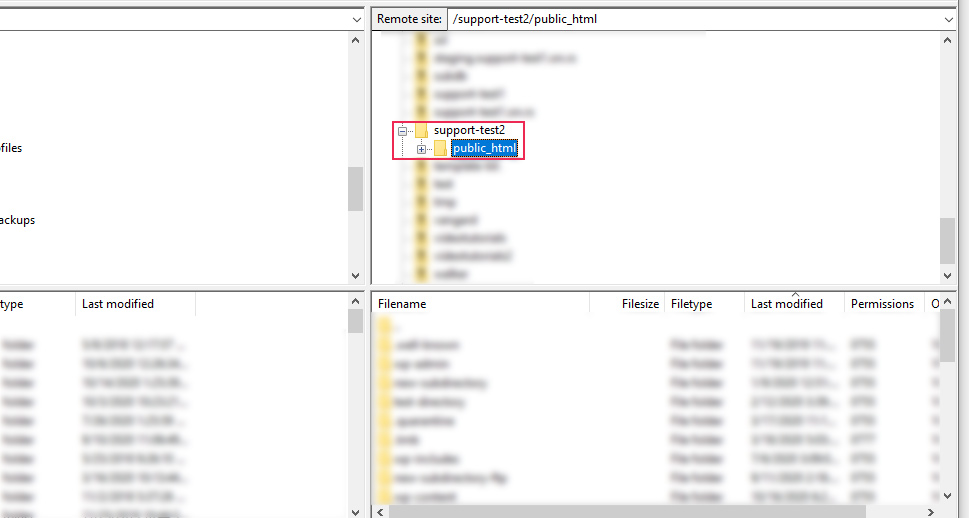
Afterward, locate your website from the list on the left, click on it and navigate to its root WordPress directory, often called public_html.

Then, find the wp-content directory within and open it. Next, find the uploads subdirectory within, right-click on it, and select the Compress option from the dropdown menu that appears.
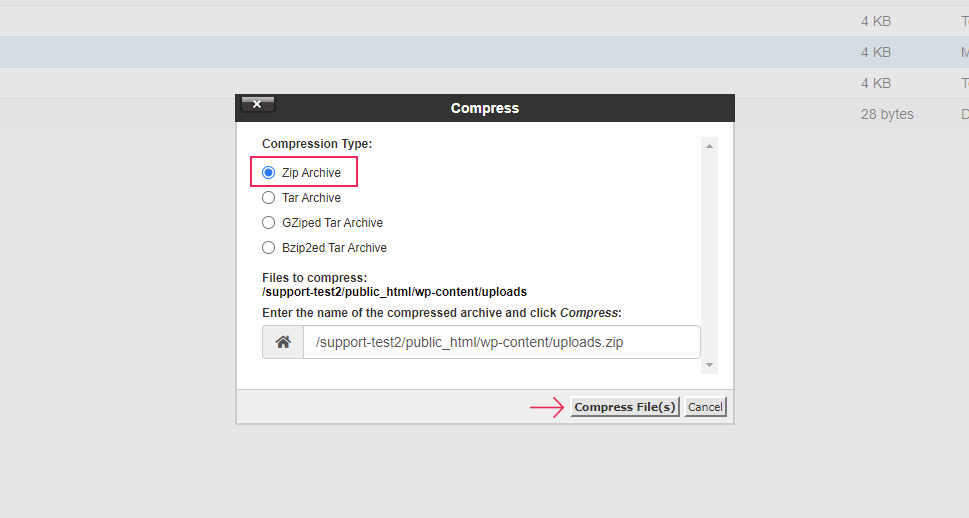
You will be prompted with a popup window asking you to specify how the folder should be compressed. We suggest choosing the Zip Archive option and then clicking the Compress File(s) button at the bottom.
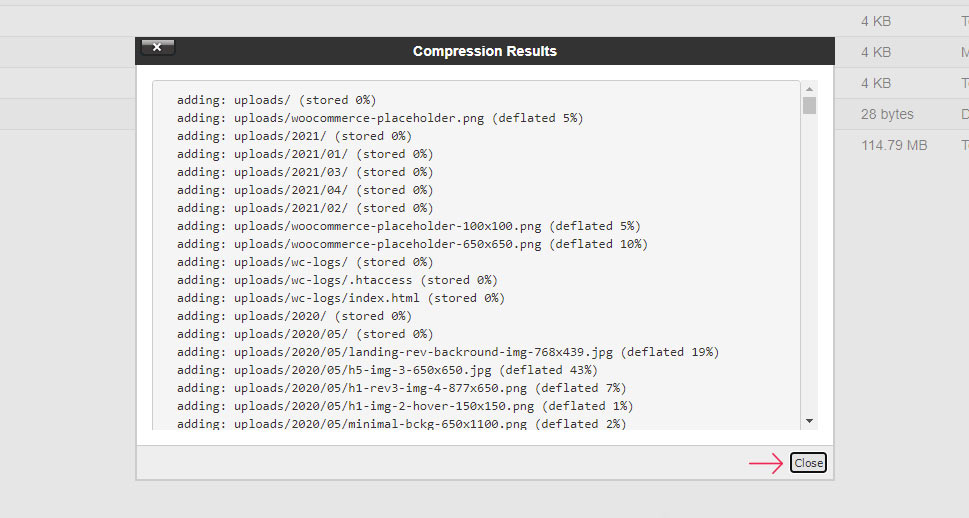
You will have to wait for a bit while the folder is compressed. When the process is done, you will see a result screen that lists how much space, percentage-wise, is saved by compressing the files. It should look similar to the image shown below. You can simply press the Close button to exit this screen.
Since the steps above served to zip the uploads folder, the only thing that remains is to download it. That’s done by locating the uploads.zip file, right-clicking on it, and selecting the Download option from the dropdown menu that appears.

Then, depending on your settings, the .zip file will likely be placed in the Downloads folder of your computer. You should navigate to your Downloads folder and locate the upload.zip file, which contains your WordPress media library files. Once you’ve found the zipped file, you can do whatever you need with it—move it to another location on your computer or store it somewhere safe, extract the .zip file, edit its content as you see fit, and more.
If you weren’t able to use the previous methods for downloading the uploads folder, or you simply don’t have access to the WordPress admin dashboard or cPanel, you can always opt to use FTP. As a requirement for this approach, you will need to have an FTP client and some knowledge of how to use FTP. If you aren’t confident in your existing knowledge, you can review our article on the use of FTP before proceeding. When you’re ready, you can proceed as described below.
To download the uploads folder, you need to connect to your server using your FTP credentials and navigate to the root WordPress directory of your website, often called public_html.
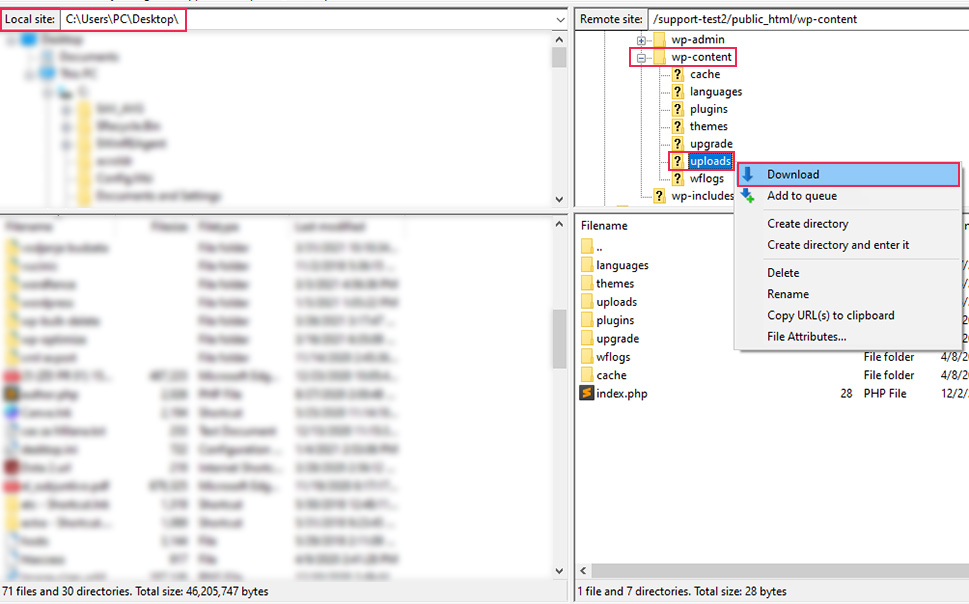
Then, locate the wp-content directory within and click on it to open. Next, locate the uploads folder. Similar to the cPanel approach, the goal of this method is to download the uploads folder. So, you will first need to select the appropriate location where you want to download the uploads folder. That’s done using the section on the left side which shows the file and folder structure on your computer. We opted to download the folder to the Desktop. Once you’ve selected the download location on the left, move to the right side and right-click on the uploads folder. Then select the Download option from the menu that appears.
After you do that, the download will start.
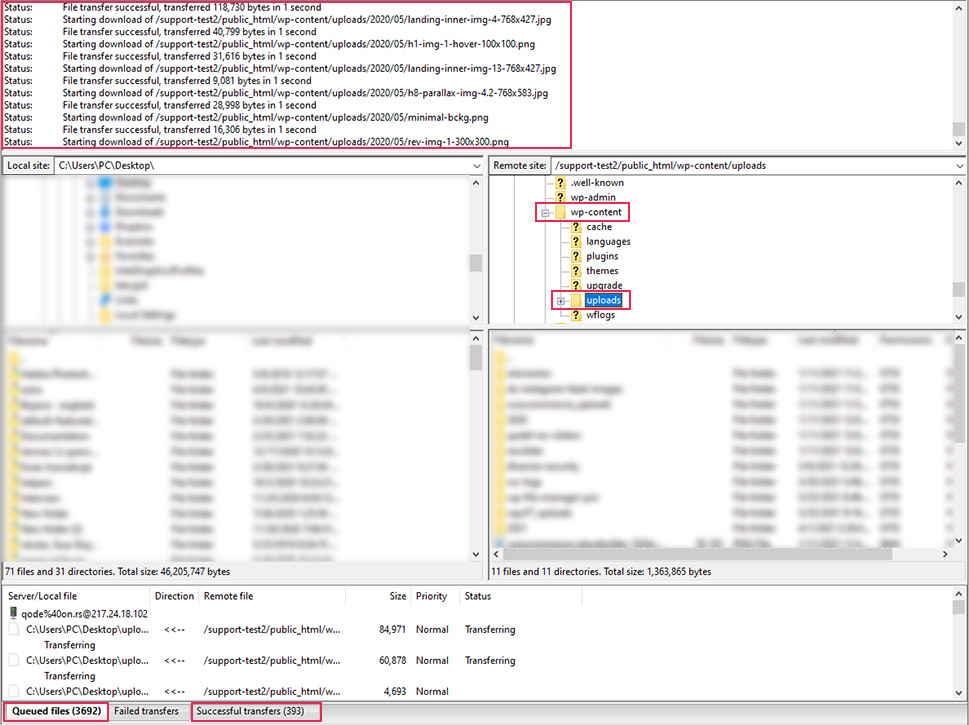
The main downside of this method is that the files you download this way are put in a queue and are downloaded one at a time. If you have a large number of media files, it can take some time until they are all downloaded. You can monitor how many files are left by looking in the Queued files tab, located in the bottom left corner of the FTP client. You can also observe the number of failed and successful file transfers by opening the Failed transfers and Successful transfers tabs, respectively. Additionally, the general progress of the file download can be observed in the log within the status bar located at the top.
After you download all the files from your WordPress media library, you can use the images, move them somewhere else, or edit them as you see fit.
Final Thoughts
Knowing how to download your entire WordPress media library can help you migrate your media files from one website onto another. It can also serve as a backup against any issues that image-editing plugins can potentially cause. Since this feature isn’t a default part of WordPress, finding a way to get your complete media library requires a bit of a workaround solution. Luckily, with the methods we discussed in this article, you will be able to do so in a matter of minutes.
As all the methods we suggested rely on downloading the uploads folder (where the media files are stored by default) a bonus to using them is that you will have a backup of your media library. Along the way, you can also get to know the WordPress file and folder structure a bit better. And, by exploring the uploads folder after downloading it, you will be able to see what additional files it contains besides the media files that were the focus of this article.
