How to Create a Custom WordPress Categories Template

Post categories and post category pages are a very useful WordPress feature, as they help users browse posts related by content. Those posts can be grouped within a single page, for the visitors’ ease of access. However, a bland or poorly designed category page can deter visitors from staying on your site and harm your overall ranking. Therefore website creators often make custom category templates to give their site that special something that captivates visitors and makes them stay a while longer.
Thanks to the versatility of WordPress, you can easily create custom templates with some code edits. You can do this either by editing the appropriate archive files or by creating one of your own which will adhere to the WordPress template structure and hierarchy. In this article, we will take a look at the reasons for using a custom WordPress categories template and how that can be done.
To help you get to grips with this topic, we’ve divided this article into several parts that you can jump to by clicking on one of the links below:
We must stress that this article is intended for more experienced WordPress users, as it deals with code and code manipulation. As such, depending on your current coding knowledge and experience, you might need to do further reading. However, rest assured the effort will be worth it as you will be able to make stunning category pages to wow your visitors afterward.
Understanding the WordPress Template Hierarchy
Page templates and page section templates are at the core of any WordPress theme. To display a page, WordPress looks for certain files following a pre-defined hierarchical template structure. You can see that structure in the diagram below.
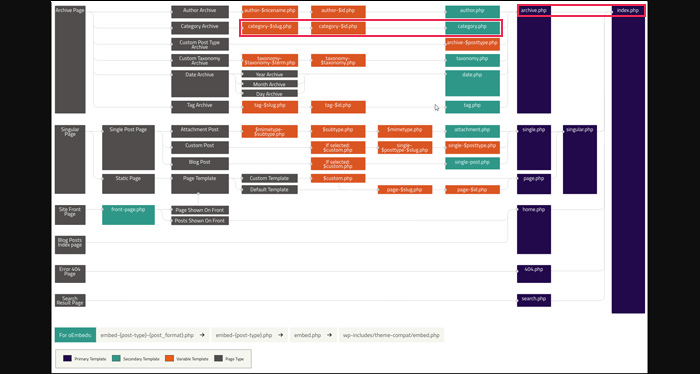

We will focus on a subsection of that diagram (marked red in the image above) that relates to the creation of category pages.
category-slug.php => category-id.php => category.php => archive.php => index.php
When looking for a template to display on a category page, WordPress searches in that order—from left to right. Meaning, if no category-slug.php file is found, it will look for category-id.php. If that file isn’t found, it will look for the next one and so on, until it reaches index.php as the ultimate fallback file.
Most themes either have an archive.php file or a category.php file within the theme folder. It should be located under your-site/wp-content/themes/your-theme. This file represents the theme template for creating all archive pages or all categories. To make a custom template for a specific category, you need to create a file that will apply only to that category. This can be either a category-slug.php file or a category-id.php file. Of course, you should replace slug and ID with the actual name of the slug/ID of the category for which you are making a custom template.
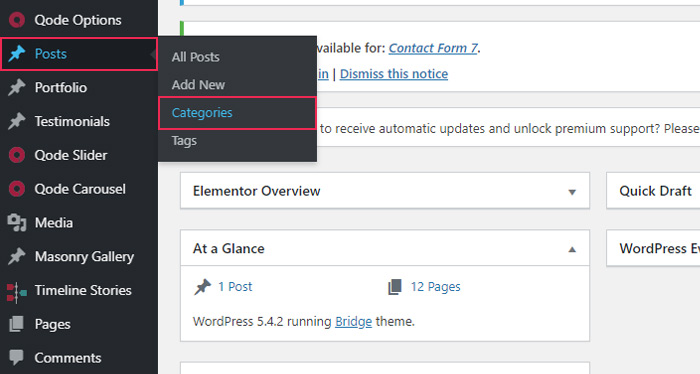
You can check which slug a post category has by navigating to Posts > Categories. Find the row with your category and check the Slug column to see the slug name.
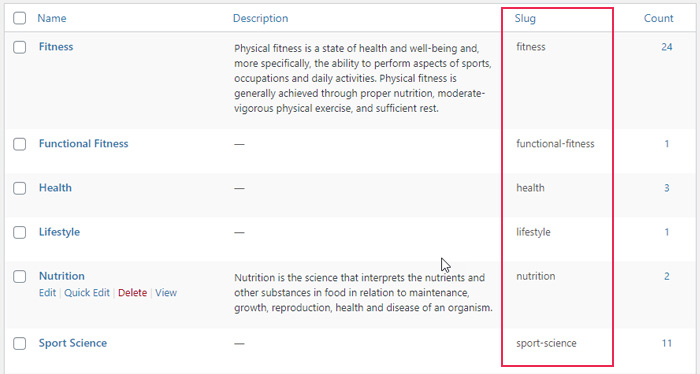
In our example screenshot, the slug corresponding to the Fitness category is fitness, while the one for Sport Science is sport-science. Therefore, the appropriate file names would be category-fitness.php and category-sport-science.php. If you want to use ID as the file identifier all you need to do is add the ID number. For example, if the category ID is 24, then the appropriate file name is category-24.php. You can find out the ID of a post category by skipping to the explanation given in the custom CSS section of this article.
Now, you can proceed to creating a custom categories template. Please note that knowing how to use FTP is a prerequisite for this process as you will need to add or edit files located on your server. If you aren’t sure how to do so, make sure to read the article regarding working with FTP before moving on to the rest of this article.
How to Create Custom Categories Template in WordPress
There are several ways to create a custom categories template. In the following sections we will cover three coding methods you can use. Those are creating custom template files, using conditional statements within a single archive file (category.php or archive.php), and creating category-specific custom CSS code. Each of these methods has its pros and cons, which we will also cover. And all three methods will be accompanied with carefully picked code examples. However, the examples we used are there to illustrate a point and you are more than welcome to improve upon them.
Furthermore, you can also use multiple methods simultaneously. This mostly applies to writing custom CSS as you will probably style the template you create further using CSS. The category content you display using your custom template will have the default browser styles (or a mix of default browser and theme stylization), which might not be visually appealing. As such, you might need to stylize it further to get the exact look you had in mind while creating the template.
Having said that, we can move on to the methods for creating custom category templates.
Creating a separate template file is the best way of creating a custom template, but it can be quite complex. Sometimes, you can do this by copying the contents of your theme’s archive.php or category.php file and editing it afterward. While at times, it’s best to create your custom category template file from scratch. Whichever method you use, you will have to upload the new to your theme folder via FTP; the folder path should be your-site/wp-content/themes/your-theme. However, we strongly advise that you backup your site before uploading the newly created custom template file to your theme folder as improper coding can break your site!
Below is an example that you can use and edit further on your own. To clarify the example, this code would be placed in a newly created category-fitness.php file. We will also explain the code sections, one at a time.
Example:
<?php
$category_query = new WP_Query( array( 'category_name' => 'fitness', 'posts_per_page' => '4' ) );
get_header();
?>
<div class="fitness-category-title-image">
<img src="<?php echo esc_url( get_template_directory_uri() . '/fitness.jpg' ); ?>" alt="<?php esc_attr_e( 'Fitness Category Image', 'text-domain-name' ); ?>"/>
</div>
<h1 class="archive-title"><?php single_cat_title( '', true ); ?>: latest posts</h1>
<?php if ( category_description() ) { ?>
<div class="archive-meta"><?php echo category_description(); ?></div>
<?php } ?>
<div class="main-content">
<?php if ( $category_query->have_posts() ) : ?>
<?php while ( $category_query->have_posts() ) : $category_query->the_post(); ?>
<div class="post-content">
<div><?php the_post_thumbnail( 'medium' ); ?> </div>
<a itemprop="url" href="<?php the_permalink(); ?>" title="<?php the_title_attribute(); ?>"><h2><?php the_title(); ?></h2></a>
<p><?php echo wp_kses_post( _substr( get_the_excerpt(), 0, 80 ) ); ?>...</p>
</div>
<?php endwhile; ?>
<?php wp_reset_postdata(); ?>
<?php else : ?>
<p><?php _e( 'Sorry, no posts matched your criteria.' ); ?></p>
<?php endif; ?>
</div>
<?php
get_sidebar();
get_footer();
?>
Please note, when you’re copying this code, you’ll need to remove the underscore (“_”) from both instances of “_substr” to ensure that it will work properly. So your code should have $excerpt = substr and $short_excerpt = substr instead.
Explanation:
- The $category_query variable is a string containing a query that will extract the latest four posts of the category with the “fitness” slug.
$category_query = new WP_Query( array( 'category_name' => 'fitness', 'posts_per_page' => '4' ) );
This string is used in conjunction with the WordPress Loop ( see 3).
2. The section at the beginning consists of a few parts. The first part shows an image called fitness.jpg that was uploaded inside the parent theme’s folder via FTP. Next, a title is displayed, consisting of the category title and the string “: latest posts” (the result would look something like “Nutrition: latest posts”). Finally, if the category description exists, it will be shown.
<div class="fitness-category-title-image">
<img src="<?php echo esc_url( get_template_directory_uri() . '/fitness.jpg' ); ?>" alt="<?php esc_attr_e( 'Fitness Category Image', 'text-domain-name' ); ?>"/>
</div>
<h1 class="archive-title"><?php single_cat_title( '', true ); ?>: latest posts</h1>
<?php if ( category_description() ) { ?>
<div class="archive-meta"><?php echo category_description(); ?></div>
<?php } ?>
3. The main section consists of an if… else… statement. Inside the if section there is a while loop with corresponding code within. This whole code section represents one of the more basic examples of a WordPress Loop. The WordPress Loop extracts data from posts based on a given query and performs the actions written inside appropriate code blocks. Specifically, if a post matches the query, the appropriate post-content block is made with its info. Else, a message with ‘Sorry, no posts matched your criteria.’ is shown on the screen.
<?php if ( $category_query->have_posts() ) : ?>
<?php while ( $category_query->have_posts() ) : $category_query->the_post(); ?>
<div class="post-content">
<div><?php the_post_thumbnail( 'medium' ); ?> </div>
<a itemprop="url" href="<?php the_permalink(); ?>" title="<?php the_title_attribute(); ?>">
<h2><?php the_title(); ?></h2></a>
<p><?php echo wp_kses_post( _substr( get_the_excerpt(), 0, 80 ) ); ?>...</p>
</div>
<?php endwhile; ?>
<?php wp_reset_postdata(); ?>
<?php else : ?>
<p><?php _e( 'Sorry, no posts matched your criteria.' ); ?></p>
<?php endif; ?>
Looking more closely at the post-content section code
<div class="post-content">
<div><?php the_post_thumbnail( 'medium' ); ?> </div>
<a itemprop="url" href="<?php the_permalink(); ?>" title="<?php the_title_attribute(); ?>">
<h2><?php the_title(); ?></h2></a>
<p><?php echo wp_kses_post( _substr( get_the_excerpt(), 0, 80 ) ); ?>...</p>
</div>
you can see that it contains the following:
-
medium sized post thumbnail
-
blog post title that correctly links to the post, when clicked upon, and
-
the first 80 characters of the post excerpt.
Of course, you can adjust these values to customize your code.
Please note we also used the wp_reset_postdata() function in our example. This function is particularly useful if you are using multiple loops, i.e. using multiple queries corresponding to those loops. It resets the value of the global $post variable to the content it had while executing the main query.
4. Lastly, the get_header(), get_footer() and get_sidebar() functions. Even though they aren’t used next to one another, they act similarly, which is why we grouped them in the fourth section. They load the corresponding templates – header, footer and sidebar, respectively.


Using conditional statements, you can make multiple templates by editing a single file. Due to the WordPress template hierarchy, which we mentioned earlier, and depending on what your theme contains, that file will be either category.php, archive.php, or index.php. When changing theme files always make sure to create a backup of the changed file, so that you don’t lose the modifications when the theme is updated.
The most important function for this purpose is the is_category function. We use this function to determine whether a page is a category archive page or not. As such, we can use it to apply code selectively. If left without a parameter, that code will apply to all category pages. You can also use a parameter (category name, slug, ID or an array of all previously mentioned parameters) to apply the code to a specific category or an array of categories, depending on the parameter you pick. To do so, you need to pair the is_category function with a conditional statement of your choice. Examples include if, if.. else…, or switch statements.
We will clarify this concept further using the two examples below.
1. Our example code makes it so that the category “fitness” has a category page title called “Fitness articles”. All remaining categories have category pages titled with a concatenation of the string “Everything about” and the actual category name. Meaning, the category named “Nutrition” will have the title “Everything about Nutrition”, the category “exercises” – “Everything about exercises”, and so on.
For easier understanding, the code can be viewed as two halves. The first half concerns the if statement where the condition for naming a category page “Fitness articles” is that the posts that will show on it must belong to the “Fitness” category. If that condition is not met, then the second half of the code, the one with the else statement, is triggered. This will create a category page title for any category other than fitness. And the resulting name will be “Everything about” followed by the name of an individual category.
<?php if(is_category( 'Fitness' )) : ?>
<h1 class="archive-title">Fitness articles</h1>
<?php else: ?>
<h1 class="archive-title">Everything about <?php single_cat_title(); ?> </h1>
<?php endif; ?>
2. As a preface to our second example, we have to mention that the code below is meant to be used in a post loop. Depending on the category, different post content will show. So, on the “Fitness” category page, it will show a post’s publish date and the number of comments that a post has. On the “Training program” category page, posts will have excerpts, while for any categories that remain, only a large post thumbnail will show.
Therefore, the first if statement denotes the code intended for the “Fitness” category while the else if statement denotes the code that concerns the “Training program” category. The code wrapped with the final else statement addresses all the remaining categories.
<?php
if ( is_category( 'fitness' ) ) { ?>
<p>Published on <?php the_date('d M Y', '<span class="post-date">', '</span>'); ?></p>
<span class="comment-number"><?php comments_number( 'no comments', '1 comment', '% comments' ); ?></span>
<?php } else if ( is_category( 'training-program' ) ) { ?>
<p><?php echo wp_kses_post( get_the_excerpt() ); ?></p>
<?php } else { ?>
<div><?php the_post_thumbnail( 'large' ); ?> </div>
<?php } ?>
However, as appealing as this method might seem, the readability of the code can be an issue, especially if the file is too long. Also, if the code contains any errors, it will be difficult to spot them. To help prevent these issues, make sure to use proper code syntax, indentation, and add helpful comments explaining certain sections of code. These are some of the widely-recommended best coding practices, so you should always adhere to this advice while making any kind of code.
If your category page requires only a little tweaking, writing custom CSS code is the way to go. You can write the code and affect all widths and viewports or you can be more specific using media queries. If you want to apply the code to a specific category, you must use a unique selector, like the ID for your category. By adding the body class corresponding to the ID, you can make sure that the code is applied only to a single category of your choosing. We’re going to briefly explain this in the following section without going too deep into details of CSS code creation. We used the Chrome browser’s developer tools, but similar tools exist in any modern browser.
We will start with the premise that you’ve prepared some CSS code, but now you want to apply it for one category only. We will use the following CSS code in our example.
h1.archive-title {
text-align: center;
position: relative;
top: -18px;
left: 0;
color: white;
}
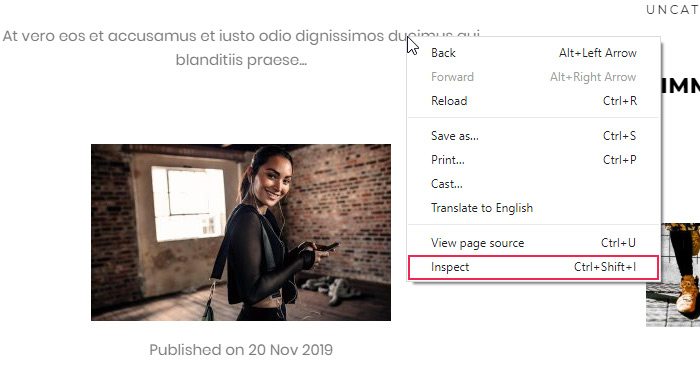
To make this CSS code category-specific, you need to inspect that category page. Right-click on any element on your page and select the Inspect option (you can also do this by pressing the F12 key on your keyboard).
This will open the Chrome developer tools’ with a view of the first tab called Elements, where the exact HTML element you clicked on will be marked.
In the same section look for the opening <body> tag and its classes, it will be located near the top. When you find it you should be able to see the class with the category ID very easily.
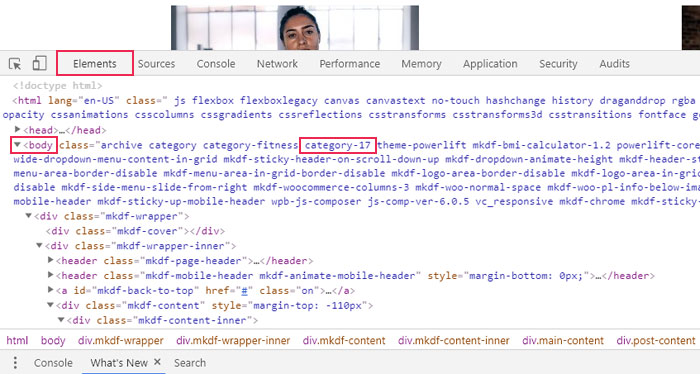
In our case, that class is category-17, meaning that the category ID is 17. To make the code specific to that category, you need to add the category name (category-17) as a prefix to the CSS selector shown above. Don’t forget to use put a dot (.) before it, as it is a class name! Therefore, the example CSS should look like this now:
.category-17 h1.archive-title {
text-align: center;
position: relative;
top: -18px;
left: 0;
color: white;
}
This will make the code category-specific. All the rules given in brackets will apply only to pages with the class archive-title whose body class is category-17.
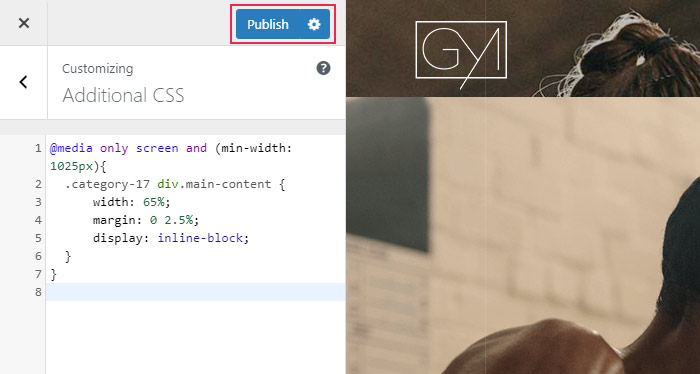
Similarly, you can wrap any CSS code with media queries to apply it selectively, within a range width, or for a specific viewport. The code below applies only for screens with a minimum width of 1025px (the first line contains the condition for which the code applies).
@media only screen and (min-width: 1025px){
.category-17 div.main-content {
width: 65%;
margin: 0 2.5%;
display: inline-block;
}
}
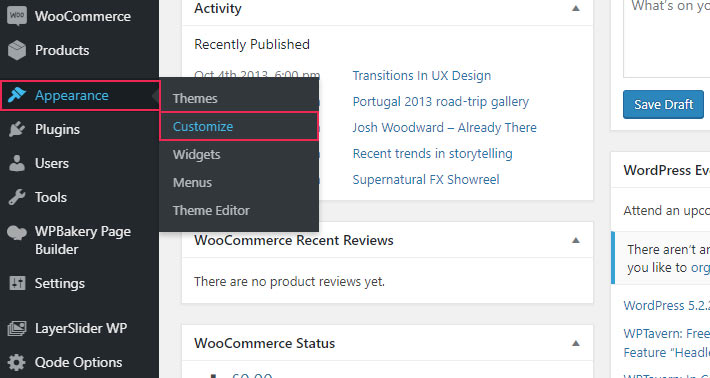
Following the suggestions above, after you create your custom CSS code the next thing you need to do is place the code appropriately in order for it to apply. To do so, log in to your admin dashboard and navigate to Appearance > Customize.
Click on the Additional CSS option, insert the CSS you created, and click on the Publish button.
If you’re a beginner and prefer working with more user-friendly solutions, and if you simply want to create a specific page listing blog posts under a specific category, there are a couple of easy ways to do that.
Specifically, the Blog List widget from the Qi Addons for Elementor collection allows you to do just that – create lovely lists of posts that can be customized to display only certain posts – for instance posts falling under a specific category. The way it works is remarkably simple: you install the Qi Addons plugin, and get 100+ customizable widgets for various purposes. Then you simply add the BLog List widget to your designated page and, in the “Query” section, under “Taxonomy,” you pick Category. For a complete tutorial, check out the video below:
Gutenberg users, don’t worry – there’s an almost identical Gutenberg block for creating a blog list. It features the same advanced design and rich customizable options. There are several list layouts readily available, such as the minimalist one, one with the side image, boxed one, and so on. So, in addition to simply listing your categories on one page, as a template, you can create rich and engaging pages that really make people want to click on your content.

Final Thoughts
Creating a custom WordPress categories template can help you give your site a unique design touch. Even though template creation can be a bit difficult, coding-wise, you now know several different methods how to do it properly. Hopefully, this article has also provided some insight into the WordPress template structure so you now have a broader understanding of how it all fits together. Now you can create your custom category templates using the code snippets we provided as examples. Moreover, with custom code solutions you will be able to introduce category-specific layouts or add different features to different pages to create stunning templates. And if that’s not something you want to deal with, simply pick one of the widgets and blocks available for creating exciting category-based blog lists.
