The Ultimate Guide to WooCommerce

If you plan on launching an online store and you want to use WordPress as your CMS, you’re going to want to learn as much as you can about the WooCommerce plugin. WooCommerce is, hands-down, the most popular eCommerce plugin for WordPress, with over 5 million active installations. So it’s only logical that some of the best premium WordPress themes include WooCommerce compatibility. Not only does this plugin come with a ton of powerful options, but it’s also extremely user-friendly. Once you get the hang of the basics, managing your eCommerce platform will become a breeze. And if you ever need any additional functionalities, there are WooCommerce add-ons and extensions for almost anything you could think of, from affiliate marketing and referral functionalities, to Etsy integration, shipment tracking, and much more.
In this comprehensive WooCommerce tutorial, we’re going to go through all the plugin’s options, explain everything you need to know about the initial setup process, and show you how to add, display, and manage your products. All you need to get started is a WordPress online store theme that’s compatible with the WooCommerce plugin. For the purposes of this tutorial, we’re going to use our Konsept theme. But the basics of WooCommerce, the plugin’s core options, and the way products are created and managed will always be the same, regardless of the theme you’re using. So you can also feel free to check out our video guide on how to create an eCommerce website using WooCommerce in our Biagiotti theme:
But now, back to the WooCommerce tutorial at hand. Here’s a breakdown of the topics we’ll be covering:
Let’s get right down to business.
If you’ve ever installed a WordPress plugin before, you already know the drill. However, in case you’re new to WordPress, let’s go through the process of installing and activating the WooCommerce plugin.
First, navigate to Plugins > Add New from you WordPress admin panel. In the search bar in the top right corner of the screen, type in WooCommerce. Once the plugin appears in the search results, click Install Now.


After you’ve installed the WooCommerce plugin, click the Activate button. And that’s it, you’ve just installed and activated WooCommerce.
eCommerce WordPress Themes
View Collection


As soon as you activate the WooCommerce plugin, you’ll be greeted with the following screen:

If you’d like to, you can use the setup wizard to configure some basic options for your site. However, since we’re going to go through all of the WooCommerce options and show you how to set up and control each aspect of your online store, we’ll simply click the Not right now link.
In your admin sidebar, you’ll now see a WooCommerce option. Clicking on it will lead to the WooCommerce dashboard, where you can view some basic statistics about your store, purchases, stock, etc.

However, we’re interested in the Settings panel, which is where you’ll determine how your store functions. Navigate to WooCommerce > Settings to access it.
In the settings, there are 7 tabs. Each one is important for making your store work just how you want it to.

Let’s take a look at each of these tabs and see what options they offer.
General
As its name suggests, the General tab is where you can define some of the general options about your store. Under the Store Address section, you should input the address, city, country, and postcode of your store.

In the General options section, you can determine to whom and how you’d like to sell your products.

The Selling Location(s) options lets you choose whether you’d like to sell to all countries, or just certain countries. If you’d like to sell only to certain countries, you can choose whether you’d like to specify those countries you’d like to sell to, or those countries you wouldn’t like to sell to.

When you choose one of these options, an additional field will appear, where you can determine which countries you’d like to include or exclude from your list.

Next, from the Shipping Location(s) dropdown, you can choose whether you’d like to ship your products to all countries, to all countries you have chosen to sell to, or to only specific countries. You can also choose to entirely disable shipping and shipping calculations.
The Default customer location option lets you choose the location you assume visitors are in. This will appear as the default location and be used to calculate shipping costs. Naturally, the customer can then change the location. This option just lets you determine which location will be used by default. You can choose between no location, shop base address, geolocate, and geolocate with page caching support. If you opt to go with either of the geolocation options, the MaxMind GeoLite Database will be periodically downloaded to your wp-content directory.
Lastly in the General Options section, you can decide whether to check any of the three following options:

-
Enabling taxes – determines whether taxes will be calculated during checkout.
-
Enabling coupons – determines whether coupon codes will be active in your store.
-
Calculate coupon discounts sequentially – determines how multiple coupons will be calculated. When enabled, the first coupon will apply to the base price, and then the second coupon will apply to the discounted price.
In the Currency options section, you can set up all the basics options regarding the currency of your store.

You can choose your website’s default currency, the position the currency sign will appear in relation to the price, the symbol you’d like to use for the thousand and decimal separator, as well as the number of decimals to display in the price.
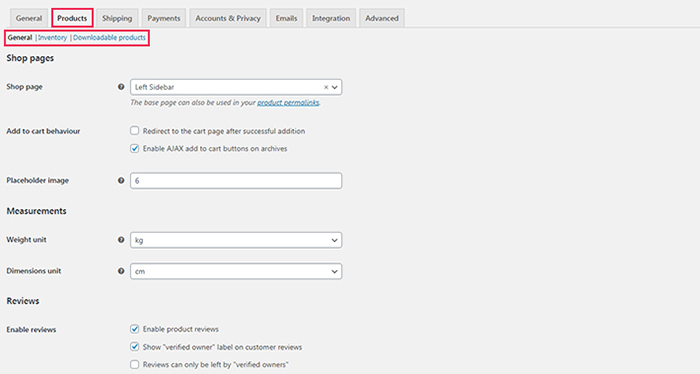
Products
In this tab, you can set up everything related to your shop products. It has three sub-tabs: General, Inventory, and Downloadable products. We’ll take you through each one and explain all the relevant options.
The first option under the General sub-tab is Shop Page. This is where you choose your default shop page. When you install WooCommerce, it will automatically create a page called Shop and set it as your default shop page. However, if you’d like to use some other page, you can choose it here.
The Konsept theme comes with multiple layouts for the shop page. You can check out the default shop layout here. If you’d like to see some more shop layouts available in Konsept, hover over the Shop menu item and check out the layouts in the Shop Lists column.

The next thing you need to choose is your Add to cart behaviour. While the Ajax on category pages option is enabled by default, you can choose whether you’d like to automatically redirect visitors to the cart page once they add an item to their cart.

The following option lets you set a placeholder image for your products. This image will appear if you don’t add any images for your products. Here’s what the default placeholder image looks like:

If you’d like to, you can upload your own placeholder image and add it to your Media Library. To set an image as a placeholder, you’ll need its unique ID number. You can find the image ID by clicking on it in the media library. In the URL bar, just look for the number at the end of the URL, after the equals sign (=).

This is the number you need to input into the Placeholder image field.

In the next two fields, under the Measurement section, you can choose the units you’d like to use for product weight and dimensions.

In the Reviews section, you can choose whether you’d like to enable product reviews and whether you’d like the “verified owner” label to appear on reviews written by customers that have purchased that specific product. You can also choose to allow only those people who have purchased a product to leave a review.

If you’d like to add a visual aspect to your product reviews, you can enable star ratings. You can also choose to make star ratings mandatory, so all the reviews customers leave have to include a star rating.

Here’s an example of what a star rating would look like on a product single page in the Konsept theme:

The Inventory sub-tab of the Product settings is where you can set up everything related to your inventory and stock. To enable stock management, mark the first checkbox on this page.

Once you do, additional settings will appear.

The Hold stock option lets you choose how long you should hold an item in stock for unpaid orders. You can define a time period (in minutes), and if the payment for an ordered product hasn’t been processed once that time runs out, the order will automatically be canceled. If you’d like to disable this option, leave the Hold stock field blank.

If you’d like to receive notifications when a product is running low on stock or is out of stock, simply mark the relevant checkboxes.

In the Notification recipient field, input the email address you’d like the low stock and out of stock notifications to be sent to.

Next, you can determine your low stock and out of stock threshold. By default, these options are set to 2 and 0. This means that once only 2 units of a product are left in stock, you’ll receive a low stock notification. And when there are 0 units in stock, you’ll receive an out of stock notification. You can adjust the low stock and out of stock thresholds as you please.

You can also choose to hide any out of stock products from your product list, simply by marking the Hide out of stock items from the catalog checkbox. In the Stock display format dropdown, you can choose whether and under which conditions you’d like to show customers how many units you have in stock. You can choose to always show the number of units in stock, to only show the number of units in stock when the low stock threshold is reached, and to never show the number of units in stock.

With WooCommerce, you can also sell downloadable products, which is great for selling any type of image or music files, software, etc. In essence, downloadable products function just like regular products, except there’s no shipping involved and there are a few additional settings. The general options for downloadable products are in the Downloadable products sub-tab of the Products settings.
The first option you need to set is your desired file download method. The first available option in the dropdown is Force downloads. This method lets you protect your downloadable files from direct linking, since the files are served by PHP and downloads are automatically forced. However, if your files are too large, this might not be a good solution, as you may experience timeouts during downloads.

If you go with the second method, X-Accel-Redirect/X-Sendfile, all downloads will be handled by your server. This is perhaps the best download method in terms of performance. However, you need to have the X-Accel-Redirect/X-Sendfile module installed on your server for this method to work. If you’re not sure whether you have this module installed, you can always check with your hosting provider.
The last method, Redirect only, is also the least secure. Since it redirects directly to the file, this method allows anyone with the upload link to access your files.
Once you’ve chosen your download method, you need to set access restrictions. Marking the first checkbox will ensure that customers with an account on your site have to be logged in to download their purchased files. Marking the second checkbox allows customers to download their files as soon as they pay for them (while the order is still processing rather than completed).
The final checkbox on this page, under Filename, is marked by default. We recommend you leave it like this, since it enhances security by adding a unique string to all downloadable files you place in your shop.

Shipping
Like the Products tab, the Shipping tab is also divided into three sub-tabs. The first one, Shipping Zones, lets you create custom zones for shipping. To create a shipping zone, simply click the Add Shipping Zone button. Then enter a name for your shipping zone and add the country or countries it applies to.

You can also limit the Zip Codes / Postcodes within your selected countries that this shipping zone applies to.

The last thing you need to do is select the shipping methods you’d like to use for this shipping zone. To do so, simply click on the Add shipping method button.

And select your preferred shipping method from the dropdown.

If you return now to the Shipping Zones sub-tab, you’ll see that the zone(s) you created have appeared here, alongside the default one called Locations not covered by your other zones. If, when a customer orders something, his or her shipping zone is not covered by one of your custom zones, the settings from this default shipping zone will apply. We recommend you check and customize the shipping methods for this default shipping zone. To do so, click on the zone and then remove or add the shipping methods to fit your needs.

Now let’s take a look at the Shipping options sub-tab. Here, you can Enable the shipping calculator on the carts page, which will show your customers the costs of shipping for the products in their cart. You can also choose to Hide shipping costs until an address is entered.

For the Shipping destination, you can choose one of three options: Default to customer shipping address, Default to customer billing address, or Force shipping to the customer billing address. The second option is selected by default.
The last option in this section, Debug mode, is used for debugging any issues you might come across while testing your shipping rates. At the following link, you can learn more about the WooCommerce shipping debug mode and how shipping rate calculations work.

The Shipping Classes sub-tab is where you can create custom shipping classes. This is useful if your shipping costs vary from item to item, and, for example, the exact cost depends on the item weight. While shipping classes don’t let you offer specific shipping rates, they are useful for grouping items of a similar type (in our example, items with a similar weight). To create a new shipping class, click the Add shipping class button.

You need to add a name for your shipping class, as well as a slug and a description. The description, for example, might be something like Up to 5kg. Later, we’ll take a look at how you can add shipping classes to your items.

Payments
In the Payments tab of the WooCommerce settings, you can choose the types of payments you’d like to use on your website. There are four default payment methods to choose from: direct bank transfer, check payments, cash on delivery, and PayPal.

You can enable or disable each one by switching the toggle button next to it. If you need to additionally set up any of your active payment methods, just click on the Manage button to the far right of the screen.
While the standard PayPal option redirects customers from your site to PayPal’s secure site to complete their payment, the WooCommerce team has also developed the free PayPal Checkout plugin, which is a bit more advanced and allows you to accept payments via PayPal or any major credit or debit cards directly from your site.
To use PayPal Checkout, you first need to install and activate the plugin. Once you do that, a new PayPal checkout option will appear on your Payments page.

To start setting up PayPal Checkout, you need to have:
-
A PayPal business account
-
Enabled PayPal Reference Transactions via Express Checkout if you want to use and sell WooCommerce subscriptions
Next, you’re going to need to set up this payment method and connect your site with your PayPal account. Once you login to your PayPal account, look for the My Selling Tools button on the left and find the API access. Click on the Update button to get your API credentials.
Now, go back to WooCommerce > Settings > Payments in your WordPress dashboard, and click the Set Up button for the PayPal Checkout payment method. In the options, find API Credentials section and input your credentials in the appropriate fields.

The rest of the settings in the API Credentials section are optional, and we won’t be using them for the purpose of this tutorial.
In the PayPal Hosted Checkout Settings section, you can customize the look of the checkout screen. The brand name you input will be shown during checkout, and you can also add logo and header images. The Landing Page option determines which page your customers will see on checkout.

The options in the Advanced Settings section will let you further customize how your PayPal checkout will work. You can find out more about all of these options in the official WooCommerce documentation.
Accounts & Privacy
Let’s move on to the Accounts and Privacy tab of the WooCommerce settings. As its name suggests, this is where you can set up everything related to WooCommerce user accounts and privacy on your website.
The Guest Accounts option lets you choose whether you’d like to allow guests (customers without an account) to place orders on your site. You can also choose whether you’d like to let customers that do have an account, but weren’t logged in during shopping, to log in to their account at checkout.

With the Accounts creation option you can set up everything related to account creation, like allowing customers to create a new account during checkout or on the My Accounts page, as well as automatically generating a username and password during account creation.

The Accounts erasure requests option lets you choose whether the personal data linked to an account will be erased from your website when a customer requests that their account be deleted. You can also choose whether access to previously purchased downloads will be removed when an account is deleted.

If you enable the Personal data removal checkbox, an option will be added to the Orders screen for deleting personal data in bulk. Deleted personal data cannot later be retrieved.
If you run any kind of online business, you need to have a Privacy Policy in place. The Privacy Policy section of the WooCommerce Accounts and Privacy options lets you choose your privacy policy page, as well as define noticies which will be displayed to users upon account creation. Please note that you first have to create a Privacy Policy page in order to select it from the Privacy page dropdown.

The Personal data retention section lets you choose how long you will store personal data before it is deleted. You should adjust the settings here in compliance with the laws applicable to your website.
Emails
In the Emails section, you can set up everything related to email notifications on your site. You can enable, disable and customize each WooCommerce default email notification by clicking on the name of the template or on the Manage button on the right side of the screen.

The Email sender section lets you change the name and email address that will be displayed as the sender of the emails, while the Email template section lets you customize the look of your emails. Here, you can also preview what your emails currently look like.

Integration
The Integration tab is where you can connect your website with the MaxMind Geolocation services. We already mentioned MaxMind when talking about the Default customer location option in the General tab of the WooCommerce settings. If you choose either Geolocate or Geolocate (with page caching support from the Default customer location dropdown, you’re going to have to connect with MaxMind in order for Geolocation to work. The Geolocation will determine where your client is located in the world, which will help determine shipping costs more precisely.
To get started with MaxMind Geolocation, you first need to create a MaxMind account. Then, log in to your account and from your dashboard choose the My License Key tab and then click on Generate new license key.

Then add the name of your online store as the License key description, choose No for Will this key be used for GeoIP Update?, and click the Confirm button.

You will then get the required key, and you should copy it immediately as it will be displayed only once.
Now, go back to the Integration tab in WooCommerce settings and paste your key into the MaxMind license key field. That’s it, you are all set up for geolocation!
Advanced
The Advanced tab is the last one in the WooCommerce settings. It has six sub-tabs, but since most of them are related to highly advanced features used for custom development, we’ll only cover those that we consider you need to customize or might find useful.
The Page setup sub-tab is where you can set up your default shop pages. If you skipped the setup wizard, you can automatically generate these pages by navigating to WooCommerce > Status > Tools and using the Page installer tool. Otherwise, you’ll need to create the pages manually and add the appropriate shortcodes to each one. You can see which shortcodes need to be added to each page by hovering your mouse over the question mark icon next to them.
If you’re using one of our themes, these pages will be imported along with all the other demo content. However, you will have to set them manually by navigating to WooCommerce > Settings > Advanced > Page setup and choosing the appropriate page from each of the dropdowns.

As you can see from the image above, the only page that you will have to create yourself is the Terms and conditions page.
Here’s an example of what the Checkout page looks like in the Konsept theme:

In the Checkout endpoints and Account endpoints sub-sections, you can customize the endpoints for your checkout page and account page, respectively. Endpoints are strings that are added to a URL to signify that an action has been taken or new content has been loaded. Since the endpoints are set by default, we suggest that you don’t change them unless you have a good reason.

The REST API, Webhooks and Legacy API sub-tabs are all used for custom development, so we’ll skip them.
The WooCommerce.com sub-tab lets you configure whether you’d like WooCommerce to gather data about your store and offer you suggestions regarding extensions you might find useful. You can enable and disable both usage tracking and suggestions simply by marking the appropriate checkboxes.

The Features sub-tab lets you choose whether you’d like a Home page to appear in the WooCommerce sidebar options.

If you enable it, your Dashboard page will be replaced with a Home page with notifications, analytical data, and shortcuts. You can see what this looks like in the image below.

However, since the Dashboard page provides more detailed analytics as well as inbox notifications and useful shortcuts, we don’t see any reason to turn on the Home page unless you prefer how it looks.
Now that we’ve covered all of WooCommerce’s default settings, let’s take a look at some of the WooCommerce settings that are specific to Qode Interactive themes. As we’ve already mentioned, we’ll be using the Konsept theme in our demonstration, but these options are all more or less the same in all Qode eCommerce themes. However, you should note that depending on the theme you’re using, some options may vary. For more information about the specific WooCommerce options available in your theme, please refer to the theme documentation.
To access the Qode WooCommerce-specific options in the Konspet theme, please navigate to Konsept Core Options > WooCommerce from your admin panel.

You’ll notice that most of these options are related to the appearance of your shop and single item pages. The first set of options is for Product Lists and they are applied to your default Shop page which lists all of your products (the one you set in the default WooComerce options under Products > General > Shop Page).
The first thing you can set up is the Item Layout. This defines what your shop page will look like, i.e. the way items will be displayed. If this option is missing from your theme, don’t worry. That simply means that your theme has only one predefined item layout.

Next, you can choose the number of columns you’d like your products to be displayed in.

The Space between items options lets you define the spacing between individual products. Depending on your theme, you’ll be able to choose several predefined spacings, from no spacing at all to enormous spacing. The number in the parenthesis shows the spacing in pixels.

You can also define the number of products you’d like to display per page by inserting a number in the Products per Page field.

The Title Tag option lets you choose which heading tag (from H1 to H6) you’d like to use for your product titles on the shop page.

In the Sidebar Layout field, you can set the width and position of your sidebar. You can also choose to completely hide the sidebar by choosing the No Sidebar option.

The default sidebar in the Konspet theme takes up ¼ of the grid width and is located on the left side of the content.

If you don’t want to display the default widget area as your sidebar, you can also choose a custom sidebar to display instead. Please note that you will first need to create a custom widget area in Appearance > Widgets.

You can also modify the space size between the sidebar and the content. This is done in the Set Grid Gutter field. Again, you can choose from several predefined spacings.

Depending on your theme, you might also be able to enable a percent sign that will be displayed instead of the Sale label for products on sale.

Once you’re done setting up the look of your product list, you can customize several settings for your single product pages.

First, you can choose whether you’d like to display the page title or not.

Next, you can set a heading tag for the page title. The default heading for products in Konsept is H1.

With the Enable Lightbox Option you can choose whether you’d like to display images in a lightbox on click and, depending on the theme you’re using, you can also choose how you’d like them to appear. We’re going to choose the Magnific Popup option.

Additionally, you can also choose whether you’d like to enable zoom on hover. By default, this option is switched on.

Besides the main product image, you can provide additional images for each product, to show your customers what it looks like from various angles. These images are usually displayed somewhere alongside the main product image in the form of thumbnails. Using the Set Thumbnail Images Position option, you can choose where you’d like your thumbnails to appear in relation to the main product image.

In the Konsept theme, the thumbnail images are set to appear to the left of the main product image by default.

You can also choose the number of thumbnail images you’d like to display. We’re going to leave that number at four.

Related products are displayed near the bottom of each single product page. With the Number of Related Product Columns option, you can choose how many related products you’d like to display per page.

Here’s what the related products look like on the front-end of the Konsept theme:

Besides the default WooCommerce options and theme-specific options, there are also a few useful things you can customize by navigating to Appearance > Customize from your WordPress admin panel.

Here, click on the WooCommerce tab to reveal the available options.

You will now see four additional tabs: Store Notice, Product Catalog, Product Images, and Checkout.

Let’s take a look at each of these tabs and see what they let us do.
Store Notice
The Store Notice is text that, if enabled, will appear below the footer in your online store. You can use it to share some important information with your customers.
When you enable the store notice, any text you type into the text box will be displayed below your footer area. You can even see a preview of the text as you type it.

Product Catalogue
Here, you can set up how your products will be displayed on several default WooCommerce pages. The first option, Shop Page Display, lets you choose what will be displayed on the default shop page. You can choose to show your products, your product categories, or both.

The Category Display option lets you choose what will be displayed on your category pages. Again, you can choose to display the products that belong to the category being viewed, subcategories of the category, or both products and subcategories.

The Default Product Sorting option lets you choose how you’d like to sort your products on shop and category pages. You can sort them by popularity (according to sales), by average product rating, by the date they were added to your store (showing the most recent products first), or by price (ascending or descending). The default option sorts your products by name, unless you specify a custom ordering.

Product Images
In this section, you can set up everything related to the size of your product images. The Main Image Width option lets you choose the width of the main images on product single pages. The height of the images will be adapted proportionally.

The Thumbnail Width option does the same as the Main Image Width option, except it’s applied to the thumbnail images on your product lists.

The Thumbnail Cropping option lets you define the aspect ratio of your thumbnails and how they should be cropped. If you select 1:1, images will be cropped into a square. For entering a custom aspect ratio, select the second option and enter the ratio by yourself. If you want the images to stay as they are, check the third circle and they’ll remain uncropped.

Checkout
The options here let you customize your checkout page. The first option lets you choose whether you’d like to display a Company Name field in your checkout form. If you choose Hidden the company name field will not appear. If you choose Optional, the field will be displayed but won’t be a required field. And if you choose Required, your customers will have to input a company name before they can proceed with the checkout.

The same applies to the Address Line 2 Field and Phone Field options.

The Privacy Policy Page and Terms and Conditions Page options let you choose these two pages, respectively, from a list of all your published pages.

Additionally, you can add some text about your privacy policy and terms and conditions in the appropriate fields. This text will be shown to customers upon checkout. If you add text to the terms and conditions field, customers will have to accept your terms and conditions before they can proceed with checkout. You can also link to your previously selected privacy policy and terms and conditions pages from this text by using the [privacy_policy] and [terms] shortcodes, as shown in the image below.

Adding Product Categories and Tags
To make it easier for your customers to find the products they’re looking for, you should add some product categories and tags to your store. This will help users when they search for products in your shop or use product filters to narrow down their search.
To create your first product category, navigate to Products > Categories from your admin panel.

In the fields on the left side of the screen, input a category name. You can also specify a category slug (which will be part of the URL for that category), but if you leave this field empty, WordPress will generate the slug automatically. If you want this category to be a subcategory of some other existing category in your store, you should choose the parent category from the Parent Category dropdown. Just note that you first need to create that parent category.

Optionally, you can add a description for your product, choose a display type and add a thumbnail image.
Once you’ve created your product, it will appear in the list on the right side of the screen. From here, you can edit the category, delete it, or view what it looks like on the front-end of your site.

The process for creating tags is more or less the same. Navigate to Products > Tags, and fill in the necessary fields on the left side of the screen.

Creating a Simple WooCommerce Product
Now that you’ve set up your categories and tags, it’s finally time to create your first WooCommerce product. There are several types of products you can create, and we’ll cover them all. But first, we’ll take a look at the options that apply to all products.
To create a product, navigate to Products > Add New from your admin panel.

First you need to specify a product name in the field at the top of your screen.

The name of your product will appear on product single pages like this:

And in product lists like this:

On the right hand side of the screen, you can choose which categories and / or tags you’d like to add this product to.

You can also add a featured image and gallery images for your product. The featured image will be displayed on product lists, as well as on product single pages as the main product image. Gallery images will be displayed as additional thumbnails on product single pages.

Next, let’s take a look at the Product Data section. This is where you’ll define most of the important information about your product. First, you need to choose the product type. For now, we’re going to leave this as a Simple Product. We’re also going to leave the Virtual and Downloadable checkboxes unchecked.

In the General tab, you need to enter a price for your product. You can enter both a regular price, and a sale price if the product is on sale.

In the Inventory tab, you need to add an SKU (Stock Keeping Unit) number. Please note that this number needs to be unique for each of your products.

If you decide to leave the Manage stock? checkbox unchecked, you’ll need to manually manage your stock by setting a Stock status for the product.

However, please note that if you go the manual route, you’ll have to remember to change the stock status each time a product is on backorder or out of stock, so we suggest you mark the Manage stock? checkbox. If you do this, several new options will appear. You can define the number of units of this product you currently have in stock, choose whether you’d like to enable backorders, and set a low stock threshold. Each time a product of this type is sold on your shop, WooCommerce will automatically deduct 1 from the total number of units you’ve set in the Stock quantity field, and it will notify you you’re running low on stock once you hit the number defined in the Low stock threshold field.

By checking the Sold individually checkbox, you can allow only one unit of this product to be sold at a time (i.e. one unit per order).

The Shipping tab lets you define important information about the product that could affect its shipping price, like its weight and dimensions.

If you’ve created shipping classes when setting up WooCommerce, you can choose which class this product belongs to in the Shipping class field.

We’ll skip the Linked Products tab for now, since it applies to Grouped products, which we’ll cover later in the article.

First you need to create the parent attribute by entering a name and clicking the Add Attribute button.

Then, click on the attribute name in the list on the right side of the screen to add its available values.

The process for adding values is the same as that for adding attributes. Just enter a name and add any additional info from the available options (like choosing a color from the color picker for example).

Now, when you return to the Attributes tab in your product, you can choose any of the attributes you created from the Custom product attribute dropdown. Simply choose the attribute you’d like to add for this product and click the Add button.

Then you’ll be able to choose the value for that attribute from the dropdown that appears. You can add multiple values for each attribute if you want. And you can choose whether that attribute will be displayed on the product single page by marking the Visible on the product page checkbox.
The Advanced tab lets you set up some more options regarding your product. In the Purchase note field, you can enter a message to display to your customers upon purchasing the product.

The Menu Order field is used to determine the position of the product in your product list if you choose the default sorting option under Appearance > Customize > Product Catalogue > Shop Page Display (see the Additional WooCommerce Options section of this article). Please note that the value you enter in the Menu Order field has to be unique for each product.
The final option in the Advanced tab lets you choose whether you’d like to enable product reviews for this product or not.

Below the Product Data section, you will see a Product short description field.

The text you enter in this field will be displayed below the product title on your product single page.

If you’re using one of our themes, below the Product short description section, you’ll find several options you can use to customize how this particular product will be displayed in your shop.
The first option applies to single product pages and, depending on the theme you’re using, lets you choose several layouts for the product single. In the Konsept theme, you can choose the Default layout, the Gallery layout, the Big Images layout, and the Sticky Info Layout.

The Default layout is the one we’ve already seen. It displays a large main product image, and four thumbnails to the left of it.

The Gallery layout displays all your product images in a gallery view.

The Big Images layout shows all your product images in a large single column.

And the Sticky Info layout displays your images in a single column while making the product information on the right side of the screen sticky (i.e. it follows the user as they scroll through the page).

Again, please note that these options may vary depending on the theme you’re using.
In the Konsept theme, you can also set several options that define how each specific product will appear in product lists. These options are located underneath the Product Single section, in the Product List section.
The first option here lets you set a separate image to display on product lists instead of your featured image. Your featured image will still be the main image on your product single pages, but if you want some other image to represent your product in product lists, you can upload it here.

Next, you can customize the dimensions for the product list image by selecting a predefined dimension from the Image Dimension dropdown.

You can also choose a hover color for this product. The hover color will be displayed as an overlay on product lists that support this option (like, for example, the Masonry List layout in the Konsept theme).

If every pixel is important to you, as it is for us, you can also change the padding for each product in the masonry list, by entering the padding value in the appropriate field.

The Show New Sign option lets you display a New label on this product in product lists.

This is how new products are displayed in the Konsept theme.

Now that we’ve covered all the options for creating simple products, let’s take a look at the other product types available to us.
WooCommerce Product Types
As we already mentioned, WooCommerce lets us create several product types, depending on our needs. We’ll take a look at each of them now, and see what additional options that we haven’t already covered apply to them.
-
Simple Products
Simple products are the most commonly used type of WooCommerce product. Since we’ve already covered everything there is to know about simple products, let’s go on to the next type.
-
Grouped Products
Grouped products let you link several of your products together into a group. To create a product group, select the Grouped product type.

Now, go to the Linked Products tab and add all the products you’d like to link together in this group. Please note that the products need to be previously created. To add each product, simply start typing its name.

One more thing you should note is that you don’t need to add a separate price for product groups, as they will inherit the prices from all the products you add to the group.
When you take a look at a single page for a grouped product, you will notice that customers will be able to add the quantity of each product from the group that they’d like to purchase, but there is only one Add to Cart button.

-
Variable Products
As their name suggests, Variable Products let you add variations for your products. For example, you can add several color variations, or clothing sizes. To do this, you’ll need to define product attributes first. Adding product attributes is explained in the Creating a Simple WooCommerce Product section of this article.
To create a Variable Product, choose the Variable Product option from the Product Type dropdown.

Next, go to the Attributes tab and choose the attributes you’d like to add for this product.

Then, input the attribute values.

And make sure you mark the Used for variations checkbox.

For our example, we’ve added two attributes, each with several values.

When you’ve added all your attributes and values, navigate to the Variations tab. This tab will remain empty until you choose the Create variations from all attributes option from the dropdown and click Go.

This will generate combinations using all the product attributes we’ve specified.

You can now click on each variation to reveal more options. We suggest you upload an image for each variation to show what it looks like. To do so, simply click the image icon and upload your image.

You will notice that each variation has additional fields that require filling, like SKU number, regular and sale price, stock status, etc. You should enter all the information that applies to your product variations. Don’t forget to also add a featured image for the product since it will appear on your product list.

-
Downloadable Products
If you’re selling downloadable goods, such as images or videos, you should create a Downloadable Product. To do so, simply mark the Downloadable checkbox next to the Product Type dropdown.

The only difference between Downloadable and Simple products is located in the General tab. You have additional settings titled Downloadable files, where you should add the file’s name and URL. You can also set a download limit, as well as a number of days before the download link expires.

-
Virtual Products
Virtual products can be used to sell, for example, website subscriptions or services (i.e. non-physical products that don’t require download). Please note that some products, like for example e-books, can be both virtual and downloadable.
To create a virtual product, simply mark the Virtual checkbox next to the Product Type dropdown.

Virtual products are no different in their appearance or options from simple products, except that they don’t require shipping, so the Shipping tab will not be displayed.
-
External Products
External Products can be used for affiliate marketing, since these are not products you sell directly. Instead, they are products sold on some other online store to which you can link.
To create an external product, choose the External / Affiliate product option from the product type dropdown.

Now simply add your affiliate link and enter the text you would like to display on the button instead of Add to Cart. You should also enter the price of the product and a sale price if the product is currently on sale.

Now that we’ve covered all the product types WooCommerce offers, let’s take a look at how you can display those products on product lists.
Each product you create will automatically be displayed on the default shop page. We’ve already covered how to create and set up your default shop page, but just as a quick reminder, you need to first create a new blank page, and then set it as the default shop page in the Products tab of the WooCommerce settings. And that’s all there is to it. Every new product you create will be displayed on that page.
However, if you’re using one of our eCommerce themes, you will have several layouts available for the default shop page. Since these layouts vary from theme to theme, we’ll show you some of our favorite layouts in the Konsept theme. The basic principles for setting and customizing these layouts apply to all our themes.
Default Shop List

The Default Shop List in the Konsept theme displays your products in a grid, with a sidebar on the left side of the screen. The sidebar is populated with a search bar, categories, filters, and a newsletter sign up form. If you’d like to change the widgets in the sidebar, navigate to Appearance > Widgets and find the Shop Sidebar widget area. There, you can add and remove widgets in the sidebar.
If you’d like to hide the sidebar from the shop page, navigate to the backend of that page and in the Sidebar Settings tab choose the No Sidebar option from the Sidebar Layout field. Additionally, you can change which custom widget area is used for this sidebar in the Custom Sidebar field.

Masonry Shop List

The Masonry Shop List displays your products in a beautiful masonry layout. The images in the list are shown at different sizes.
To create a Masonry List, you need to add the Product List shortcode or Elementor widget (depending on the page builder you’re using) to a page, and choose the Masonry type.

Cascading Products

The Cascading Products List displays your products in a cascading layout, similar to the Pinterest style. The images in the list are shown at different heights.
To create a Cascading List, you need to add the Product List shortcode or Elementor widget (depending on the page builder you’re using) to a page, and choose the Masonry type. For the Image Proportions you should choose Original. The heights of uploaded images for this type of list should be different, if you want to keep the visual appearance of the cascading layout.

Gallery List

The Gallery List displays your products in a simple gallery layout. The images in the list are shown at the same sizes.
To create a Gallery List, you need to add the Product List shortcode or Elementor widget (depending on the page builder you’re using) to a page, and choose the Gallery type.

Metro Gallery List

The Metro Gallery List displays your products in a gallery type layout. The images in the list are shown at different sizes with spaces between.
To create a Metro Gallery List, you need to separate your section/row into two columns and add the Product List shortcode or Elementor widget (depending on the page builder you’re using) to each column. Then choose the Gallery type for both. For the left one, for the Number of Columns field you have to choose Two, and for the right column, there is obviously only one column with one product listed, so you should choose One over there.

Pinterest List

The Pinterest List displays your products in a Pinterest-style layout. The images in the list are shown at different sizes simulating the way the pins are displayed on Pinterest.
To create a Pinterest List, you need to add the Product List shortcode or Elementor widget (depending on the page builder you’re using) to a page, and choose the Masonry type. The same as for the Cascading list, for the Image Proportions you should choose Original. The way the images will be displayed and arranged will depend on the original dimensions of the images you upload.

Masonry Category List

The Masonry Category List displays your categories in a beautiful masonry layout. The images in the list are shown at different sizes, each with a category label displayed in the corner.
To create a Masonry Category List, you need to add the Product Categories List shortcode or Elementor widget (depending on the page builder you’re using) to a page, and choose the Masonry type.

Product Carousel List

The Product Carousel List displays your products in a carousel layout. The list appears as a slider with four columns.
To create a Product Carousel List, you need to add the Product List shortcode or Elementor widget (depending on the page builder you’re using) to a page, and choose the Slider type. Next, you need to choose the number of columns you’d like to display. For our example we chose four. This means that four images will be visible in the carousel on load. To view the remaining images, we need to scroll through the carousel.

Product Slider

The Product Slider displays your products in a simple slider layout. One product is displayed at a time, and you can browse through the products using the arrows or bullet navigation.
To create a Product Slider, you need to add the Product List shortcode or Elementor widget (depending on the page builder you’re using) to a page, and choose the Slider type and set the number of columns to one.

Dashboard
The WooCommerce dashboard displays several useful statistics about your store. It’s a great way to get a quick overview of your overall sales, most popular products and more. This is also where you can see all your inbox notifications. To view the WooCommerce dashboard, navigate to WooCommerce > Dashboard from your admin panel.
Orders
Whenever a customer buys something from your store, a new order will be created. You can view all orders by navigating to WooCommerce > Orders.

The orders will be displayed as rows. Every row contains columns with the necessary information, like the order ID and the title, date when the product was ordered, the order status, shipping address and the purchase total.

The order status gives you all the important information about the order. There are several predefined statuses and they are color coded so you can instantly see how far an order has gone through the purchase process. If, for example, you’ve received an order but the payment hasn’t been processed yet, the status of that order will be Pending payment. If the payment isn’t successfully processed, the order status will change to Failed. If the order status is On-Hold, that means that you need to confirm the payment was successfully made. A Canceled order status means either you or the customer have canceled that order.
Once the order is paid for and the payment has been confirmed, the order status will change to Processing. This only applies to products that are not virtual or downloadable, since these two types don’t require manual shipping or any other type of processing. Finally, when the order is fulfilled it gets the status – Completed.
If a customer pays for the product, but then decides to cancel the order after the payment, and gets a refund, the order status is set to – Refunded.
Coupons
To offer your customers discounts, you can create coupons. This is done by navigating to WooCommerce > Coupons and then clicking the Create your first coupon button.

First, you need to enter (or generate) a unique coupon code. This is what the customer will use to get their discount. You can either type in any alphanumeric code by yourself (just as long as it’s unique), or you can let WooCommerce generate it for you by clicking on the Generate coupon code button.

You can also enter a description for the coupon. It’s not required, but if there are certain terms, dates, or specific products the coupon applies to, you might want to let your customers know.

The most important part of creating a coupon is defining the coupon data. Here, you will find three tabs: General, Usage Restriction, and Usage limits.
In the General tab, you first need to choose a discount type. You can choose Percentage discount, Fixed cart discount, and Fixed product discount.

The Percentage discount type applies to the total cart amount. For example, if you set a Coupon amount of 20%, and the total purchase amount is $100, the customer gets a discount of $20.
The Fixed cart discount gives the customer a fixed discount on the entire value of their cart. For example, if the Coupon amount is set to $10, the customer gets a fixed discount of $10 on the total value of their cart, regardless of what that value is.
A Fixed product discount means that the customer gets a fixed discount, but only for selected products. However, if the customer chooses to purchase several units of the discounted product, he will get a discount on each unit separately. For example, you set a fixed product discount of $10 on a t-shirt in your store and a customer decides to buy three units of that t-shirt – he will receive a $10 discount on each unit, equaling to a $30 discount on his entire order.
We’ve already mentioned the Coupon amount settings. This is where you define the value of the coupon.

You can also opt to allow Free shipping. But in order to do that, free shipping must be enabled in your WooCommerce options.
One last thing that has to be defined in the General Coupon settings is the Coupon expiry date. Assuming the coupon wouldn’t last forever, this is one of the main things to set. The coupon will expire on the chosen date at midnight (at 00:00). The time zone will be the one you set from the general WordPress settings, i.e. your website’s time zone.

The Usage Restriction tab lets you define certain restrictions that will be applied to your coupon.

You can add a minimum or maximum amount that needs to be spent in order to use the coupon. The Individual use only option, if checked, means that the customer can use only one coupon at a time (i.e. they can’t stack coupons to further discount the price). If you don’t want coupons to apply to products that are already on sale, simply mark the Exclude sale items checkbox.
The Products option allows you to make the coupon valid for only certain items. To do that, simply type in the name of the item or items you’d like the coupon to apply to in the Products field.

You can also exclude the coupon from one or more products by using the Exclude products field. And you can include or exclude entire product categories as well.

You can also set the coupon so it applies only to certain email addresses (i.e. certain users) by adding the applicable email addresses in the Allowed emails field.

The Usage limits tab, similar to the Usage restriction tab, also allows you to add some limits to your coupon.

First, you can limit how many times the coupon can be used. Please note that if you don’t enter anything in this field, the usage will be unlimited until the coupon expires. The second field lets you limit the usage per user. So, if you enter the number 2 here, one person will only be able to use that coupon twice.
Customers
The Customers page in WooCommerce lets you view and manage all of your customers. You can search customers by name, email, see their orders and the total amount they have spent in your store. Additional info like city, region and postal code are also visible.

Reports
The Reports page lets you see an in-depth report of your shop’s performances. There are three main tabs here: Orders, Customers, and Stock.
The Orders tab allows you to view your sales volume, top sellers, product downloads, etc. This tab has 5 sub-tabs you can use to further filter your reports: Sales by date, Sales by product, Sales by category, Coupons by date and Customers downloads.

The Customers tab lets you see how many purchases are made by customers vs. guest, as well as the number of new registered users in a certain period of time. You can also view a list of all your registered users here.

The Stock tab lets you view products that are low on stock, out of stock, or most in stock.

Status
The Status page lets you view the overall status of your online store. It’s divided into four main tabs: System Status, Tools, Logs, and Scheduled Actions.
The System Status tab shows you almost everything you need to know about your site, from the software version and server settings to a post type count, a list of active plugins on your site, and more. However, perhaps the most useful option here is the Get System Report button, which you can use to generate an entire report about your site, which can then be copied.

The Tools tab provides you with a set of useful tools you can use to control user capabilities, customer session, etc. Since this is advanced material, we suggest you don’t touch anything in this tab unless you’re certain of what you’re doing.

The Logs tab is exactly what it sounds like – a log of all the events and errors that occurred on your site. The logs are kept for 30 days by default.

The Scheduled Actions tab shows all the scheduled actions on your site, both those completed and those that are yet to occur. Again, since scheduling actions is an advanced functionality, we suggest you don’t touch anything here if you’re not certain of what you’re doing.

Extensions
The Extensions page displays all of WooCommerce’s extensions, both free and paid. You can learn more about each extension by clicking on it.

Conclusion
And that’s all there is to it, you now know how to set up WooCommerce with WordPress, create your first products, and manage an entire eCommerce website. As you can see, the free WooCommerce plugin provides all the power necessary to run a successful online business. And with all the amazing extensions available, you can create any type of shop website imaginable. We hope our ultimate guide to WooCommerce has helped you toward launching your very own eCommerce platform. Or that it has at least shown you that running a successful webshop isn’t actually all that complicated. In either case, we wish you the best of luck in your future endeavours, and if you have any questions, make sure to hit us up in the comments.
