The Ultimate Guide to the Most Useful WooCommerce Shortcodes

Before the introduction of the Gutenberg block editor, shortcodes were considered an integral part of WordPress when it comes to efficiently displaying both static and dynamic content on your site. And while it’s true that Gutenberg was created to make the entire page editing process easier for users not willing to learn how to use shortcodes (among other things), many WordPress plugins and themes still come packed with ready-made shortcodes that can be used to insert specific functions into pages. There’s even a shortcode Gutenberg block you can use to easily insert shortcodes to pages and posts with the new editor, which is only further proof that these small pieces of code remain very much relevant and will continue to be used to contribute to the platform’s overall functionality. And the same goes for one of the most popular and all-encompassing eCommerce plugins on the web – WooCommerce. Some of the most vital WooCommerce pages such as Products, Checkout, and Cart are all built with the help of shortcodes.
To help you truly learn all there is to know about WooCommerce, we’ve decided to share some of the most useful WooCommerce shortcodes available. There are so many possible shortcode combinations and parameters, and you will be able to use them to build the most unique custom pages and make your WooCommerce-powered store truly stand out among the rest. We are also going to explain what shortcodes are in general, as well as what makes WooCommerce shortcodes useful in particular, so make sure to stick around:
eCommerce WordPress Themes
View Collection


As their name suggests, shortcodes represent condensed pieces of code whose main role is to carry out a particular function on a WordPress site. Depending on their purpose, these shortcodes can help you create anything from a full-blown image gallery to custom product categories.
As for the shortcode structure, it almost always looks the same in the backend – you will be able to recognize it as a word in brackets:
[shortcode]
In most cases, it will be located within a shortcode block.
If a shortcode consists of more than one word, then these words will usually be connected with underscores. Like this:
[shortcode_phrase]
Finally, shortcodes can also consist of extra parameters that can be used to customize a particular shortcode even further (more on this later). Here’s what the structure of a shortcode with two parameters can look like:
[shortcode parameter1="x" parameter2 ="y"]
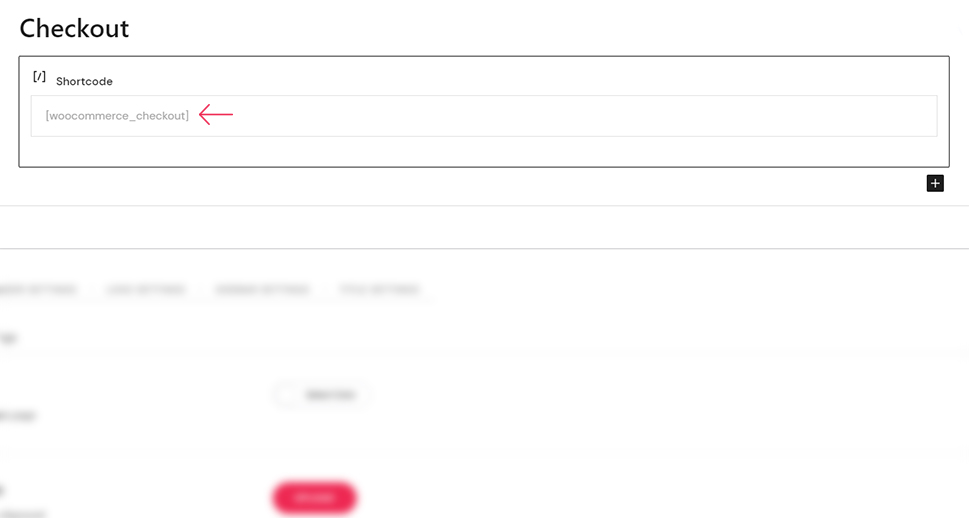
Now, WooCommerce shortcodes are still those same short pieces of code that appear in brackets on your website’s backend, but they’re specifically made for the purposes of adding more functionality to the WooCommerce plugin. By default, once you install WooCommerce for the first time, the plugin will automatically create several different pages on your site. Every one of these pages actually consists of different shortcodes that load various pieces of content. For example, the shortcode named [woocommerce_checkout] will display the Checkout page.
Now, we’ve already mentioned that shortcodes are used to add specific functionality to your site, but the main appeal of shortcodes lies in the fact that they allow for plenty of customization. Many of the available WooCommerce shortcodes actually come with the ability to add various parameters and modify some of the shortcode qualities. This will allow you to create a fully functional and unique-looking eCommerce site that will grab the attention of the right customers.
For example, you can adjust the way specific products (or product categories) are displayed on your product page by setting a specific number of columns for them to appear in, you can choose whether you’d like to sort your products by price, color, publishing date, etc. And the best thing about all this is that you don’t need to know any coding to customize your WooCommerce store using shortcodes. All of it can be easily done using the right shortcode parameters.
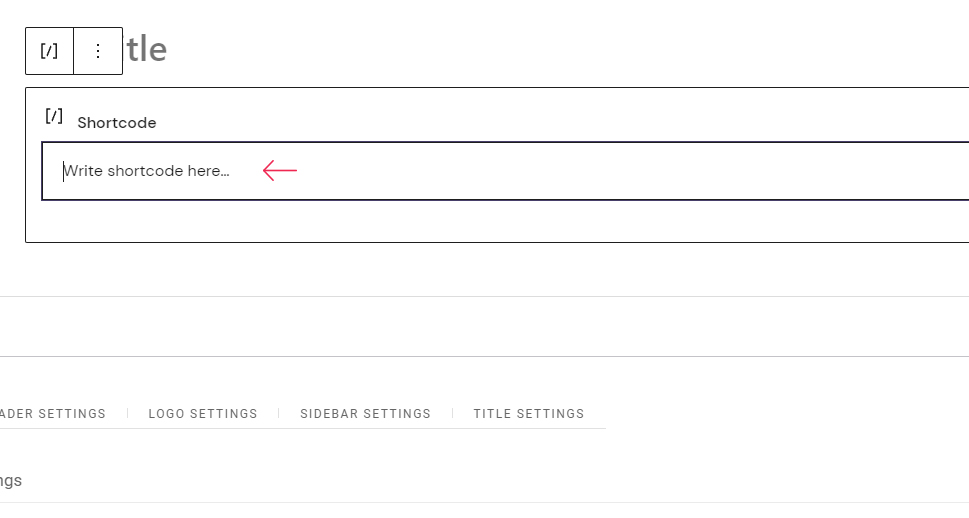
Essentially, the process for adding WooCommerce shortcodes in WordPress is the same as for any other WordPress shortcode. You simply need to head to your page or post and hit the (+) sign. Then, insert “shortcode” into a search bar and add a Shortcode block.
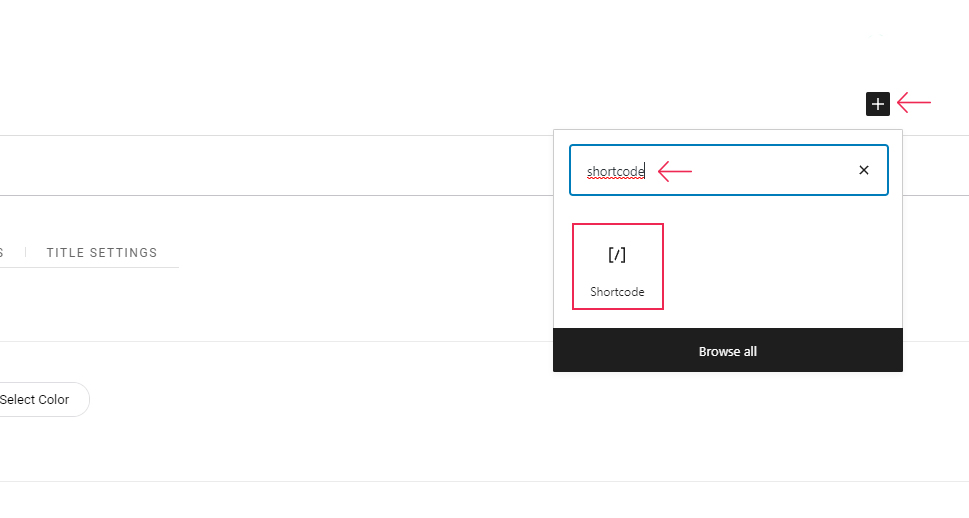
From then on, you simply need to add your shortcode into the shortcode field.
And if you’re using the Classic editor, you can simply insert your shortcode into the Visual part of the editor. Like this:
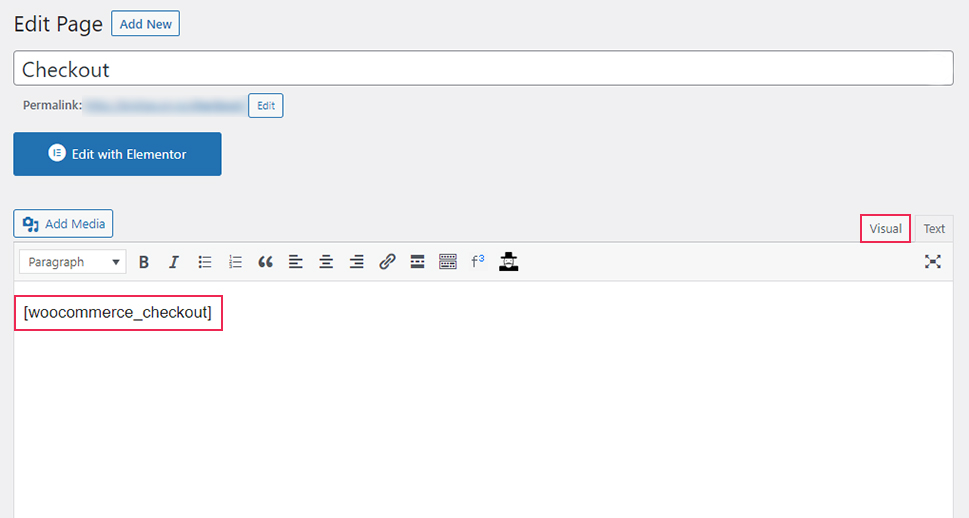
You will be able to see what your shortcode looks like on the frontend once you preview your page.
If you want to add shortcodes using WordPress widgets, you can do this by going to Appearance >> Widgets and then using the shortcode block.
We suggest that you check out our article on the same subject for more info.
Now that we’ve explained what WooCommerce shortcodes are and how they work, it’s finally time to present you with a list of some of the most useful WooCommerce shortcodes available as well as some of their most notable parameters. Many of these shortcodes may prove to be quite useful during the customization of your own WooCommerce store, so make sure to check them out:
-
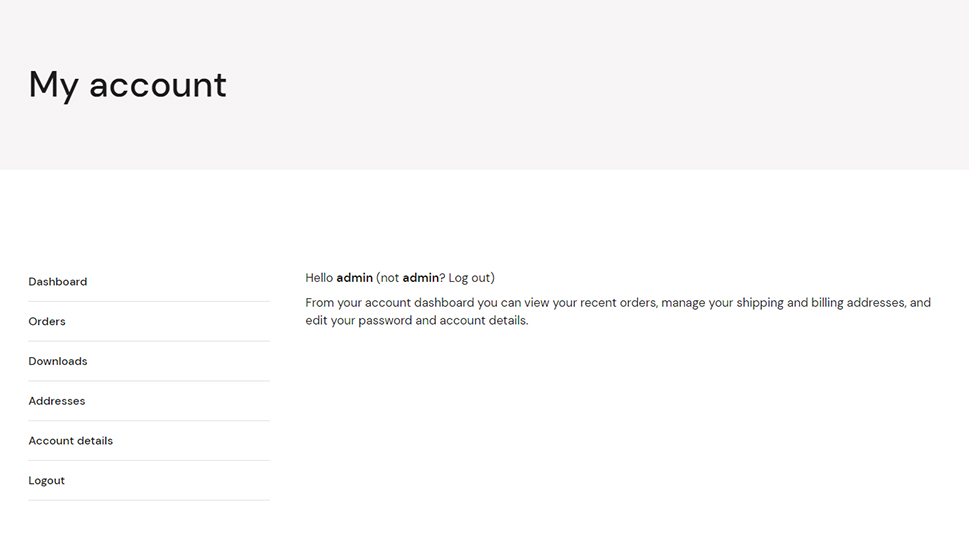
[woocommerce_my_account] – this shortcode is used to display the My Account page. This page consists of all essential customer information, including their previous orders (if there are any). Here’s what it can look like on your frontend:
-
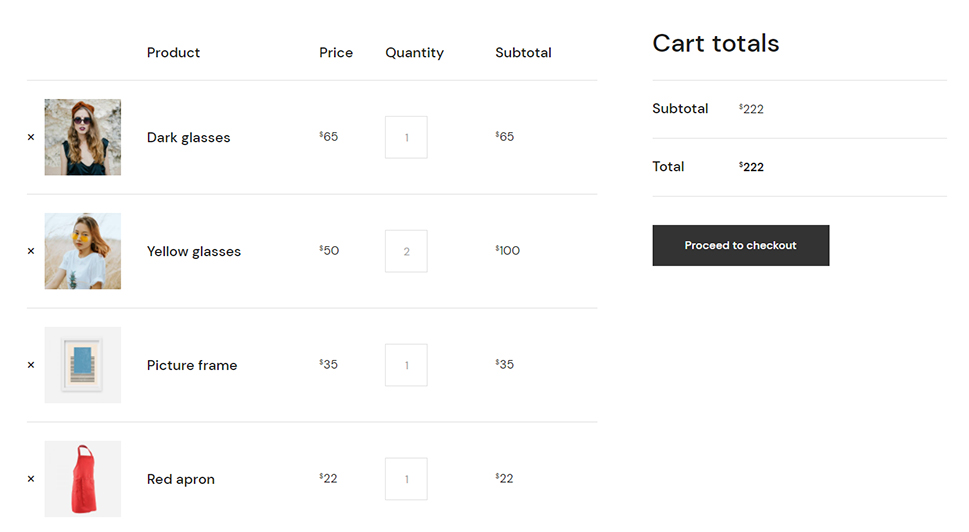
[woocommerce cart] – this shortcode adds the WooCommerce cart functionality to the page. In other words, it will display all of the products that the user has added to their cart. There are no parameters to add to this shortcode.
-
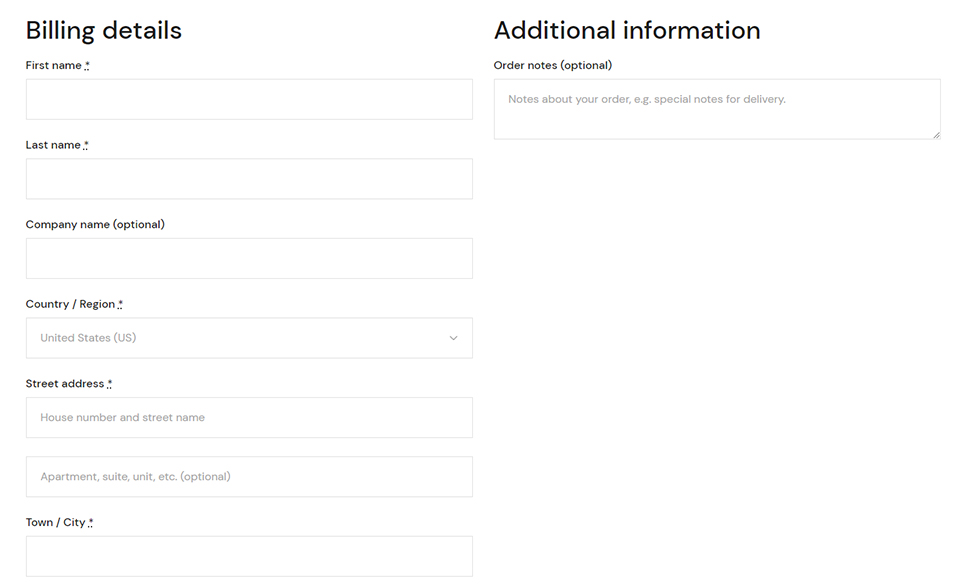
[woocommerce_checkout] – as is apparent from its name, this shortcode will allow you to display the checkout page. This shortcode contains no additional parameters.
-
[woocommerce_order_tracking] – this shortcode will generate an “order tracking” page that lets customers check the status of their order.
-
[products] – this is easily one of the most useful and most extensive WooCommerce shortcodes available. This shortcode will allow you to display your products and comes with many different parameters that will further customize the way your products will be displayed on your site.

Though you may think that adding shortcode parameters is a complicated process, it is actually quite intuitive. You only need to add the name of your parameter, then add an equals (=) sign, and place your desired value inside quotes. Remember the example of the shortcode parameter structure we mentioned at the very beginning of the article? Here is a more concrete example of that:
[products limit="5" category="pants"]
This shortcode is meant to limit the number of products to five and also only display products from the “pants” category.
To make things a bit clearer, we are going to list some of the most important parameters that can be used with this shortcode one by one:
-
“Limit” – this parameter will allow you to limit the number of products displayed on your page (it will display all products by default):
[products limit="5"]
-
“Category” – this parameter will allow you to display products from a specific category. If you wish, you can include more than one category by simply adding a comma between different categories. For example:
[products category="pants, shirts"]
-
“Columns” – this parameter will let you customize the layout of your product page. More specifically, it will allow you to set the desired number of columns (it is set to 4 columns by default):
[products columns="2"]
-
“Paginate” – this particular parameter will let you define whether your product page will be paginated or not. There are two options you can use – true or false (it is set to false by default).
You will probably want to use the paginate parameter in conjunction with the limit parameter we mentioned above. Thus, the limit parameter will determine how many items are listed on each page.
[products paginate="true"]
Here’s how this shortcode can look like when combined with the paginate and limit parameters:
[products limit="10" paginate="true"]
-
“Orderby” – the “orderby” parameter has multiple options that will let you determine the order of your products. This order will be set by the product title by default. Also, you can add more than one option by adding space between them. Some of the possible options include date (order products based on the publishing date), rating (order products by their average rating), popularity (order the products by the number of purchases), id (orders products by their post ID), and rand (this option will display products at random).
[products orderby="date"]
-
“order” – aside from the orderby parameter, you can also define whether the order of your products will be ascending (ASC) or descending (DESC). Like this:
[products order="ASC"]
-
“tag” – if you want, you can use this parameter to display products using a specific tag. Once again, you can include multiple tag parameters within one shortcode – you just need to separate them with a comma. For example:
[products tag="silver, elegant"]
-
“on_sale” – this parameter will allow you to display products that are on sale. You can either insert the “true” or “false” option:
[products on_sale="true"]
-
“best_selling” – similarly, this parameter will allow you to display the best-selling products only:
[products best_selling="true"]
-
“top_rated” – this parameter will let you display your top-rated products:
[products top_rated="true"]
Just a quick note before we continue – these last three parameters (“best_selling”, “top_rated”, and “on_sale”) should not be combined.
-
[product_categories] – this particular shortcode will allow you to display more than one category (not the products that can be found in those categories, but the categories themselves). There are plenty of customization options you can use, just like with the [product] shortcode. If you don’t apply any parameters, this shortcode will simply showcase all your product categories on one page.
Some of the parameters you can use with this shortcode are:
-
“limit” – limits the number of categories that will be displayed
-
“orderby” – use this parameter to order the categories by number, name, ID, slug, or menu order
-
“order” – you can arrange the categories in ascending (ASC) or descending order (DESC).
For example:
[product_categories limit="5" orderby="name" order "DESC"]
-
[product _category] – this shortcode allows you to display products from a specific category. Once again, you should add a parameter to specify your category. Some of the available parameters include ids (allowing you to display categories by ID), limit, columns, category, order, orderby, and so on.
Here’s an example of a shortcode combined with a few of its parameters:
[product_category category="pants" limit="12" columns="4" orderby="name" order="asc"]
So, this [product_category] shortcode will display products from the pants category with a limit of displaying 12 products on a page in 4 columns. The products from the pants category will also be ordered by name, in ascending order.
-
[add_to_cart] – this is another built-in shortcode that allows you to add an “add to cart” button to any product. You just need to add the product ID (or its SKU) and the button will be displayed for that specific product. This shortcode also includes many parameters you can use to further customize your add to cart button. Here are some of them:
-
“id” – as we already mentioned, this parameter allows you to select the product by its ID
-
“SKU” – using SKU is another way in which you can choose your product
-
“show_price” – this allows you to choose whether the price will be shown together with the button or not. You can either use show_price=”TRUE” or show_price=”FALSE”.
Here’s an example of an [add_to_cart] shortcode with the parameters we mentioned:
[add_to_cart id="12" show_price="TRUE"]
-
[related_products] – just like its name suggests, this shortcode displays related products on any page it gets added to. Some of the parameters you can use include:
-
“limit” – once again, it will limit the number of related products on the page
-
“columns” – sets the number of columns the related products are going to be displayed in
-
“orderby” – this parameter lists the related products by the option you specified. Some of the options include date, ID, rating, menu order, and so on.
An example would be:
[related_products limit="8" columns="4" orderby="title"]
-
[recent_products] – last but not least, this shortcode will allow you to showcase the products that have been recently added to your WooCommerce store. The available parameters are pretty much the same as the ones for the [related_products] shortcode, including limit, order, orderby, columns, etc.
For example:
[recent_products limit="6" columns="3" orderby="date" order="ASC"]
Wrapping Things Up
As you can see from the examples we listed above, there are quite a few shortcodes you can use if you plan to build your online store with the powerful WooCommerce plugin. But in reality, this is only the tip of the iceberg when it comes to all available WooCommerce shortcodes, and we would be here all day if we were to list all of them. So, we made sure to share only some of the most essential ones to give you a good head-start. If you want to get familiarized with the complete list of customizable shortcodes (and parameters) you can use to create a truly outstanding online store, we recommend checking out WooCommerce’s shortcodes documentation page.
