How to Fix the Leverage Browser Caching Warning in WordPress

Page speed plays an important role in search engine ranking, as well as in the user experience and the number of conversions it leads to. This is why most webmasters often consult online tools like GTMetrix, PageSpeed Insights, or Pingdom to measure the current speed of their website and obtain valuable suggestions for its optimization.
One of the more common suggestions that webmasters in the past have seen is the “Leverage browser caching” warning. Now, while this warning might have changed its name recently, leveraging browser caching as a website speed optimization tactic is as important as it was before. In this article, we will be explaining more about what it means, what warnings to expect, and in what ways you can leverage the browser caching to benefit your WordPress website. Without further ado, let us begin. Here is what we will be discussing:
Qode Themes: Top Picks
View Collection


When a user visits a website for the first time, the copies of its static files (CSS and JS stylesheets, images, and other assets) are downloaded from the web server and temporarily stored within the cache of the browser you are currently using. When the user visits the same website on subsequent occasions, copies of those files from that temporary storage will be used instead of downloaded again.
As a result, fewer files will need to be downloaded, increasing page speed, reducing the server load, and decreasing bandwidth consumption. However, even though the advantages of this method are obvious, this doesn’t mean that the files will be cached forever. Since websites tend to change over time, it is important to determine the correct amount of time during which the files will be cached, to ensure that the visitors are seeing the latest version of the website.
In general, these expiration periods are determined for each asset type individually by the server which provides them. After a predetermined period has passed for a type of website asset, said asset will need to be downloaded and stored in your browser cache again. This is referred to as the server’s caching policy and it is what brings us to the topic of this article.
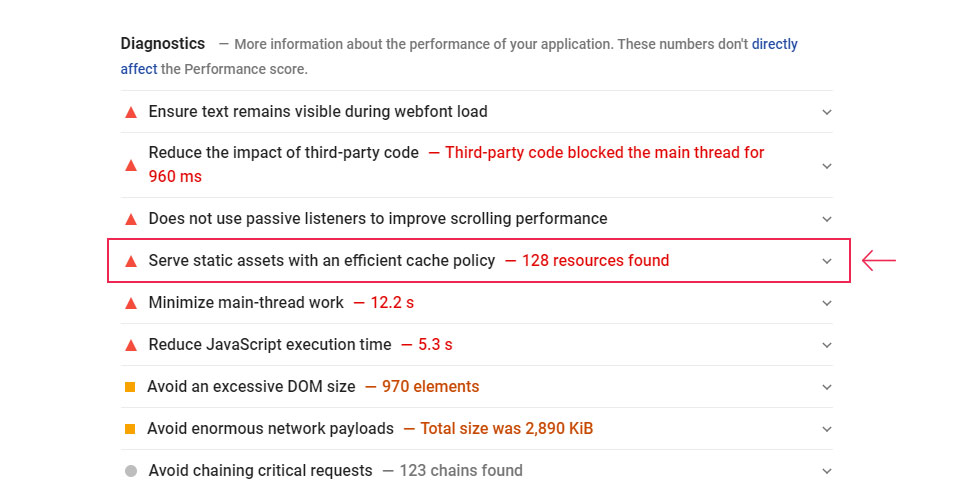
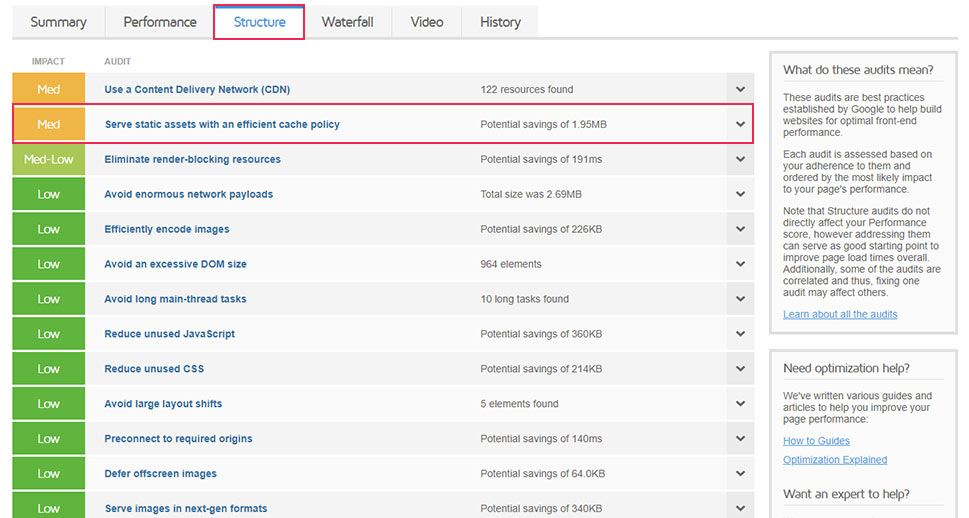
The “Leverage browser caching” warning is issued by website speed optimization tools in the case said expiration periods weren’t set on the server or if they were set as too short to impact the website speed meaningfully. As the latter case is more frequent recently,the warning message has changed. If you are using PageSpeed Insights or GTMetrix, the same warning will be labeled as “Serve static assets with an efficient cache policy”. For the former website speed tool, this message can be seen within the Diagnostics section, while for the latter it will be within the Structure tab.
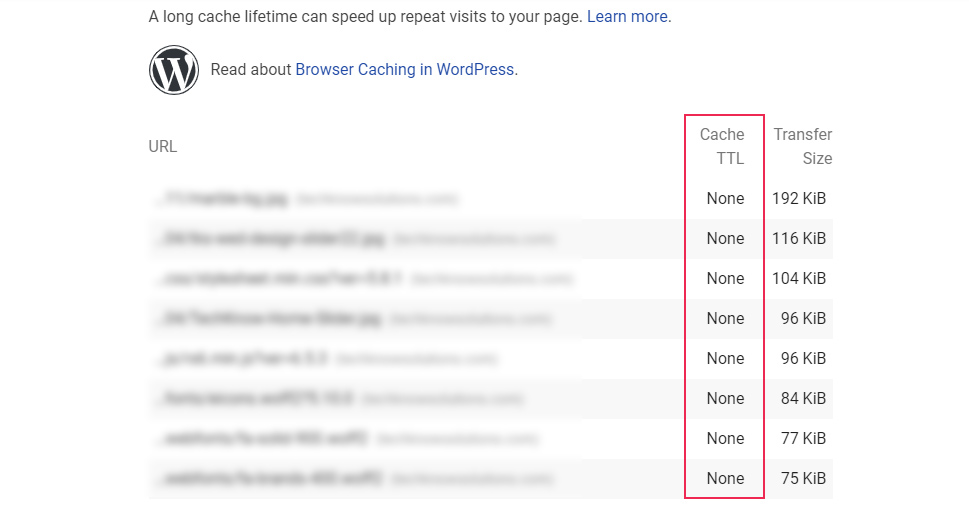
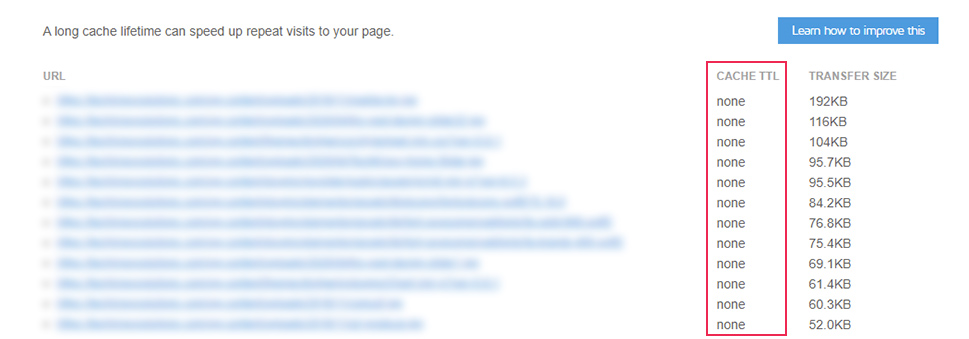
Furthermore, by opening the warning section, you will get an overview of the current expiration dates that have been set on all your static resources in the Cache TTL column. In case they weren’t set, you will see the label “None” next to the relevant resource in the Cache TTL column.
In order to address this warning, you need to edit the server’s configuration file and add some instructions which specify the expiration period for those assets. We will discuss how you can implement them below.
Generally speaking, fixing the leverage browser caching warning involves implementing the Cache-Control or Expires headers using corresponding rules. In this section, we will discuss how you can add rules using a WordPress plugin or custom code. In doing so, you will be able to implement an efficient caching policy for the assets hosted on your server.
We will also mention how the same principle can be done for the Google Analytics code, which is a third party asset which can commonly cause the “Leverage browser caching” warnings even after applying one of the two previously mentioned headers. With that being said, let us begin.
Adding Cache-Control and Expires Headers
As noted above, the biggest part of this warning can be solved by implementing a Cache-Control or Expires Headers. The Expires header only contains the expiration date for a specific asset, whereas the Cache-Control header, as the newer HTTP header, contains multiple rules for caching both HTTP requests and responses. Generally speaking, you don’t need to add both types of header, one is enough to fix the warning. And, it being the newer one and featuring more directives which you can add, we suggest Cache-Control. Nevertheless, we will explain how you can add both below.
-
Using a WordPress plugin
Using a WordPress plugin for troubleshooting or implementing a feature is often the go-to way for most WordPress users. The same can be said for the “Leverage browser caching” warning, for which there are several plugins you can use. Apart from ones which are built specifically to tackle this issue, you can also use some of the more popular WordPress caching plugins, which have appropriate options for browser caching optimization. One such plugin is W3 Total Cache, which we will be using in this article.
The W3 Total Cache plugin is a freemium website performance optimization plugin with a wide array of options regarding file minification and database, object, and browser caching. The premium options include features like fragment caching and lazy loading for Google Maps, a WPML caching extension, REST API caching, premium support, and others. For this article, the free version of the plugin will be sufficient, as we will use some of the options for browser caching optimization only. Let us explain how these options can be used.
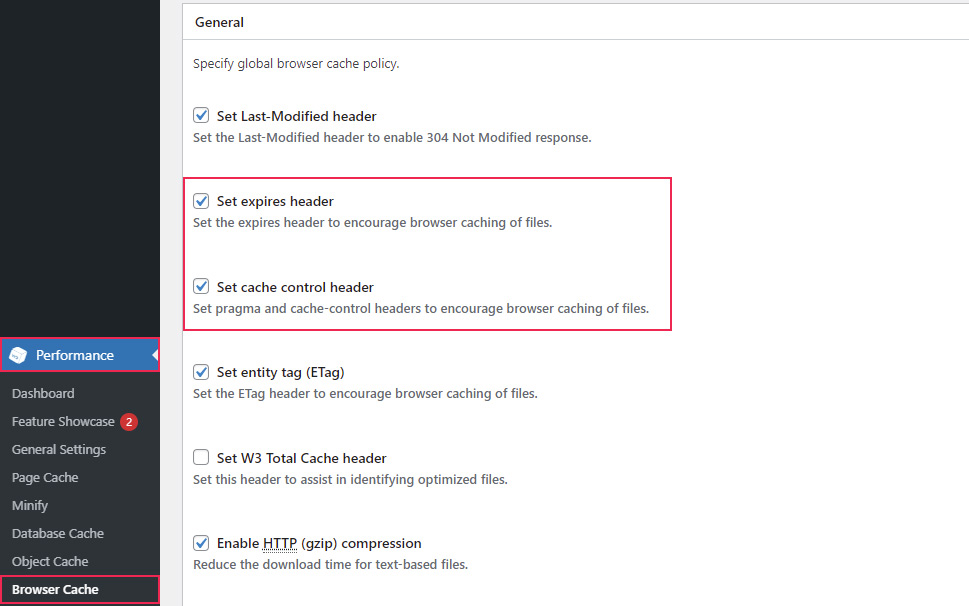
After installing and activating the plugin, navigate to Performance > Browser Cache. Here, you will see a lot of options sorted into several sections, the first of which will be the General section. Within it, you will be able to set the important options regarding browser caching, including Expires Headers and Cache-Control. There, locate the options titled Set expires header and Set cache control header and make sure they are ticked. When you are done, click the “Save all settings” button to apply these options to your website with the values predefined by the plugin.
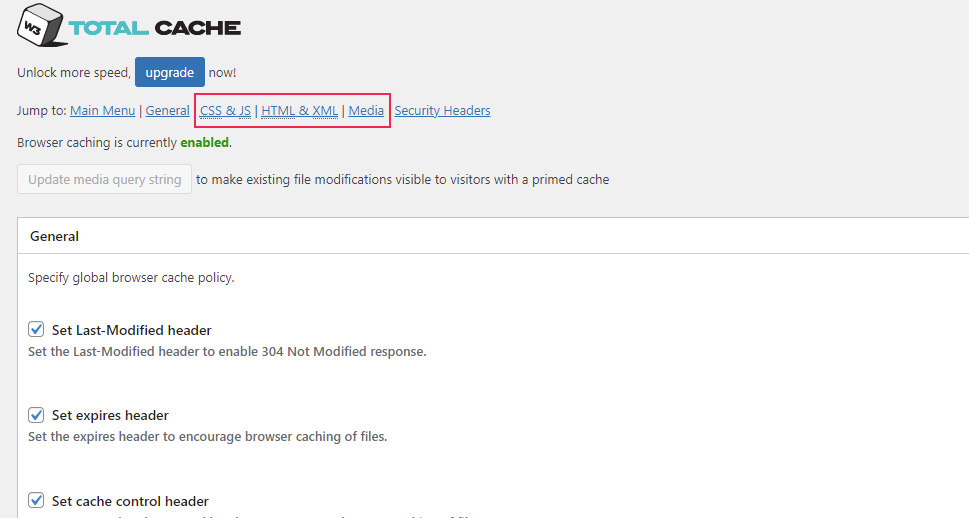
You can also tweak the values that are used by manually modifying the appropriate option sections. These are the CSS & JS, HTML & XML, and Media sections, which can be located by scrolling down the page or by using the anchor links provided at the top of the current page.
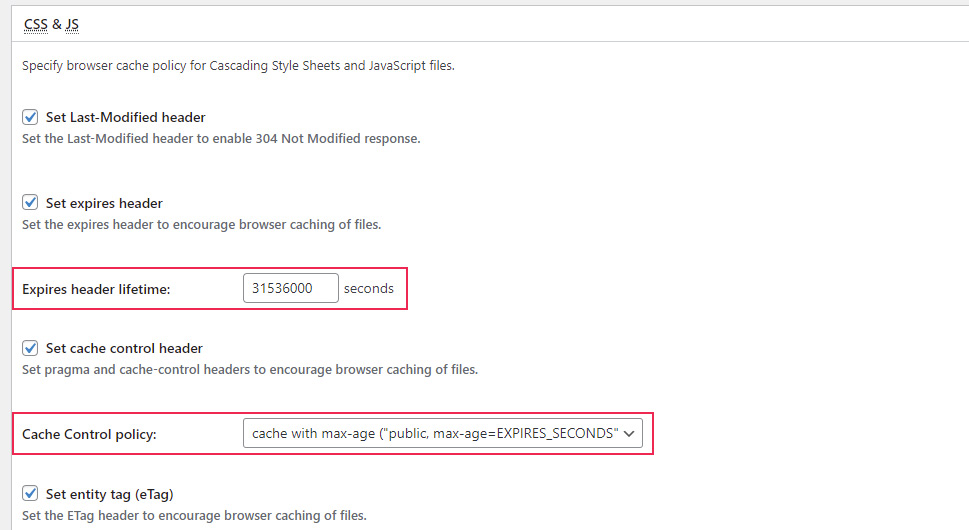
If you choose to customize these options on your own, you will need to navigate to each of these sections and adjust the relevant Expires header lifetime and Cache-Control policy settings accordingly. Needless to say, these options are only recommended for more advanced WordPress users, while for most other users the default values are more than adequate.
-
Using custom code
Adding Cache-Control and Expires Headers can also be done using custom code, both for websites which use Apache and Nginx servers. We will talk about how it is done for both below. But the first thing you need to do is figure out which of the two servers does your website use. This can be done by asking your hosting provider or by inspecting the HTTP requests of your website. Additionally, as you will need to edit the configuration file of your server via FTP, we advise brushing up on your knowledge of FTP. Finally, as a safety precaution, we also advise making a backup of your website at this point. Having done that, proceed as below.
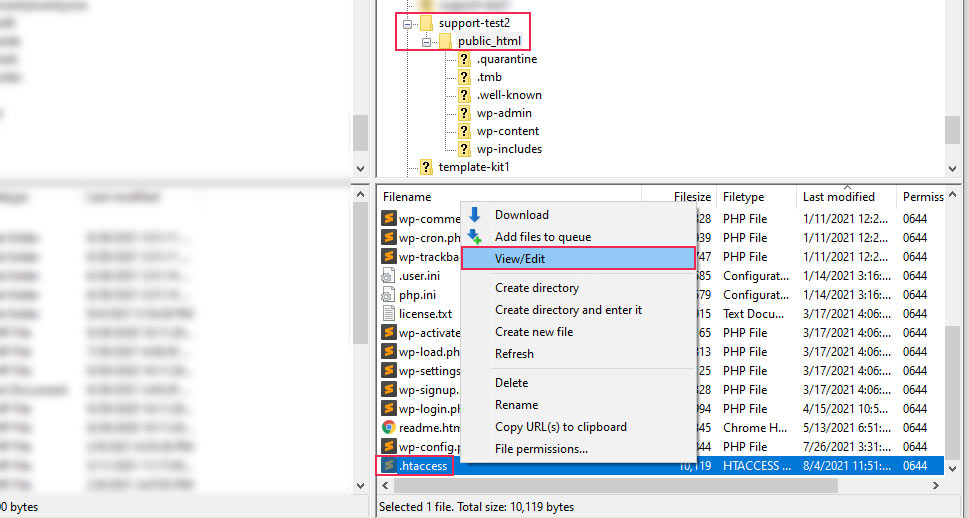
If you are using an Apache server, all you need to do is a minor edit of your .htaccess file, which is located in your root WordPress directory. To do so, first, connect to your server using your FTP credentials, navigate to your root WordPress directory and locate the .htaccess file within. If you aren’t able to see it, make sure to enable the visibility of hidden/dotfiles within your FTP client. Then, right-click the file and select the “View/Edit” option from the menu.
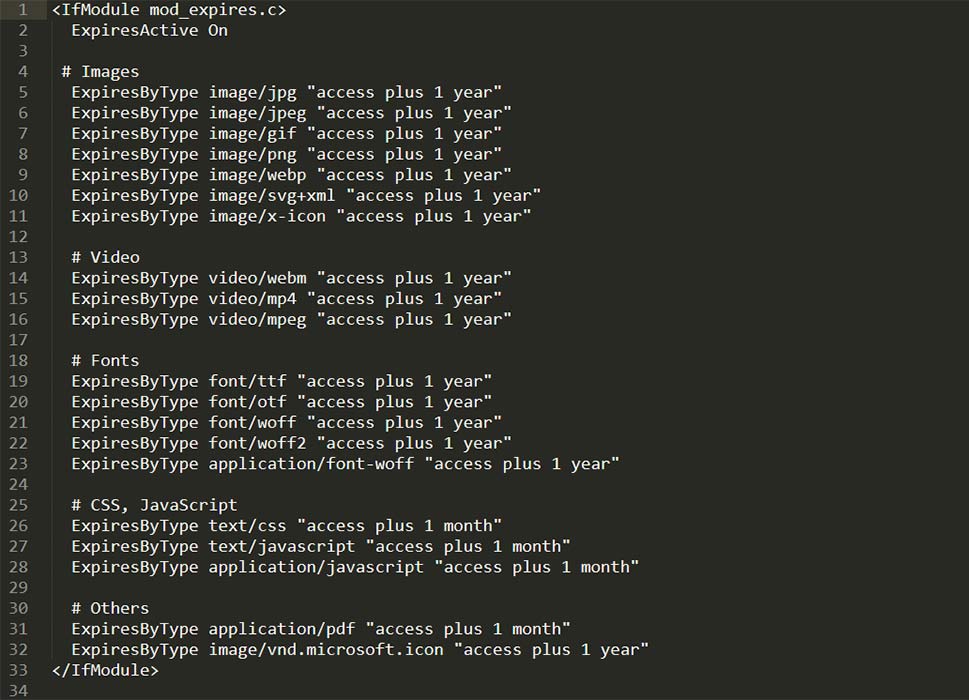
Having done that, open the .htaccess file using your preferred text editor. To add the Expires Headers to your website, you will need to insert the following code snippet to the .htaccess file:
<IfModule mod_expires.c>
ExpiresActive On
# Images
ExpiresByType image/jpg "access plus 1 year"
ExpiresByType image/jpeg "access plus 1 year"
ExpiresByType image/gif "access plus 1 year"
ExpiresByType image/png "access plus 1 year"
ExpiresByType image/webp "access plus 1 year"
ExpiresByType image/svg+xml "access plus 1 year"
ExpiresByType image/x-icon "access plus 1 year"
# Video
ExpiresByType video/webm "access plus 1 year"
ExpiresByType video/mp4 "access plus 1 year"
ExpiresByType video/mpeg "access plus 1 year"
# Fonts
ExpiresByType font/ttf "access plus 1 year"
ExpiresByType font/otf "access plus 1 year"
ExpiresByType font/woff "access plus 1 year"
ExpiresByType font/woff2 "access plus 1 year"
ExpiresByType application/font-woff "access plus 1 year"
# CSS, JavaScript
ExpiresByType text/css "access plus 1 month"
ExpiresByType text/javascript "access plus 1 month"
ExpiresByType application/javascript "access plus 1 month"
# Others
ExpiresByType application/pdf "access plus 1 month"
ExpiresByType image/vnd.microsoft.icon "access plus 1 year"
</IfModule>
You can insert the code at the beginning of the file, as we have.
Additionally, to add the Cache-Control header, you will need to add the following code snippet as well.
<filesMatch ".(ico|pdf|flv|jpg|jpeg|png|gif|svg|js|css|swf)$">
Header set Cache-Control "max-age=84600, public"
</filesMatch>
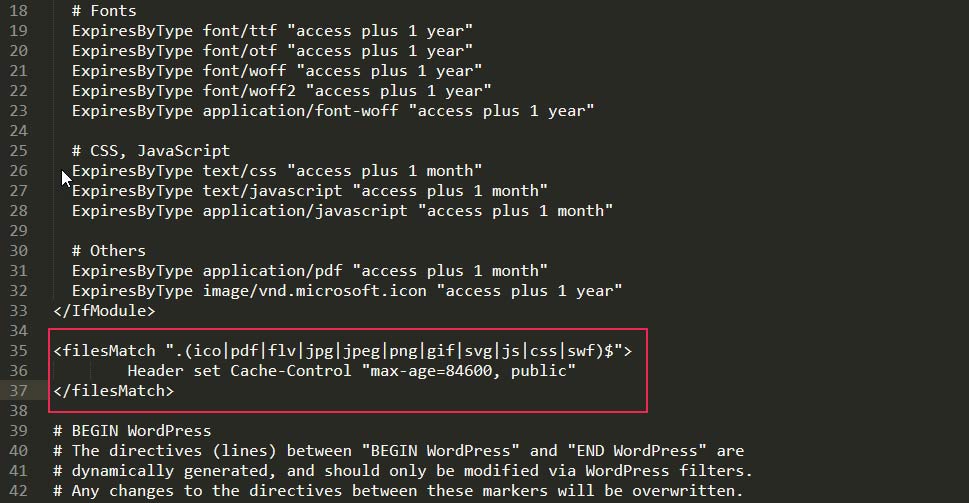
Having done that, save the changes you have made and upload the file back to your server, overriding the one currently there.
Note that the above instructions will only apply to Apache users. We will also give the equivalent set of instructions for Nginx users. Similarly, they involve code snippets which help implement the two types of headers we previously discussed. Furthermore, the process also
involves editing your server’s configuration file. But, as the location of this file depends on your hosting provider, we suggest asking them for help regarding finding and accessing it.
After you access the file, add the following code to it. With that, you will be adding the Expires Header to your website.
location ~* \.(jpg|jpeg|gif|png)$ {
expires 365d;
}
location ~* \.(pdf|css|html|js|swf)$ {
expires 30d;
}
If you wish to add the Cache-Control type of header, insert the following code snippet inside your server’s configuration file.
location ~* \.(js|css|png|jpg|jpeg|gif|svg|ico)$ {
expires 30d;
add_header Cache-Control "public, no-transform";
}
That said, after implementing one of the methods discussed in this section, you will need to investigate if a more efficient caching policy has been applied to your website correctly. You can do so either by examining your website using the tools like GTMetrix, PageSpeed Insights, or Pingdom once more and examining the TTLs of individual assets or by using online caching checkers to inspect the caching policies which are set for your website’s static assets.
After implementing one of the two methods mentioned above, the status of the leverage browser caching warnings will be greatly improved. However, in most cases, you won’t be able to get rid of the warning completely as there may be some resources hosted on third party servers over which you don’t have any control.
One such asset which will often be shown as requiring a more efficient caching policy is the Google Analytics script, which has the cache expiration date of only two hours by default. To solve this issue, you will need to host this script locally, which will allow you to implement an efficient caching policy employing above mentioned methods. Luckily, hosting the Google Analytics script is possible using a WordPress plugin called CAOS or Complete Analytics Optimization Suite.
The CAOS plugin was created specifically for hosting the analytics.js/gtag.js files locally, as well as to keep those files updated using WordPress cron jobs. Apart from that, it offers additional features, notably tracking logged-in administrators, increased GDPR compliance of your tracking, compatibility with some other Google Analytics plugins, the ability to choose where to store the downloaded files (whether on the server or by using a CDN), a more accurate bounce rate metric, and an ability to track users with ad blockers. Let us quickly go through the operation of this plugin.
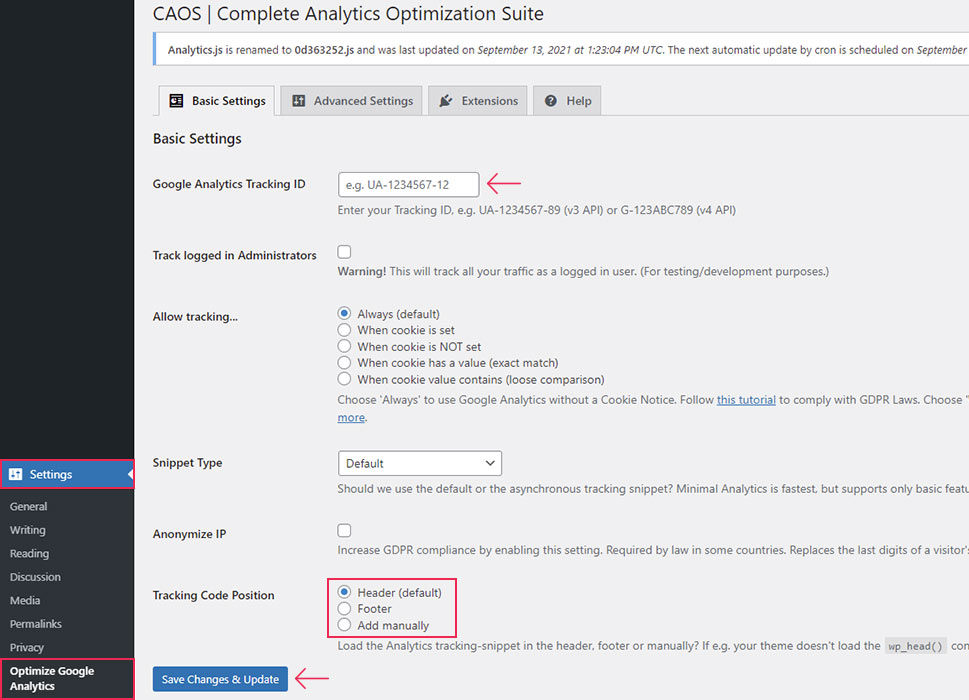
After installing and activating the plugin, navigate to Settings > Optimize Google Analytics. You will see the options organized into four tabs, with the first one, Basic Settings, being opened by default. Remove the leverage browser caching warning for your Google Analytics code by using the options within this tab. Input your Google Analytics ID into the Google Analytics Tracking ID field, choose where to place the analytics code using the Tracking Code Position option, and press the “Save Changes & Update” button to complete the setup. The tracking code will be placed in the header by default, but using the footer option is advised in the plugin’s FAQ section.
Afterward, you will need to make sure the relevant browser caching-related warning about your Google Analytics script has disappeared. You can use the same testing suggestions as mentioned at the end of the previous section. With this, we conclude this article.
Final Thoughts
In this article, we have discussed what browser caching is and what you should do if you see the “Leverage browser caching” or “Serve static assets with an efficient cache policy” warnings while inspecting your website using some of the website optimization tools. Specifically, by implementing an efficient caching policy on your server, you can greatly reduce your website’s loading time, increase its SEO and improve its user experience.
You can do this by adding Cache-Control or Expires headers to your server assets, which is what we have discussed in this article. We have also discussed how you can resolve the same warnings for the Google Analytics script. Since we have covered both avenues of fixing the “Leverage Browser Caching” warnings in WordPress in detail, you should have no issues implementing them on your website.
Finally, as optimizing the speed of any website plays a crucial role in its success, we strongly advise bookmarking this article for future use.
