How to Add Expires Headers in WordPress

If you ever ran your WordPress website through a website speed test, you likely saw the recommendation to “add Expires Headers”. This represents just one of the many methods you can employ to optimize your website speed and reduce the server load. As useful as it is, this method isn’t commonly known or used, and we’re here today to change that.
In this article, we’ll shed more light on the topic of the WordPress add Expires Headers. We believe more WordPress users of various knowledge levels and backgrounds should be aware of what it is and how it is implemented. So, without further ado, let’s dive in and begin answering the following questions:
Qode Themes: Top Picks
View Collection


When a visitor comes to your website for the first time, copies of specific files like image, CSS, or JavaScript files are downloaded and stored inside their browser’s cache. Then, on every subsequent visit, instead of downloading those files again, the cached versions are used. This boosts the overall website loading speed.
The server that provides those assets decides how long the cached versions of the files should be used. Once the set period expires, the browser will download the newer versions of those assets and store them in the cache once more. This is referred to as the server’s caching policy.
Expires Headers is an HTTP header that helps implement that caching policy. More precisely, they allow you to specify the precise duration for keeping a resource, or a specific resource type, before it expires and needs to be downloaded again. For more control over the process, you can also specify different expiration durations for different file types.
However, keep in mind that this will not improve the website speed during the initial website load. Instead, it will improve it on each subsequent visit by reducing the number of HTTP requests going to the server.
When adding Expires Headers in WordPress, you need to consider which files should be cached and for how long. Generally speaking, you should set expiry durations for resource types that correspond to the amount of time those resource types wouldn’t be changed.
For assets that hardly ever change, like images, it’s generally recommended to add an expiration time of one year. This applies to most websites, except e-commerce ones, as they are more likely to change their images frequently. On the other hand, for CSS and JS files, you should aim at setting that period to one month.
In the section below, we will explain how to set the Expires Headers with expiration durations that apply to most websites. Also, you should know that there is another, more modern, technique called Cache-Control. It allows you to set a more flexible set of caching directives. However, as web servers treat the two equally, we will focus on the Expires Headers method in this article.
How to add Expires Headers in WordPress
Now that you have a better idea of what Expires Headers is, let’s examine how it can be implemented. This process involves making slight adjustments to the configuration file of your server, and we’ll take you through the steps for that below. As doing this manually may prove challenging for less experienced WordPress users, we’ll also include some WordPress plugins. Using them, you can perform this task with minimal effort.
One of the many benefits of WordPress as a CMS is the abundance of useful plugins. So, it’s relatively easy to find a plugin that focuses on adding Expires Headers while browsing the WordPress plugins directory. You can also look for plugins that have a broader scope, such as leverage browser caching, caching, or website optimization in general.
We will showcase two plugins that help you implement Expires Headers. One is specifically designed for this purpose, and the other is a well-known caching plugin that includes this feature.
-
Add Expires Headers
The first plugin we’ll cover, Add Expires Headers & Optimized Minify, is more specialized for this purpose. It is a freemium plugin for adding expiration time to your internal resources and for minifying your files. The free version allows you to set precise and differing expiry dates for the cached resources coming from your server, as well as to merge, minify, or inline CSS files. The premium version of the plugin allows you to add expiry duration to external resources as well.
Additionally, this plugin allows you to set other caching-related improvements like unsetting ETags and Gzip compression. You’ll also be able to merge, minify, and defer JS files, as well as minify HTML to improve the overall website load.
We will focus on adding an expiry duration to internal resources. So, if you’re not decided on the plugin, you can do this with the free version.
To start, navigate to the Add Expires Headers > Add Expires Headers section. Then, in the left section of the main screen, you will notice five tabs from your position in the first one (Cache Settings). From this first tab, you will be able to specify the expiry duration for each resource type as they are displayed in separate sections.
Furthermore, you will be able to check or uncheck the exact resource types or even resource sections that you don’t need to apply the Expires Headers for. This provides an extra layer of control over the caching feature.

After selecting the resource types that you want to add Expires Headers to, and after setting the exact number of days, press the Submit button at the bottom, to apply your desired settings.

-
W3 Total Cache
The other plugin we will showcase is more versatile, as it focuses on website optimization in general. That plugin is W3 Total Cache. It is another freemium plugin that comes with a wide array of options, which are caching and minification-related. Most of the options are available within the free version of the plugin. However, the premium version offers features like fragment and REST API caching, lazy loading for Google Maps, WPML caching extension, and premium support, among others.
Again, if you’re not sure this is the plugin for you, the free version has all the features we need, so you can try it out. It offers several browser caching-related methods like Cache-Control, Expires Headers, and ETags. We will be focusing on the Expires Headers.
To start, navigate to the Performance > Browser Cache section. Then, within the General subsection on the right, locate the Set expires header option. Tick this option, and it will apply the Expires Headers with the values that are predefined within the plugin.

Another way to apply the WordPress add Expires Headers method is by editing the configuration file on your server. So, if you want more control over the settings, you can skip using a plugin, and opt for custom code as a way of adding Expires Headers.
As the steps will differ based on whether you’re using an Apache or Nginx server, you will first need to figure out which of the two is used by your website. The easiest way to figure this out is by asking your hosting provider. Otherwise, you can inspect your website using the developer tools of your browser, which we will explain below.
To do this, open one of your website’s pages and right-click on any part of that page. Then, select the Inspect option from the menu that opens.

This will open the developer tools of your website and position you within the Elements tab, over the element you right-clicked on. Switch to the Network tab and make sure that All requests are shown by choosing the corresponding filter. If you don’t see any requests at the bottom, press Ctrl + R to reload the page.

Then, locate the request that displays the URL of your website from the Name section. After clicking on it, its information will be displayed in the Headers tab on the right. Locate the Response Header subsection within and open it. You will be able to find what server your website is using from the data shown after the Server: label.

After that, skip to the instructions for the appropriate server type.
-
Apache
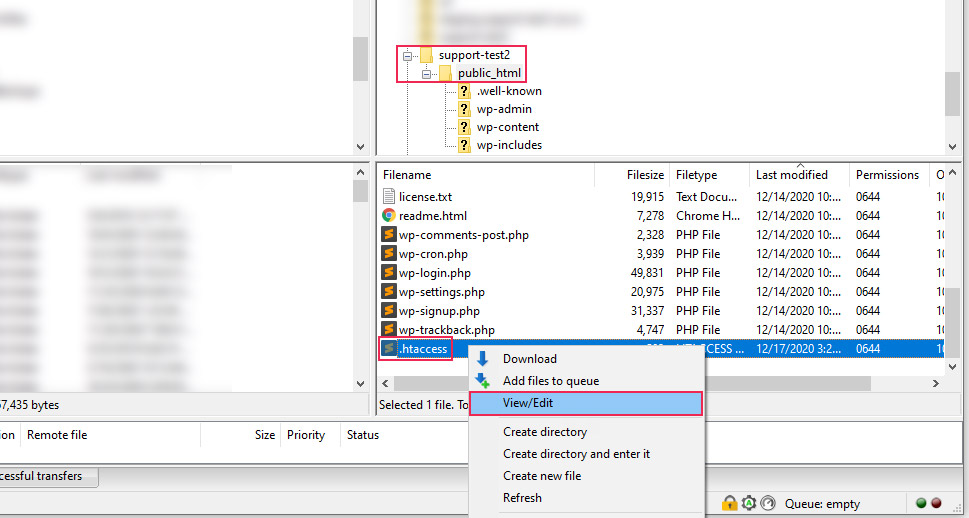
For Apache, connect to the server using your FTP credentials and navigate to the root WordPress directory of your website, often called public_html. Find the .htaccess file within it and right-click on it. Then, before proceeding, we recommend downloading this file as a backup. Simply press the Download option and you will have a backup version of the .htaccess file in case something goes wrong.

After that, right-click on the .htaccess file that’s still on your server and select the View/Edit option. In case you weren’t able to find the .htaccess file, make sure to enable the options for displaying hidden files within your FTP client. Then, proceed as mentioned above.
Open the .htaccess file using your preferred text editor and insert the following code at the beginning of the file.
<IfModule mod_expires.c>
ExpiresActive On
# Images
ExpiresByType image/jpg "access plus 1 year"
ExpiresByType image/jpeg "access plus 1 year"
ExpiresByType image/gif "access plus 1 year"
ExpiresByType image/png "access plus 1 year"
ExpiresByType image/webp "access plus 1 year"
ExpiresByType image/svg+xml "access plus 1 year"
ExpiresByType image/x-icon "access plus 1 year"
# Video
ExpiresByType video/webm "access plus 1 year"
ExpiresByType video/mp4 "access plus 1 year"
ExpiresByType video/mpeg "access plus 1 year"
# Fonts
ExpiresByType font/ttf "access plus 1 year"
ExpiresByType font/otf "access plus 1 year"
ExpiresByType font/woff "access plus 1 year"
ExpiresByType font/woff2 "access plus 1 year"
ExpiresByType application/font-woff "access plus 1 year"
# CSS, JavaScript
ExpiresByType text/css "access plus 1 month"
ExpiresByType text/javascript "access plus 1 month"
ExpiresByType application/javascript "access plus 1 month"
# Others
ExpiresByType application/pdf "access plus 1 month"
ExpiresByType image/vnd.microsoft.icon "access plus 1 year"
</IfModule>

Then, save the changes you made and upload the file back to the server to override the version of it that’s currently there.
-
Nginx
Nginx users will need to add Expires Headers differently from Apache users. The process involves editing your server’s configuration file. As the location of this file depends on your hosting provider, we suggest asking them for help.
Once you find the file you need, add the following code to it:
location ~* \.(jpg|jpeg|gif|png)$ {
expires 365d;
}
location ~* \.(pdf|css|html|js|swf)$ {
expires 30d;
}
You should know that the default values we used in the codes above will work for most websites. However, you might need to adjust those expiration durations differently, based on the file types used on your website and your requirements for their caching.
After that, the only thing that remains is to check the results. You can do this by re-running the online website performance test and reviewing the change in the metrics for Expires Headers that you get now versus those you got before. If your website speed test didn’t show these metrics, you can also inspect the HTTP requests of your website by inspecting a page. Then look for the Expires: section within the Response headers of each HTTP request, examining them one at a time.
Example:

Alternatively, as checking each HTTP request can be slow-going, you can also use an online caching checker. After inserting your website URL and pressing the Check button, you should see a list of cached resources, their expiry duration, and the cache type. Depending on the configuration of your website, it should also note whether you’re using the Expiry Headers or Cache-Control cache type.

As a final reminder, the Expires Headers method is used for setting an expiry duration on internal resources, i.e. resources belonging to your server. That means you will need to find other ways of adding the expiry duration for external resources (e.g. Google Fonts or Google Analytics). One way to do so involves hosting the third-party files locally, and another involves using suitable WordPress plugins. The plugins we already mentioned in this article are a good place to start, but you can also explore other WordPress plugins that would help you do this.
Final Thoughts
By implementing Expires Headers in WordPress, you can reduce the number of HTTP requests issued toward your website and improve your website load for repeat visitors. Adding expiry dates to internal resources loaded by your visitors’ browsers will improve the user experience by making it smoother. In time, it can reduce your bounce rate as well.
In this article, we discussed the different ways you can implement the WordPress add Expires Headers method. While it might sound scary, you’ll just need to edit the server’s configuration file. This can be done in several easy steps that we covered in detail. And, for anyone leery of tinkering with server files, we also covered two WordPress plugins that can help you achieve the same thing with no stress.
