How to Install a WordPress Theme
WordPress is free, intuitive, easy to customize, and great for virtually any kind of website, regardless of your niche. Whether you’re a beginner or an experienced developer, you’ll find your way around the platform without too much struggle.
While the WordPress core is powerful enough, it won’t get you far in terms of great website design or advanced functionalities. If you want to enhance the functionality of your website and ensure it looks professionally designed, you’ll need to install a WordPress theme. Most premium WordPress themes will provide everything your website needs, depending on the industry or niche you’re in. Of course, there are also tons of free WordPress themes available if you’re just starting out, are on a tight budget, or just want to play around in WordPress to see how it works.
Once you make up your mind and decide which theme you’d like to go with, you’ll need to install the theme on your website. In this article, we’ll show you how to install a WordPress theme using three separate methods.
How to Install WordPress Theme Using Admin Theme Search
One of the ways to install a WordPress theme is through the WordPress theme directory. The best thing about the themes in the directory is that you can download them for free.
To do this, go to your admin dashboard and from the menu on the left select Appearance > Themes.
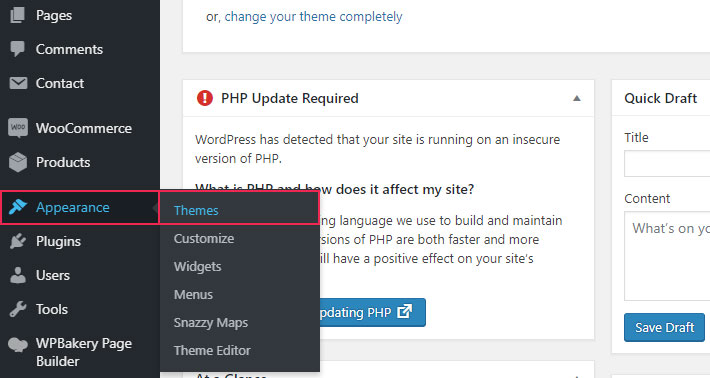
Click on the Add New button. You’ll find it at the top of the screen.

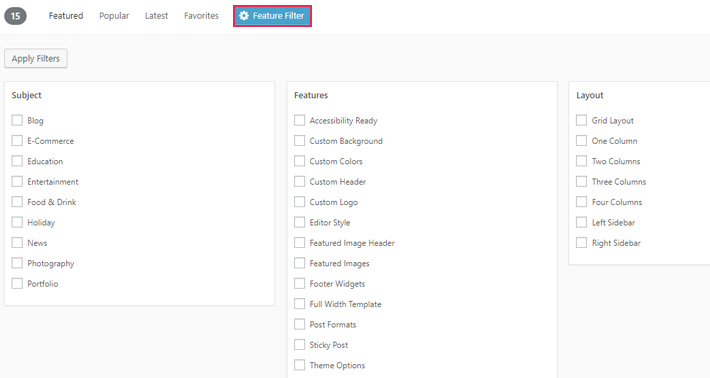
You can now browse the Popular, Latest, or Favorites categories to find the theme for you. There’s also the Feature Filter option, so you can perform the search based on specific criteria. You can tick as many filters as you like. Just make sure to click the Apply Filters button to get relevant results.
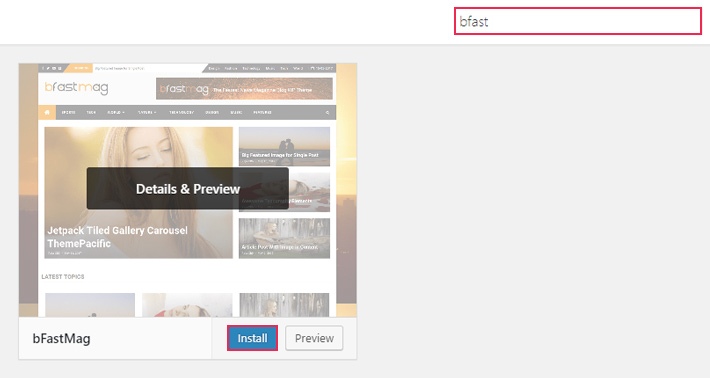
At the far right, there’s also a search bar. In case you already know the name of the theme you’d like to install or if you wish to do the search based on a key word (e.g. you can type in movies, etc.).
Next, you’ll get a list of themes that matched your criteria and filters. If you’re uncertain which one to go with, before you install any theme, you can preview it and view more details. To do this, simply hover over the theme of your choice and click on Preview or on Details and Preview.
Once you’ve made your decision, click on Install.
When the installation is completed, you’ll be notified that your theme has been installed. Now just click on Activate. And that’s it, you’ve managed to successfully install and activate a WordPress theme.

How to Install WordPress Theme Using the Upload Method
This method is usually used to install premium WordPress themes, since they can’t be installed directly from the WordPress directory. The same goes for custom themes. In both cases, it’s important to mention that you won’t be able to use the upload method to install a theme unless you’re using WordPress.org. This option is not available for WordPress.com users.
For starters, download the .zip file of the theme you’d like to install on your computer.
Then, go to Appearance > Themes in your admin area.

The next thing to do is click on the Add New button. Again, it’s at the top of the screen.

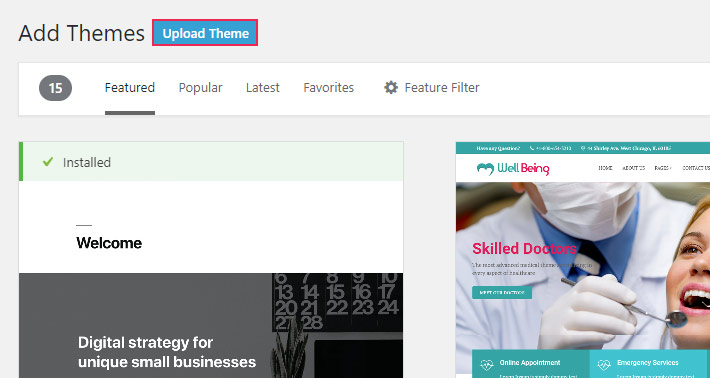
As soon as the Add New page is done loading, you’ll see the Upload Theme button at the top. Click on it.
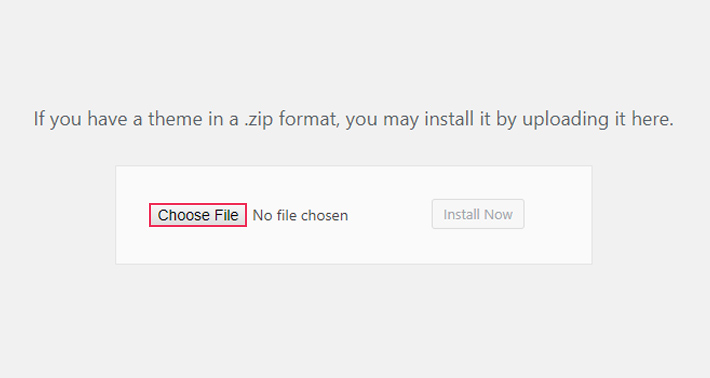
To add the .zip file you’ve previously downloaded, click on Choose File, find and select the .zip file on your computer, and then hit the Install Now button.
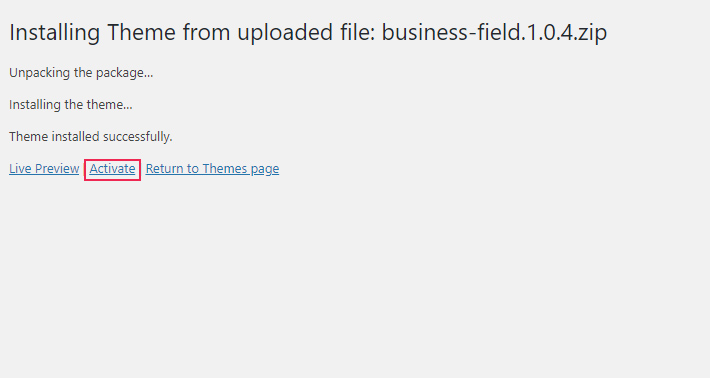
When the installation process is completed, all that’s left is to activate the theme by clicking the Activate button.
How to Install WordPress Theme Using FTP
If you want to install a theme using FTP, you first need to make sure you have an FTP client installed.
FTP basically enables you to upload a file from your computer to your website’s directory. Be careful when you use it though. Adding and removing files from the website’s server is a touchy matter, and if you make a mistake, the website could go down. Therefore extra caution is advised. If you need any help using FTP, you can check out our beginners guide to using FTP .
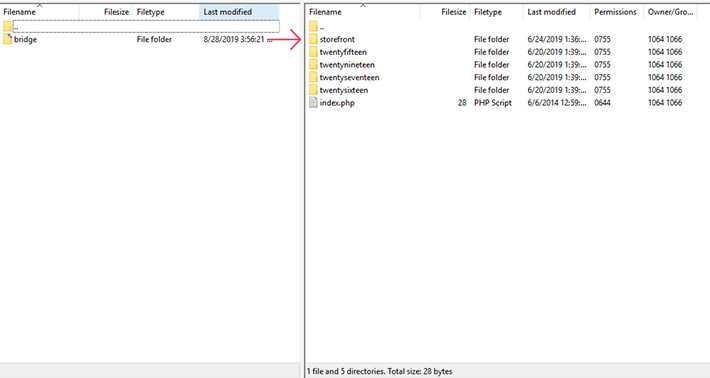
To install your theme, first and foremost, download the theme’s .zip file to your computer and extract it. Next, connect to your host using FTP, and upload the unzipped files to the /wp-content/themes folder on your website’s server.
When the upload is finished, go to you admin dashboard and select Appearance > Themes. The theme you’ve just uploaded should be visible here. Finally, activate the theme by pressing the Activate button.
Conclusion
Now that you know how to install a WordPress theme, go ahead and play with the layouts, upload your own images, add the content that best describes you and your services, etc.
If, at some point, you decide to customize your theme, it’d be good to have a WordPress child theme ready as well, so you don’t risk losing your additions when you update your theme. Also, in case at any point you realize the theme you’ve installed is not exactly what you were hoping it would be, you can easily change your WordPress theme and activate another one.
WordPress comes with endless possibilities and a myriad of themes to choose from. Find the one to your liking, and create the website you’ve always dreamed of.


