How to Create a Limit for Publishing and Submitting WordPress Posts

There are obvious benefits to a regular posting schedule: on the one hand, your website visitors get fresh content with regularity, which gives them good reason to return to your website with regularity, while, on the other, frequently updated websites get a boost in the SERP rankings.
But is more content automatically better? Can there be such a thing as too much content? Are there other considerations? These are the questions we would like to address before sinking our teeth in the meat of creating a post limit in WordPress.
Blog & Magazine Themes
View Collection


Why Create a Post Limit
In this case, we are talking about too much of a good thing: even if your content is great, there can be too much of it. Even assuming all your authors and contributors provide superb content all the time (which is a stretch even for great teams of any size), just publishing a massive amount of content all at once will result in some of it being buried. Limiting the number of posts can therefore be beneficial in getting your writers to stick to your publishing schedule – especially if you take into account the best time to publish an article, while your writers might not pay the same level of attention..
If you are running a more serious sort of operation, you are likely employing editors to make sure your posts are proofread for grammar and compliant to any policy you may have. Limiting the number of posts per user makes your editors’ workload more manageable.
Another thing you should take into account are content mills: websites with a massive output, usually of low quality. While search engines show preference for frequently updated websites, Google (and possibly others) have gone out of their way to exclude websites espousing this quantitative approach and rank quality content better. A lot of posts in a short amount of time might make your website look like a content farm to an algorithm, and that is best avoided.
Finally, you may be running a website which allows your users to compete with one another in some way or another – an online marketplace, say, such as Teachers Pay Teachers – you want to avoid users spamming the market with their products. By limiting the number of posts per user per unit of time, you safeguard against user-generated spam.
How to Create a Post Limit in WordPress
While WordPress is extremely versatile, it does not come with a functionality which permits you to limit the number of posts for your contributors and other types of registered users. As it often happens, you can gain access to the requisite functionality by installing a plugin.
The plugin we will be using is User Posts Limit, a free and simple plugin which provides additional post limiting functionalities to various user roles. Before you begin, you need to make sense of the user roles on your website: know which user roles can contribute to your website, and how much do you want to limit them.
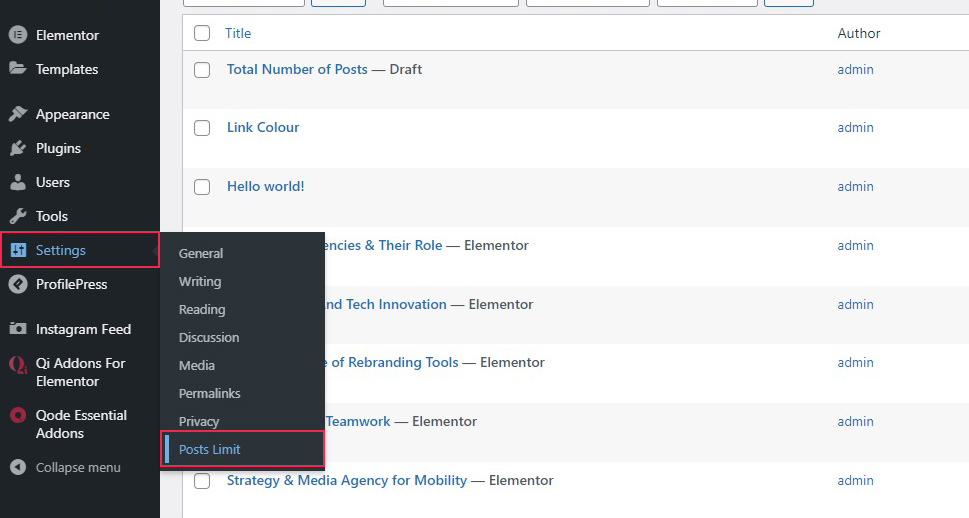
Then, after having installed and activated the plugin, access its settings by navigating to Settings/Post Limit from your WordPress dashboard.
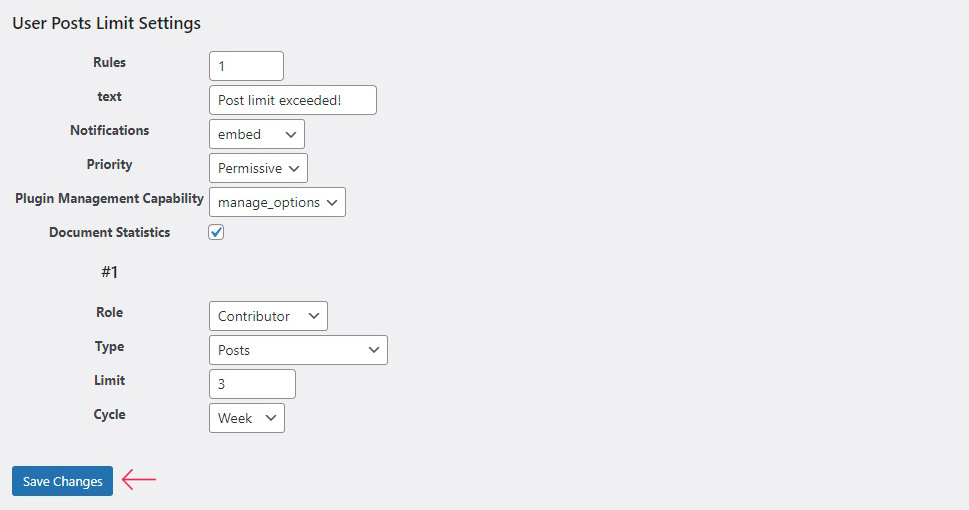
This plugin allows you to set any number of rules for your users. The default number of rules is 1, and we will be showing you how to set up a single rule. To add more rules, simply input how many rules you want in the Rules field and click Save Changes.
The next field down is the Text field, in which you can enter the message which will appear to the users who exceed their limits. We have gone with the very simple Post limit exceeded! In the Notification menu, you can choose how the notification appears to the user. We will leave it at the default Embed, but you can also choose Full Screen or Redirect.
The Priority menu lets you choose between Permissive and Restrictive, and this functionalities governs the plugin’s behaviour in case a user has two roles, and, consequently, two limits: permissive behaviour means that the higher limit applies, while the reverse is true for the restrictive behaviour.
We won’t be touching the Plugin Management Capability menu, as it is an advanced function not suited for this tutorial. Here we will limit ourselves to saying that it has to do with the ways a user can affect their or other users’ limit.
The Document Statistics checkbox should be checked if you want to log user behaviour – especially useful for your editors.
Each of the rules you establish begins with # and a number. Since we are only working with one rule, we are only seeing one set of instructions prefaced by #1.
Here you can select the Role to which the rule applies (we have gone with Contributor, but your website may have different roles), the Type of change to your website for which the rule applies (for the purposes of this tutorial, we will be going with Posts, obviously), the Limit itself (which can be anything, but we went with 3), and Cycle, which is basically when the counter resets for the users the rule applies to, and can be set to Year, Month, Week, or Day. We have gone for Week, but, of course, you make your own rules.
Once you have everything set up the way you like it, click Save Changes.
And there you have it, your contributors are now limited to three posts a week. Bear in mind, though, that we have only shown you the basics here. If you are an advanced WordPress user, you can check out the developer’s website for more tips on the plugin’s functionalities.
In Conclusion
As you can see, limiting the total number of posts is not very complicated, and the plugin we have been using is very versatile: you can have all kinds of different rules for different user roles set up in next to no time at all and at no cost. So, whether you are looking to make life easier for your editors, make your contributors stick to their posting schedules, or simply to avoid spam or similar kinds of abuses, now you know how it can be done.
