How to Fix WordPress Keeps Logging Me Out Issue
Anyone who’s ever maintained a WordPress website or created its content has likely experienced being repeatedly logged out of their website for no apparent reason. If this description sounds familiar, then you too have experienced the WordPress keeps logging me out issue, also known as the WordPress session timeout error. Unfortunately, this error can occur at any time, and often does while you are making changes to your WordPress website. As frustrating as the error can be, the reasons behind it are quite straightforward and the troubleshooting methods are easy to apply. We will show you the different steps you can take to resolve this issue:
Qode Themes: Top Picks
View Collection


How to fix WordPress keeps logging me out issue
There are quite a few reasons why this issue occurs, but most frequently it happens because of expired cookies or caching-related issues. Besides those, the error could be caused by a faulty WordPress plugin or by WordPress URLs that haven’t been properly updated. In this article, we will explain how you can troubleshoot this error, starting from the methods used for the more likely causes. As a safety precaution, you should make a backup of your website beforehand. Once you’ve done that, you can proceed to the steps below.
One of the most common reasons why WordPress keeps logging you out is because you’re trying to access the site with an expired cookie saved in your browser. As a result, your most recent browser session can’t be authenticated. And this results in the WordPress keeps logging me out issue. Therefore, the easiest way of solving it is to clear the cookies within the browser you’re using. We will show you how to do this for the most popular browsers.
-
Google Chrome
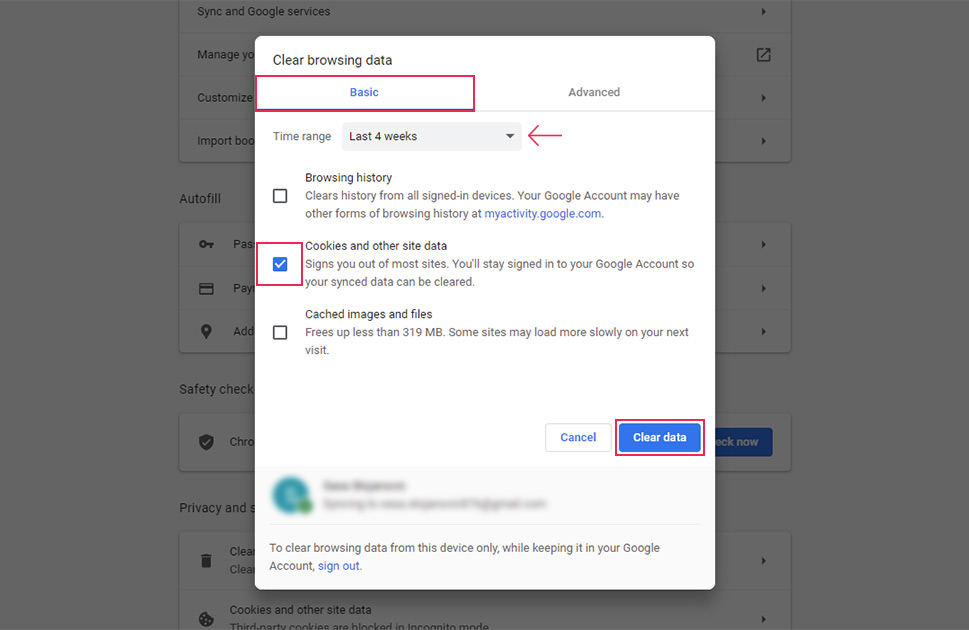
One way of clearing browser cookies in Chrome involves pressing the three dots icon and, then, opening the More Tools option. Following that, you should select the Clear browsing data… suboption.
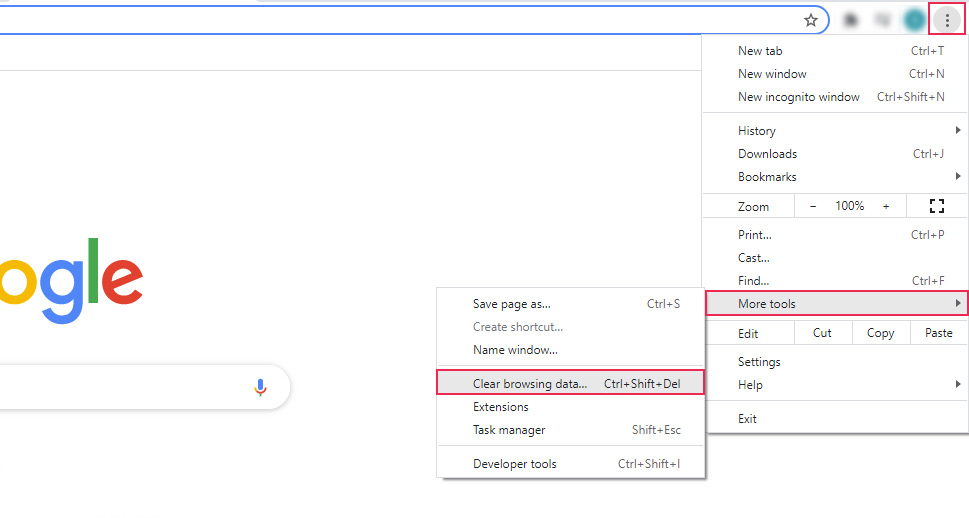
This will open a popup window, which is also used for clearing the cache within Chrome. Within that window start by making sure you’re located in the Basic tab. Then, select a suitable time range and tick the Cookies and other site data option. Finally, press the Clear data button to confirm your choices and clear your browser cache.
-
Firefox
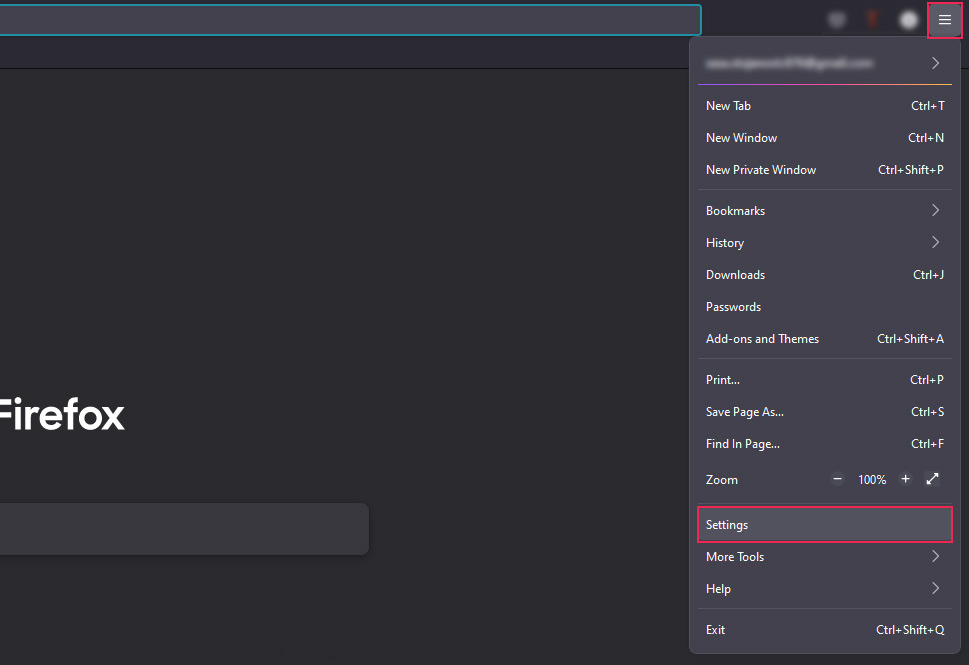
To clear the browser cookies in Firefox, press the hamburger icon on the right side and select the Settings option.
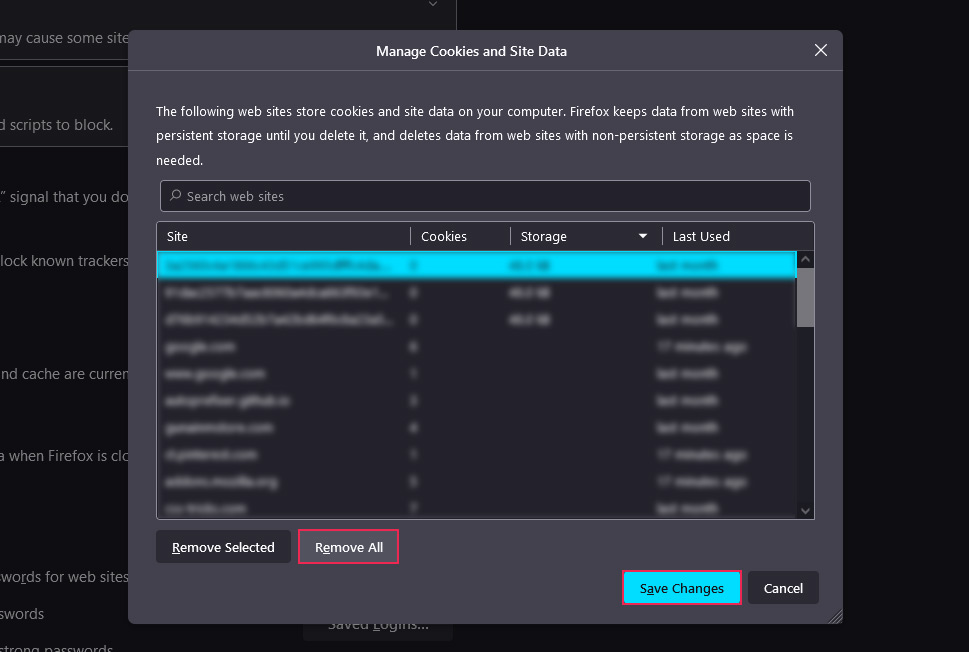
Within the following window, select the Privacy & Security tab from the menu on the left and navigate to the Cookies and Site Data section. Then, press the Manage Data button located within this section.
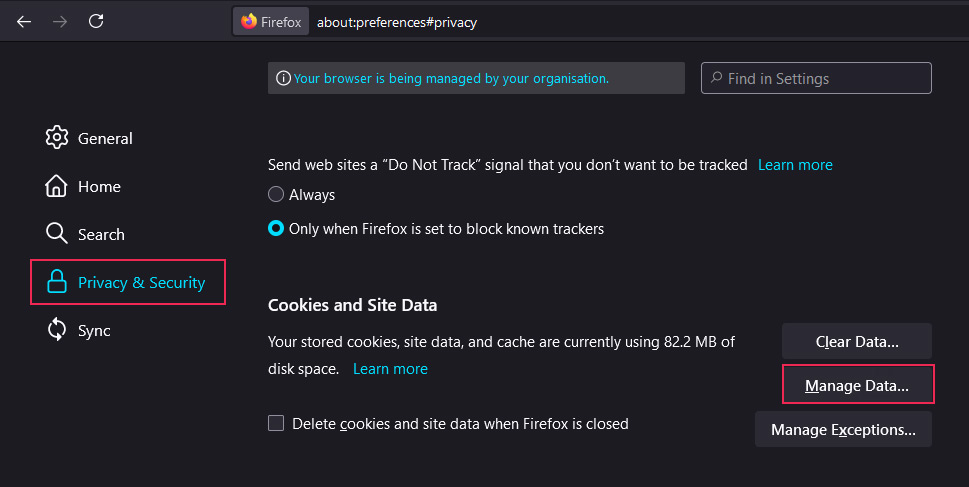
A popup window that will allow you to manage cookies and site data will open. If you wish to remove the cookies from a singular site, you can do so by selecting it from the list, clicking on the Remove Selected button, and then pressing the Save Changes button. Otherwise, to clear all cookies, press the Remove All button, followed by the Save Changes button.
-
Microsoft Edge
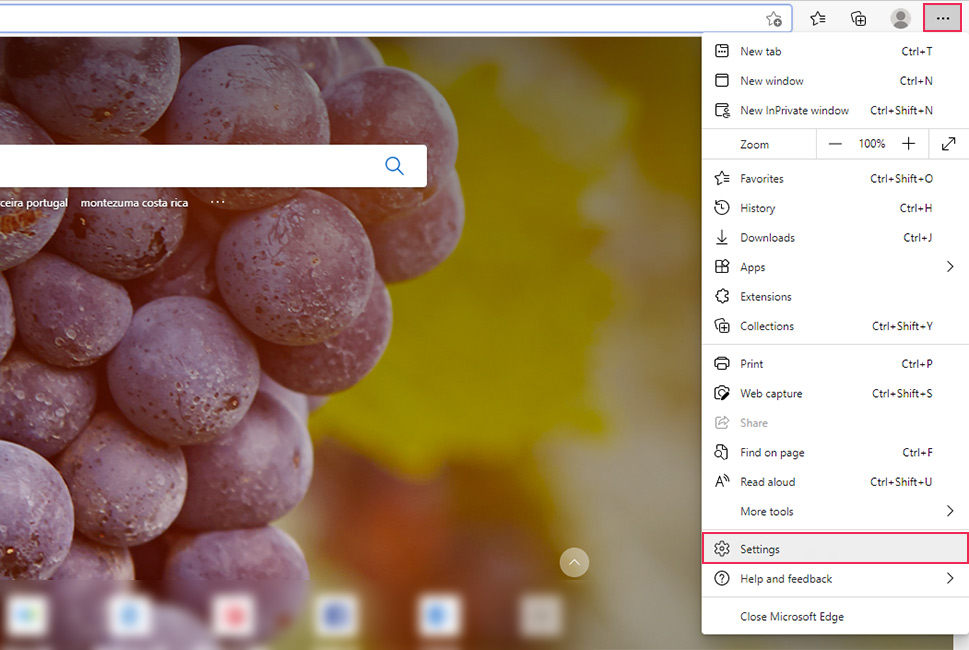
To clear the browser cookies within Microsoft Edge, press the ellipsis icon in the top-right corner, and then choose the Settings option from the dropdown menu.
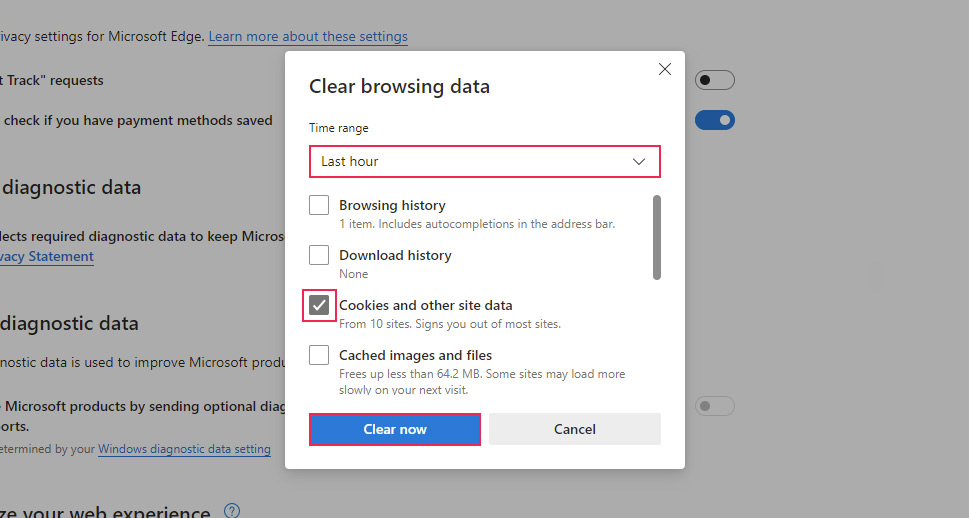
After that, open the Privacy, search, and services tab from the menu on the left and find the Clear browsing data section within the main part of the screen. Finally, locate the Choose what to clear button and click on it.
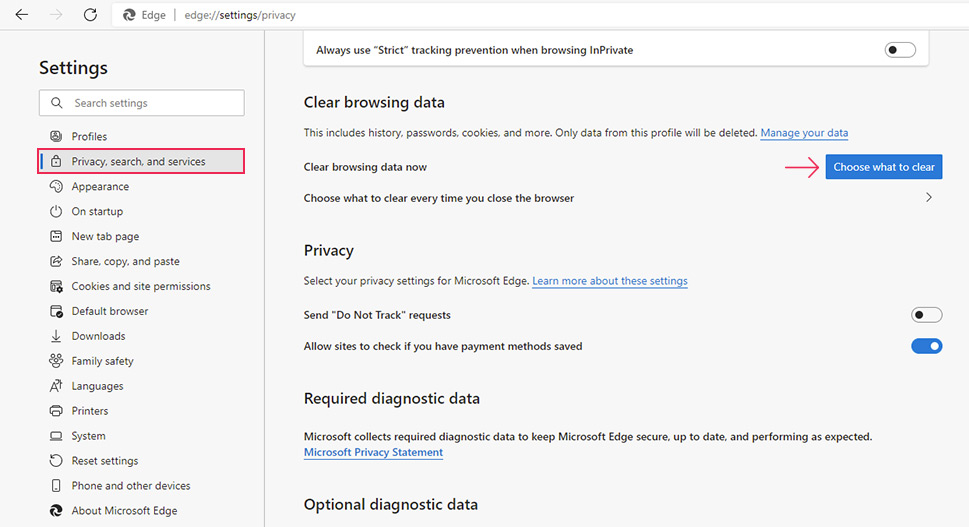
This will open a popup window allowing you to clear your browsing data. Select a suitable time range and tick the Cookies and other site data option. Then, click on the Clear now button to clear the browser cookies.
-
Safari
To clear the browser cookies within Safari, click on on the Safari option in the top bar and select the Preferences option from the menu that opens.
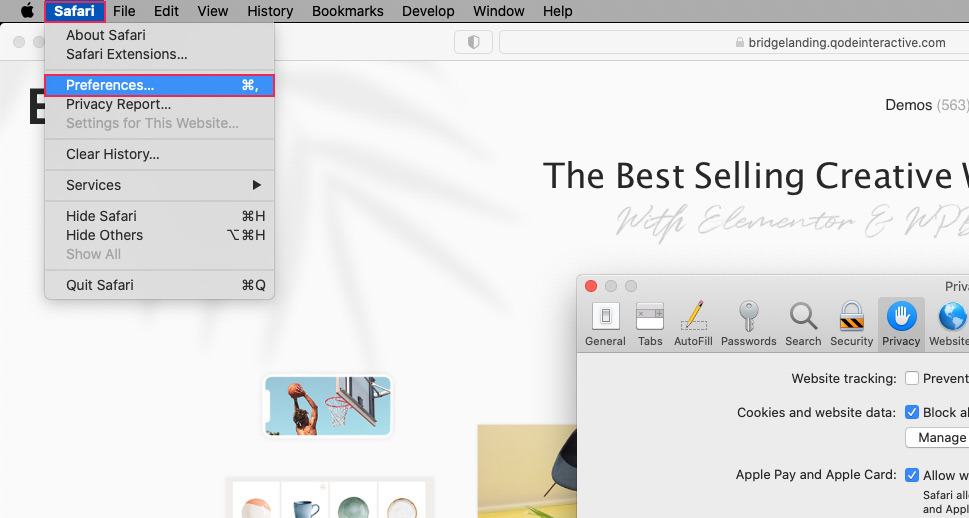
Next, select the Privacy tab and click on the Manage Website Data… button within.

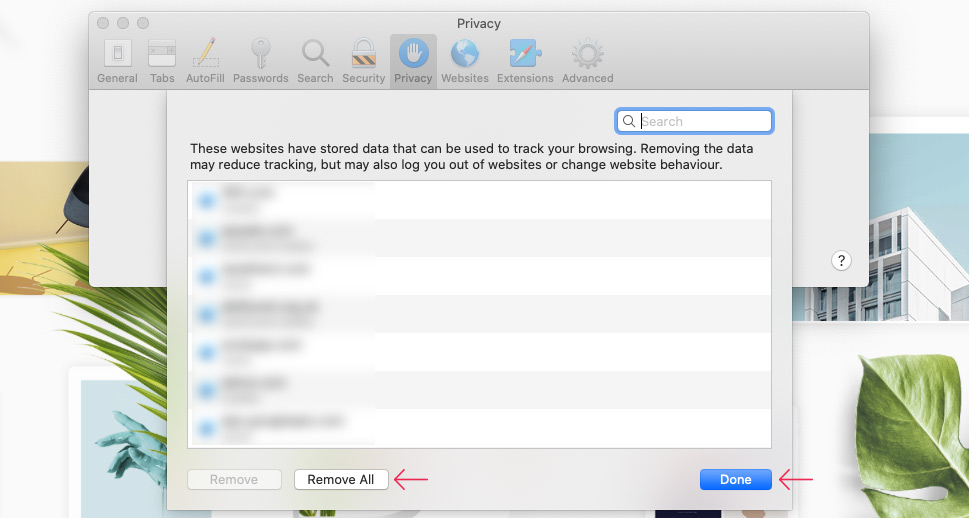
You will be given the option to clear browser cookies for a certain site or all websites. To remove all browser cookies, click on the Remove All button, followed by a click on the Done button.
When tackling the WordPress keeps logging me out issue, clearing the browser cache can be helpful and it can complement the previous troubleshooting step. As we already examined how to remove stored cookies and data, we will explain the process for clearing the browser cache for Google Chrome only. Additionally, we covered the topic of clearing the browser cache in a separate article, so you can check it out for more information on this topic or for detailed instructions on working with other major browsers.
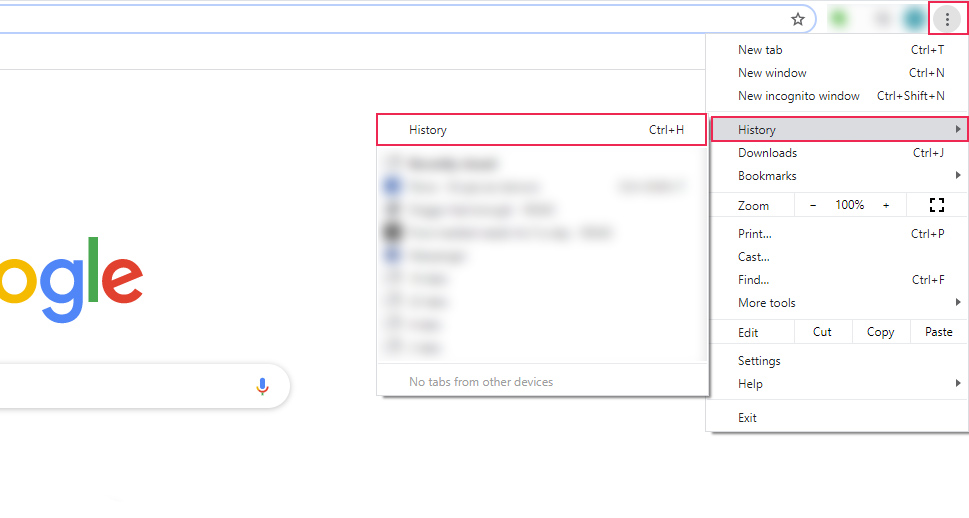
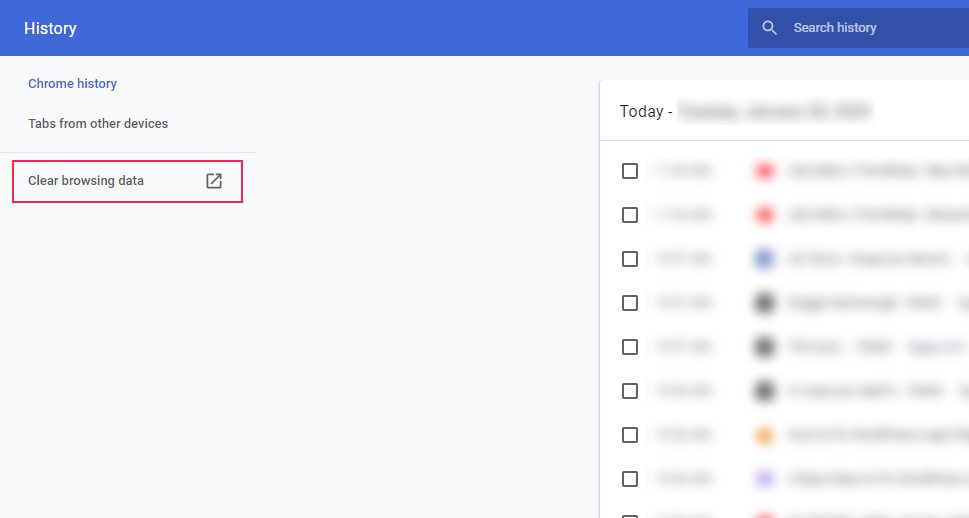
To clear the browser cache inside Google Chrome, click on the three dots in the top right corner of the screen. Next, click on the History option, and then select the History suboption.
In the following window, locate the Clear browsing data option from the top left corner of the screen and click on it. This is just one possible way of accessing the Clear browsing data pop-up window. You can also use the path we described in the previous section on clearing browser cookies.
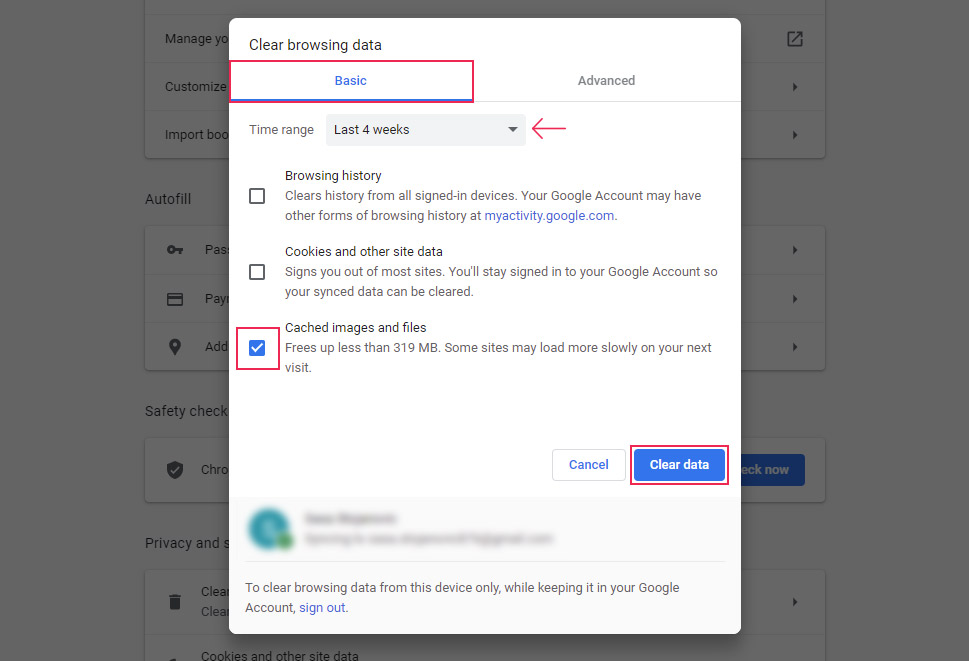
When the popup window opens, make sure you’re within the Basic tab. Then, choose the appropriate time range, tick the Cached images and files option, and click on the Clear data option.
If the previous two troubleshooting methods didn’t resolve the issue, you should check the cookie settings within your browser. As different browsers contain settings that force an expiration date on cookies, WordPress could be logging you out simply because of a misconfiguration within the browser’s cookie settings. As such, you will need to inspect and change those settings accordingly. You can find the instructions on how to do that within different browsers below.
-
Google Chrome
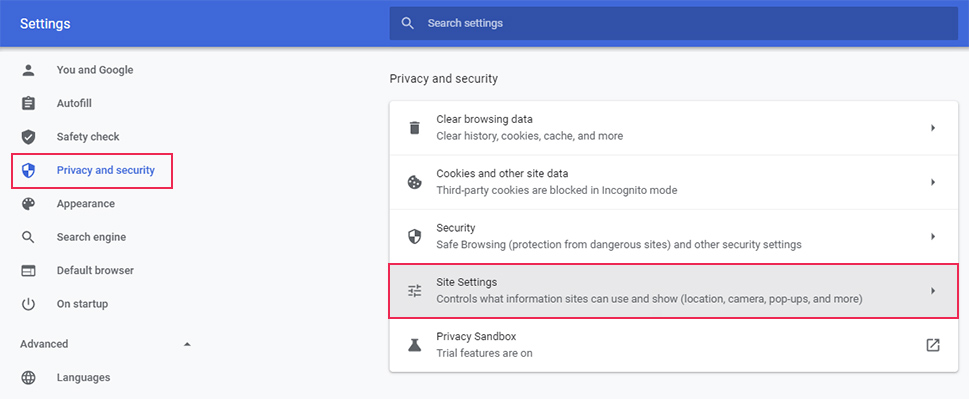
To check your cookie settings within Chrome, you should click on the three dots icon in the top right corner and choose the Settings option from the menu that opens.

On the following screen, select the Privacy and security tab from the menu on the left and then click on the Site Settings option within the main part of the screen.
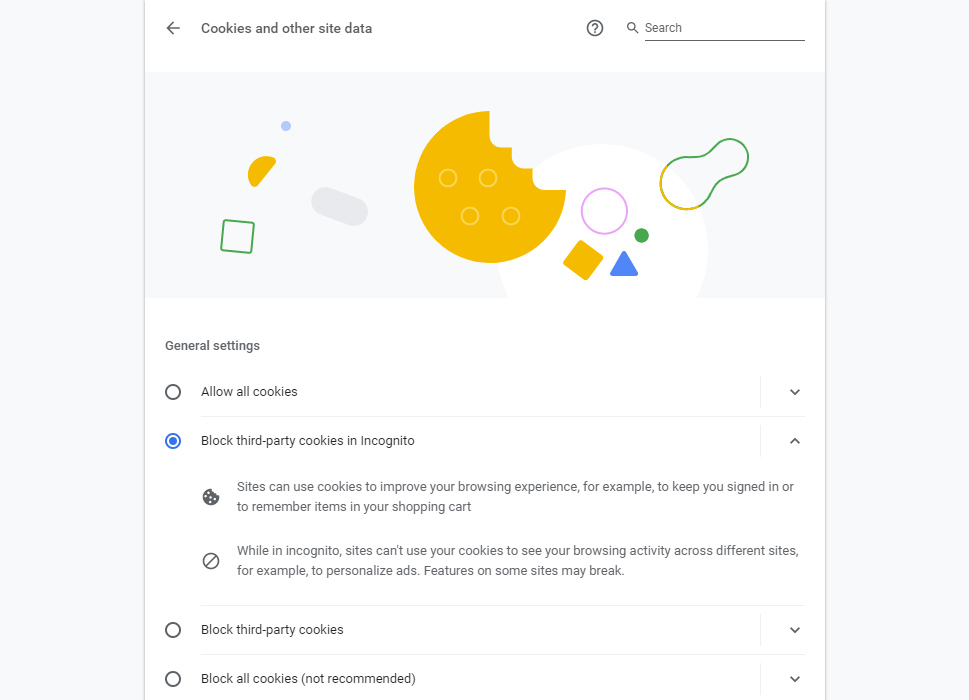
This will open the Site Security section. To continue with the process, scroll to the bottom of the page. Find and click on the Cookies and site data option to open the final option window.
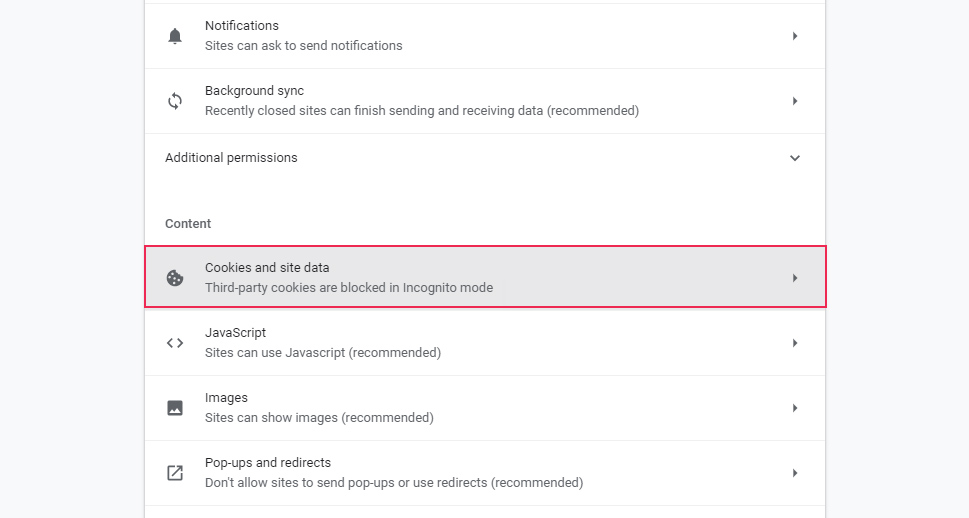
This is where you’ll be able to adjust the general cookie settings. If your cookies were set to Block all cookies, this is where you can change that. Examine the options to see which one is best suited for your website and then change the settings accordingly.
-
Firefox
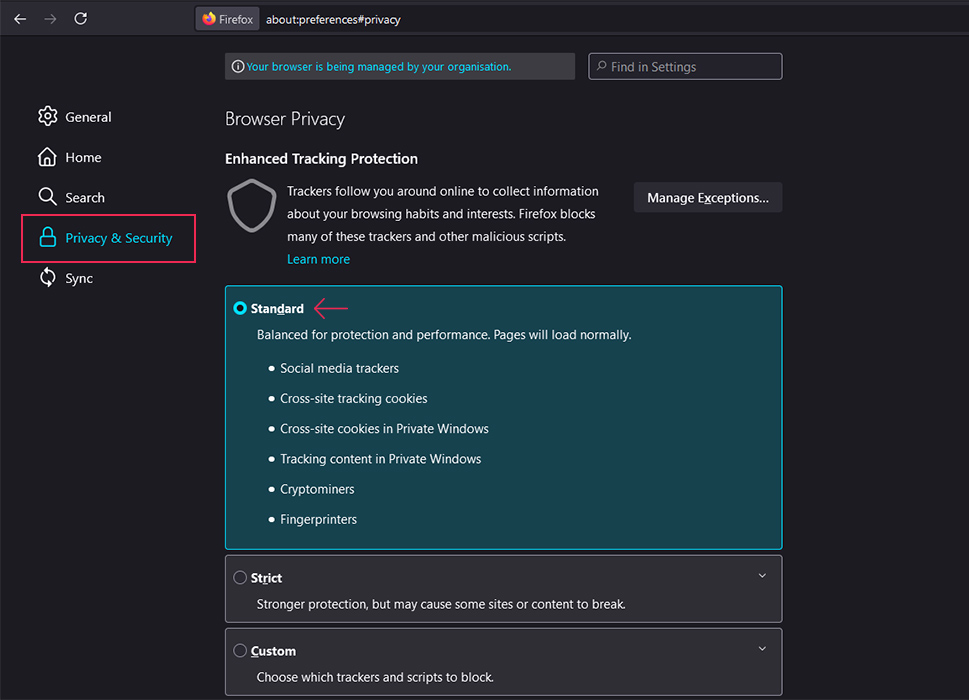
To check your cookie settings within Firefox, press the hamburger icon in the top right corner and select the Settings option from the menu that opens.
Then, locate and open the Privacy & Security tab from the left side menu. Within that tab, find the Enhanced Tracking Protection section and make sure to select the Standard option. If you find it’s already selected, you should continue to the next troubleshooting step.
-
Microsoft Edge
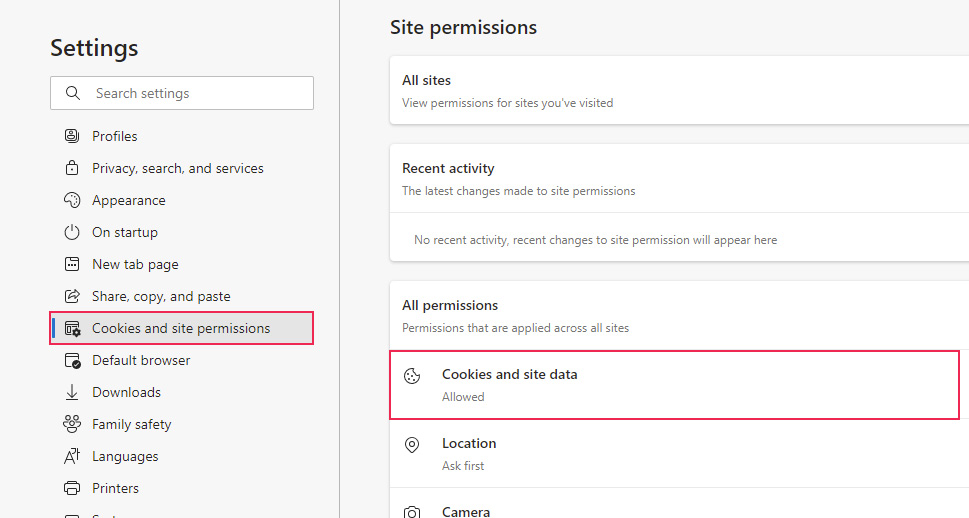
To check the cookie settings in Microsoft Edge, press the three dots icon in the top right corner and then select the Settings option from the dropdown menu.
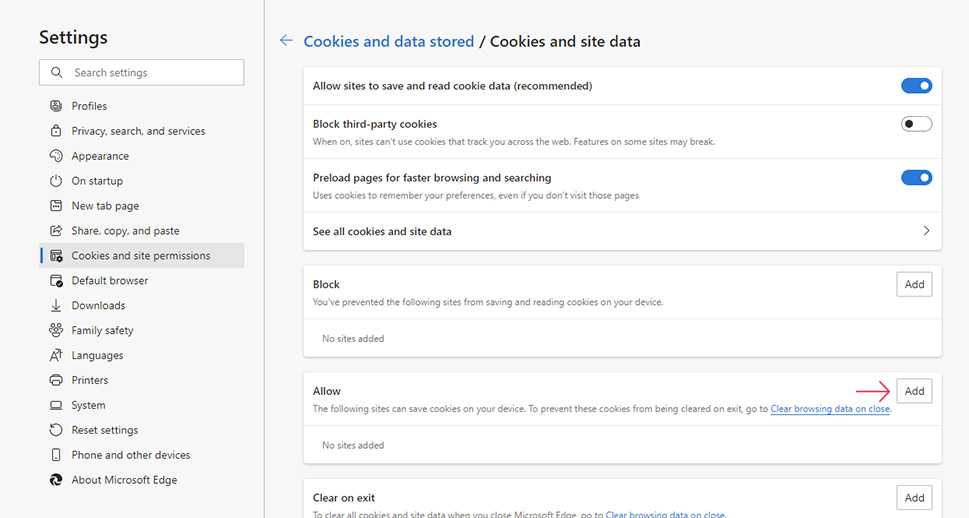
In the window that opens, locate the Cookies and site permissions tab from the menu on the left and access it. Then, click on the Cookies and site data option, located within the Site permissions section on the right.
From the following set of options, you need to enable the Allow sites to save and read cookie data option. Your option choice will be applied automatically after you select it. If this option was already enabled in your browser, then make sure that the option below it, Block third-party cookies, is disabled.
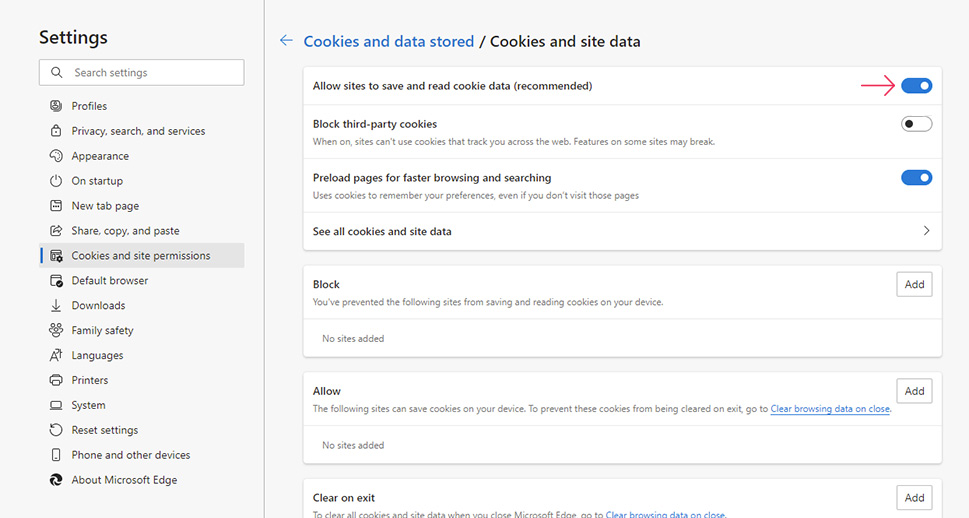
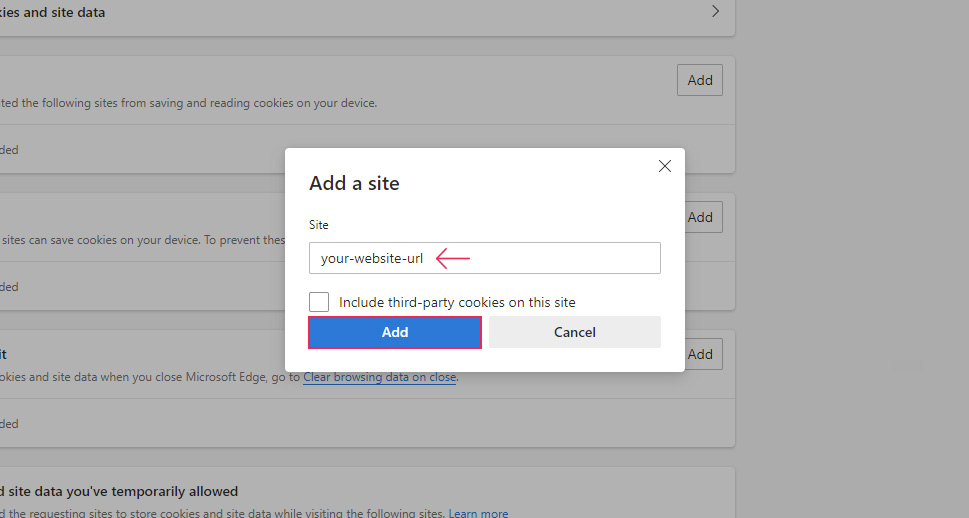
Check if this has resolved the logging out error. If the issue persists, you can try to tackle it by adding your website address under sites that are allowed to save cookies on your device. To do this, click on the Add button located in the Allow section.
In the popup that appears, insert the URL of the website where WordPress keeps logging you out and click on the Add button.
-
Safari
To check your cookie settings in Safari, start by clicking on the Safari option, and then selecting the Preferences sub-option from the dropdown menu.
In the popup window that opens, select the Privacy tab and find the Cookies and website data: option. Make sure that the option isn’t checked, i.e. enabled. If you find it’s already checked in your browser, you’ll need to uncheck it. Any changes you make will be applied automatically.
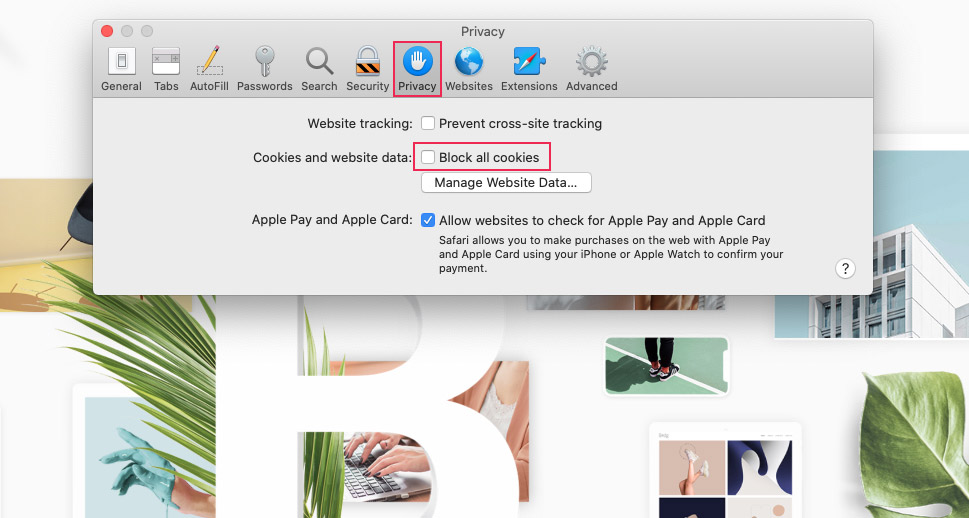
After that, assess the status of the WordPress keeps logging me out issue. If it persists, you should also uncheck the Prevent cross-site tracking option. You can find that option within the Privacy tab as well, just above the Cookies and website data: option.
Apart from browser-related causes, the reason for the WordPress keeps logging me out issue could be the WordPress cache. More precisely, the outdated versions of your pages stored in the WordPress cache can lead to you getting logged out. To test if this is the case for you, you will need to clear the WordPress cache. Depending on the website, this could include clearing various types of cache, including plugin, server, and CDN cache. Let’s take a look at how to clear all three.
-
Clearing plugin cache
Depending on which caching plugin you use, you will have an option, or a set of options, that enable you to clear the plugin cache. You should examine your caching plugin’s options to find the one(s) you need. If you’d like to learn more about this topic, you can check out our article on clearing the plugin cache.
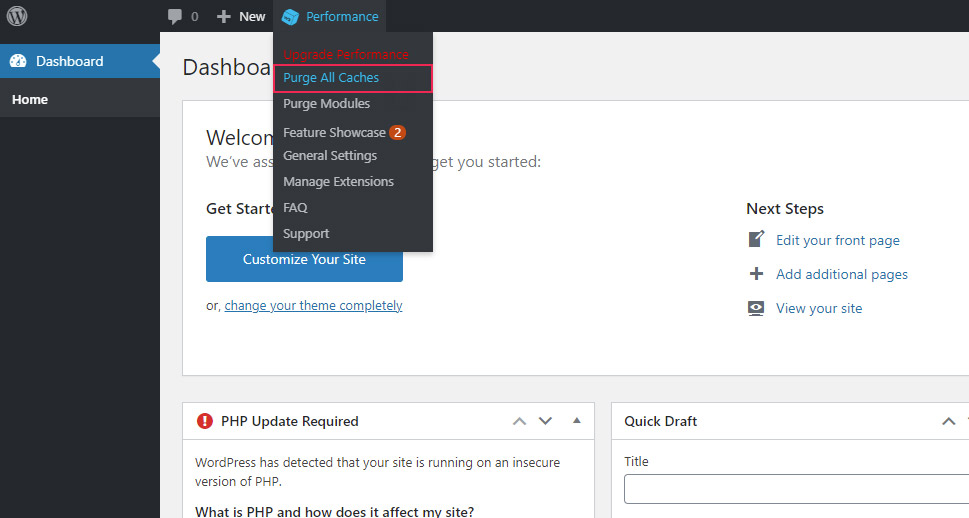
We will use the W3 Total Cache plugin as an example to show you how to clear the plugin cache. Its options are shown both in the backend and in the frontend of a WordPress website. We will cover the explanation using the options in the backend. So, to start, log in to the WordPress admin dashboard. Hover over the Performance option located in the admin bar, and click on the Purge All Caches option from the submenu.
This will clear the plugin caches and all you have left to do is check the status of the error.
-
Clearing CDN cache
Although very rarely, CDN caching issues can happen and cause the WordPress keeps logging me out issue. As such, purging the CDN cache is the next sensible step.
It is worth noting that some caching plugins provide an option to integrate your CDN with them. This means you can clear the CDN cache within the plugin options. But, this differs depending on your choice of caching plugins.
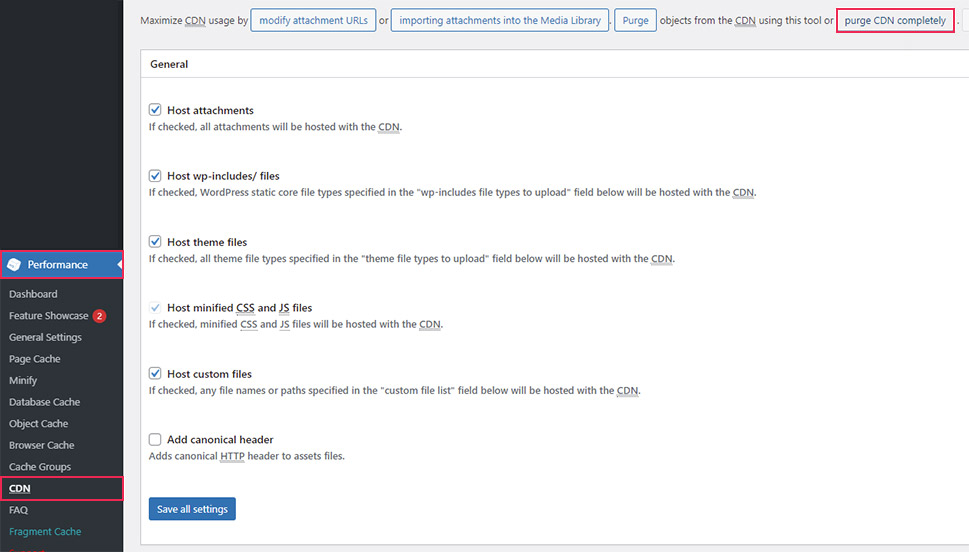
With the W3 Total Cache plugin that we used as an example, the options were located in the Performance > CDN section. They included two buttons, one for purging single objects and one for purging all cache. You should click on the second one to purge CDN completely and then examine if the issue has disappeared.
However, if you don’t have a plugin with integrated CDNs, you will need to consult your CDN provider on how to clear the caches. Afterward, you will need to examine if that worked to resolve the issue.
-
Clearing server cache
Finally, if the error is still present after clearing all previous forms of cache, you should try to remove the server cache as well. This is provided that the server cache is enabled on your server. To clear it, you will need to contact your hosting provider and ask them to remove any server caching. Once they’ve done that, you should check on the status of the issue once again.
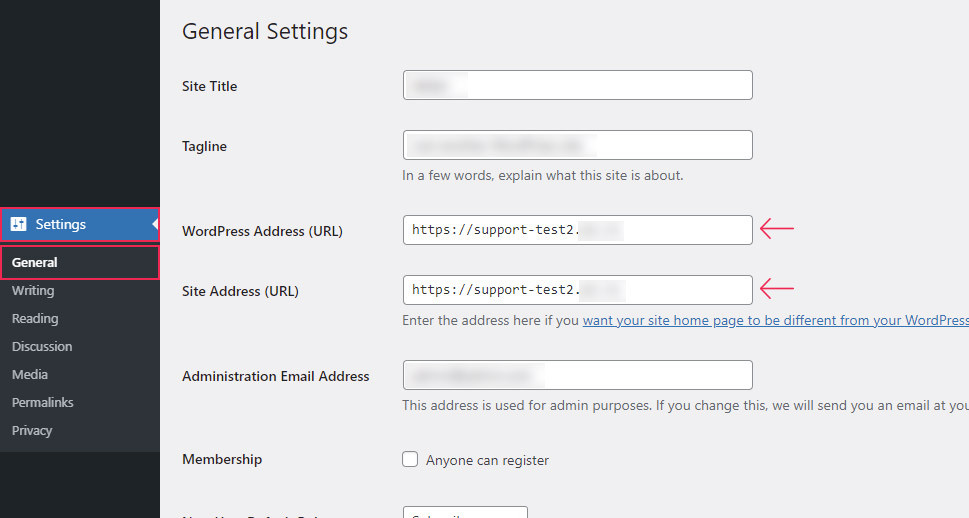
Another reason why WordPress might keep logging you out is a mismatch between your WordPress site address and the URL stored in the login session cookies. This often happens when you forget to update the website URLs within WP-Admin. This can happen after changing the URL, whether because of a domain name change or simply to add an SSL certificate. If this is the case with you, you need to update both website URLs to their correct values to solve this issue.
To start, log in to your WordPress website and navigate to the Settings > General section within your admin dashboard. Then find the WordPress Address and Site Address options. The WordPress Address represents the locations of your WordPress files, whereas the Site Address represents the address visitors need to type to access your website.
With that in mind, update the two URLs so that they match their currently appropriate values. For example, if they lack a prefix, make sure to add it. Similarly, if they have a prefix that shouldn’t be there, make sure to remove it. Both suggestions could relate to adding or removing the “www” part or making sure that the URLs are correct after adding the HTTPS protocol to your website. After you add the correct URLs, click on the Save Changes button at the bottom to update the options.
After that, you should check if the logging out issue got resolved. If it didn’t get resolved or if you haven’t been able to log in for long enough to perform the actions, you should try an alternative way of changing the WordPress URLs.
Some of the solutions, in this case, could include editing the wp-config.php file or the functions.php file of your theme using FTP. You can check out this article to see the different ways of changing WordPress URLs. Keep in mind, the same suggestions we mentioned will apply—you’ll need to pay attention to the prefixes your WordPress URLs should or should not have, be it either the www or https prefix.
Apart from the reasons we’ve mentioned so far, a faulty WordPress plugin could also be behind the WordPress keeps logging me out issue. This is particularly likely if that plugin performs login authentication using cookies. To check if that is the case on your end, you will need to pinpoint the faulty plugin first and then disable it.
First, you will need to manually deactivate all your plugins via FTP. This is done by renaming the plugins folder as this will both deactivate the plugins and make them inaccessible. Therefore, if the error was caused by a faulty plugin, it will be gone after you deactivate the plugins.
Once you’ve done that, you will be able to log in to your WordPress website and perform the second part of this troubleshooting method—pinpointing the exact plugin that caused the issue. To be able to do that, you will need to restore the plugin folder’s original name, i.e. plugins. This will make the plugins accessible via the admin dashboard without reactivating them.
For the last step in this method, you will need to navigate to Plugins > Installed Plugins. Then, using the admin dashboard, re-activate your plugins one at a time to discover the culprit. You’ll need to be patient for this part and reactivate the plugins one-by-one while clearing the browser cache after each plugin is reactivated. If the issue reappears, the plugin that you reactivated last is your culprit.
If this seems confusing, don’t worry—the process of examining plugins manually is a common troubleshooting step for a wide range of WordPress-related issues. If you’d like to see it described in more detail, you can take a look at our article on disabling plugins while locked out of WP-Admin.
Finally, if it turns out a plugin was causing your issue, you should ask the plugin authors for help once you pinpoint it. Or you can consider finding a suitable replacement for that plugin.
If you weren’t able to troubleshoot the issue using the methods so far, there is one more thing you can try. And that is to increase the expiration period for the authentication cookie. Doing this will prolong the time a user is kept logged in after enabling the Remember me option. However, you should be aware that this poses a security risk for any live website. As such, if you plan on increasing the cookie expiration time for live websites, we advise tightening the security of that website as well.
To increase the expiration time for the authentication cookie, you will need to add the following code to either the functions.php file of your child theme (using FTP) or a site-specific plugin. You can see the code below.
function qode_change_auth_cookie_expiration_period( $expiration_period ) {
$expiration_period = MONTH_IN_SECONDS; // 1 month in seconds

return $expiration_period;
}
add_filter( 'auth_cookie_expiration', 'qode_change_auth_cookie_expiration_period' );
This code is very simple; it sets the expiration period of the authentication cookie to one month using the MONTH_IN_SECONDS time constant. This is done by hooking onto the auth_cookie_expiration() filter hook using a simple function we made called qode_change_auth_cookie_expiration_period().
Other time constants you could use include DAY_IN_SECONDS, WEEK_IN_SECONDS, and YEAR_IN_SECONDS, whose meaning is clear on its own. If you opt to use one of these other time periods, simply replace the MONTH_IN_SECONDS time constant from the code given above with the one you prefer.
Final Thoughts
Falling victim to the WordPress keeps logging me out issue can be quite frustrating for any WordPress user, especially those in the middle of editing the website. However, this issue can be solved easily. Just remain calm and apply one of the troubleshooting methods we outlined in this article.
Try clearing browser cookies, adjusting the cookie settings, clearing the browser and WordPress cache, updating the WordPress URLs, and removing potential plugin conflict. Each of these is aimed at a different potential culprit. And with all of them together, we covered all the ways you can use to fix the error. And, even if you don’t manage to solve the issue with these steps, you can always increase the cookie expiration period, to make the problem far less frequent and annoying.
