How to Display Recent WordPress Posts from a Specific Category

Even though its purpose has expanded vastly since its beginnings, WordPress remains the best platform for managing a blogging website. It lets many less experienced users make their blogs with little to no effort. This is possible thanks to the numerous themes and plugins specialized for blogging, as well as the core functionalities WordPress offers.
The most important page on every blog website is the Blog page that displays the most recent posts you made across all categories. Even though this page attracts the most readers to your website, some may still decide to leave upon having to scroll through a long list of seemingly unrelated articles. To stop those readers from leaving, you can offer them a smaller list of recent posts, focused on a single category. This list should be tailored to show articles relevant to the page they’re on. This will improve the likelihood that the readers will click through your website.
You can also feature posts from a specific category created for drawing attention to your website or simply feature some of the most important articles on your website. Using methods like these in conjunction with the regular blog feature will improve the traffic your website receives significantly. As such, we put together this article to show you how to display a list of WordPress recent posts from a specific category. Let us proceed.
How to display recent WordPress posts from a specific category
Displaying recent WordPress posts from a specific category can be done using a suitable WordPress plugin or through the use of custom code. Depending on the theme you are using, this functionality could even be integrated within the features of that theme. Therefore, you should examine the possibilities offered by your WordPress theme before proceeding. If it doesn’t include a feature for displaying WordPress recent posts from a specific category, you should carry on with this article. In the following sections, we will be exploring the possibility of displaying recent posts using a plugin and using code.
Using a plugin
Most WordPress users opt for using a plugin when implementing a new functionality as it is a very beginner-friendly method. With the abundance of WordPress plugins, the chances that you will find a plugin for displaying WordPress recent posts that suits you are fairly high. When browsing, look for plugins that are specifically created for showing recent posts or ones that are made for displaying posts in general.
The plugin that caught our eye while searching through the WordPress plugin repository was the Recent Posts Widget With Thumbnails.
This lightweight plugin is made specifically for displaying recent posts by extending the basic functionality of the WordPress Recent posts widget. The plugin offers a simple and intuitive widget that can be used for displaying posts that match the options you set. As such, you can use it to display a list of recent posts within a single category, or even a list of random posts, if you choose to. The widget options allow you to adjust the additional information about each of the posts you display. That includes post titles, featured images, author and category names, dates, and more.
To use this plugin, you will need to install it first. Then, navigate to Appearance > Widgets, and find the Recent Posts with Thumbnails widget. Insert the widget inside the widget area of your choice and adjust the options as you see fit.
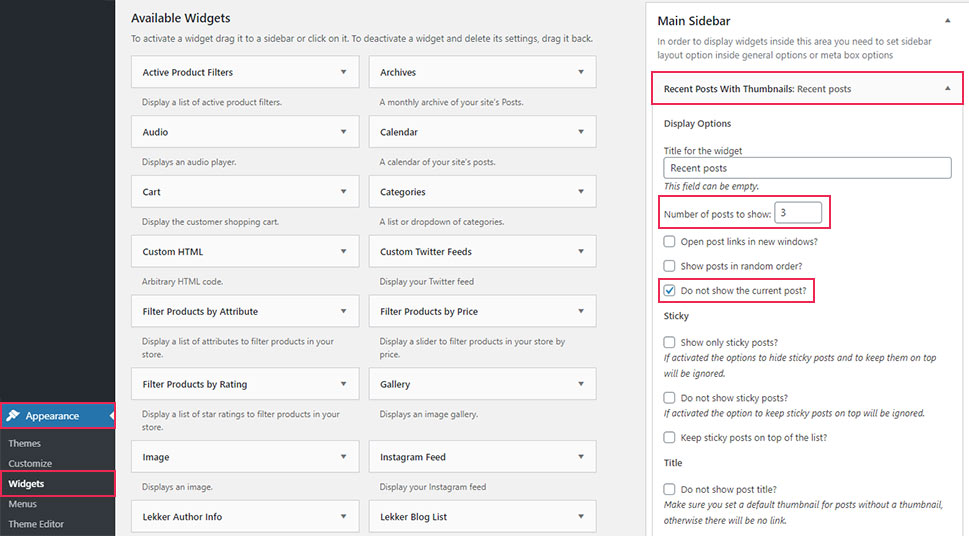
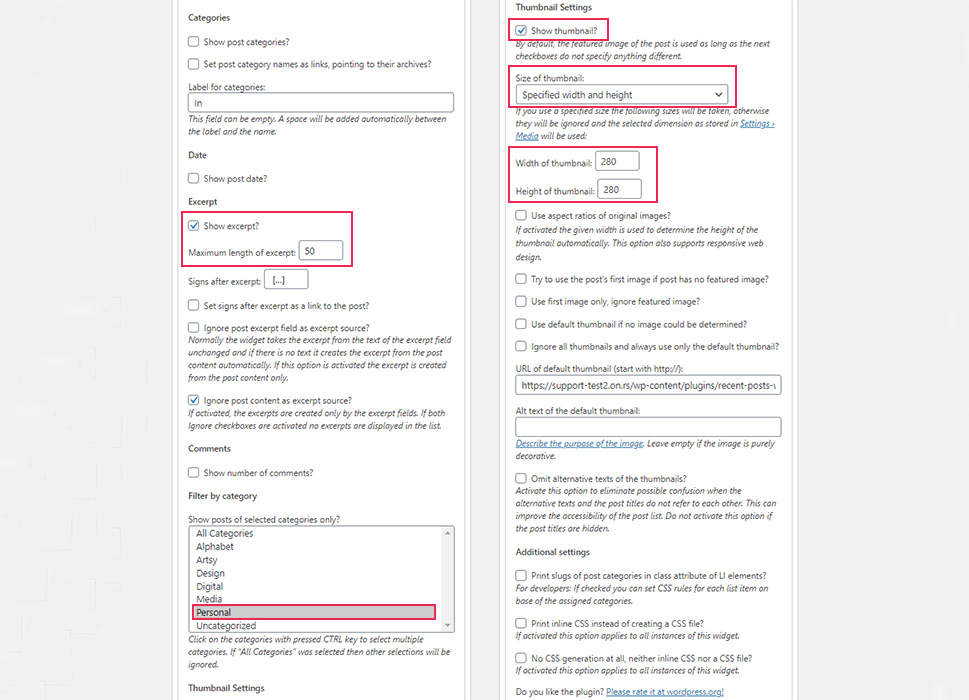
The widget offers a lot of options that you can explore. We highlighted the ones we considered to be the most relevant, and which we used for this article. Those are the number of posts the widget shows, whether the current post should be excluded from the output or not, showing the excerpt and choosing its length, as well as the ability to show recent posts within a single category, which is the point of this article.
Apart from that, we also chose to show the featured image and specified its dimensions exactly. It is important to note that the Size of the thumbnail option also allows you to specify the image dimensions in accordance with the registered image sizes within the theme you are using.
After adjusting all of those options, we got the following output.
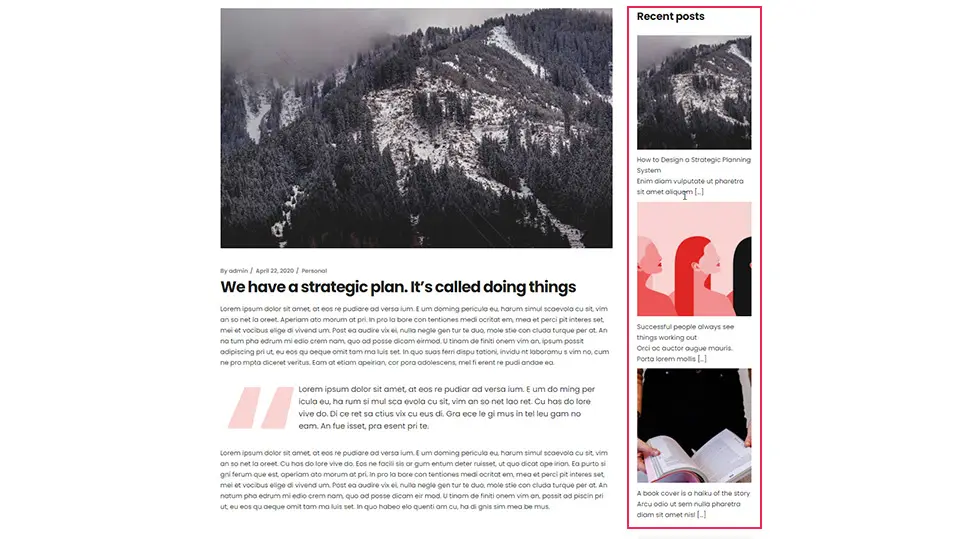
If you aren’t fully satisfied with the display, you can further stylize it with some CSS. To help you do that, the plugin developer left a list of available CSS selectors you’ll be able to use for the task. You can find them on the plugin’s official page, near the end of the Details tab.
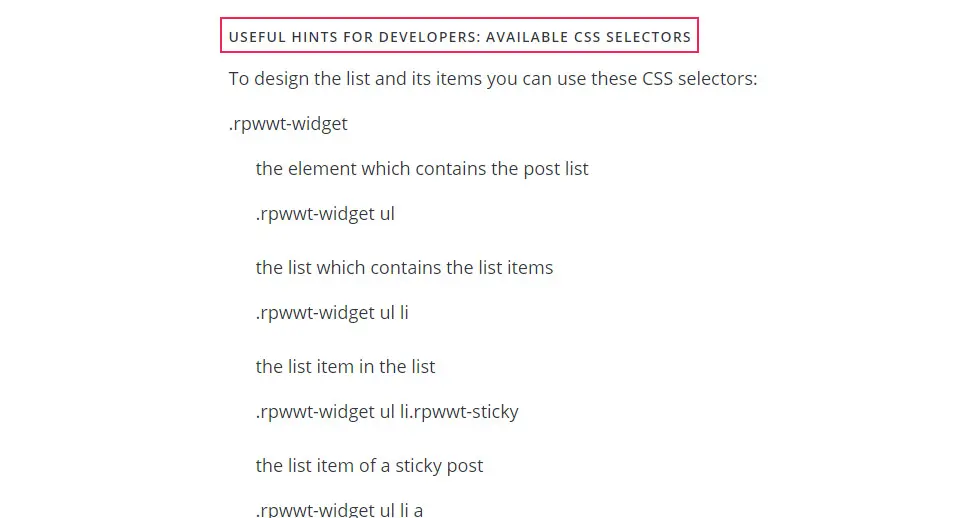
Finally, any CSS you create should be added under Appearance > Customize to keep the plugin lightweight, as noted in the FAQ section.
Using custom code
Adding WordPress recent posts by category using custom code is best suited for the more advanced WordPress users. Simply put, this method requires some existing coding knowledge. The benefit of using it is that it offers the flexibility of manually adjusting everything so that the feature or functionality you want to add matches your wishes exactly. This is the main reason why some opt for this method.
Needless to say, there are a lot of coding approaches you can take to creating a recent posts section based on a single category. For this article, we have created a sample code that you can use directly or improve upon, as you see fit. You can add the custom code either in the functions.php file of your theme or within a site-specific plugin. We will show the former. As adding code into the functions.php file requires the knowledge of FTP, we advise brushing up on it before going further. Additionally, we advise making a backup of your website to avoid potentially harming it. Afterward, proceed as described below.
First, connect to your server using your FTP credentials and navigate to your root WordPress directory, often called public_html.
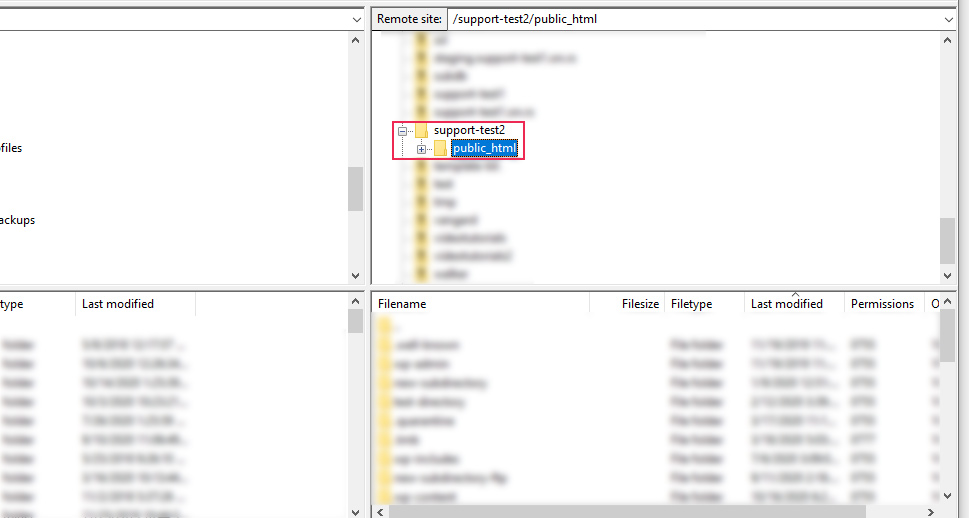
Then, navigate to /wp-content/themes and click on the directory of the theme you are currently using to open it. Find the functions.php file of the theme within the directory, right-click on it, and select the View/Edit option.
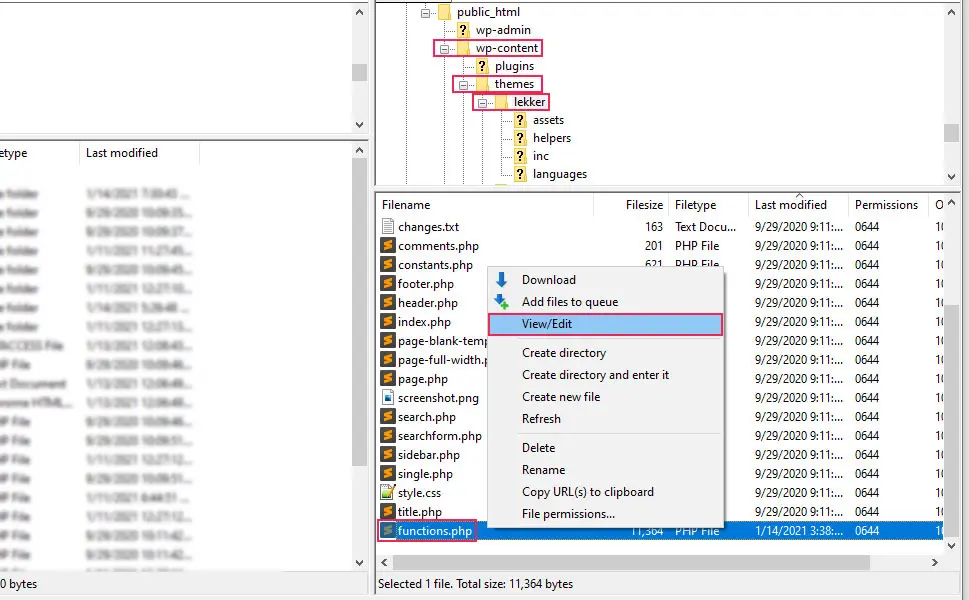
Open the file using your preferred text editor and insert the following code at the end of it.
function custom_recent_posts_function( $atts ) {
$default_atts = array(
"category" => 'uncategorized'
);
$params = shortcode_atts( $default_atts, $atts );
$recent_posts = new WP_Query(
array(
'post_type' => 'post',
'post_status' => 'publish',
'posts_per_page' => 3,
'category_name' => $params['category'],
'post__not_in' => array( get_the_ID() ),
'orderby' => 'date',
'order' => 'DESC'
)
);
$html = '';
global $post;
if ( $recent_posts->have_posts() ) {
$html .= '<div class="recent-posts">';
while ( $recent_posts->have_posts() ) {
$recent_posts->the_post();
$html .= '<div class="recent-posts-item"><a rel="bookmark" href="';
$html .= get_the_permalink();
$html .= '" class="recent-posts-link">';
if ( has_post_thumbnail( $post->ID ) ) {
$image = wp_get_attachment_image_src( get_post_thumbnail_id( $post->ID ), 'medium' );
$html .= '<img class="featured-image" src="' . esc_url( $image[0] ) . '">';
}
$html .= '<h4 class="recent-post-title">' . get_the_title() . '</h4>';
$html .= '</a>';
$long_excerpt = get_the_excerpt();
if ( ! empty( $long_excerpt ) ) {
$short_excerpt = substr( get_the_excerpt(), 0, 40 );
$excerpt = substr( $short_excerpt, 0, strrpos( $short_excerpt, ' ' ) );
$excerpt .= '[…]';
$html .= '<p>' . wp_kses_post( $excerpt ) . '</p>';
}
$html .= '</div>';
}
$html .= '</div>';
wp_reset_postdata();
} else {
$html .= '<div class="recent-posts">' . esc_html__( 'There are no posts within this category.', 'textdomain' ) . '</div>';
}
return $html;
}
add_shortcode( 'custom_recent_posts', 'custom_recent_posts_function' );
Then, save the changes you made and upload the file back to your server to override the old version of it that’s currently there.
Now, let’s explain the code. We’ll start by looking at it in a simplified form, shown below.
function custom_recent_posts_function( $atts ) {

$default_atts = array(

"category" => 'uncategorized'
);
$params = shortcode_atts( $default_atts, $atts );

$recent_posts = new WP_Query(
array(
'post_type' => 'post',
'post_status' => 'publish',
'posts_per_page' => 3,
'category_name' => $params['category'],
'post__not_in' => array( get_the_ID() ),
'orderby' => 'date',
'order' => 'DESC'
)
);

$html = '';
global $post;

if ( $recent_posts->have_posts() ) {
// Some code here
} else {
$html .= '<div class="recent-posts">' . esc_html__( 'There are no available posts within this category.', 'textdomain' ) . '</div>';
}

return $html;
}
add_shortcode( 'custom_recent_posts', 'custom_recent_posts_function' );
Looking at the code like this, it becomes clear that it represents a shortcode called custom_recent_posts (created using the add_shortcode() function) and the callback function we created called custom_recent_posts_function. This shortcode only has one parameter that you can insert; it’s called category, and it has the default value of uncategorized. Meaning, if the category parameter isn’t used when “calling” the shortcode, then this default value will be used.
Afterward, you can see the $recent_posts variable, which is a WP_Query class. Using the parameters we have given to it, we will be able to show specific posts. More precisely, we will be able to show three published blog posts, whose category slug matches the category that the user inserts when calling the shortcode. The posts will be sorted by date in descending order, i.e. from the most recently published to older ones. Finally, if the shortcode is “called” within a post that matches these conditions, that post will be excluded, to avoid duplicate entries.
If we look at the remaining part of the simplified version of the code, we can see an if-else statement. These are rather simple to interpret – if the previous conditions are met, then a specific part of code within the curly brackets of the IF statement is executed, else the other part of the code is executed. In this case, if the previously described conditions aren’t met, then a message There are no available posts within this category. will be shown.
Let’s focus on the remaining code, found within the curly brackets of the IF statement.
if ( $recent_posts->have_posts() ) {
$html .= '<div class="recent-posts">';
while ( $recent_posts->have_posts() ) {
$recent_posts->the_post();
$html .= '<div class="recent-posts-item"><a rel="bookmark" href="';
$html .= get_the_permalink();
$html .= '" class="recent-posts-link">';
if ( has_post_thumbnail( $post->ID ) ) {
$image = wp_get_attachment_image_src( get_post_thumbnail_id( $post->ID ), 'medium_large' );
$html .= '<img class="featured-image" src="' . esc_url( $image[0] ) . '">';
}
$html .= '<h4 class="recent-post-title">' . get_the_title() . '</h4>';
$html .= '</a>';
$long_excerpt = get_the_excerpt();
if ( ! empty( $long_excerpt ) ) {
$short_excerpt = substr( get_the_excerpt(), 0, 100 );
$excerpt = substr( $short_excerpt, 0, strrpos( $short_excerpt, ' ' ) );
$excerpt .= '[…]';
$html .= '<p>' . wp_kses_post( $excerpt ) . '</p>';
}
$html .= '</div>';
}
$html .= '</div>';
wp_reset_postdata();
}
The IF statement is, in fact, part of the so-called WordPress Loop. For every post that matches the aforementioned conditions, a section is created. This section will contain the title of that post and its featured image with a predefined medium_large image size if that post has a featured image. Furthermore, both the title and the image will serve as a link that will lead readers to that post. Additionally, this section will contain the post excerpt, provided the post has an excerpt. The excerpt will be shortened to the last whole word before the 100th character and it will end with an ellipsis.
This concludes the explanation of the shortcode, so we can focus now on how to use it. In this case, we suggest employing it within a widget. And, if you’d like to learn about other ways of using shortcodes, you can take a look at our article on custom shortcodes. With that being said, let us proceed.
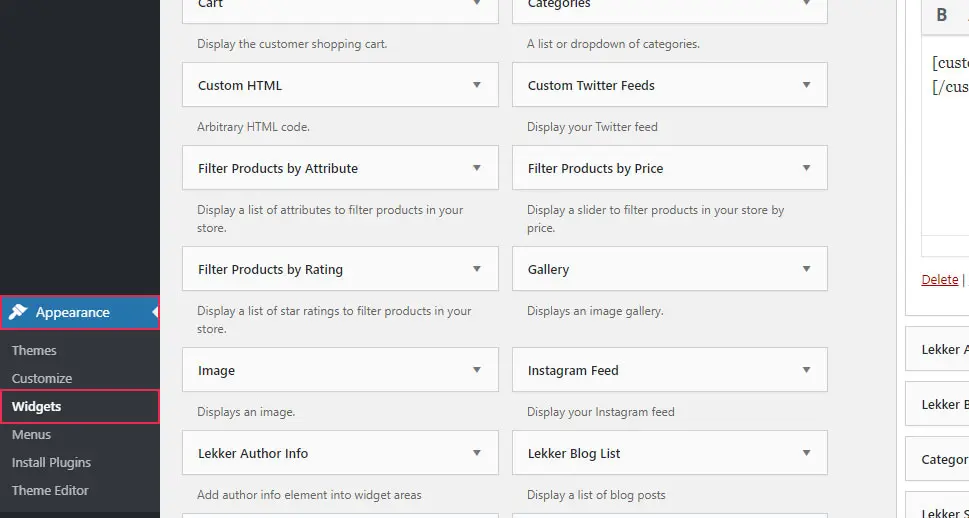
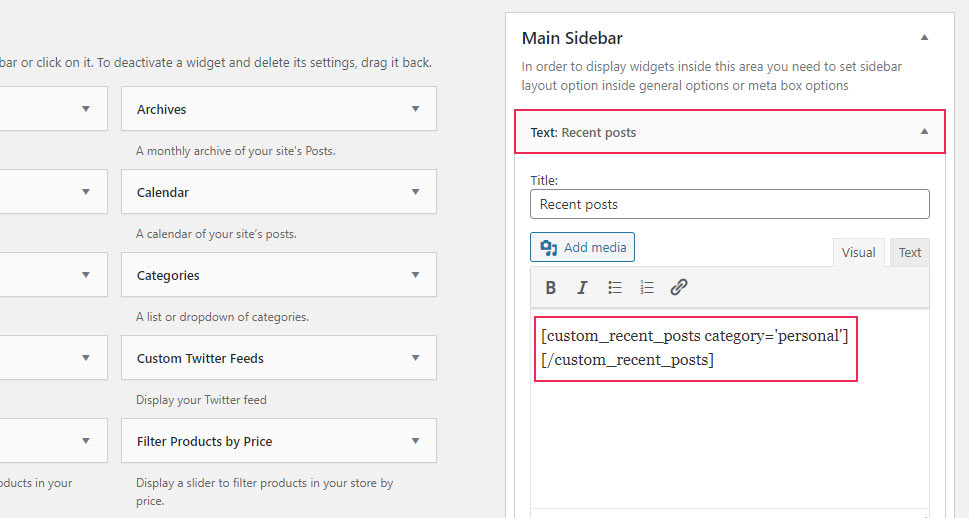
To use this shortcode within a widget, first, navigate to Appearance > Widgets. Then, locate the widget area where you want to use the shortcode and add a Text widget to it. Next, add the following shortcode call within the main section of the Text widget:
[custom_recent_posts category='your-category-slug-here'][/custom_recent_posts]
Make sure to replace the your-category-slug-here part with a slug from one of your site’s categories. And, if you want, you can add a title to your Text widget. When you are done, press the Save button below and check the frontend of your website to see the results.
With this shortcode, you will be able to display recent posts within a chosen category. However, depending on the theme you are using, the output of the shortcode could require some additional stylization with CSS code. This CSS should be made on a case by case basis as it needs to match individual site design, so we can’t recommend a code that would be globally applied. However, we will share the small CSS tweak we used to make our output look how we wanted it to.
.recent-posts-item {
margin-bottom: 25px;
}
.recent-post-title {
margin: 12px 0;
font-size: 22px;
}
Small CSS code snippets like this should always be added in Appearance > Additional CSS. However, if you need larger quantities of CSS to stylize your output, we advise putting it in a separate .css file and enqueueing that stylesheet, which is proper programming practice.
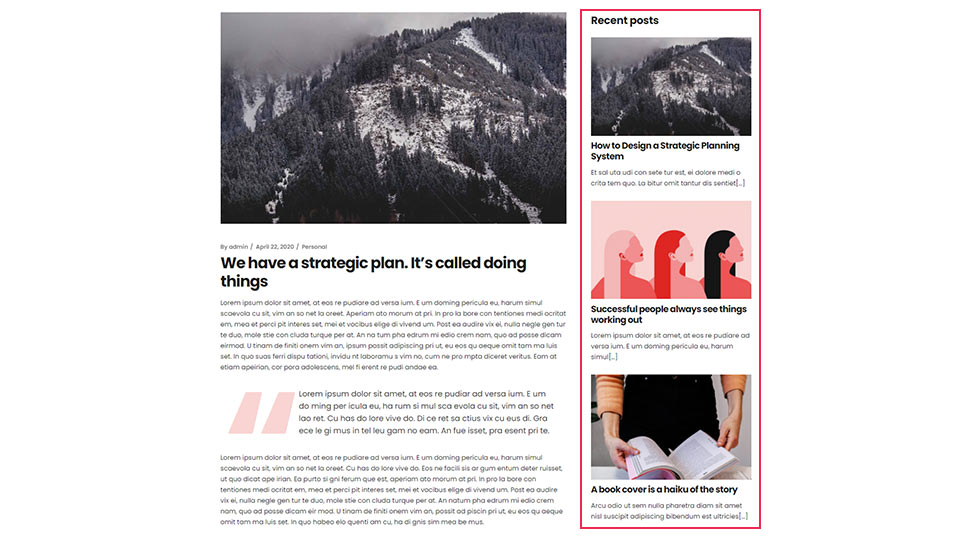
Finally, here is how the output of our recent posts widget looked after adding the above-mentioned CSS.
Final Thoughts
Displaying WordPress recent posts from a specific category can be quite useful for improving the traffic your blog receives. Showing a few selected articles will guide your readers through your website while keeping them engaged. In this article, we have shown you two possible ways of adding a category-based recent posts section. Whether you decide to go the plugin route or opt to use the code, we don’t doubt that you will be able to add this feature to your site in a matter of minutes. And, as showing WordPress recent posts based on their category is helpful for both blogging websites and websites in other niches, we suggest bookmarking this article for future use.


