How to Enqueue Custom Scripts and Style Sheets in WordPress

Adding custom scripts or stylesheets to your WordPress site is usually done to improve the functionality, features, and design of a site. There are multiple ways of adding JavaScript (also called JS) and CSS code to your theme or plugin. In a different article, we covered all the ways to add JS code, ranging from ones that are easier to understand and implement to ones that are more coding intensive. In this article, we’re going to take a closer look at one of those methods—enqueueing. It is best for adding larger custom scripts and stylesheets but it is an advanced-user method. As such, this article is more suitable for developers or WordPress users who wish to enhance existing knowledge. Of course, it’s a good read for any WordPress user, but be sure to do additional research if you want to attempt this but aren’t comfortable with coding. We will cover several approaches to enqueueing custom scripts and stylesheets in this article and provide examples for them:
Before we dive into the main part of this article, let’s take a look at what enqueueing and WordPress hooks are. By enqueueing, i.e. using the wp_enqueue_script and wp_enqueue_style functions, you inform WordPress when and where to load custom scripts and stylesheets. Simply put, instead of having all your code in one place, which would slow down your load time, you use the enqueue function. It helps you set when WordPress should interact with a custom code file and which dependencies that file has.
WordPress hooks are a feature that allow developers to add custom code to plugins and themes which interact with the WordPress Core in order to change its behavior but leave its files intact. Apart from adding custom code, a developer can choose when that code will run during the WordPress PHP processing. This is done using hooks. You can either choose a default WordPress hook or insert and use a custom hook. To use a hook, you first need to write a custom function (often called a callback or a hooked function). Those functions are divided into two types: actions and filters. Depending on which type of function you use for your hook, you can have action hooks or filter hooks. The difference between actions and filters is that actions add to existing content while filters can only modify it. Filters edit the argument they are given and always need to return a value. In contrast, actions aren’t always given arguments and they don’t need to return a value.
Now that we’ve come to grips with what enqueueing and hooks are, we can move on to adding scripts and stylesheets to WordPress. First, you need to create a separate file for your code. The file’s extension should be .js (if adding Javascript) or .css (if adding a stylesheet). Then, place the file either inside your theme or plugin directory. Afterward, create a snippet of code that enqueues the file. You need to insert it into the functions.php file of your parent or child theme or inside a plugin file, depending on the location of your custom script/stylesheet file. The code snippet contains two distinct pieces of code. The first piece is a function that enqueues the file with the use of wp_enqueue_script and wp_enqueue_style. The second represents the use of the add_action function which hooks on one of the two default WordPress script and stylesheet loading hooks – wp_enqueue_scripts and admin_enqueue_scripts. The first hook is intended for loading scripts and stylesheets that affect the frontend of the site, while the second is for those affecting the admin dashboard.
Any developer of a well-coded theme or plugin prefers this method of adding scripts and stylesheets. It prevents the same scripts and stylesheets from being loaded multiple times and reduces incompatibility-based plugin conflicts. Moreover, developers can take advantage of a list of widely used scripts to standardize their coding even further.
Enqueue Scripts
The function wp_enqueue_script has five parameters (also called arguments), which we will explain below. Only the first is mandatory, and it has to be unique.
$handle – a unique script name.
$src – full URL path to the script or a relative path combined with path functions (examples below). The default value is an empty string (”).
$deps – an array of scripts/script handles that the script you want to enqueue depends on. The default value is an empty array (array()).
$ver – a number determining the version of the script. If the value is false, it’s automatically set to the current WordPress version. When set to null, no version is added. The default value is false.
$in_footer – ‘true’ or ‘false’ value determining the placement of your script. If set to ‘true’, the script will be loaded before the closing body tag (). If set to ‘false’, it will be loaded in the. By default, the value is ‘false’.
To help you understand the use of the wp_enqueue_script function, we have included a couple of examples. The same applies to all the other sections in this article. But, before proceeding, we need to mention two essential points, which are relevant to the whole article.
As the function has only one required argument ($handle) if you don’t include any other parameters, their default values will be used instead.
The second point is that you should avoid using full URLs, and favor using default WordPress functions that retrieve the path. This is done to avoid hard-coding static URLs, which would be rendered useless in the case the URL changes. You can use several different WordPress functions for path-retrieval; we’ve included three examples below.
get_template_directory_uri() – which returns the parent theme directory path, without the trailing slash,
get_stylesheet_directory_uri() – which returns the child theme directory path, without the trailing slash, and
plugins_url() – which returns the path to a plugins directory. Of these three functions, only the plugins_url() can have parameters (up to two). Those are the extra path that should be added at the end and the full relative path of the file (script or stylesheet) which is located inside the plugin’s directory. The latter is noted by including __FILE__ as the second parameter.
Examples:
-
By placing this code inside the functions.php file of your parent theme you can enqueue a JS script with the handle theme-script. The file path is your-site-url/wp-content/themes/theme-name/assets/js/theme_script.js, while the remaining arguments are set to their default values. This means the script doesn’t depend on any other scripts, its version is the same as the current WordPress version, and the enqueueing is done before </head> the tag.
function theme_js_script() {
wp_enqueue_script( 'theme-script', get_template_directory_uri() . '/assets/js/theme_script.js');
}
add_action('wp_enqueue_scripts', 'theme_js_script');

-
By placing this code inside the functions.php file of your child theme you can enqueue a JS script with the handle counter. The file path is your-site-url/wp-content/themes/child-theme-name/js/counter.js and it depends on the script with the handle jquery. Its version is the same as the current WordPress version and it’s enqueued before the </body> tag.
function counter_script() {
wp_enqueue_script( 'counter', get_stylesheet_directory_uri() . '/js/counter.js', array( 'jquery' ), false, true );
}
add_action('wp_enqueue_scripts','counter_script');

-
By placing this code inside the functions.php file of your child theme you can enqueue a JS script with the handle counter. The file path is your-site-url/wp-content/themes/child-theme-name/js/counter.js and it depends on the script with the handle jquery. Its version is the same as the current WordPress version and it’s enqueued before the </body> tag.
function my_plugin_script() {
wp_enqueue_script('compatible', plugins_url('assets/js/compatible.js', __FILE__), array(), '1.4', true);
}
add_action('wp_enqueue_scripts','my_plugin_script');

Enqueue Stylesheets
The function wp_enqueue_style also has five arguments, most of which are the same as those for the enqueue scripts function. Only the first argument is mandatory and has to be unique.
$handle – a unique name of the stylesheet.
$src – full URL path to the stylesheet or a relative path combined with the same path functions. The default value is an empty string (”).
$deps – an array of stylesheets/stylesheet handles that the stylesheet you want to enqueue depends on. The default value is an empty array (array()).
$ver – a stylesheet’s version number. If the value is false, it’s automatically set to the current WordPress version. When set to null, no version is added. The default value is false.
$media – identifies which media the stylesheet serves. The values could be given as media types (e.g. ‘screen’, ‘all’, or ‘print’) or using media queries (e.g. (orientation: landscape) or (max-width: 1024px)). The default value is ‘all’.
Examples:
-
By adding this code in the functions.php of your child theme you can enqueue a CSS stylesheet with the handle default-style, whose path is your-site-url/wp-content/themes/child-theme-name/css/default.css. It has no dependent stylesheets, its version is the same as the current WordPress, and it’s intended for all media types.
function default_css_styles() {
wp_enqueue_style('default-style', get_stylesheet_directory_uri() .'/css/default.css');
}
add_action('wp_enqueue_scripts', 'default_css_styles');

-
By adding this code to one of the plugins’ files, you can enqueue a CSS stylesheet with the handle plugin-styles and the path to the file is your-site-url/wp-content/plugins/plugin-name/assets/css/plugin.min.css. There are no dependent CSS stylesheets, the file version is 2.1, and the CSS is intended for all media types. The default value is ‘all’, and we’ve deliberately added that parameter to the example so you can see it within the code, but you can omit it.
function my_plugin_styles() {
wp_enqueue_style('plugin-styles', plugins_url('assets/css/plugin.min.css', __FILE__), array(), '2.1', 'all');
}
add_action('wp_enqueue_scripts', 'my_plugin_styles');

The previous section described how to add scripts and stylesheets that will affect the frontend of your site. However, using similar methods, you can enqueue scripts and stylesheets intended to affect the backend of your site. More precisely, your admin dashboard. The WordPress hook for enqueueing scripts and stylesheets meant to be used for your admin dashboard is called admin_enqueue_scripts. The proper use of the hook includes making a function with the enqueueing code first and then adding an action with the hook and function name as two of the arguments used.
Examples:
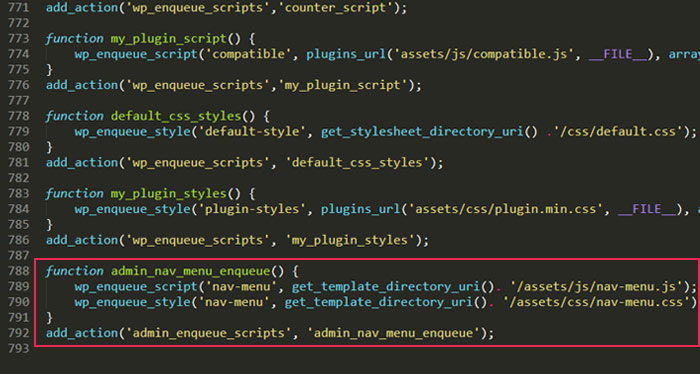
You can enqueue multiple files (both scripts and stylesheets) within a function by using the wp_enqueue_script and wp_enqueue_style functions multiple times. Moreover, separate scripts and stylesheets can be enqueued with the same handle. Both are done to supply additional structure to your theme or plugin. In this example, both a script and a stylesheet are added with the same handle. They are meant to affect the creation of a navigation menu inside the admin panel.
function admin_nav_menu_enqueue() {
wp_enqueue_script('nav-menu', get_template_directory_uri(). '/assets/js/nav-menu.js');
wp_enqueue_style('nav-menu', get_template_directory_uri(). '/assets/css/nav-menu.css');
}
add_action('admin_enqueue_scripts', 'admin_nav_menu_enqueue');
Sometimes, you want to enqueue a certain script or stylesheet only if one or more conditions are fulfilled. The pseudocode for those cases is shown below.
If ( /* insert a conditional here */ ){
// insert the enqueue code here
}
The number of conditional statements inside the “()” brackets could be one or more. In case that two or more conditions are included, the use of logical operators && or || is needed. The && operator stands for logical conjunction, meaning the statement is true only when both conditions are met. On the other hand, the || operator stands for logical disjunction, i.e. the statement is true if either of the conditions used is met.
Conditional enqueueing is often paired with the use of the wp_register_script() and wp_register_style(). Those functions have the same arguments as their enqueue counterparts (wp_enqueue_script and wp_enqueue_style, respectively). However, wp_register_script only registers the script, while wp_enqueue_script both registers and enqueues, given that it uses both $handle and $src arguments. Therefore, the wp_register_script function is used in the case you aren’t sure when to enqueue, to delay the enqueueing for a later time or when certain conditions are met. The same applies to the wp_register_style function.
Example:
-
In the first example, there are three conditional statements that determine if the script will be enqueued or not. The same script is registered prior to using the wp_register_script function, which allows for enqueueing with only the handle name. Since the logical operator && is used twice, it means that only if all three conditions are met the script with the handle comment-reply will be enqueued. As for the conditions, the first statement—is_singular() determines what post type (post, page, attachment, or a custom post type) your content belongs to. The second—comments_open() determines if the content can be commented on (if that option is allowed). And the final condition—get_option(‘thread_comments’) determines if native WP nested comments are enabled for the content.
if( is_singular() && comments_open() && get_option('thread_comments') ) {
wp_enqueue_script('comment-reply');
}

-
In the second example, there is only one condition – is_multisite(), which, as the name suggests, checks whether a site is multisite or not. A benefit of using the wp_register_style function with conditional statements is the option to use the wp_deregister_style function. That function deregisters a previously registered function. This allows you to enqueue a new stylesheet instead of the deregistered stylesheet. Moreover, the handle can be the same to make code more clear and intuitive. Likewise, you can use the wp_deregister_script() function in combination with the above-mentioned functions.
if( is_multisite() ) {
wp_deregister_style('conditional-style');
wp_enqueue_style('conditional-style', get_template_directory_uri() .'/assets/css/conditional_style.css', array(), false, true);
}


Apart from wp_enqueue_script and wp_enqueue_style, which are more suited for adding larger scripts and stylesheets, there are two additional functions, best used for adding smaller pieces of JS and CSS code. Those functions are wp_add_inline_script and wp_add_inline_style. It’s best to use them in conjunction with wp_enqueue_script and wp_enqueue_style to make small adjustments that would extend the functionality of a theme or plugin.
Adding Scripts with wp_add_inline_script
The function wp_inline_script has three arguments and the first two are required. Let us explain them.
$handle – a unique script handle name. It represents the name of a previously enqueued script to which the inline JS code will be added.
$data – JS code which will be added. It mustn’t contain the opening and closing script tags (<script> and </script>, respectively)
$position – whether the inline JS code is added before or after the enqueued script. The default value is ‘after’.
Example:
The code below first enqueues the script with the handle inline-js-script and with the remaining arguments, according to the enqueue scripts explanation above. Strictly speaking, you don’t have to enqueue a script within the same function (in our example it’s called add_inline_js_code()); this can be done in a separate function. However, it is necessary that the script is enqueued before using the wp_inline_script function.
Then, you can add small inline JS code to the previously enqueued script by using the wp_add_inline_script function. More precisely, use the same handle and replace the add-your-inline-js-code-here with actual JS code. Since no third argument is used, inline JS code is added after the script code.
function add_inline_js_code() {
wp_enqueue_script( 'inline-js-script', get_template_directory_uri() . '/assets/js/scripts.js', array( 'jquery' ), false, true );
wp_add_inline_script( 'inline-js-script', 'add-your-inline-js-code-here');
}
add_action('wp_enqueue_scripts', 'add_inline_js_code');

Adding Stylesheets with wp_add_inline_style
The wp_add_inline_style has only two arguments, which are the same as the first two arguments of the wp_add_inline_script. Those are:
$handle – a name of the previously enqueued stylesheet and
$data – the inline CSS code that should be added to the stylesheet.
Example:
According to the definition of the function wp_enqueue_style, a stylesheet with the handle css-modules is first enqueued. The wp_enqueue_style function doesn’t have to be a part of the add_inline_css_code() function, as long as the stylesheet is enqueued before the use of the wp_add_inline_style function.
Then, use the wp_add_inline_style function. The handle will be the same but you need to replace the add-your-inline-css-code-here with actual CSS code.
function add_inline_css_code() {
wp_enqueue_style('css-modules', get_template_directory_uri() .'/assets/css/modules.css');
wp_add_inline_style('css-modules', 'add-your-inline-css-code-here');
}
add_action('wp_enqueue_scripts', 'add_inline_css_code');

Final Thoughts
Adding scripts and stylesheets can be quite useful in improving your WordPress website. From improving the functionality and adding features to creating a more attractive design—there’s a wide range of reasons to add custom scripts or stylesheets. And to make sure your custom code integrates and works well with WordPress you should add it properly by enqueueing the files. Using this article and the various examples we’ve shown here, you will be able to enqueue scripts and stylesheets to your site and dashboard in no time.

kabways
I was wondering if A closing parentheses ‘)’ wasn’t missing on the First Example code for enqueueing à stylesheet or it was left out on purpose?
Qode Interactive
Thanks for pointing that out 🙂 . It’s fixed now.