How to Create a Staging Environment for Your WordPress Site

Have you ever seen a white screen instead of your site after making a change or adding a plugin? Have you ever thought If only I’d had a testing environment where I could have tried this out instead of crashing my website? If the answer to either of those is yes, then this article is for you.
To avoid mishaps like these, you should always test-run any changes you want to make in a staging environment and not on your live website. In this article, we’re going to show you how to create a staging environment for your WordPress website so you will be able to safely test or try out any changes before applying them for real.
We will touch on the following methods you can try:
What Is Staging and What Does It Do?
A staging site is essentially a copy or clone of your live website. However, a staging site is not available to the wider public; it’s only accessible to you and any changes you make to it won’t show up on your live website. This means you can test any changes without risking or crashing your live site.
Another reason to have a staging environment is to avoid problems caused by different server configurations. When building sites, many users will first install WordPress locally on their computers. For the local installation to work, they use server emulators for Windows or Mac. This lets them do their testing offline before launching their site. However, when the time comes to launch the site, you might end up with a problem because of server configuration differences. Simply put, the local and live servers might not have all the same settings. But, using a staging site, which would be on the same server as your live site, will help you avoid issues with server configuration compatibilities.
How to Create a Staging Site in WordPress
There are several ways to create a staging site and, fortunately, none of them require you to be very tech-savvy.
Most leading WordPress hosting providers will offer you the option to create a staging site with a few clicks as part of the hosting package. However, if your provider isn’t one of them you still have alternatives. You can use a plugin to make a staging site or create one manually.
If you’ve already bought hosting for your site, then this is the simplest method to try. Leading WordPress hosting providers, like SiteGuard, WP Engine, Bluehost, etc. all include built-in staging site features. So setting it up will only take a few clicks as all the options and tools you might need should already be included in your hosting plan.
Now, since the actual step-by-step procedure here can differ from provider to provider, we suggest reaching out to your hosting provider. Ask them for information about accessing the feature and using it then just follow their instructions.
In case your hosting provider isn’t offering staging site features, you can use a plugin. Several plugins on the market can help you, such as Duplicator, WP Staging – DB & File Duplicator & Migration plugin, All-in-One WP Migration, WP Stagecoach, BlogVault… Any of them can help you create a staging site with a few straightforward steps.
Before we proceed we need to stress that there are a few drawbacks to this method. Keep in mind that whichever plugin you choose may only have limited control over the server which means it might not provide the best results. Also, some plugins create a staging site using their server(s) so you should inquire about their privacy and data protection policies in advance.
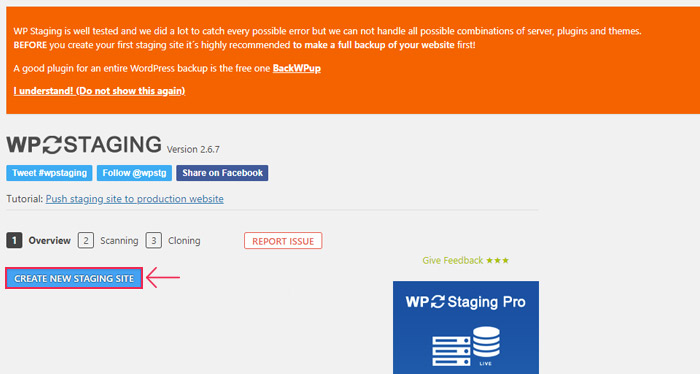
Now we’re going to show you how to make a staging site using the WP Staging – DB & File Duplicator & Migration plugin. To start, you need to install and activate the plugin. Then find the plugin options in your WordPress admin menu (depending on your other installed plugins, this one should be near the bottom) and open Sites/Start. Then click on Create new staging site.
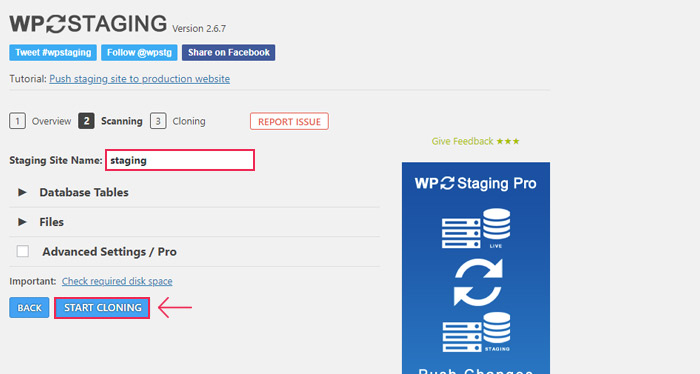
Next, you need to add a name for your staging site. We used staging but you can pick whatever name you like. Then just click on Start cloning.
The process can take some time depending on the size of your site, so just wait until you see the notification that the process has finished successfully.
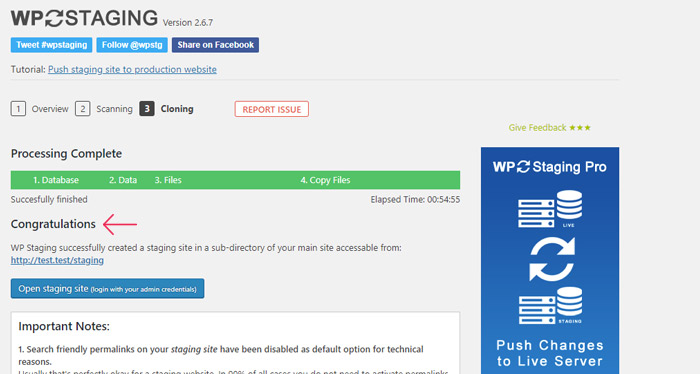
To access your newly created staging site just click on the access link and log in using the same information you use for login to your live site. Keep in mind only admin-level users will be able to access the staging site.
If you are unable to access your staging site for any reason or if you get an error notice then you should consult the plugin documentation.


Creating a staging site manually is a method you should try only if you are a more advanced WordPress user. It requires more technical knowledge compared to the other two, so it may be challenging for beginners. However, using this method will give you the greatest control over the process of creating your staging site. On the other hand, you should keep in mind that, with manual creation, you will have a final step where you deploy the changes from your staging environment to the live server. During this move, your live site will be unavailable. We will touch on this later as well.
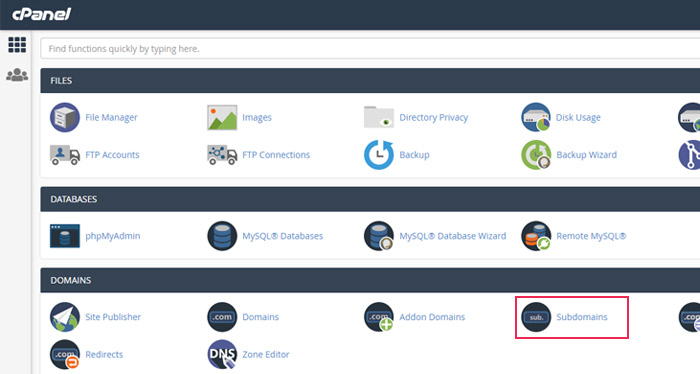
To manually create your staging site, you first need to create a subdomain for it. Log in to cPanel (or the platform you use to access the server) and find the Domains section, then select Subdomains from there. We’ve included screenshots, and while the actual look of your cPanel dashboard may be different from ours, the options it has are always the same.
Once the new window is open, you need to create a subdomain. We called ours staging but the name is entirely up to you. Click on the Create button and your hosting’s control panel will do the rest.

Now you have a staging environment where you can import your live website. You have two options for import—using an FTP client or using a plugin.
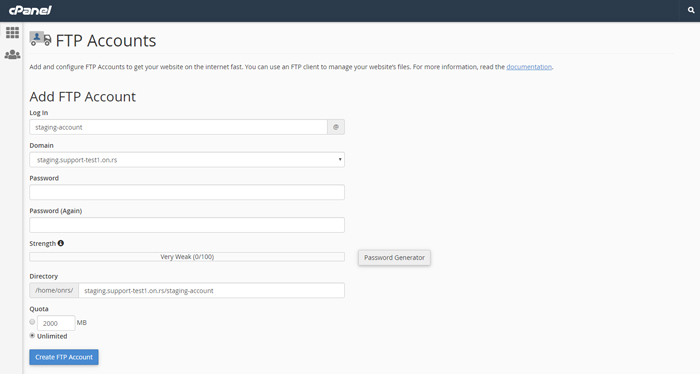
If you use FTP, we suggest you create an FTP account you’d use just for your staging site. You can easily do this via the FTP Accounts option in cPanel. Set your login information in the new window (the Domain was automatically generated during subdomain creation—you can find it in the field Document Root as shown above).
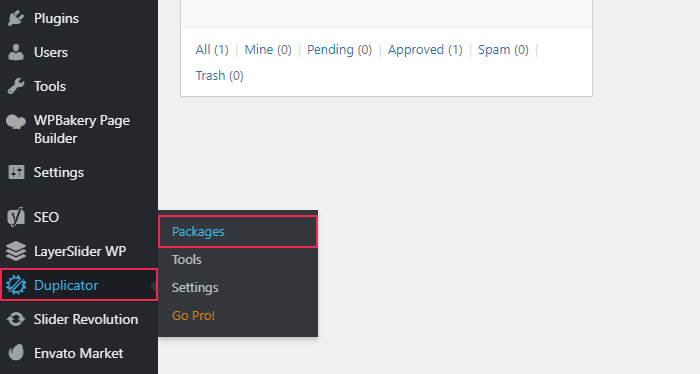
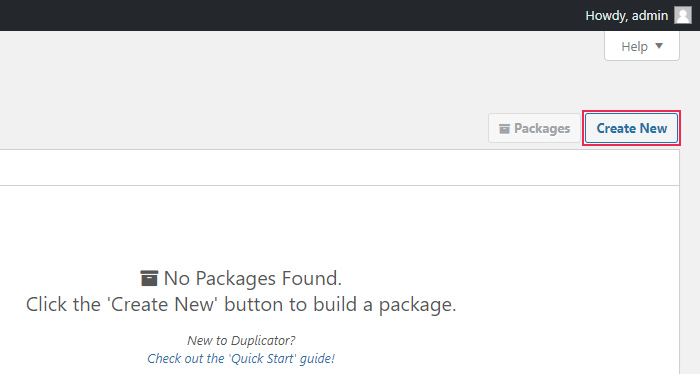
Now you can continue the process of importing your live website using the Duplicator plugin. Install and activate the plugin. Once you’ve done that, find the settings for it in your WordPress admin menu and open them. Then locate and click the Create New button.
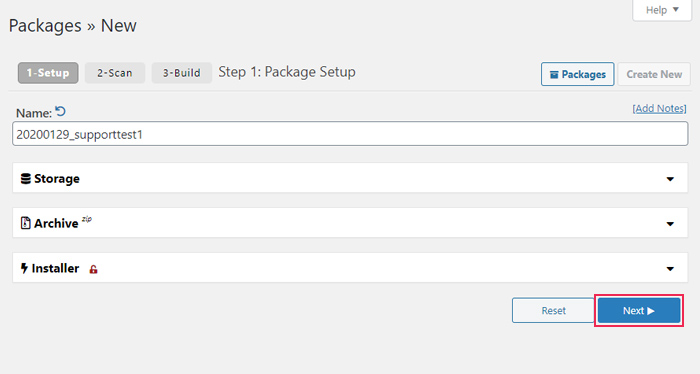
Then, in the new view that opens, name your package and select Next.
Now the Duplicator plugin will start its scan wizard to check if everything is alright so the process can continue. If the scan results are marked as Good, then you can tick the confirmation box and proceed by clicking on Build.
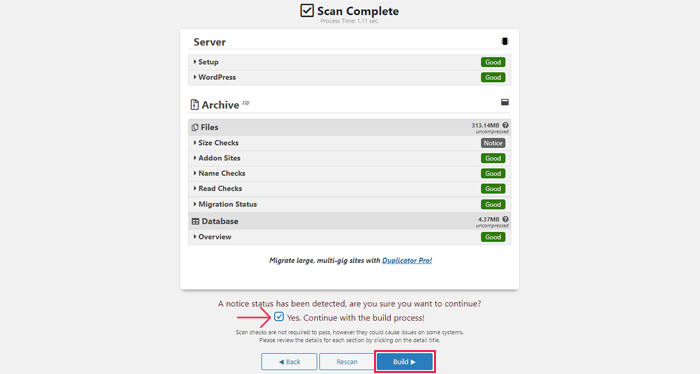
Depending on your site size, this process may take some time. Wait until a notification with Package Completed has appeared. This package will contain copies of all your live site files and folders. You need to download it. We suggest selecting One-Click Download as it will create a .zip archive containing both the Installer and Archive files. Now just save it to your computer.
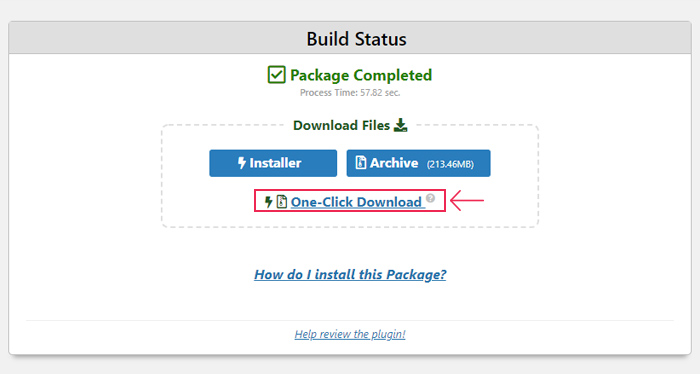
Make sure the download includes both the installer and archive files; you will need both for upload to the staging site. Then you can upload the package to the staging environment—the subdomain you’ve made earlier—using an FTP client or via cPanel and unpack it.
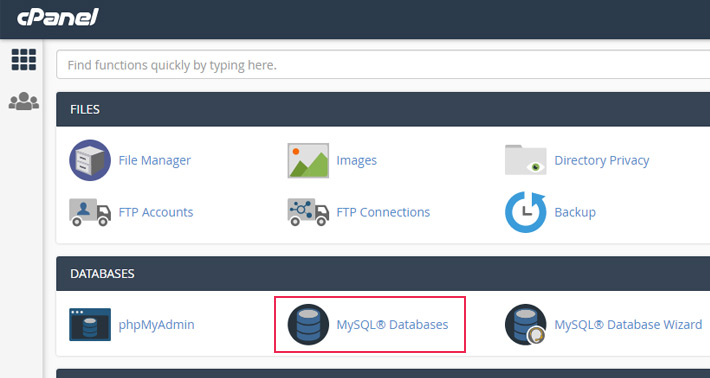
But, before you can do anything with the downloaded package, the staging site will need a database. To create one, go to cPanel and find the Databases section. Then select MySQL Databases.
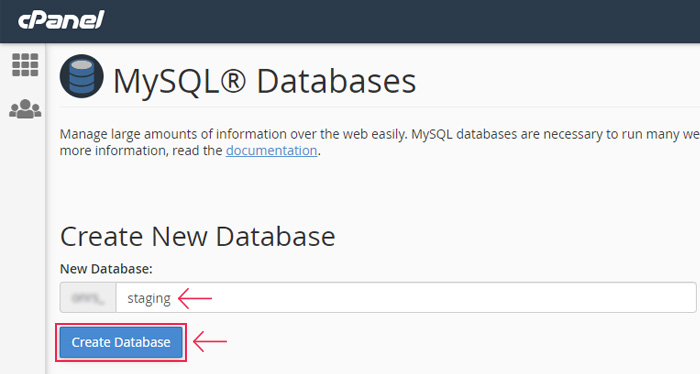
A new window will open where you will need to create a name for your database. We called ours staging, but this is entirely up to you. Click on Create Database.
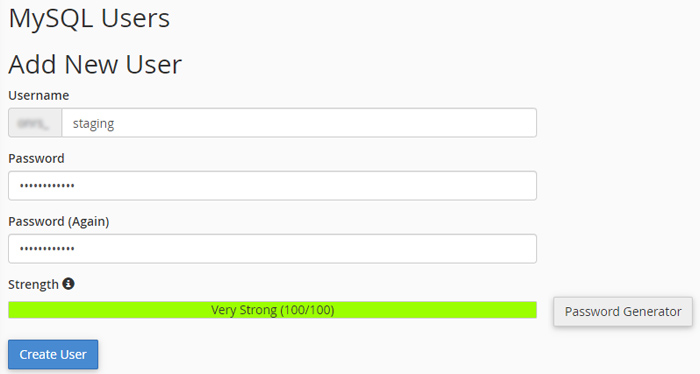
Now that that’s done, you need to create a user for your database. Staying on the same cPanel page, scroll down until you reach MySQL Databases, then find the MySQL Users section. Next, create a profile by setting a username and password and then choosing Create User.
After you create a user you need to connect them to the database. On the MySQL Databases page find the Add user to database option. Select the newly created user and the staging database then click on Add.

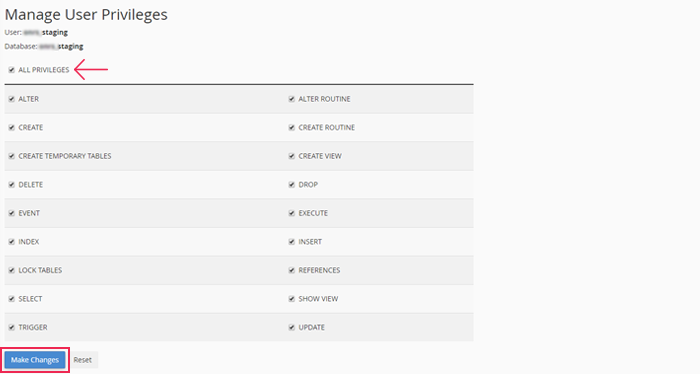
After that, you need to assign privileges for your new user that include access to and modification of the database. In the Manage User Privileges section simply tick the checkbox with All Privileges and click on the Make Changes button.
Now your database is ready to be used for your staging site.
For the next step, open a new tab in your browser and type in your subdomain address followed by a forward slash and the installer.php words. The result should look something like this:
https://yoursubdomain.com/installer.php
Of course, this is just an example and you will need to replace yoursubdomain.com with your actual subdomain address. Once you do that, you will run the Duplicator plugin’s installer wizard which will search for the Archive file that you previously uploaded to the staging site.
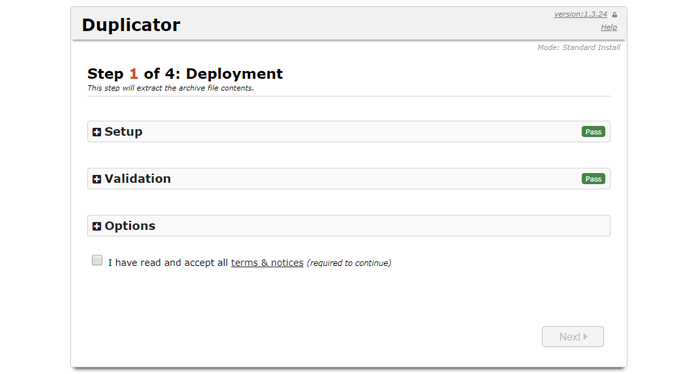
Don’t forget to tick the box with the terms and notices as you won’t be able to proceed to the Next step without it.
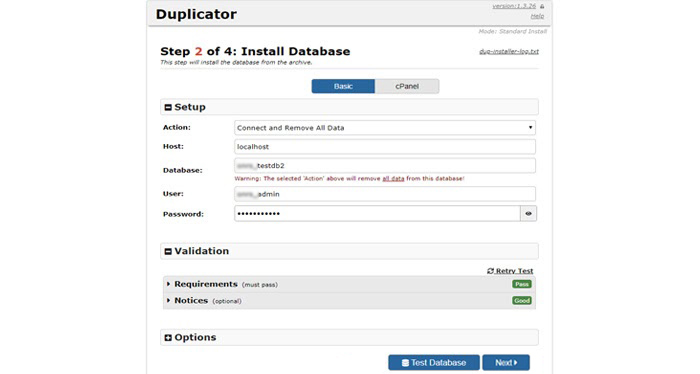
During the next step, the wizard will ask you to fill in your database information. You can leave the first two fields as they are—Action: Connect and Remove All Data and Host: localhost. But you need to fill in the Database, User, and Password fields with the same information you set during staging database creation. If you’re not sure you added the right login information, you can click the Test Database button to check if the information you’ve added corresponds to an existing database. If everything is ok you will get green results under the Validation section. Then you can proceed to the Next step.
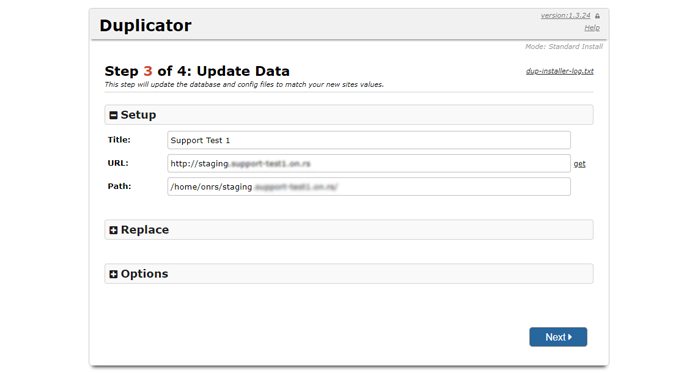
The plugin will then unpack the .zip archive and upload your website database copy into the newly connected staging site database. At the same time, it will automatically detect the URL and subdomain path—you just need to make sure it’s right before proceeding.
In case the automatic detection fails, you can add the URL and subdomain path manually.
Once you’ve done that, click on Next and the Duplicator will finish the migration of your site copy to the staging environment on the server.
When the migration is complete, click on the Admin Login button to log in to your staging site’s WordPress dashboard. The login here will be the same one you use to access your live site.

Now that your staging site is up and running and even though it’s not visible to the public, you should still give it an added layer of protection. You can do that by creating a password for access to the subdomain.
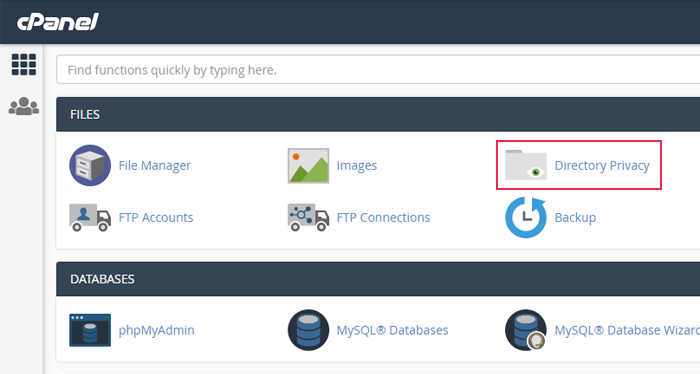
Go to your cPanel dashboard and find the Directory Privacy option in the Files section.
After that, find the subdomain you created for your staging site and tick the Password protect this directory checkbox. Then enter a name for the directory you want to protect and pick a username and password.
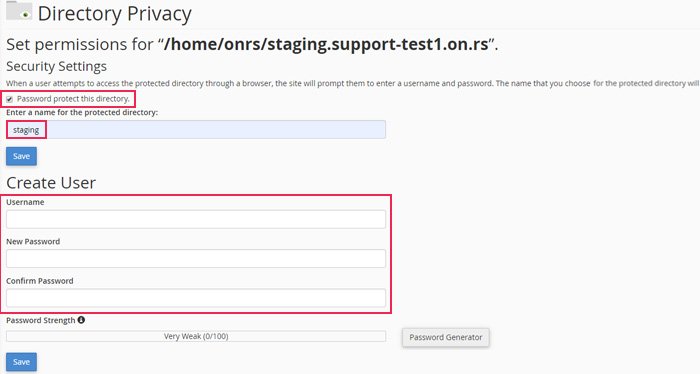
Click on Save to activate the new security measure for your subdomain. Now your staging site will be protected and hidden.
And you’re done! All that’s left now is for you to start testing changes and modifications to your site in its fully operational staging environment without having to worry that your live site will suffer in any way.
Bonus Tip
Sometimes your staging site, a perfect copy of your live site, can negatively impact your SEO and SERP position. To avoid that, you should make your site non-indexable. You can do this by going to your staging site’s WordPress admin dashboard and then to Settings > Reading. Find the option Discourage search engines from indexing this site and tick the box next to it. This will automatically add a noindex tag to your entire staging site.

Transferring the Staging Site Back to Live
When you finish testing, all the same steps you took to make a staging site are used in reverse to migrate it to live. Using the Duplicator plugin, make a package (or download separate Installer and Archive files) containing your staging site files with all the changes you made, and save it to your computer.
At this point, it’s always a good idea to make sure you have a backup of your live site (e.g. the package you uploaded to your staging environment). If you don’t have one ready, you can make a backup using a plugin or even backup your website manually. Backing up your site ensures that you can restore it if anything goes wrong.
So, after you’ve made sure that you have a backup, delete all of your live site files and folders.
Then upload the Installer and Archive files from your computer via cPanel or an FTP client. Since you had to delete all files, your live site will, naturally, be down while you upload everything from your staging site. Depending on your internet speed, server settings, and site size the upload might take some time (ideally a few minutes, but don’t worry if it takes longer), just wait until it’s done.
When the files have finished uploading, just follow the steps in the Duplicator Wizard to the end to finalize your live site import.
Final Thoughts
Creating a staging environment can be essential if you are developing WordPress websites. And it is extremely useful for anyone who wants to safely make changes to their site. As we’ve seen, there are several ways you can use to make a staging environment. The simplest and most user-friendly method will always be to use the built-in options available via your hosting control panel. We advise you to opt for that as it’s also the most reliable and time-efficient option you can use. If your hosting provider doesn’t offer this possibility, then try the other methods but keep a backup of your site at hand and find out how to restore it from backup.
