How to Display a Category Description in WordPress

WordPress categories and tags are one the most effective ways of grouping posts into a more logical structure. They have the added benefit of making the posts more accessible to readers and improving the overall user experience on the website. Most WordPress owners use categories and tags for these purposes daily, but they rarely take advantage of their full potential. Even though we will only focus on categories in this article, the same principle applies to the tags as well.
Firstly, category pages naturally help with your website’s SEO by providing content that matches certain keywords and phrases. They also serve as a form of navigation through a specific selection of posts that your visitors might be interested in reading. Even so, categories have one feature that is often underutilized on WordPress websites—the description.
Category descriptions complement the category title, providing an insight into the subject matter of the articles within the category. By displaying a description, you can improve traffic to the category pages that have vague or uninteresting titles or those that would otherwise be overlooked by readers. However, despite its usefulness, this feature is underutilized because it isn’t enabled by default in WordPress and depends on the theme you are using. So, in this article, we’ll dig deeper into the subject of WordPress category descriptions and we’ll answer the following questions:
Qode Themes: Top Picks
View Collection


How to display a category description in WordPress
In this article, we will discuss two possible methods of displaying category descriptions in WordPress. Both methods require the use of custom code snippets. The first will enable you to display descriptions on category archive pages—where most users would expect them to be. While the second will provide you with the flexibility to display them on any page of your WordPress website.
But, before going any further, you should make a backup of your website just in case. Additionally, brushing up on your knowledge of FTP is a good idea, as FTP will be necessary for inserting the code correctly. Finally, it is important to note that this article is geared more towards intermediate and advanced WordPress users. Meaning, even though we tried to clarify all the points in this article, depending on your WordPress knowledge, you might need to do additional research. And with that out of the way, let’s begin.
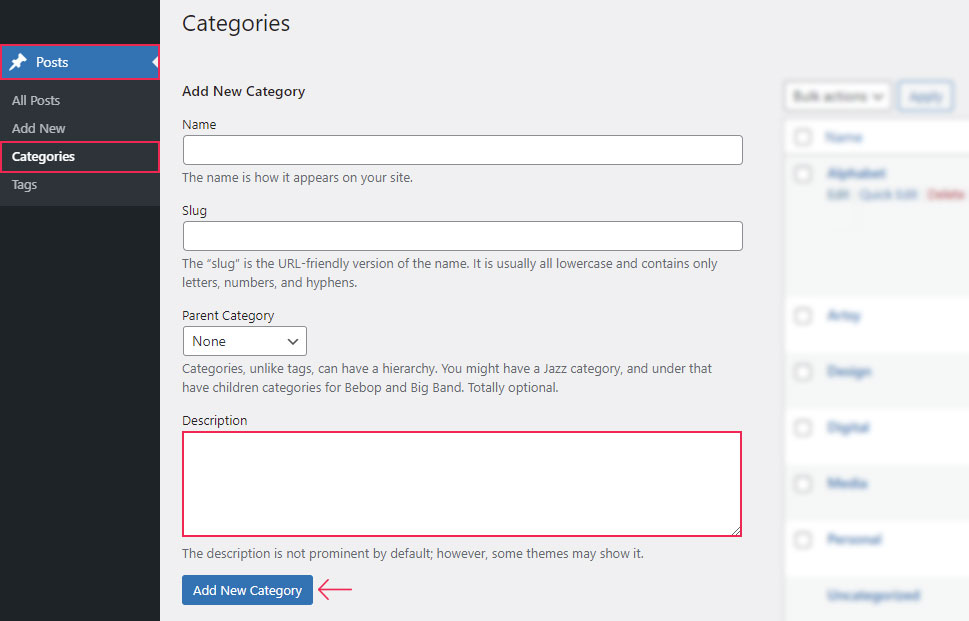
Before we can explore how to display a WordPress category description, we need to explain how this description is added. To add a description to a category, navigate to Posts > Categories first. There, you will see two sections – one for adding new categories and the other that displays the list of your existing categories.
To add a new category, fill out the Add New Category form on the left. This includes adding a name, category slug, assigning a parent category (if needed), and adding the description within the Description field. When you’re done, press the Add New Category button below to create your new category.
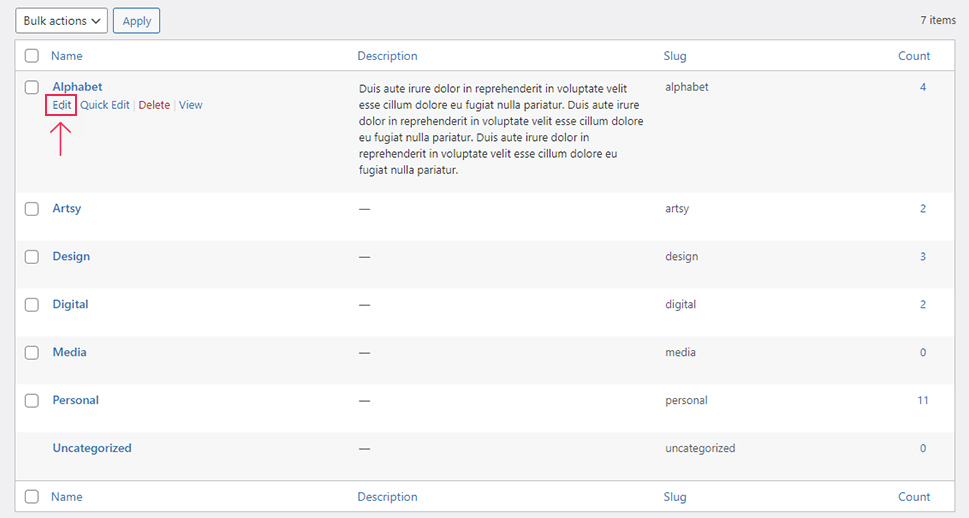
On the other hand, if you want to add or edit the description for an existing category, you need to find it within the list of existing categories on the right, first. You’ll need to hover over it to reveal the additional options. Finally, to add a new description or edit the existing one, press the Edit option.
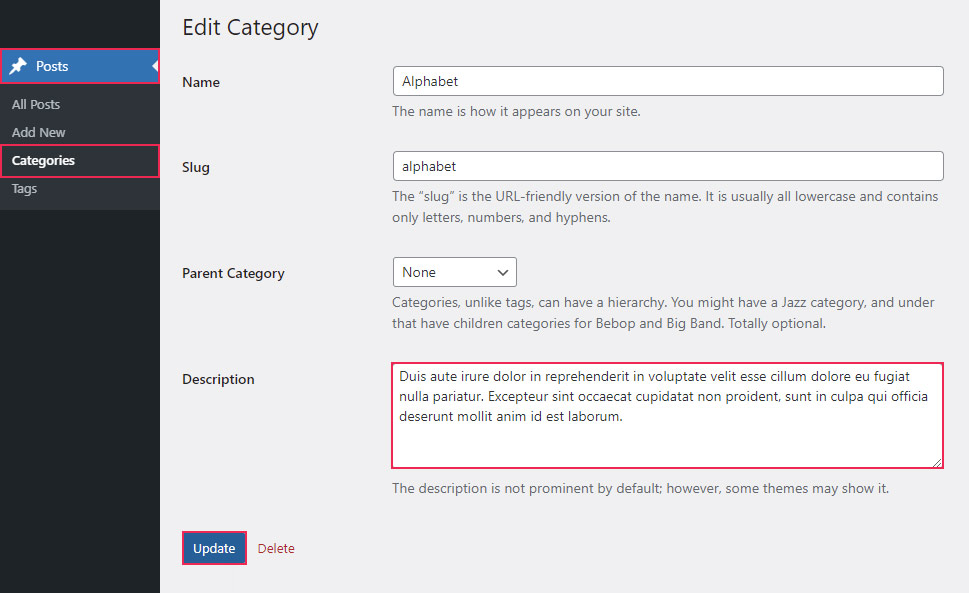
This will open the edit screen of your chosen category, where you can edit its description in the Description field. To save the information you inserted, press the Update button at the bottom.
Even though you may expect a category archive page to show a category description after you’ve added it in the previous step, this won’t happen. Displaying category descriptions is not the default WordPress behavior and it depends entirely on the theme you are using. Some themes choose to display the description on category archive pages, while others do not. Therefore, the first method that we’ll cover is how to show a category description on a category archive page regardless of the theme you are using.
In general, to display the category description, you only need to use the_archive_description() function. As you can see on the linked page, the function displays the description for archives (category, tag, term, or author) if they’ve been inserted previously. Meaning, the code can also be used to display descriptions for other archives, if they’ve been added. Additionally, it allows you to specify the HTML element that wraps that description.
Example:
The following code would display the archive description wrapped with a div HTML element that has the class qodef-category-description.
the_archive_description( '<div class="qodef-category-description">', '</div>' );
For it to display the archive description, you would need to insert it inside the appropriate theme template file. That file could be the category.php file or the archive.php file, or some other template file, depending on the file structure of your theme. However, as directly changing the template files of your theme isn’t good coding practice, we’ll explain how you can achieve the same result using hooks.
The reason you shouldn’t be editing the template files of your theme, apart from possibly breaking your website, is that any edits will be lost after you update the theme. Instead, the custom code that you create should be “hooked” onto an appropriate hook.
To help you understand this concept, think of hooks as small code placeholders that developers leave inside the files. By “hooking” your code onto them, you will achieve the same functionality as if the code was directly placed inside the template file in the same location as the placeholder hook. The benefit of doing this is that you can insert the whole hooked code via FTP inside the functions.php file of your child theme or a site-specific plugin, thus making it safe against theme updates.
There are two types of hooks—action hooks, used for adding new features, and filter hooks, used for changing existing features. Since our goal is to display the category description, which wasn’t displayed previously, we would need to use an action hook. With that in mind, we created the example code you can see below.
if ( ! function_exists( 'your_function_name' ) ) {
function your_function_name() {
if ( is_category() ) {
the_archive_description( '<div class="qodef-category-description">', '</div>' );
}
}
add_action( 'your_hook_name', 'your_function_name' );
}
Let’s break this code down.
It represents a function called your_function_name() which is called using the add_action() function onto the hook called your_hook_name. The function is only executed if a function with the same name doesn’t already exist. As for the main part of the code, it displays the archive description using the the_archive_description() function.
Since we only want to display the description of category pages, we wrapped the code with an is_category() conditional statement. Meaning, the description will only be shown on the category archive page. Needless to say, to properly use this code, you need to replace the your_function_name and your_hook_name parts accordingly.
While coming up with a name for the function isn’t hard (you can use any name that you find fitting), picking the appropriate hook to use can be quite challenging. You will need to either review the files of your theme to find the most suitable hook or consult with your theme authors about this matter.
For this article, we decided to use display_description_on_category_archive_pages as the function’s name and lekker_action_before_page_content_holder as the action hook. The code we ended up using is shown below.
if ( ! function_exists( 'display_description_on_category_archive_pages' ) ) {
function display_description_on_category_archive_pages() {
if ( is_category() ) {
the_archive_description( '<div class="qodef-category-description">', '</div>' );
}
}
add_action( 'lekker_action_before_page_content_holder', 'display_description_on_category_archive_pages' );
}
However, since it contains a hook specific to the Lekker theme, this code can’t be copy-pasted to other themes. You need to alter the example given above with your unique function name and a hook specific to the theme you are using. After you create the code, it should be inserted either in the functions.php file of your child theme or inside a site-specific plugin.
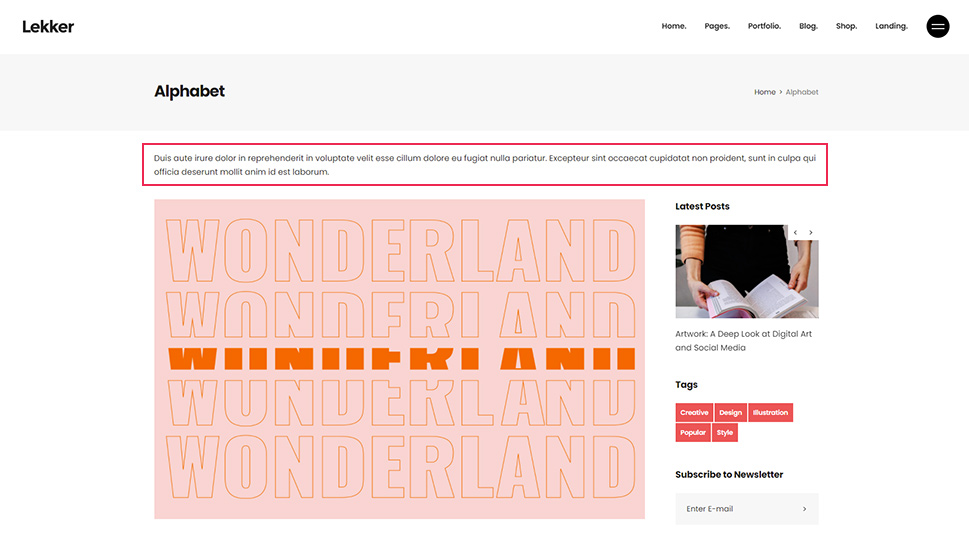
Once you’ve inserted the code into an appropriate location, you will see the category description displayed on the category archive pages. Often, this description requires additional CSS code to style it so it matches the theme.
However, CSS code like that is created on a case-by-case basis. Therefore, you will need to create a unique piece of CSS code that fits your theme design and your website as a whole. To help you style the description, you can use a helpful CSS selector. The one we added to the code so we can use it for stylization now is the qodef-category-description class that was inserted in the wrapping div HTML element.
For example, we used the following CSS code:
.qodef-category-description {
margin: 40px 0;
}
And this has created the following result on an archive page from the Lekker theme.
While it’s quite an improvement to be able to display the category description at all, some WordPress users may be constrained if it’s only displayed on category archive pages. This method is for all of you who want to display the description across the whole of your website, including pages and posts.
We enabled this functionality by creating the following code:
if ( ! function_exists( 'qodef_categories_with_descriptions_list' ) ) {
function qodef_categories_with_descriptions_list( $atts ) {
$default_atts = array(
"cat_ids" => ''
);
$params = shortcode_atts( $default_atts, $atts );
$categories = array();
if ( ! empty( $params['cat_ids'] ) ) {
$categories = explode( ',', $params['cat_ids'] );
}
$output = "<div class='category-list'>";
if ( ! empty( $categories ) ) {
foreach ( $categories as $category_id ) {
if ( ! is_wp_error( get_the_category_by_ID( $category_id ) ) ) {
$output .= "<div class='list-item'><h4><a href='" . esc_url( get_category_link( $category_id ) ) . "' class='category-link'>" . get_the_category_by_ID( $category_id ) . "</a></h4>";
$output .= category_description( $category_id ) . "</div>";
} else {
$output .= "<div class='not-valid'>" . esc_html__( 'Not a valid ID.', 'textdomain' ) . "</div>";
}
}
} else {
$output .= "<div class='no-value'>" . esc_html__( 'No category IDs were inserted.', 'textdomain' ) . "</div>";
}
$output .= "</div>";
return $output;
}
add_shortcode( 'categories_with_descriptions', 'qodef_categories_with_descriptions_list' );
}
Let’s consider this code more closely.
It represents a custom shortcode called categories_with_descriptions. It was created using the qodef_categories_with_descriptions_list() function and registered as a shortcode using the add_shortcode() function. Instead of going any further into details about every part of the code, we’ll give you a general overview of what the expected outcomes of this shortcode are and how it should be used.
This custom shortcode accepts only one parameter called cat_ids, which has an empty string as the default value. The cat_ids parameter represents the list of category IDs you should insert, separated only by a comma (,). Based on the values you insert, three different outcomes are possible. If nothing was inserted, a message stating No category IDs were inserted. is displayed. Otherwise, for every invalid entry, be it an invalid ID or something that isn’t ID at all, a message stating Not a valid ID. is shown. Finally, for every valid category ID, its name and description are shown, with the category name linking to the category archive page.
Now that you understand what this shortcode is supposed to do, let’s see how you can use it. As we mentioned above, it accepts a list of category IDs as the only parameter. Therefore, to use it you need to know how to find the ID of a given post category.
To do that, navigate to the Post > Categories section and click on the Edit button next to one of your categories to figure out its ID.
This will open the categories’ edit screen. You’ll be able to find the ID of the category by reviewing the URL of the page. The ID is the number located after the part of the URL with category&tag_ID=. In our example below, the category ID is 16.
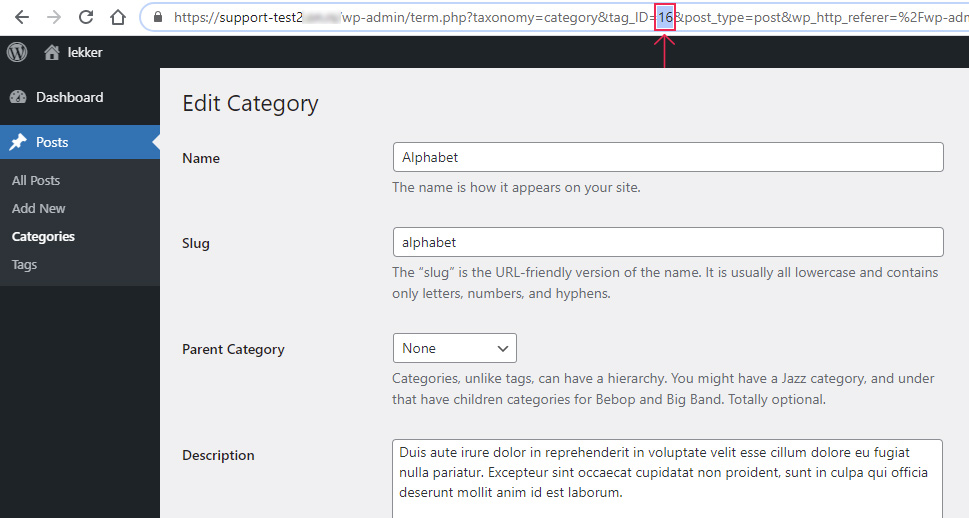
Afterward, you can simply return to the Dashboard, without editing anything on the previous screen.
Once you’ve found the IDs of all the categories you wish to display using this shortcode, we can take a look at how such a shortcode is used.
To use a custom shortcode, you need to insert its call within an appropriate shortcode for adding text. Depending on which page builder plugin you’re using, these shortcodes for adding text can have different names. For Elementor, it is the Text Editor. For WP Bakery, it is the Text Block. And for Gutenberg, it is a specialized Shortcode block.
Similarly, shortcodes can be used as widgets as well. To use them as widgets, you will need to insert the shortcode call inside a Text widget. We covered this in detail in our article on custom shortcodes, so you can read through it if you’d like to learn more. However, for this current article, we’ll focus on showing you how to use a shortcode inside a Text widget.
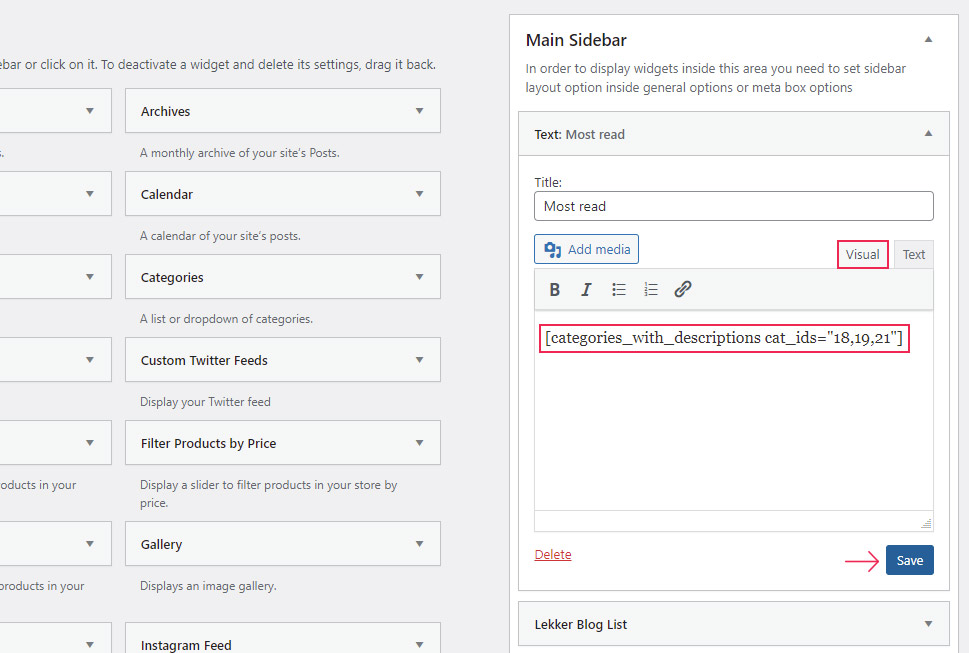
Navigate to Appearance > Widgets. Then find a widget area where you wish to show your shortcode, and add a Text widget to it.
To display the shortcode, you need to insert its shortcode call inside the Visual tab of the Text widget. For widgets that don’t accept any parameters inserting [shortcode_name] is sufficient. Please note, the shortcode_name text should be replaced with the actual name of your shortcode. In our case, since our shortcode is named categories_with_descriptions, that shortcode call would be [categories_with_descriptions].
However, since our shortcode accepts a parameter, that means we need to add it as well, alongside the value(s) we want to be used as the parameter value(s). As we mentioned earlier, our shortcode accepts a single parameter called cat_ids, which should be a list of category IDs, separated only by commas(,). This list of category IDs should be placed in quotes and, if you only add a single category ID, no comma is needed.
Possible examples:
-
shortcode call with a single category ID
[categories_with_descriptions cat_ids = “16”]
-
shortcode call with multiple category IDs
[categories_with_descriptions cat_ids = “18,35,120,185”]
As you can see, example a) shows how to insert a shortcode call for a single category whose ID is 16. On the other hand, example b) shows how to insert a shortcode call for multiple categories whose IDs, in this case, are 18, 35, 120, and 185. Keep in mind, you need to replace these example IDs with appropriate category IDs found on your website. Also, you can add as many category IDs as you see fit, as long as they follow the structure shown in the examples above.
After inserting the appropriate shortcode call inside the Visual tab of the Text widget, press the Save button to save your input.
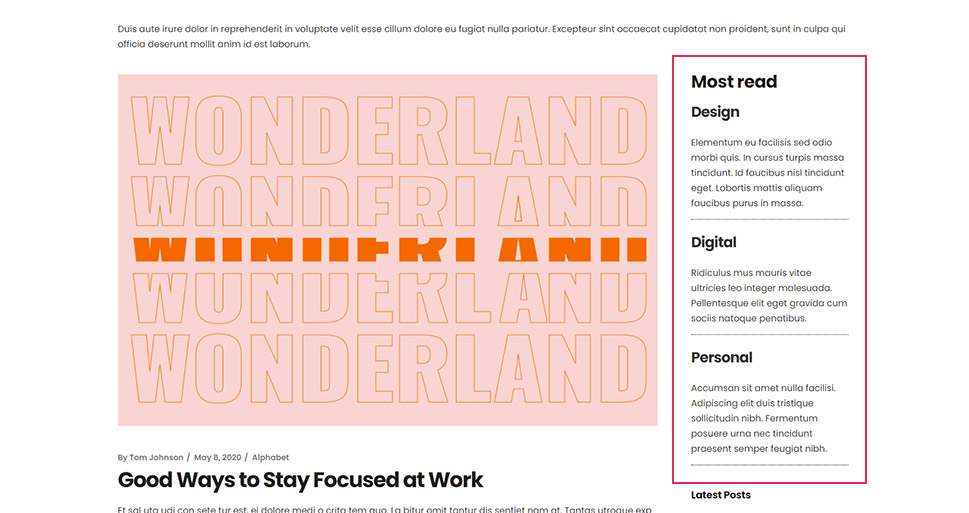
Afterward, examine a page where this widget area is displayed to observe the output. Similar to the case from the previous section—this shortcode enables a new functionality but its design might need additional styling with CSS code. This CSS is also created on a case-by-case basis. Meaning, you will need to create it yourself so that it suits your website’s current design. You can use some of the CSS classes we left in the HTML markup of the shortcode to help you create suitable CSS selectors for that CSS.
For our example, we only needed a little bit of CSS, and it’s shown below.
.category-list .list-item {
padding-bottom: 5px;
border-bottom: 1px dotted black;
}
.category-list .list-item h4 {
font-size: 26px;
}
After adding it, we got the following result.
Since properly styling the output of this shortcode requires additional CSS code, it is also important to know where to place that CSS code. Most WordPress users can simply insert it under Appearance > Customize > Additional CSS. The alternative is inserting it within a suitable plugin for adding CSS code, provided you’ve tested the plugin’s compatibility before.
However, more advanced WordPress users should place it in a separate file and enqueue it using the wp_enqueue_style() function. If you’d like to learn more about enqueueing scripts and styles, you can take a look at the linked article for more information.
With this, we conclude our article on displaying category descriptions in WordPress.
Final Thoughts
WordPress category descriptions reveal more information about a category and attract visitors to access posts they might have missed if they only had the category title to go off of. However, WordPress doesn’t have a default feature for showing category descriptions. Instead, you’ll need to use custom code to display them.
In this article, we provided some code examples you can use and covered two different ways to show category descriptions. It’s up to you whether you want to show the descriptions on category archive pages alone, or if you want to show them on any page. Additionally, we covered important intermediate and advanced WordPress topics like the creation of custom shortcodes and their use, as well as the use of WordPress hooks. We hope you found this article useful for adding a WordPress category description as well as expanding your existing WordPress knowledge.
