How to Clone a WordPress Website

Cloning a WordPress website means creating a fully functional, exact copy of your current site. There are many reasons to make a clone website. Cloning your existing website can save a lot of valuable time when you are switching hosts or domains or migrating from a local environment to a live server. Also, having a clone of your website allows you to test any plugin, theme or WordPress update before adding it to your existing live site. Additionally, having an exact clone of your current website could serve as a backup.
In this detailed guide, we’ll show you how to clone WordPress site and make sure you’re fully prepared for any experiment or unexpected situation. To make it easier to navigate, we’ve broken this article down into several topics:
How to Clone a WordPress Website
You can clone your WordPress website manually or using a plugin. We will describe both methods and it’s up to you to decide which one is more suitable for you. There are two requirements for cloning a website – you need to have a developed website (either already online or local-hosted) and a new website where you’ll clone the existing site. This new site should not have WordPress installed. The installation will be done during the cloning process, either manually or automatically with a plugin. Also, you need to have an FTP client and know how to use FTP.
Using WordPress plugins to clone a website is a good choice both for WordPress beginners and advanced users. There are many cloning plugins you can choose from, and they also serve as backup plugins. We opted for Duplicator – it is free, powerful and easy to use. However, it’s suitable only for cloning smaller websites, up to 500 MB in size. If you need to clone a larger website, we suggest trying Duplicator Pro or some of the premium plugins mentioned by the end of the article.
Another tip: before you start using the Duplicator plugin, you need to create a database or have one clean database.
-
Installing the plugin
To install the plugin, navigate to Plugins > Add New, type in the keyword (Duplicator), locate the plugin and press the Install Now button.

Activate it after the installation.

-
Creating a backup package
The next step is creating a backup of the existing website. Navigate to Duplicator > Packages and click on the Create New button in the top right corner of the screen. If you’ve previously made a package, select it from the list of available packages.


Give your package a name (or use the one that’s automatically suggested) and click on Next.

Duplicator plugin will scan your site – if there are any issues that need addressing, you’ll get a warning or notice. If you get any notices about minor errors and precautions, review them and try to solve them. However, you don’t have to be too thorough with each notice – it is completely normal to get some notices about the size of your website. Simply check the Yes. Continue with the build process! checkbox and click on Build.

After the building process is done, select the One-Click Download option, which will download both the installer script and an archive containing the backup of all your files.

-
Uploading the files to your new site
If you are cloning the website to a live location, you need to know how to use FTP and have an FTP client. Then, connect to the server of your new site using your FTP credentials and navigate to the root directory (often called public_html). Upload both the installer and the archive file directly into the public_html directory.

It is best if the root directory of your new website is completely empty and has nothing except the two files you’ve just uploaded.
-
Executing the installer script
Open a new browser tab and visit the following path: your-new-website/installer.php. Replace the your-new-website part with the actual URL of your new website. Duplicator installer script will start to run.
First, the script will verify if there are any issues with the archive files or the settings of your new site. Afterward, mark the checkbox with terms and conditions and press the Next button.

Once the data is extracted, you’ll create a database that will hold all the information about your new site. Insert an existing clean database name – otherwise, the installer script will override the current content of the database. It is very important not to forget this – that’s why we pointed it out at the beginning of our instructions before step a).
Continue by inserting your username and password, which will serve as the login info. Don’t forget to click on Test Database first to verify that everything is functioning properly. You’ll see the result of the test in the section called Validation. After a successful test, click on the Next button.

Review the info in the popup window and press the OK button.

The following step requires you to review and edit the information about your site. Edit the site title, URL and path to the files and click on the Next button.

-
Testing your new site and removing the Duplicator installer files
After a couple of moments, a new window will appear asking you to test your site. Check the Auto delete installer files after login option and click on the Admin Login button.

It will lead you to the login screen, where you’ll enter the login info you previously created. After you successfully log in, navigate to Duplicator > Tools and review the notices. If the installer files are deleted, you’ll get a notification.


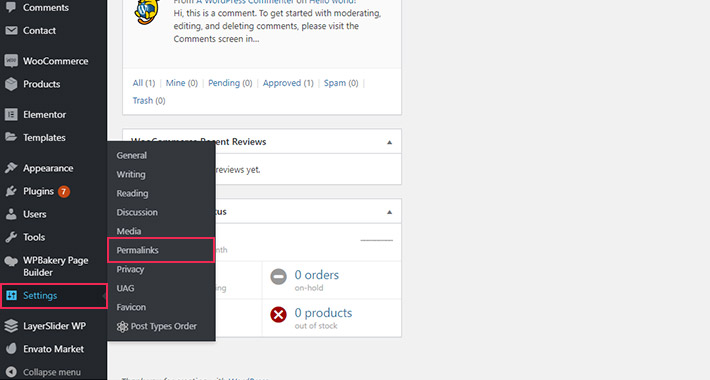
If the installer files weren’t deleted automatically, they need to be deleted manually via FTP. After you’re done, view your new site, both frontend and backend, to see if everything is functioning properly. Don’t forget to inspect all the site pages – it’s not enough to check only the front page. In case you cannot access the inner pages, we suggest saving the permalinks.
Navigate to Settings > Permalinks, choose a permalink type (post name is suggested) and press the Save Changes button.

Qode WordPress Themes: Top Picks
View Collection


Cloning a WordPress website manually is more complicated compared to the automatic process. This method is recommended only if you are an experienced WordPress user or developer. Although our guide is fairly detailed, if you get stuck with manual cloning, consult with a professional.
-
Exporting the database as a .sql file
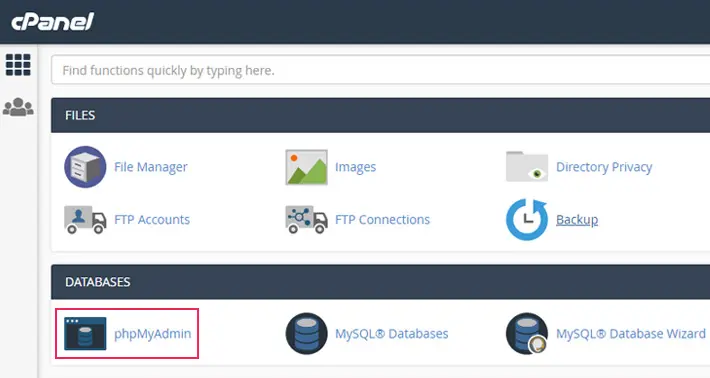
Start manual cloning by exporting the database of the existing website. Connect to the cPanel using your credentials and click on the phpMyAdmin list located in the Databases section.
A new tab will open, containing all your databases. Locate the database of your current website in the menu and click on it. Then click on the Export option, select the SQL format and click on the Go button.

If you aren’t sure what is the name of your database, check the wp-config.php file. To access it, return to the cPanel main page and click on the File Manager option located in the Files section.

Find your root WordPress directory in the menu on the left. A list of files and directories stored within the directory will be shown in the central part of your screen. Locate the wp-config.php file, right-click on it and select the Edit option.

Look for the line of code that defines your database name. This is the line that contains define ( ‘DB_NAME’, ‘your-database-name’ ). In our case, the database is called onrs_supporttest2.

After discovering the database name, you should export following the instructions above.
-
Doing a search and replacing the old website name
After exporting the data, it is necessary to edit the .sql file. More precisely, you need to update all the instances of the old website URL with the new one. Open the .sql file with a text editor that allows you to search for specific keywords and replace a given phrase (or phrases). In this example, we used the Sublime Text editor. In the editor, go to Find options and select Replace. You can do the same thing by pressing CTRL and H keys at the same time.

At the bottom of the screen, insert the old website URL under Find and the new URL under Replace. Click on the Replace button to replace a single instance of the old URL. You can do the same for all the remaining URLs, one by one, or click on the Replace All button to replace them in bulk.

Depending on the situation, we also suggest that you add HTTPS or www to your new URLs. After you are done editing the file, save the changes.
-
Importing the edited .sql file
After editing the .sql file, you need to import it to the database of your new site. To do that, you need to have a new database where you’ll import the edited code. More precisely, having a WordPress installation on your new site is a prerequisite for this step.
Afterward, access the database of your new site. Log in to cPanel with your credentials and click on the phpMyAdmin option.
Locate your new database in the menu on the left and click on it. Then, click on the SQL option at the top. Open the previously edited .sql file with a text editor and copy its whole content. Paste the code in the text area marked with an arrow and then click on Go.

Here’s an extra tip for copying the file content.
In the text editor, right-click anywhere and choose the Select All option. You can also press the CTRL and A keys on your keyboard simultaneously.

Then, right-click again and select Copy.

You can also copy the selected content by pressing CTRL + C.
There’s another way to import your database or, more precisely, the edited .sql file using the Import option within phpMyAdmin. If you’ve made some changes to your new site, we recommend dropping the existing database and then importing the .sql file.
It is important to know that dropping the database will delete all the content from your new site. Also, we suggest exporting the database of your new site before you proceed, as a safety precaution.
To drop the database, select it from the menu on the left. In the main section of the page, click on Check All and choose the Drop option from the dropdown menu.

A new page will open asking for confirmation. Simply click on Yes, if you are sure you want to do it.

Then, go to the Import option and click on the Choose File button. Select the .sql file that was edited in step b). Choose the SQL format and press Go.

Wait until you get the message: Import has been successfully finished.

We recommend importing the .sql files when cloning a large website.
-
Compressing and moving your original files
To move the files, open the File Manager options in your cPanel.
Locate your old website’s root WordPress directory and click on the wp-content (the path is probably your-old-website/public_html/wp-content). Select all the files and folders by checking the Select All option at the top. Right-click on one folder or file and click on Compress.

Choose the Zip Archive option, enter the name of the .zip file (wp-content.zip in our case) and press the Compress File(s) button.

Right-click on the newly created .zip file and select Download.

Then, navigate to the wp-content directory of your new website (the path is probably your-new-website/public_html/wp-content). Click on the Upload option at the top of the screen.

Upload the downloaded .zip file and wait until it is uploaded completely.

Return to the previous directory and locate the uploaded .zip file. Right-click on it and select Extract.

A popup window will open. Enter the path (the path is probably your-new-website/public_html/wp-content) and click on Extract File(s).

Afterward, delete the uploaded .zip file.

Next, click on Confirm in the pop-up window.

-
Editing the wp-config.php file of the new site
The next step is to update your new website’s wp-config.php file with relevant information. Navigate to the main page in the cPanel and open the File Manager.
Go to the root WordPress directory of your new website and locate the wp-config.php file. Right-click on it and select Edit.

Find the part of the file containing the database name, user and password. Edit those lines of code with the current database name and login credentials.

Afterward, navigate to the top right corner of your screen and press the Save Changes button.
-
Saving permalinks and testing the new site
Log in to the admin dashboard of your new site and inspect both backend and frontend. Make sure to examine the inner pages, not just your front page, to see if everything is working properly. If you are having trouble accessing your inner pages, saving the permalinks could help.
Navigate to Settings > Permalinks, choose a permalink type (post name is suggested) and press the Save Changes button.
One of the numerous advantages of WordPress is a large selection of plugins for all kinds of purposes. Most of the cloning plugins are paid or come with a free and a premium version. The premium version unlocks additional features. The plugins designed for creating and restoring backups usually offer cloning as a premium feature. Here’s a list of the most popular plugins that enable website cloning.
All-in-One WP Migration
All-in-One WP Migration is a popular, user-friendly plugin for creating site backups. It has a search-and-replace feature and you can opt to exclude spam comments, media files and post revisions from the backup. After the site backup is done, you can clone your existing website by activating the plugin on your new website and importing the backup file. However, the free version of this plugin is only useful for smaller websites, up to 512MB in size. In that sense, it is similar to Duplicator. To remove that limit and increase cloud storage capabilities, you will have to buy one of the premium extensions, starting at 69$.
WP Migrate DB
WP Migrate DB is a relatively simple plugin for backup and migration that only exports the database of your website. It allows you to exclude spam comments, transients and post revisions when backing up the database. Additionally, it has a very efficient search-and-replace functionality. However, in order to import an exported database, you will need to use another database management tool, like phpMyAdmin. Upgrading to a premium version will also allow you to push and pull the database to or from a remote WordPress website. Other features include media, theme and plugins addons for migration of corresponding files, as well as WP-CLI migration and multisite tools that export a subsite and import it to a separate, new website. The premium price range is from 99$ to 599$. It is a very powerful plugin. It is suitable for advanced WordPress users, namely developers, who want to have a more hands-on approach to site cloning and migration.
UpdraftPlus
Updraft Plus is a very powerful and popular backup plugin. It offers multiple scheduled site backups on a daily basis and across multiple storage services (UpdraftPlus Vault, Dropbox, Amazon S3, FTP, Google Drive and many more). Backups are easy to restore directly from your control panel. And if you ever need any help, we have a separate article explaining how you can create a site backup with Updraft Plus. However, you will need to buy a premium version to be able to clone or migrate your website. UpdraftClone can be useful for making testing or staging websites. The sites are made and maintained using the tokens. 5 tokens can be purchased for a one-time fee of 15$ or a monthly subscription of 12$. Updraft Migrator add-on is a great migration tool that costs 30$ for up to two websites or 49$ for multiple websites. You can also purchase the UpdraftPlus Premium which includes all the add-ons, free add-on updates, free UpdraftClone tokens, storage at UpdraftVault and premium support. The price ranges from 75$ to 195$.
Backup Buddy
Backup Buddy is a popular premium plugin designed for creating and restoring backups. It can also serve as a cloning plugin thanks to its Import Buddy tool. To clone or migrate a site, you only need its backup file and the importbuddy.php file – then you just run the installer script. This simple cloning process makes Backup Buddy similar to the Duplicator. With this tool, it is quite simple to switch hosts, servers or domains. The price ranges from 80$ to 199$. Features include scheduled backups, Backup Buddy Stash storage, premium support, and security checks.
Final Thoughts
By following the steps given in this article, we are sure that you were able to clone your WordPress site quickly and with ease. You also learned how backup and cloning work, which will certainly come in handy in the future. Additionally, as the website cloning is a fairly common routine for WordPress site administrators, it would be a good idea to bookmark this article for later use.
