How to Bulk Upload WordPress Media Files using FTP

Even though present in WordPress by default, bulk uploading media files to the WordPress media library has its limitations, namely the low maximum file upload size. This poses a problem for all webmasters who need to upload large files, especially if those are high-resolution images. An obvious circumvention of this problem is uploading the same files using FTP. This skill often comes in handy to website owners or webmasters, no matter whether they are uploading a single larger file or hundreds in bulk. Therefore, we decided to write this article to show you how to do it properly. We will focus on how to bulk upload WordPress media files using FTP, the more convenient and more common media upload method.
Bulk uploading WordPress media files using FTP differs slightly from the usual approach of using the upload feature of the admin dashboard. Specifically, after uploading the files onto the server via FTP, they won’t appear in the Media > Library section, as the necessary database information regarding those files is missing. Therefore, the bulk upload process using FTP is divided into two parts – uploading the files and registering them, so that the necessary database metadata is created and stored. We will cover both of those aspects below.
We will explain how you can bulk upload media using FTP, either using an FTP client or the File Manager option of the cPanel. For those who aren’t familiar with FTP, we advise consulting our article on the use of FTP beforehand.
Here’s what we will be showing you:
Qode Themes: Top Picks
View Collection


To upload media files using an FTP client, connect to the server using your FTP credentials and locate your root WordPress directory.

Then, navigate to the wp-content/uploads directory where you will find the folders with years for titles, as well as other folders which may be created by your plugins. We will focus on the former as they represent the default structure in which WordPress images are stored.

Having done that, click on the folder with the title of the current year. In this folder, you will see subfolders named after months. Click to open the folder corresponding to the current month. In our case, that meant navigating to the 2021/11 folder. If you don’t see the folder of the current year in the uploads directory or the month folder in the current year folder, you can create them on your own by selecting the corresponding parent directory, right-clicking, and choosing the Create directory option.

Next, locate the directory where the images you wish to bulk upload are stored on the left side of your FTP client where your local file structure is displayed. In that directory, select all the images and right-click on one of them. Then, click on Upload in the menu which appears.

This option will apply to all the selected images. The only thing that remains is to wait until the images are fully uploaded to the server. You will be able to monitor the upload progress in the three sections at the bottom of the FTP client, called Queued files, Failed transfers, and Successful transfers. After all the images have been successfully uploaded, the first part of this operation is over.

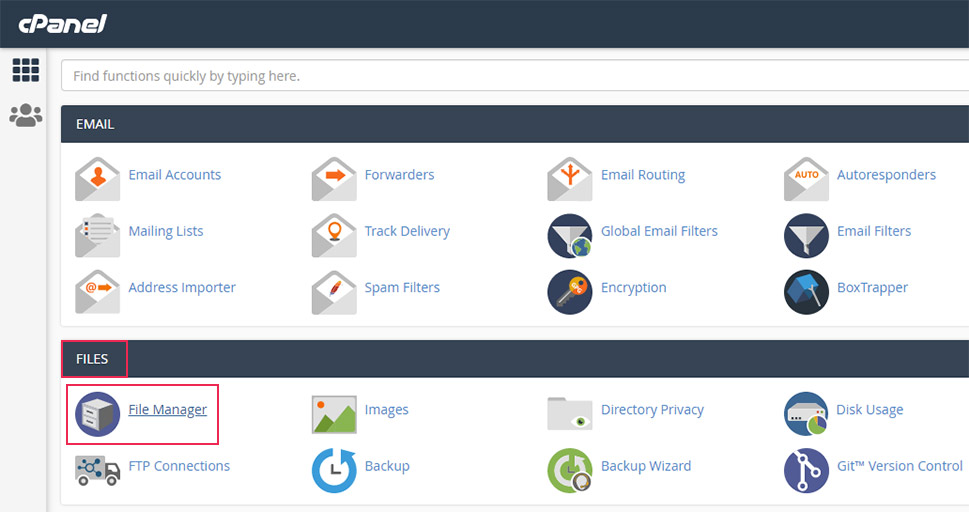
If you are using cPanel, log on to it using your credentials and navigate to the cPanel’s dashboard. Then, locate the File Manager option in the Files section and click to access it.
Having done that, locate your root WordPress directory, often named public_html, and select it.

Then, navigate to the wp-content/uploads directory, where you will see folders with years for names which contain your WordPress images by default. Click to open the folder for the current year.

In it, you will see subfolders with numbers corresponding to the months in a year. Once again, click to open the folder for the current month of the current year. In our case, that meant navigating to the 2021 folder and opening the subfolder named 11.

Next, click the Upload button near the top of your browser window.

The File Upload section will be opened in a separate tab. There, you will have the option to upload several files by dragging and dropping them into the corresponding field or to click on the Select File button which will open a file dialog allowing you to upload a single file. Drag and drop all the images you wish to upload and wait until the upload process is fully completed.


After all the images are uploaded, click on the Go Back link to return to the year/month folder in the File Manager section.
The media files are now successfully uploaded and stored on your server, in the uploads directory. However, as WordPress doesn’t contain the necessary information regarding those media files in the posts and postmeta database tables, it can’t recognize them, nor can they be used in a way that WordPress users are accustomed to.
Therefore, the second part of this process requires you to update the aforementioned database tables with relevant data. While this can be done using custom code which relies on the wp_generate_attachment_metadata() and wp_update_attachment_metadata() functions, we won’t cover the DIY method in this article. Instead, we will explain how you can use a plugin called Add From Server to perform this functionality.
This plugin was made specifically to import media files previously uploaded to the server using FTP to WordPress. In other words, the plugin will update the database tables with the relevant data. As this quite a niche usage intent which could be mistaken for similar, broader ones, the plugin authors have made it clear that the plugin is not to be used as a migration service, or as a replacement for a file uploader, or to bulk upload media files to the server – the part which we discussed in the first part of the article.
After installing and activating it, navigate to the Media > Add From Server section, where you will see the files and folders structure on your server. By default, you will be positioned in the wp-content directory. Click on the uploads/ link to navigate further.

Click on the folder named for the current year, and then a click on the subfolder that has the current month number as the title. As mentioned before, in our case, it was the 2021/11 navigation path, while, of course, that needn’t be the case for you.


Once you have selected the needed folder, select all the media files you wish to add from the server. You can use the Select All option at the top, but make sure to exclude any you don’t want to upload. Finally, click the Import button to add those files.

Wait until all the media files are added. Importantly, in the case of uploaded images, the plugin will also create copies of those images, in various image sizes registered on the website. This is done by default in WordPress every time an image is uploaded to the Media Library, so it should not surprise you that the same occurs when using this plugin to replace that process.
That said, once the process is completed, you will see status messages, as well as get a list of all the images and image variations created during it. The added image variations can be recognized by the image dimensions added at the end of the image title. Furthermore, they are all stored in the same year/month folder on the server, as is done in WordPress by default.

Finally, having completed the process, the uploaded images will also appear in the Media > Library section. You will be able to add them to your pages and posts in the manner that you are most accustomed to.

Final Thoughts
Bulk uploading media files to WordPress via FTP is a great way to deal with upload size limitations some web hosting providers impose. While not as straightforward as using the default WordPress media uploader, it can be done with relative ease by following the instructions we have given, both regarding the FTP upload and the import process using the Add From Server plugin. If your website relies on larger media files which need to be uploaded to WordPress, we suggest bookmarking this article for future use.
