How to Add Custom Items to Specific WordPress Menus

An admin user in WordPress can create navigation menus by adding links to pages, posts, archives, or custom resources. This is accomplished within the Appearance > Menus section, a custom admin page reserved for menu creation. Users can arrange and add menu items on this page by drag-and-dropping them, as well as fill out important menu-related options and fields.
However, there is a limit to what can be accomplished using just the default functionalities of the menu screen. Fortunately, you can extend those by adding custom items to specific WordPress menus. For example, you can add conditional logic to your menu items, or create additional custom fields that change a menu’s stylization or its functionality.
In this article, we will explore not just how to add menu items in WordPress but how to add a custom item to a specific menu, using code. Besides letting you tailor-make your menus, the information in this article will broaden your overall WordPress knowledge, and show you how to implement similar custom items. As we dig into the subject of adding custom item menus, we’ll answer the following questions:
Qode Themes: Top Picks
View Collection


In the following sections, we will showcase two different ways of adding custom items. One relies solely on code, while the other involves the use of the WordPress user interface as well. Please bear in mind that the topics in this article are best suited for intermediate and advanced WordPress users. To keep up with what we’ll be covering, you’ll need an understanding of HTML and CSS, as well as what WordPress hooks are and how they are used. We will try our best to explain the code in detail, but you should conduct additional research if you need help to fully understand this topic.
Before we proceed to the examples we prepared for this article, we recommend making a backup of your website beforehand. This is an important safety precaution when adding any custom code. The code we’ll be using (and any similar to it) should be added either in the functions.php file of your child theme using FTP or in a site-specific plugin. If you’re not sure how to do that, we suggest checking out the resources we’ve linked and brushing up on any points you’re not confident about.
One way to add custom items to WordPress menus with code is by adding the code directly to a specific WordPress menu’s HTML. This is done using the wp_nav_menu_items filter hook, which was introduced in WordPress 3.0. This way is slightly more complicated for WordPress beginners, as a custom feature or functionality is added using only code. Depending on how it was coded, a custom feature or functionality can be added to all the registered menu locations within the theme or a specific one alone.
We will show you how this is done using a simple code snippet created for this article. This snippet can be used to add a custom search form at the end of the mobile menu. The code is given below.
function qode_adding_a_search_form_to_the_mobile_menu( $items, $args ) {
if ( 'mobile-navigation' === $args->theme_location ) {
$items .= '<li class="qode-mobile-header-search">' . get_search_form() . '</li>';
}

return $items;
}
add_filter( 'wp_nav_menu_items', 'qode_adding_a_search_form_to_the_mobile_menu', 10, 2 );
Let’s break it down.
The code represents a function we named qode_adding_a_search_form_to_mobile_menu() that was hooked onto the wp_nav_menu_items filter hook. The purpose of this code is really simple. If you have a registered menu location called mobile-navigation within your theme, then an additional menu item is added to the menu tied to that location. That menu item displays a search form using the get_search_form() function.
The get_search_form() function will look for and display the content of the searchform.php file, if one is present in either your parent or child theme. If one isn’t present in either location, a default search form will be displayed instead. Alongside that, there are two more things we need to explain so you can make the best use of this custom code.
First of all, we used a menu location called mobile-navigation. This location is specific to the Lekker theme, as it’s the one we’re using. As such, this code shouldn’t be copied and pasted without modification. Instead, you will need to replace the mobile-navigation part with a suitable menu location name that is registered within the theme you are using.
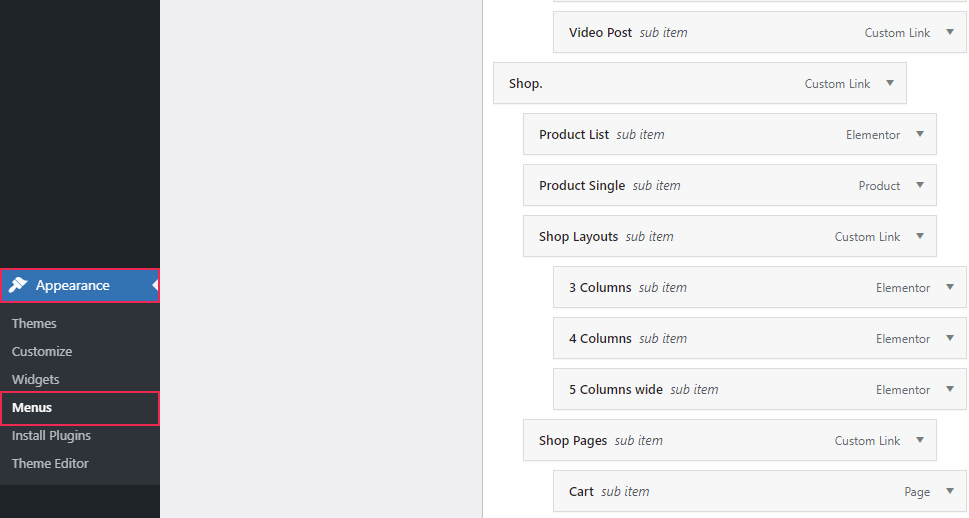
To help you with that task, there is a simple trick you can use to figure out the registered menu location name for any theme. To find yours, navigate to Appearance > Menus and scroll to the bottom of the page. Within the Menu Settings section, you will see the labels of all available menu locations where you can assign a specific menu.
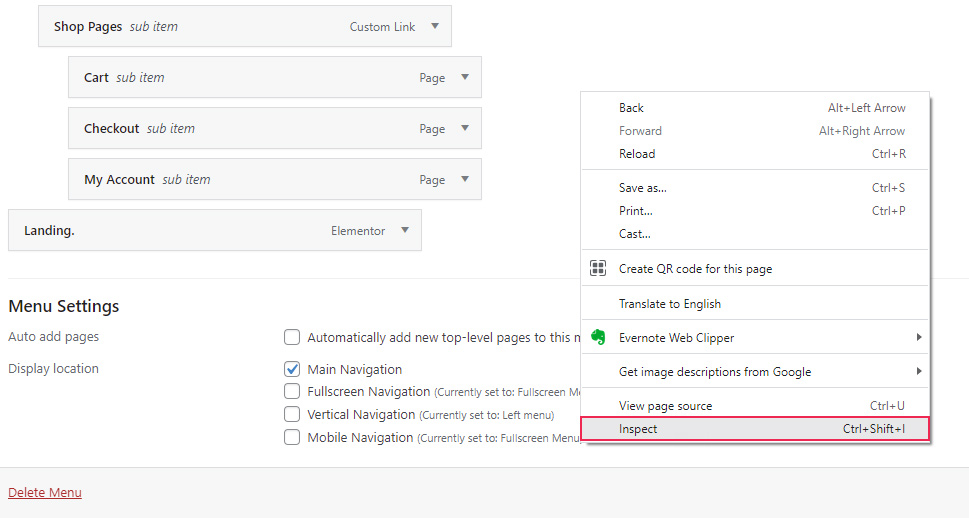
However, to find the registered menu location names, you will need to inspect those labels. Position your mouse cursor over the menu location you wish to use and right-click on it. Then, select the Inspect option from the menu that appears.
This will open your browser’s developer tools and put you within the Elements tab, on the exact HTML element that you right-clicked on. Then, you will need to examine the HTML structure of that part of the page to locate the appropriate menu location name. Luckily, that’s very straightforward as the suitable menu location name will be displayed in three places, as you can see from the screenshot below.
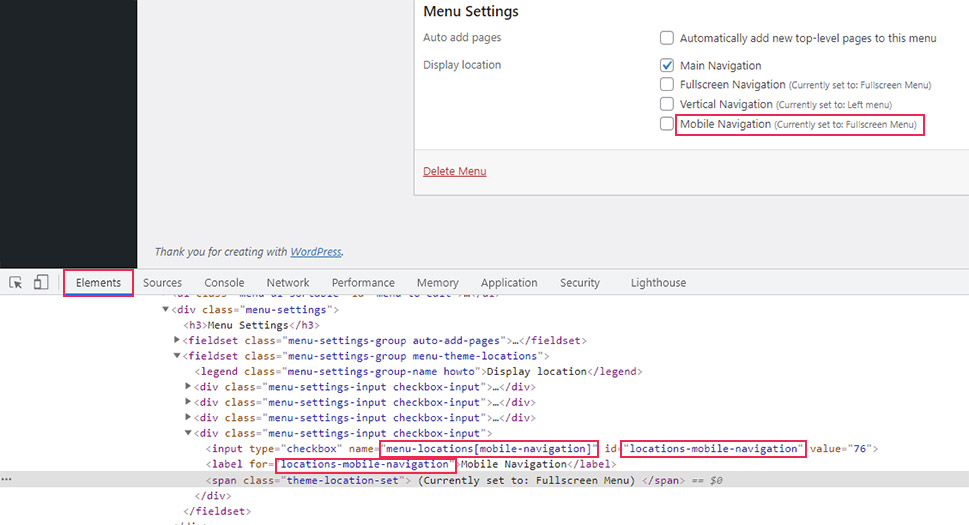
To clarify, you will see the same marked parts of code on your end. They will be in the forms of menu-locations[your-location-name] and locations-your-location-name. Please note, the part with your-location-name will have a suitable replacement. The reason for this structure lies in how the menu options are created. This is thanks to the code located in the /wp-admin/nav-menus.php file, one of the WordPress core files.
After you find a suitable menu location, you will need to replace the mobile-navigation part in our code with the appropriate location for the code to work properly on your theme.
The second point we wanted to make concerns the custom CSS class called qode-mobile-header-search. This CSS class was added to help us make the CSS code needed to stylize the search form after displaying it. Your newly created search form will most likely only be partially styled and it will require additional stylization code. As code like this is made on a case-by-case basis, we can’t suggest something that would be applicable for all websites. However, we will share the code we used to illustrate this example.
.qode-mobile-header-search{
margin-top: 20px !important;
position: relative;
}
.qode-mobile-header-search input {
width: 100%;
vertical-align: top;
padding-left: 20px;
padding-right: 78px;
font-size: 14px;
color: #333;
background-color: #fff;
border: 1px solid #000;
height: 50px;
line-height: 30px;
border-radius: 0;
outline: 0;
}
.qode-mobile-header-search button {
position: absolute;
top: 0;
right: 0;
width: 78px;
font-size: 15px;
padding: 10px 30px;
text-align: center;
color: #fff;
background-color: #000;
border: 0;
}
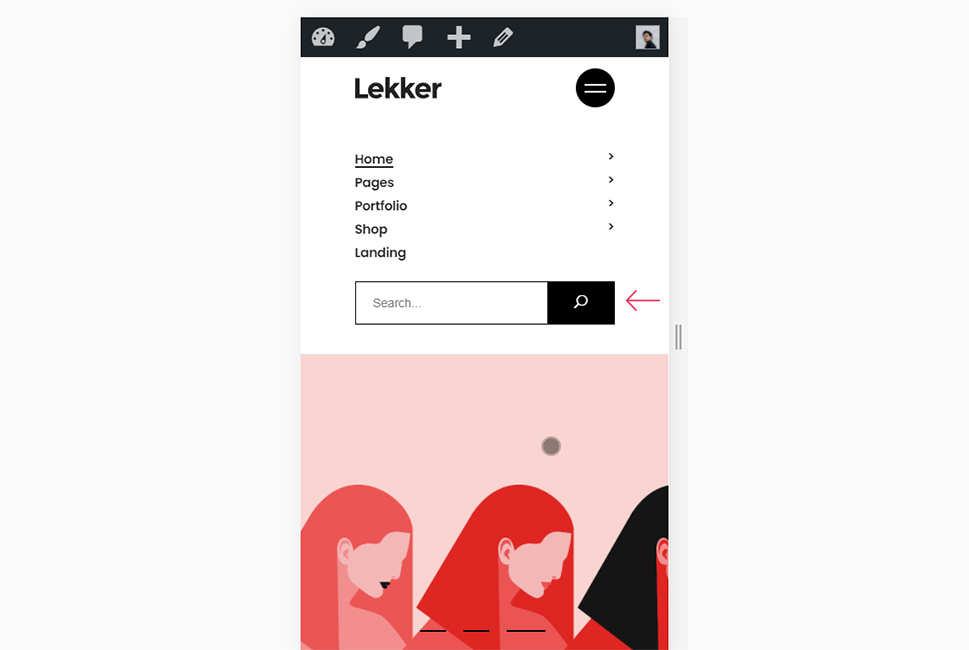
After adding this stylization code, we got the following result (shown in the screenshot below). The search form is added after the last mobile menu item by the first code snippet and stylized so it matches the looks used in the mobile menu by the second.
The second method of adding custom items to WordPress menus involves creating custom fields that are tied to all menu items. Then all you need to do is fill the custom fields belonging to the menu items within a specific WordPress menu, and this will add a custom item to that menu alone.
This approach to adding custom items to a menu is much easier once you lay down the groundwork. Then you will only need to fill a specific menu item field and your custom content will be displayed on the website in the place tied to that custom field. However, coding-wise, this method is more complex than the one we described before. Its complexity is eased by the WordPress 5.4 update, which introduced the wp_nav_menu_item_custom_fields action hook. We’ll show you one way of how this hook can be used.
For this example, we created a code snippet that adds a custom field called Menu item description to any menu item. If a value is inserted into this custom field, then the field will be displayed on the website’s frontend, below the corresponding menu item label. You can see the code we used to accomplish this below.
function qode_create_custom_menu_item_field( $item_id, $item ) {
$description_value = get_post_meta( $item_id, '_menu_item_description', true );
?>
<p class="description description-wide">
<label for="edit-menu-item-title-<?php echo esc_attr( $item_id ); ?>">
<?php _e( 'Menu item description' ); ?><br/>
<input type="text" id="edit-menu-item-description-<?php echo esc_attr( $item_id ); ?>"
class="widefat edit-menu-item-description"
name="menu_item_description[<?php echo esc_attr( $item_id ); ?>]"
value="<?php echo esc_attr( $description_value ); ?>"/>
</label>
</p>
<?php
}
add_action( 'wp_nav_menu_item_custom_fields', 'qode_create_custom_menu_item_field', 10, 2 );
function qode_save_custom_menu_item_field( $menu_id, $menu_item_db_id ) {
if ( isset( $_POST['menu_item_description'][ $menu_item_db_id ] ) && '' !== trim( $_POST['menu_item_description'][ $menu_item_db_id ] ) ) {
$sanitized_data = sanitize_text_field( $_POST['menu_item_description'][ $menu_item_db_id ] );
update_post_meta( $menu_item_db_id, '_menu_item_description', $sanitized_data );
} else {
delete_post_meta( $menu_item_db_id, '_menu_item_description' );
}
}
add_action( 'wp_update_nav_menu_item', 'qode_save_custom_menu_item_field', 10, 2 );
function qode_display_custom_menu_item_field( $title, $item ) {
if ( is_object( $item ) && isset( $item->ID ) ) {
$description = get_post_meta( $item->ID, '_menu_item_description', true );

if ( ! empty( $description ) ) {
$title .= '<p class="qode-mi-description">' . esc_html( $description ) . '</p>';
}
}

return $title;
}
add_filter( 'nav_menu_item_title', 'qode_display_custom_menu_item_field', 10, 2 );
Let’s break it down.
Simply put, the code above consists of three functions that we created, which are then hooked onto appropriate WordPress hooks. Each of these functions plays an important role in adding a custom field to a specific menu item. We will discuss them below, one at a time.
The first function, called qode_create_custom_menu_item_field() is used for displaying the new option field within every menu item, as well as the field’s value in the website’s backend. This function contains HTML code that serves to display the option in the backend. That code consists of two things. One is a label that states Menu item description, which describes the custom field, and the other is an input field where the description is inserted. The latter is where you would insert the description that will be displayed below the chosen menu item in your website’s frontend. And thanks to the use of the get_post_meta() function, this same label will display the option value in the backend.
The qode_create_custom_menu_item_field() function is then hooked onto the wp_nav_menu_item_custom_fields action hook. This allows our custom field to be created for all menu items.
function qode_create_custom_menu_item_field( $item_id, $item ) {
$description_value = get_post_meta( $item_id, '_menu_item_description', true );
?>
<p class="description description-wide">
<label for="edit-menu-item-title-<?php echo esc_attr( $item_id ); ?>">
<?php _e( 'Menu item description' ); ?><br/>
<input type="text" id="edit-menu-item-description-<?php echo esc_attr( $item_id ); ?>"
class="widefat edit-menu-item-description"
name="menu_item_description[<?php echo esc_attr( $item_id ); ?>]"
value="<?php echo esc_attr( $description_value ); ?>"/>
</label>
</p>
<?php
}
add_action( 'wp_nav_menu_item_custom_fields', 'qode_create_custom_menu_item_field', 10, 2 );
The second function we created is called qode_save_custom_menu_item_field(). It ensures that the description value you insert is properly saved inside the database and that the corresponding meta field is properly updated after the Save Menu button is pressed in the Appearance > Menus section.
To explain in further detail, the code first checks if you have inserted a value in the new description field. It also checks that the inserted value isn’t only composed of whitespaces. Then, if those checks are passed, the input value is sanitized using the sanitize_text_field() function and saved into the corresponding meta field using the update_post_meta() function. Otherwise, the previously saved meta value is deleted using the delete_post_meta() function. To make sure this code is properly executed, the function is hooked onto the wp_update_nav_menu_item action hook.
function qode_save_custom_menu_item_field( $menu_id, $menu_item_db_id ) {
if ( isset( $_POST['menu_item_description'][ $menu_item_db_id ] ) && '' !== trim( $_POST['menu_item_description'][ $menu_item_db_id ] ) ) {
$sanitized_data = sanitize_text_field( $_POST['menu_item_description'][ $menu_item_db_id ] );
update_post_meta( $menu_item_db_id, '_menu_item_description', $sanitized_data );
} else {
delete_post_meta( $menu_item_db_id, '_menu_item_description' );
}
}
add_action( 'wp_update_nav_menu_item', 'qode_save_custom_menu_item_field', 10, 2 );
Finally, the third function we created is called qode_display_custom_menu_item_field(). It serves to display the description value below the corresponding menu item on the website’s frontend. It does so by first checking the validity of the menu item whose description value we want to display. This is accomplished using the is_object() function, as well as the isset() function, that check the menu item ID. The remaining part of the code is executed only after passing both these checks.
In the following part of the code, we first store the description value inside the $description variable. This is done using the get_post_meta() function for the menu item and meta key we gave to the newly created field.
Then, as long as the description value isn’t empty, it is added below the appropriate menu item. The description is included inside a paragraph with a custom class qode-mi-description. That way, it can be used for stylization purposes later on if necessary.
Finally, to make the code work properly, we hooked the qode_display_custom_menu_item_field() function to the nav_menu_item_title filter hook.
function qode_display_custom_menu_item_field( $title, $item ) {
if ( is_object( $item ) && isset( $item->ID ) ) {
$description = get_post_meta( $item->ID, '_menu_item_description', true );

if ( ! empty( $description ) ) {
$title .= '<p class="qode-mi-description">' . esc_html( $description ) . '</p>';
}
}

return $title;
}
add_filter( 'nav_menu_item_title', 'qode_display_custom_menu_item_field', 10, 2 );
This wraps up our breakdown of the code. Now, let’s take a look at how this newly created custom field is used.
For starters, you will need to pick the menu where you want to add a custom item. Then, choose the menu item that you want to add a description to. Finally, insert a value into the description field, so that it could be displayed on your website.
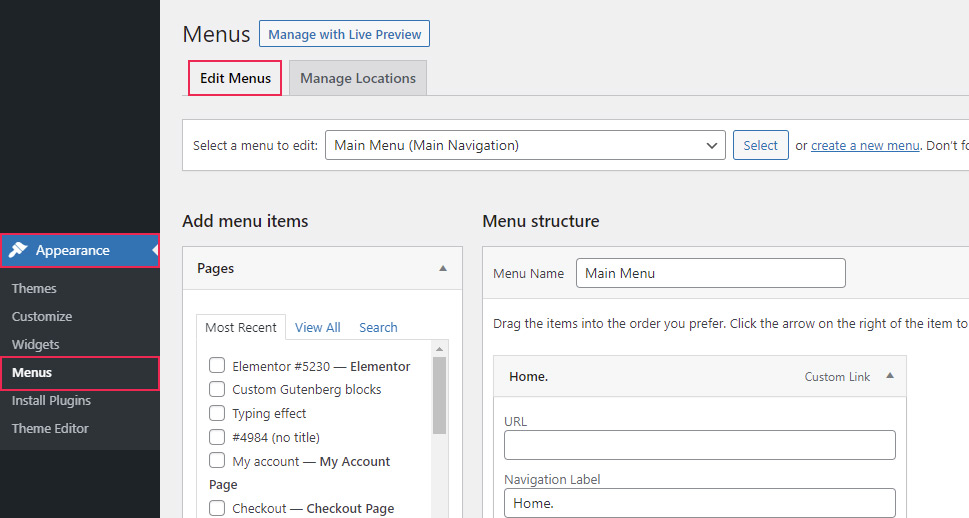
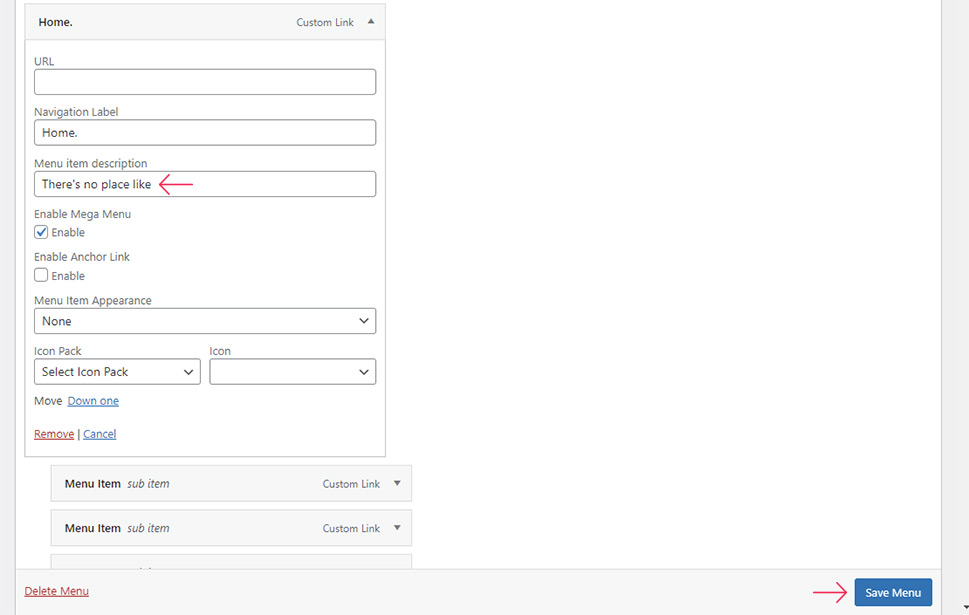
To put this into practice, navigate to Appearance > Menus and select a menu that you wish to edit. Then, locate the menu item that you want to add a description to. Click to open that menu item and locate the input field with the label Menu item description above it. Insert your description for that menu item and press the Save Menus button to update the option.
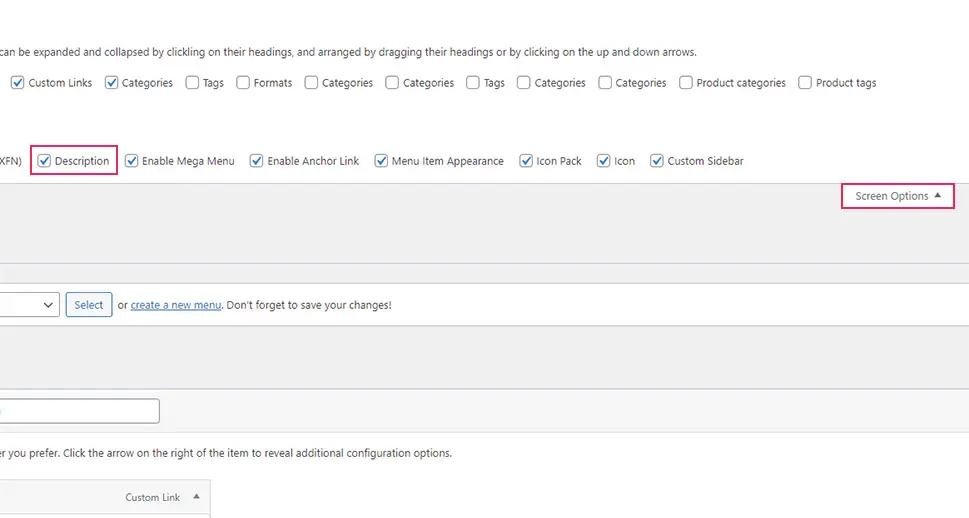
There is one more thing we need to mention—the custom Menu item description field that we created for this article closely resembles an existing WordPress field called Description. The Description field can be found within a menu item, once you enable the appropriate option (called Description) within the Screen Options at the top of your menu edit screen.
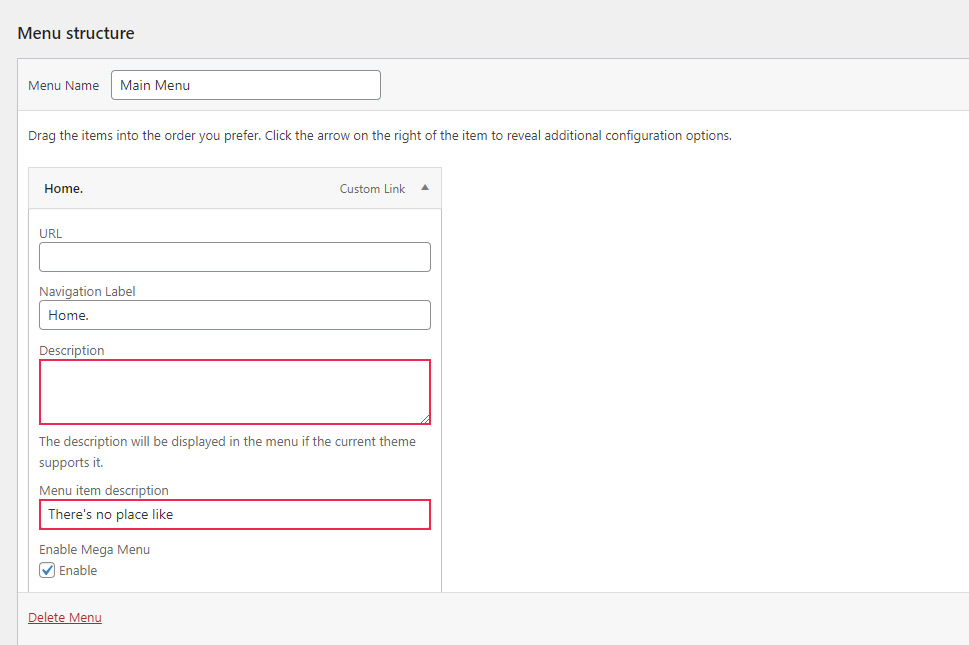
The default WordPress Description field is created thanks to the code located across several files within the wp-admin and wp-includes folders. However, whether its value is displayed depends on your theme (as is mentioned below the field). Our custom field differs, coding-wise, from the default WordPress field, which lets it work with all themes. We invite you to use it, just remember to properly replace things like the menu location!
Additionally, the code we created can be used as a teaching example. We carefully covered all the steps necessary for a menu field to work properly and be displayed on the website. This should allow you to see how similar custom fields are created and get a deeper understanding of WordPress menu fields as a whole. Having said that, let’s continue with the article.
After inserting the value into your custom field, you can open the front end of your website and examine the result you got. Don’t forget to make sure that the menu you edited has been associated with a menu location displayed on the website. Similar to our example for adding a search form to a mobile menu, the resulting display of your custom menu item description might lack stylization. To fix any style inconsistency with your site, you will need to create suitable CSS code. This is done on a case-by-case basis, so we can’t suggest any universally applicable code. You will need to create this CSS code yourself, but we left you the custom class in the code that you can use now.
While any CSS code we used shouldn’t be copied and pasted directly, we will nevertheless show it below. For our purposes, only a small snippet of CSS code was sufficient to adjust the style.
.qode-mi-description {
margin: 0;
color: #ff0000;
font-style: italic;
}
When you prepare your CSS, you should know where it and any similar CSS code can be safely placed. Generally speaking, most WordPress users should insert the CSS code in the Appearance > Customize > Additional CSS section. However, more advanced users with the knowledge to do it can opt to put their CSS in a separate file. Then they’d upload it to the server and enqueue it using the wp_enqueue_style() function. If you’d like to learn more about how to do that, you can check out our article on enqueue-ing custom scripts and styles.
Finally, after adding the CSS code shown above, we got the following result that you can see below.

Final Thoughts
There are many benefits that would inspire WordPress users to add a custom items menu. Custom items can enrich a WordPress menu and add new functionalities or use descriptions to entice viewers towards specific parts of your website. But, as creating custom menu items isn’t a default WordPress option, you will need to use carefully crafted code snippets to help you. Alternatively, you can try to find a WordPress plugin that would work for this purpose.
In this article, we chose to explore the first route. We carefully explained two coding examples and how they are used. If you follow the steps outlined in our instructions, we are sure that you will have a new custom items menu in no time. Additionally, the code we provided can also work as a guideline for creating new custom items and extending the functionality of WordPress menus using custom items. So, hopefully, you will have learned something new while improving your website with custom menu items.
