How to Fix the “413 Request Entity Too Large” Error in WordPress

WordPress is the most popular content management system (CMS) in the world, and rightfully so. It is powerful and versatile, suitable for people with or without a coding background. However, as any website owner might tell you, the road to site creation and maintenance is rarely without hurdles. WordPress errors are among those hurdles. The more common errors are often paired with numbers and/or error log names. One such error is the 413 Request Entity Too Large error. This is a rather common error for websites that use shared hosting.
The 413 Request Entity Too Large error happens when you try to upload a file or folder that is bigger than the maximum upload limit. It usually happens when uploading a plugin or theme folder using the upload options of your dashboard. Luckily, this error has quite an easy solution, which you can approach using one of the methods listed below:
How to solve 413 Request Entity Too Large error
To solve this error, you simply need to increase the server resources whose limits lead to the error. Those are the file upload size and the maximum time allowed for executing PHP scripts.
We will show you various ways of increasing server resources. You can choose the method best suited to your needs or try them one by one. In case the issue isn’t solved after applying one of the methods, you should consider increasing the values further. However, make sure to do so within the limits of your hosting package! If additional resources that exceed the limits are needed, we suggest negotiating with your hosting provider regarding the increase. Finally, the problem can also be solved by manually uploading the large file or folder via FTP. We discuss this method towards the end of the article.
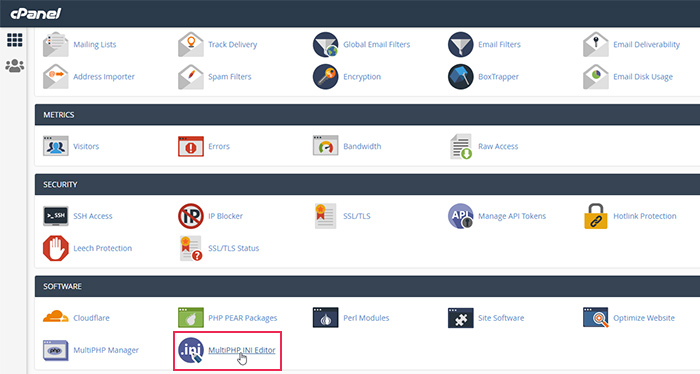
Hosting providers will offer their clients access to a control panel like cPanel. Thus, the easiest way of solving this error is to change the settings relating to the php.ini file within cPanel. To change your php.ini settings, navigate to MultiPHP INI Editor located within the Software section in cPanel.
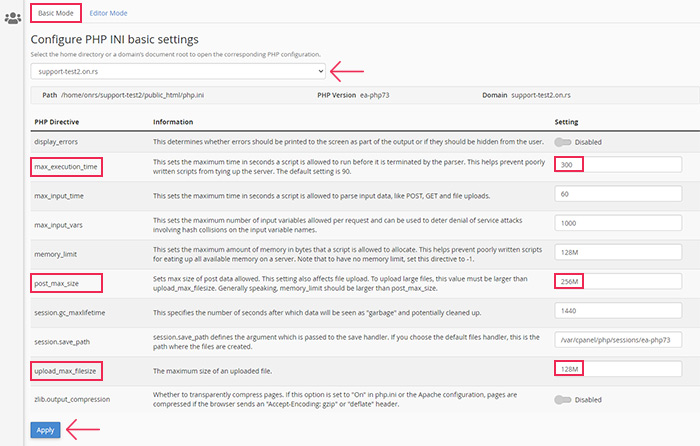
You will be able to change the basic php.ini settings in the following window. Make sure you are in the Basic Mode tab, choose your domain, and then adjust the values of the following settings:
max_execution_time = 300
upload_max_filesize = 128M
post_max_size = 256M
Once you’ve done that, press the Apply button below.
Afterward, you will receive a message stating Successfully applied the settings in the top right corner of the screen.
Other ways of solving the error require you to edit certain files. This process is only slightly more difficult than the previous one we mentioned. Furthermore, you can edit those files either within the File Manager section of cPanel or via FTP, using an FTP client. We’ve included examples for both types of editing, depending on the file. But, to avoid the article being needlessly long, we left out duplicate instructions for every file mentioned.
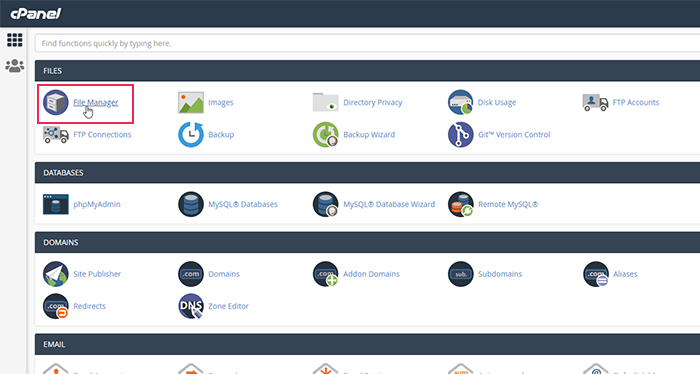
With that being said, let us examine how to edit the functions.php file, which is one of the files that can be edited to increase server resources. Within the Files section of cPanel click on the File Manager option.
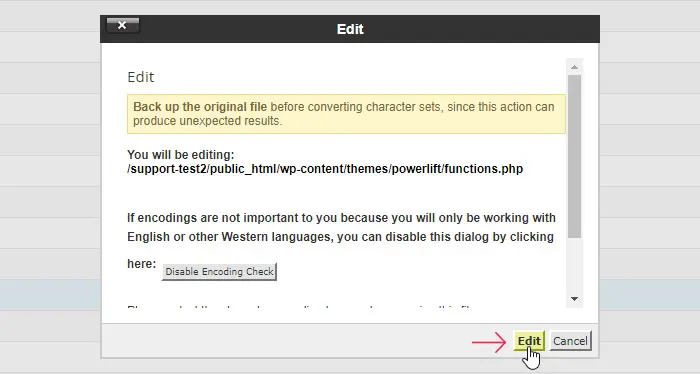
Afterward, locate your domain and position within your root WordPress directory, often called public_html, from the left-side navigation. Then, navigate to /wp-content/themes directory and open the directory of the theme you are currently using. Find the functions.php file within, right-click it, and select the Edit option in the dropdown.

Confirm that you wish to edit the file by pressing the Edit button in the popup that appears.
The file will be opened with a text editor native to cPanel. Insert the following code at the bottom of your functions.php file:
@ini_set( ‘upload_max_size’ , ’128M’ );
@ini_set( ‘post_max_size’, ’256M’);
@ini_set( ‘max_execution_time’, ‘300’ );
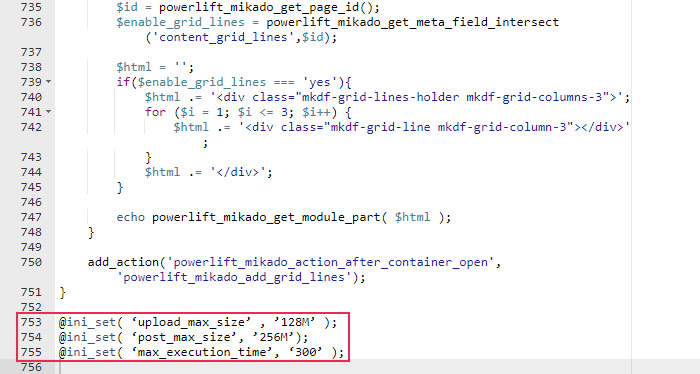
Then press the Save changes button in the upper right corner of the screen.
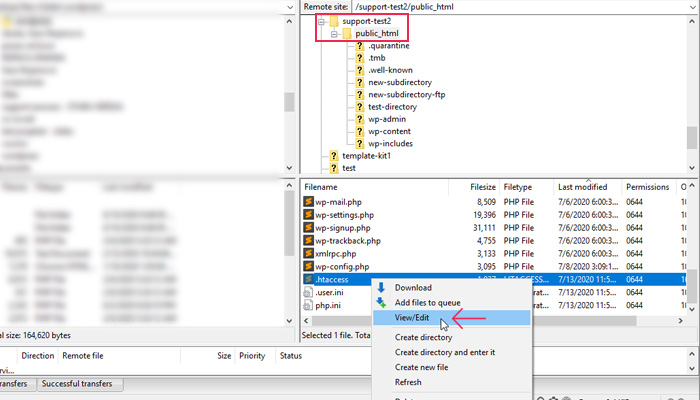
Another file that you could edit to increase your server resources is the .htaccess file. As .htaccess is a server configuration file for Apache servers, it can help enable or disable a multitude of other server functionalities. You can access it using FTP. However, as it is usually hidden, you will have to enable the appropriate options for showing hidden files within the FTP client of your choice to see it.
After connecting to your server using your FTP credentials, navigate to the root WordPress directory of your site, called public_html. Locate the .htaccess file within, right-click it and select the View/Edit option.
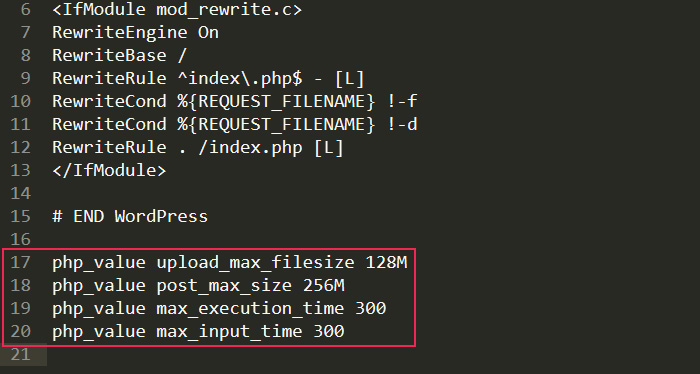
Open the file using a text editor you prefer. Insert the code shown below at the end of the file, after the # END WordPress line of code.
php_value upload_max_filesize 128M
php_value post_max_size 256M
php_value max_execution_time 300
php_value max_input_time 300
Afterward, save the changes and upload the edited file back to your server to override the current one.
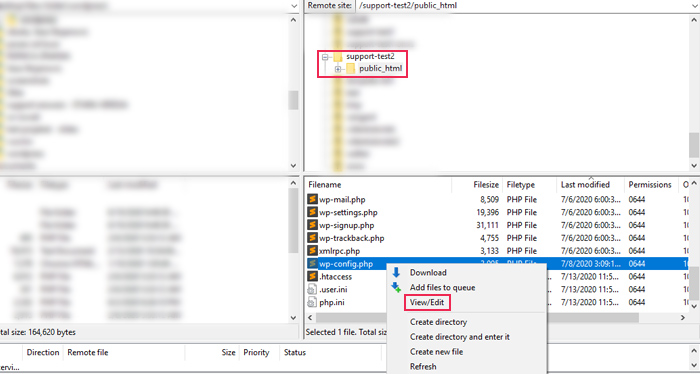
The wp-config.php file is yet another file that can be used for increasing server resources. The process is very similar to the one for editing the .htaccess file.
Connect to your server using your FTP credentials and navigate to the root WordPress directory. Find the wp-config.php file within, right-click it, and select the View/Edit option. You can edit the file using any text editor you like.
Insert the code shown below right before the /* That’s all, stop editing! Happy publishing. */ line of code.
@ini_set( ‘upload_max_size’ , ’128MB’ );
@ini_set( ‘post_max_size’, ’256M’ );
@ini_set( ‘memory_limit’, ’300MB’ );
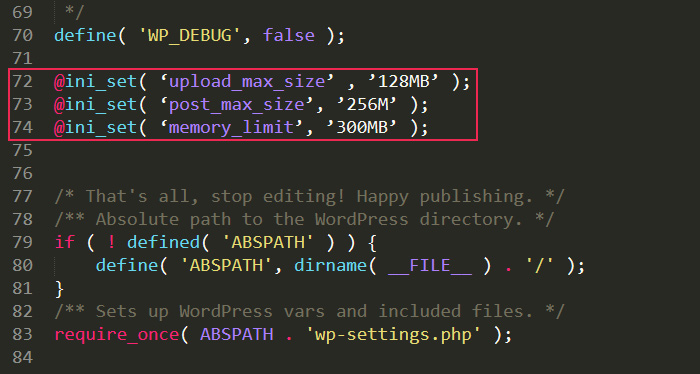
Then, save the changes and upload the file back to your server to overwrite the old wp-config.php on your server.
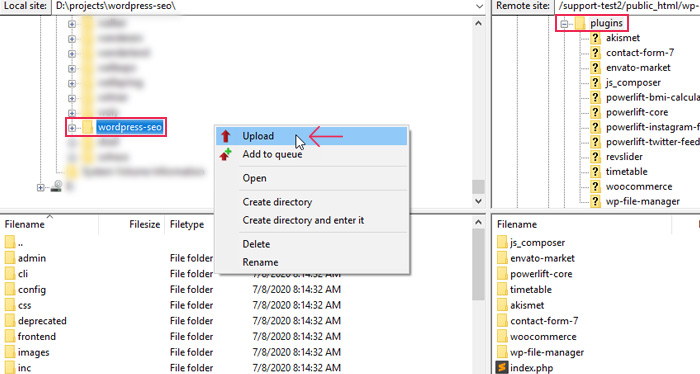
Since the 413 error happens when uploading a very large file or folder within your dashboard, an additional way of solving the issue is by uploading the troublesome file via FTP. We will show you the steps using a plugin folder as an example. You can upload it manually by connecting to your server with your FTP credentials and navigating to your root WordPress directory, called public_html. Afterward, find and enter your /wp-content/plugins directory. Then, in the left section of the FTP client, find the unzipped plugin folder located on your computer. Right-click it and select the Upload option in the dropdown.
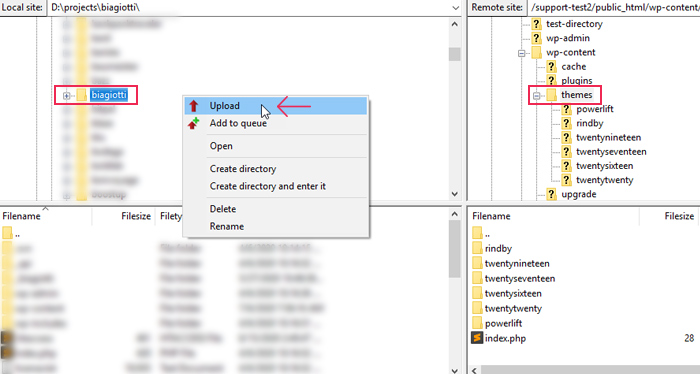
Uploading themes via FTP is very similar. Using the navigation on the right side of the FTP client, start from your root WordPress directory and navigate to the /wp-content/themes directory. Then, in the FTP client navigation on the left side, find the unzipped theme folder. Right-click it and select the Upload option.
In both cases, you might need to have a little bit of patience for the upload to be complete. Depending on the size of the plugin or theme folder, this process could take some time. But, your patience will be rewarded once the folder is uploaded as it will solve the error you were having.
Qode Themes: Top Picks
View Collection


Final Thoughts
WordPress errors can seem puzzling and difficult to solve at times, but most can be solved quite easily. The 413 Request Entity Too Large error is no exception. By carefully following any of the methods we discussed above, we are confident that you will be able to solve the error quite quickly. Furthermore, increasing the server resources could prove beneficial for your site in the long term. It can solve (or prevent) the appearance of other common WordPress errors such as image upload errors. And increased server resources can help your website run smoothly in general.
