How to Increase the Maximum File Upload Size in WordPress

To ensure your WordPress website looks attractive and engaging, you have to put a lot of thought into the kind of content to add to your pages. Videos, images, audio files and other types of media can help you better present the products or services you’re offering to your client base.
WordPress comes with its own media uploader, so you don’t have to bother with using different file managers. However, there’s a limit when it comes to the maximum file size you’re allowed to upload. This can be an issue when trying to add animated GIFs in WordPress, large video files or sizable images to your site, but it can also create problems when installing a theme or plugin.
But don’t fret! There are actually several ways in which you can change this. We’ll show you just how to increase the maximum file upload size in WordPress, so let’s dive right in, shall we?
Check the Maximum Upload Size Limit
The maximum upload size limit may vary, depending on the settings of your WordPress hosting provider. To check your current upload limit, go to your admin dashboard. From the menu on the left select Media > Add New. Here, you’ll be able to see the maximum upload size.

If it doesn’t meet your requirements, this is what you can do to increase the maximum file upload size in WordPress:
The first way to increase the max upload size in WordPress is by altering the functions.php file.
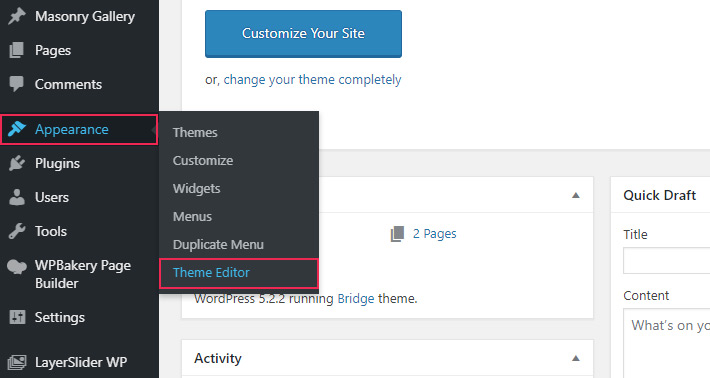
Go to Appearance > Theme Editor from your admin dashboard.
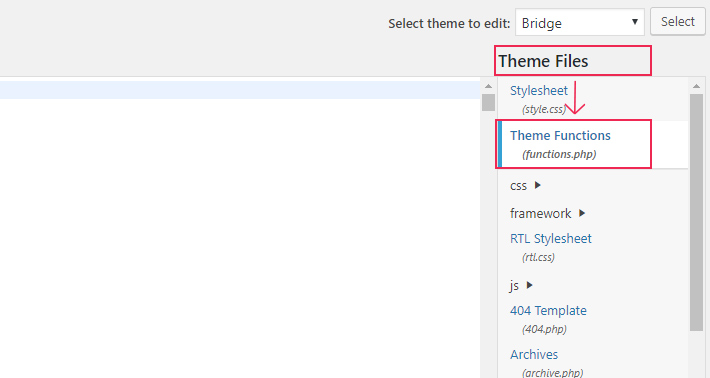
On the right side of the screen, under Theme Files, select functions.php.

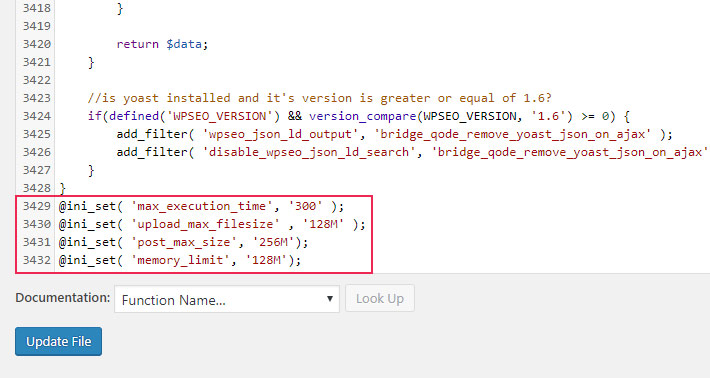
Scroll to the bottom of the code, create a new line, and paste the following code:
@ini_set( 'max_execution_time', '300' );
@ini_set( 'upload_max_filesize' , '128M' );
@ini_set( 'post_max_size', '256M');
@ini_set( 'memory_limit', '128M');
Let’s take a closer look at what each of these directives mean:
-
The max_execution_time directive defines how long a PHP script will be allowed to run before it’s stopped. The default value is 30 seconds, meaning if a script takes longer than 30 seconds to execute it will result in an error. To make sure this doesn’t happen, we have increased the maximum execution time to 300 seconds.
-
The upload_max_filesize directive is the one that actually defines the maximum size of a file you can upload. As you can see, we have set it to 128 megabytes.
-
The post_max_size directive defines the maximum size of all POST body data, including your uploaded files. This is why it should be set at the very least to the same size as your upload_max_filesize directive, though we suggest you set it higher. In our example, we set it to twice the size of upload_max_filesize.
-
The memory_limit directive defines the maximum amount of memory a script is allowed to allocate. It limits scripts to a certain amount of memory so they don’t use up all the available memory on the server. We set our memory limit to 128 megabytes.
If you’re having issues uploading a file to your server due to its size, we suggest increasing all four of these directives. Of course, you can adjust the sizes for each directive as per your needs.
Once you’re done, click on Update File to save your changes.
Qode WordPress Themes: Top Picks
View Collection


Another way to change the upload limit is by creating or editing a php.ini file on your server. For starters, access the WordPress root folder of your website. To do this, you have to use an FTP client or File Manager from the cPanel dashboard of your hosting account.
Next, look for the php.ini file in the root folder. If you’re using a shared hosting plan, you might not be able to see one. In that case, you could create a php.ini file on your own and then upload it to your root folder. In the php.ini file itself enter the following code:
max_execution_time = 300
upload_max_filesize = 128M
post_max_size = 256M
memory_limit = 128M
The .htaccess file is used for your website’s configuration. You can find it in the root folder of your WordPress website. Like in the previous example, you will need to access your server via FTP or through your control panel’s file manager.
To make the changes, open the .htaccess file in a code editor or Notepad++. At the very end of the code, enter the following four lines:
php_value max_execution_time 300
php_value upload_max_filesize 128M
php_value post_max_size 256M
php_value memory_limit 128M
To locate the wp-config.php file, once again, connect to your server via an FTP client or through your cPanel File Manager and head over to the root directory of your WordPress installation.
Open the wp-config.php file and add these lines of code to the bottom:
@ini_set( 'max_execution_time', '300' );
@ini_set( 'upload_max_filesize' , '128M' );
@ini_set( 'post_max_size', '256M');
@ini_set( 'memory_limit', '128M');
Just don’t forget to save the changes once you’re done.
Conclusion
One of the numerous advantages of using WordPress is the fact that you can customize pretty much anything you like. You want to make your posts or pages private? No problem. Or perhaps you’d like to remove the admin bar? You can do it in a snap. In this little guide we showed you that you can even increase the maximum file upload size. But if you’re not comfortable with any of these options, you can always contact your hosting provider and ask them to do it for you. Whichever option you choose, it’s fine, as long as you don’t let anything stop you from creating superb websites.
