How to Add a Custom Author Profile Page in WordPress

There is no doubt that blogging has always been one of the main purposes of WordPress websites. And it drives bloggers and website owners to constantly search for ways to increase their reader base and add authenticity to their blogs. Besides the essential, like producing engaging content, another way to give your blog an extra edge is by creating customized author profile pages.
New readers are far more likely to engage and read more articles on your website if they can relate to the author behind them. The easiest and most effective way to accomplish this is to add short author bios that will introduce and humanize each author.
Even though WordPress offers its users the means to enter author information, it often requires additional work to fine-tune the frontend display or to insert new fields. Therefore, in this article, we will take you through several methods for customizing your author’s information and making it more attractive to readers.
Blog & Magazine Themes
View Collection


How to add a custom author profile page
Generally speaking, there are two possible ways of changing the author profile page in WordPress. They involve either using a suitable plugin or adding custom code to make a custom author template file. We will cover both methods in detail.
You should first investigate whether an author page already exists on your website. If you find one, you need to decide whether you like its design and what you would like to change. At this point, the simplest choice is to examine the options of your current theme. This investigation is worth the time investment since some themes include settings that directly affect the display of the author’s page. In that case, you can adjust the author profile page quickly and easily using the theme options.
However, if you find you don’t like the look of your author profile page and your theme doesn’t offer the options to customize it, you can proceed to the other approaches described below.
How to add a custom profile page using plugins
Using plugins as opposed to custom code is the more beginner-friendly method. Due to the multitude of WordPress plugins, you are bound to find a plugin that fits your needs. And, you can explore and test the plugins from the WordPress plugin repository until you pin down the one that suits you best.
One way of customizing your author archive page is by adding a widget inside the sidebar on the author pages. The widget will show a short bio for your authors. You can accomplish this using a plugin such as the Author Avatars List/Block.
Install the plugin, then navigate to Appearance > Widgets, and locate the Author Avatars widget.
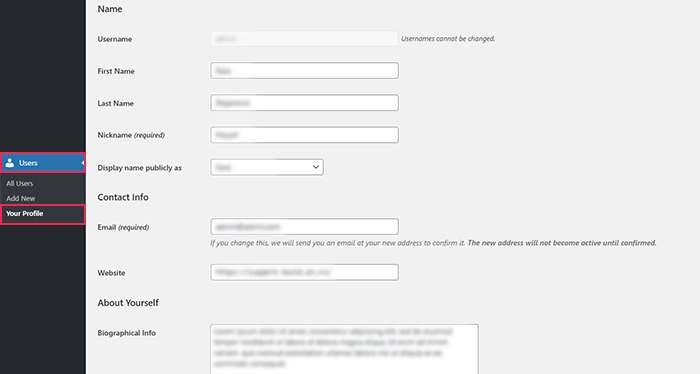
Before we can proceed, your author’s user data must be filled out. If it isn’t, make sure to navigate to Users > Your Profile in a new tab and fill it out. if you are adding information for a third-party author, navigate to Users > All Users and, as admin, edit the appropriate user account.
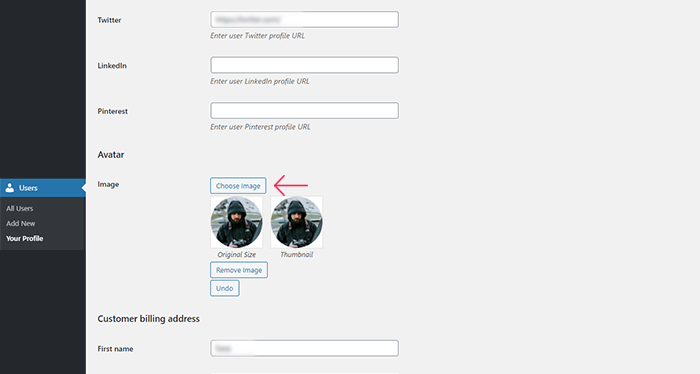
This plugin only displays the user data that’s already entered, which is why you needed to fill in the user profile beforehand. However, it has a drawback—it doesn’t allow you to change the default user avatar with a custom user image.
To add a custom user image as the avatar, you need to install a plugin for user avatars. We will show you the steps using the WP User Avatar plugin as an example. After installing it, navigate to the newly-created Avatar section within Users > Your Profile and add an image by pressing the Choose Image button.
After you’ve filled out all the author information you want, you can insert the widget that would display it in the appropriate widget area.
In our example, the goal is to show it on both our posts and post archives, such as the author page. Therefore, the widget area you need is most likely one of your theme’s default widget areas. But, as widget areas differ based on the theme you are using, you will need to figure what yours is called. For example, in the Behold theme, which we used for making the article, the widget area is called Main Sidebar.
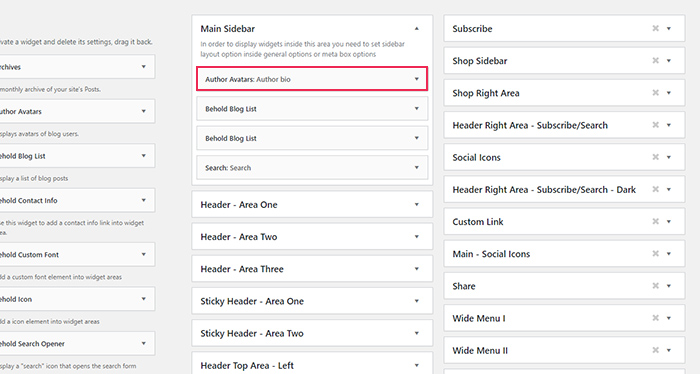
After you insert the widget, you will need to edit its options. As the options are quite straightforward, there’s no need to go through them all. The most important one to mention is that you can use the widget to show information about a single author or multiple authors. Either has its merits and which one you pick depends on individual needs. Another option worth noting is the Link users to field that determines if the user’s name will contain a link and where that link will lead.
If you only have a single author on your WordPress website, then it can be useful to show information about them on all posts as well as on the post archive pages (categories, tags, and the author archive page).
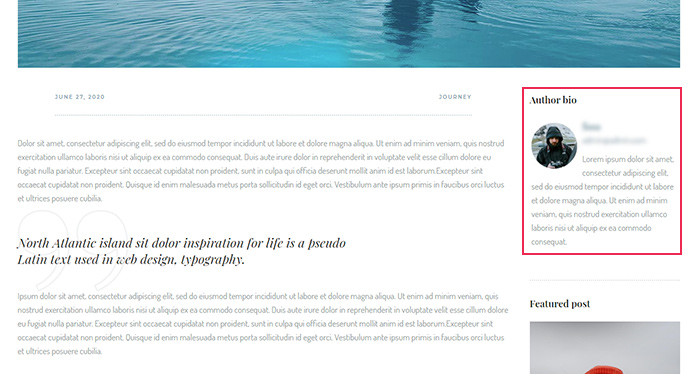
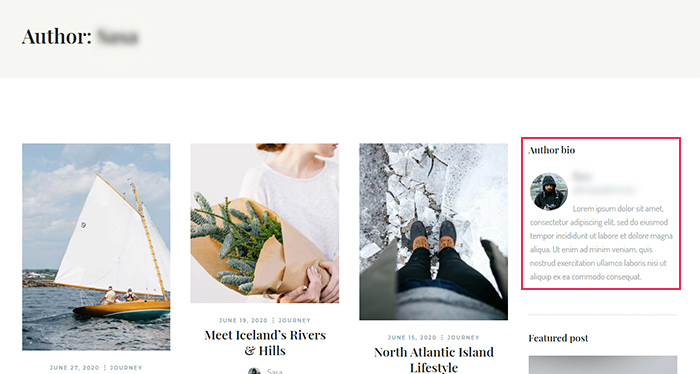
And, if your blog has several authors, showing their information together can be helpful. That way, readers can get familiar with all the authors on the site and follow the one they like. Additionally, the widget allows you to show how many published texts an author has next to their name. And you can link the authors’ names to the appropriate author pages, which will make it easy for readers to access the articles they’re interested in.
However, showing the biographies of multiple authors on all posts could be undesirable. If you worry that it will seem misleading as it can imply that the posts are a collaborative work of several authors.
If you want to hide the widget on blog posts, we have included a description of how to do it below. You need to add the following CSS code to Appearance > Customize > Additional CSS.
.single-post .widget_author_avatars{
display: none;
}
This is an example code, so you might need to adjust it for your site. We will briefly explain how to find the CSS class you need so the code can work as you want it to.
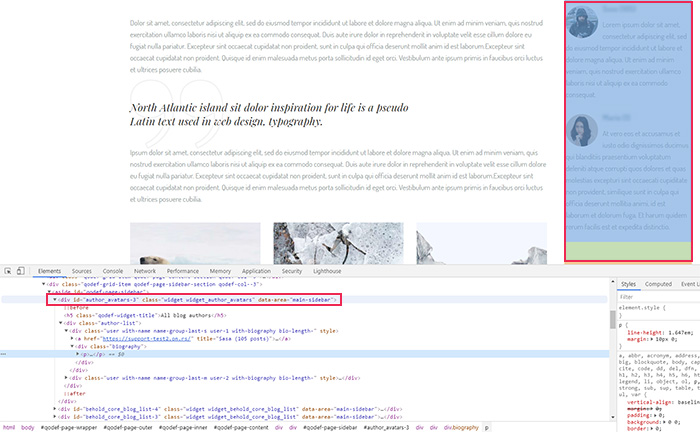
First, you need to right-click the widget within the sidebar. Press the Inspect option from the menu that opens to access the developer tools of your browser.

This will open the Elements panel, and you will be positioned on the element that you right-clicked. Navigate upward through the widget’s HTML code to find the element that wraps the whole widget content. As you navigate through the HTML, the corresponding frontend part of the widget will be highlighted on the page.
Once you find the element, you will also find its CSS class. You can use the CSS class (in this case widget_author_avatars) along with the CSS hiding rule (display: none;) to hide the widget.
Please note that if you only use the code below, it will hide the widget from all pages.
.widget_author_avatars{
display: none;
}
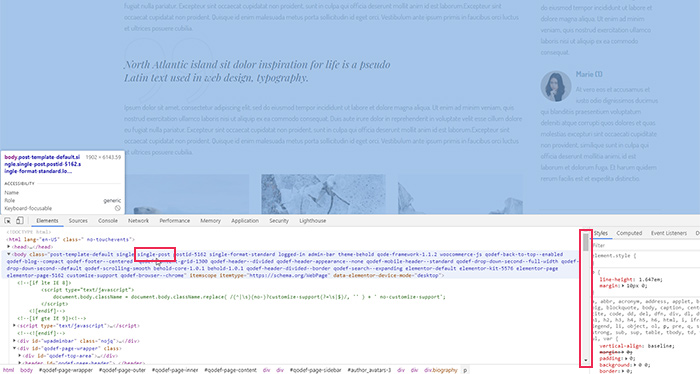
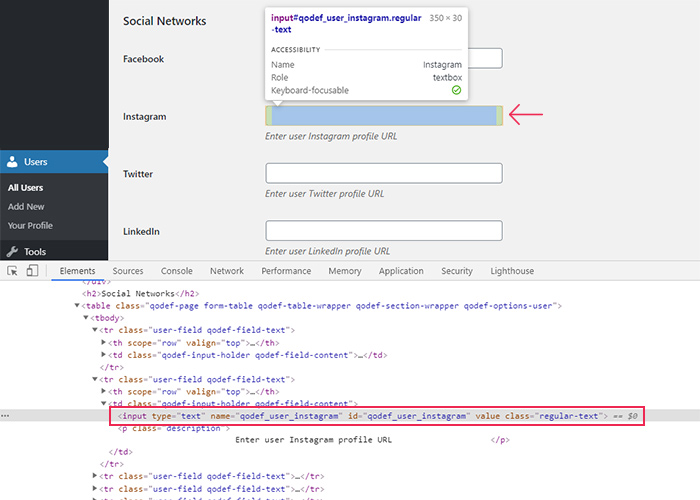
Since this isn’t what we intend, we need to specify that this CSS should only apply to blog posts. To do so, navigate to the top of the HTML code using the side scroller and find the CSS class of the body element for single posts. As you can see in the image below, that class is named single-post. And you can use it in your CSS code to ensure that the custom author information won’t be shown on single blog posts.
While the WP User Avatar plugin is very useful for customizing your author profile display, there is a downside to it. Namely, there is no option for adding social media icons. A social media presence is imperative in this day and age, so you should try to supplement this feature. Check if your theme has built-in social sharing options which you can use to add social icons to the author profiles.
Another addition you can consider for your site is the author box that would be included with every post. Author boxes have become standard practice nowadays. The term author box refers to a page section, often placed at the bottom of every blog post, that contains the author’s bio and social media accounts.
Even though author boxes don’t directly affect the author profile page, they aim to do the same—add credibility to your blog and provide a way for readers to easily connect to their favorite author via social media. Additionally, readers can use them to navigate your site. Simply link an author’s name to their profile page, and the readers will have easy access to all articles by that author.
Because of their usefulness, we will also cover how to add author boxes to your WordPress website.
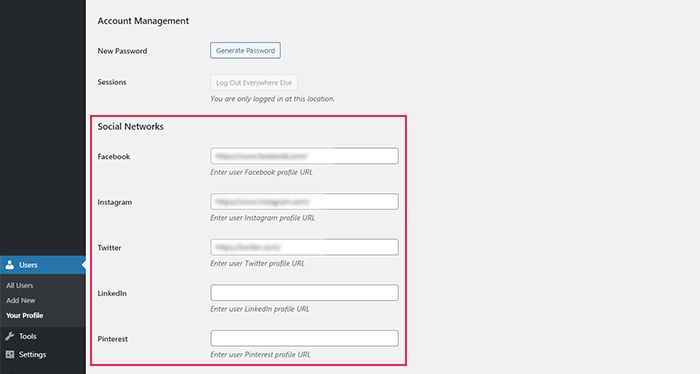
Firstly, investigate if you have an option or a set of options for storing a user’s social media information. Start by checking the Users section in your dashboard menu.
Unfortunately, this isn’t a default WordPress functionality. So, whether you have these options and how they’re called depends on the theme you’re using. Our example theme for this article, Behold, offers these options in a section called Social Networks.
If your theme includes social sharing options, check if those include showing the author info box on blog posts. All of our premium WordPress themes, for example, include this option. With the Behold theme, you can find the settings for it under Theme Options > Blog > Blog Single > Enable Author Info.
However, your theme might not include social sharing options or the available options don’t include all the social networks you want. In that case, you should look for a suitable author box plugin. As there are quite a few good author box plugins, you should try a couple until you find the most suitable one for you. For this article, we picked the Simple Author Box plugin as an example.
After installing the plugin, navigate to the Simple Author option found in the admin dashboard menu. The plugin options you’re most likely to need for work are sorted into five tabs: Settings, Appearance, Colors, Typography, and Misc. The plugin includes an action box above the options so you can preview any changes you make.
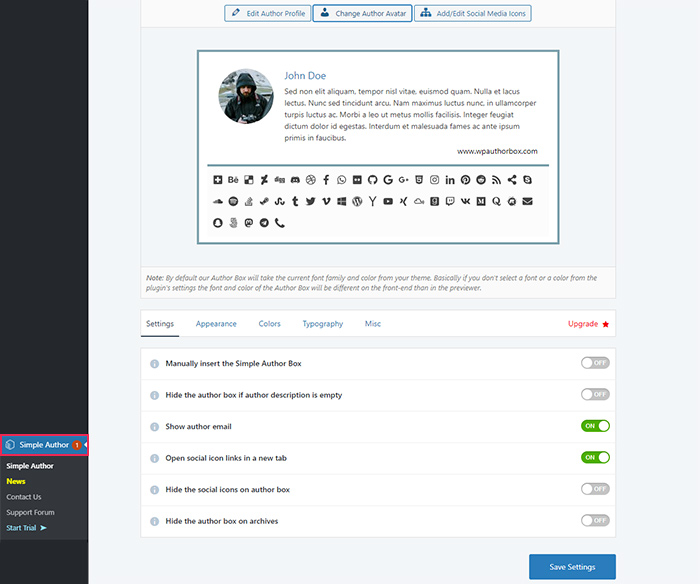
Additionally, you can use the three buttons above the preview to directly access the Author Profile, Author Avatar, and Add/Edit Social Media sections. The options accessed by the buttons will open in a new tab, so you won’t lose your place and navigation will be much easier.
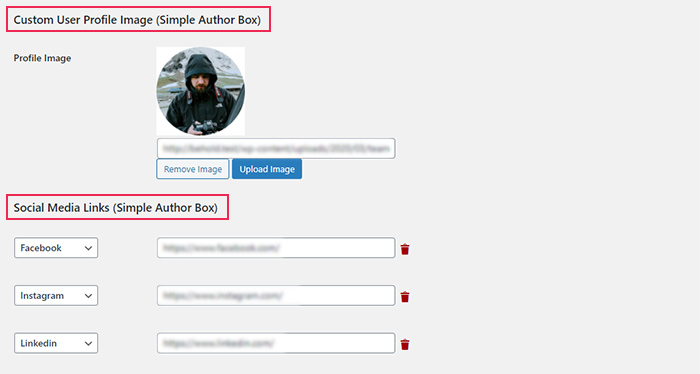
Using the Simple Author Box plugin you can add images as author avatars and insert social media information for the author(s). Images are added in the Custom User Profile Image section and social networks in the Social Media Links section. You also have the option of adding a new social media platform if the existing options don’t cover your needs.
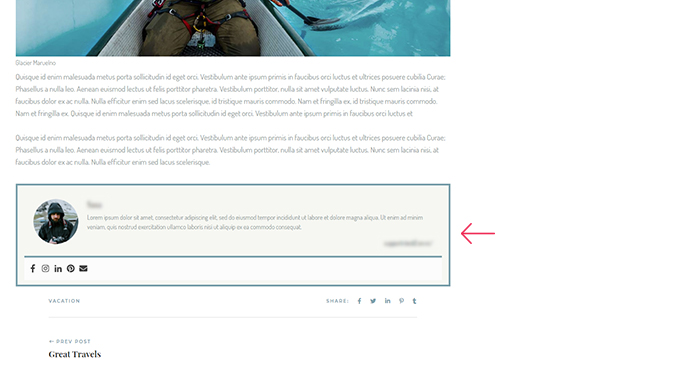
When you are done making changes in the Users section of your admin dashboard, press the Update Profile button at the bottom of the page. Then, switch back to the tab with the settings for the Simple Author Box plugin. Once you are sure all options are set as you want them to be, press the Save Settings button. Depending on your design, your author box could look like this:
How to add a custom profile page using code
If you are a more advanced WordPress user then you can try your hand at creating a custom author template. This method is more suitable for developers, as it requires the use of FTP and familiarity with coding. However, it offers the freedom of making a custom template that would fit your needs precisely.
Before you proceed, we strongly suggest making a backup of your website, as a coding mistake could break it. Once you’ve done so, we can start making a custom author template.
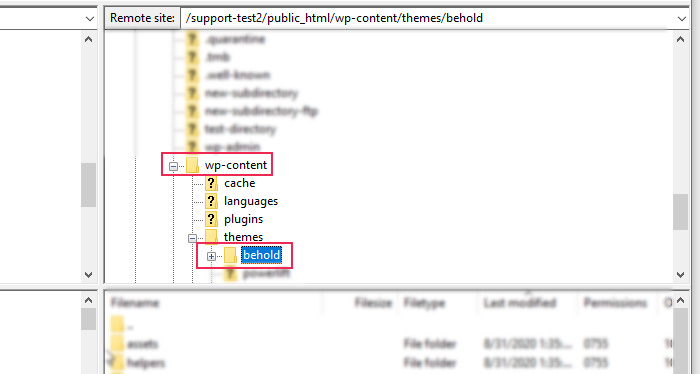
First, connect to your server using your FTP credentials and open your root WordPress directory, often called public_html.

Then, navigate to /wp-content/themes and open the directory of the theme you are currently using.
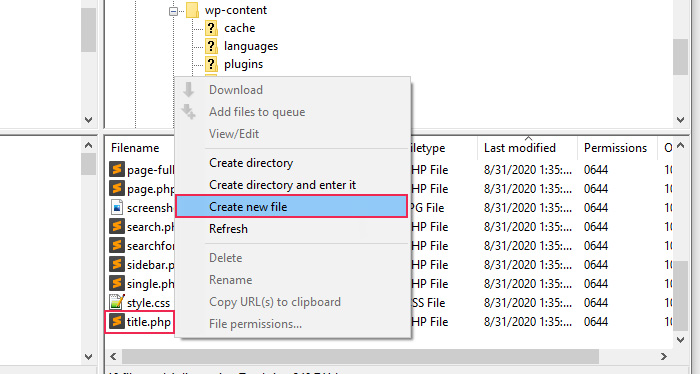
In the theme’s directory, look for the author.php file. When you find it, right-click on it and select the View/Edit option to edit it. In case your theme doesn’t include an author.php file, right-click anywhere within your theme directory (that’s the bottom right panel in your FTP client) and select the Create new file option. Make sure not to accidentally click on any existing files and folders.
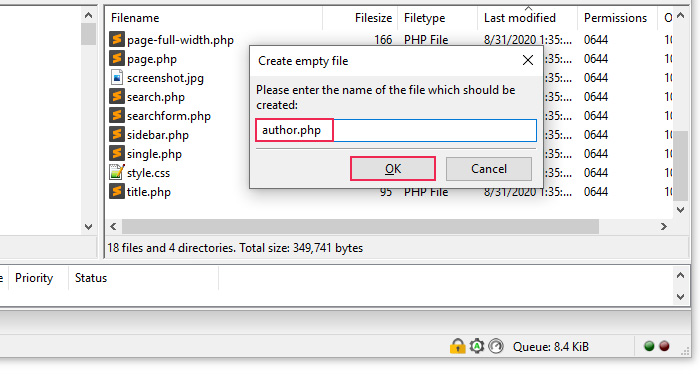
Then, type in author.php as the file name and press OK. This will create an empty author.php file that you will need to edit.
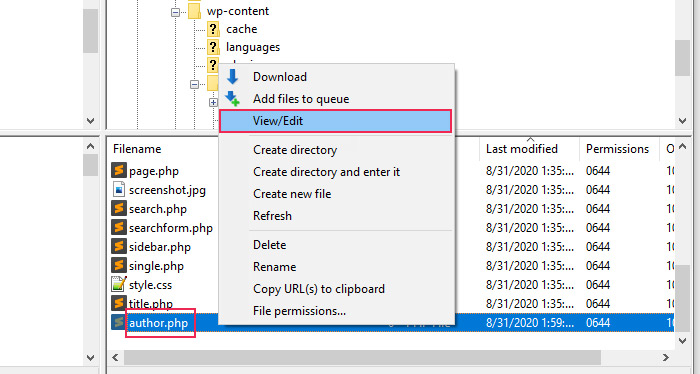
Right-click on the author.php file and press the View/Edit option to edit it in your preferred text editor.
If you created an empty author.php file as opposed to editing an existing one, you now need to add the appropriate template code. This can be done by copying the code from the archive.php file within your current theme and editing it according to your needs. If your theme doesn’t have that file, you can try the same using the index.php file. Alternatively, you can create the code from scratch, which we’ve done.
You can see the code we made below. We will explain it in the following sections.
<?php
get_header();
// Set the Current Author Variable $current_author
$current_author = ( isset( $_GET['author_name'] ) ) ? get_user_by( 'slug', $author_name ) : get_userdata( intval( $author ) );
?>
<div class="main-content-holder">
<div class="author-card-holder">
<h2>About <?php echo $current_author->display_name; ?></h2>
<div class="author-photo">
<?php echo get_avatar( $current_author->user_email , '100 '); ?>
</div>
<div class="author-info">
<p>
<strong>URL:</strong>
<a href="<?php echo $current_author->user_url; ?>"><?php echo $current_author->user_url; ?></a><br />
<strong>Bio:</strong> <?php echo $current_author->user_description; ?>
</p>
<p>
<strong>Follow me on social media:</strong></br>
<a href="<?php echo $current_author->qodef_user_facebook; ?>">Facebook</a>
<a href="<?php echo $current_author->qodef_user_instagram; ?>">Instagram</a>
<a href="<?php echo $current_author->qodef_user_twitter; ?>">Twitter</a>
<a href="<?php echo $current_author->qodef_user_linkedin; ?>">Linkedin</a>
</p>
</div>
</div>
<div class="author-articles-holder">
<h2 class="articles-title">All posts by <?php echo $current_author->first_name; ?></h2>
<?php if ( have_posts() ) : while ( have_posts() ) : the_post(); ?>
<article class="post">
<h3>
<a href="<?php the_permalink() ?>" rel="bookmark" title="Article link: <?php the_title(); ?>">
<?php the_title(); ?>
</a>
</h3>
<p class="publish-date">Published on: <?php the_time('d m Y'); ?></p>
<div class="post-category">
<?php the_category ( ', ' ); ?>
</div>
<?php the_excerpt(); ?>
</article>
<?php endwhile;
// Previous/next page navigation.
the_posts_pagination();
else: ?>
<p><?php esc_html_e('The author has no published posts.', 'textdomain'); ?></p>
<?php endif; ?>
</div>
</div>
<?php get_sidebar();
get_footer();
After adding your code into the author.php file, save the changes you made, and upload the file to your server. This will override the file that was previously there.
Now we can take a look at the code in detail. First, our template is on par with the smaller code block given below.
<?php
get_header();
// Set the Current Author Variable $current_author
$current_author = ( isset( $_GET['author_name'] ) ) ? get_user_by( 'slug', $author_name ) : get_userdata( intval( $author ) );
?>
<div class="main-content-holder">
<div class="author-card-holder">
<!-- some code here -->
</div>
<div class="author-articles-holder">
<!-- some code here -->
</div>
</div>
<?php get_sidebar();
get_footer();
In this block, we are using the functions get_header(), get_sidebar(), and get_footer(), to include the default theme templates for the header, sidebar, and footer sections. And we’re storing the information about the current author, within $current_author.
Regarding the HTML structure, you can see that we created a section with the custom class called main-content. This section contains two subsections intended to hold the author card/box and author articles.
Let us take a closer look at the first subsection.
<h2>About <?php echo $current_author->display_name; ?></h2>
<div class="author-photo">
<?php echo get_avatar( $current_author->user_email , '100 '); ?>
</div>
<div class="author-info">
<!-- some code here -->
</div>
It uses the get_avatar function to show the author title, which has the h2 tag, and the author avatar image, which has the display dimensions set to 100×100. This function can accept user email as one of the valid arguments.
This code subsection contains an additional subsection that shows user-related information. That information includes the author website URL, the author description/bio, and links to their social media accounts.
<p>
<strong>URL:</strong>
<a href="<?php echo $current_author->user_url; ?>"><?php echo $current_author->user_url; ?></a><br />
<strong>Bio:</strong> <?php echo $current_author->user_description; ?>
</p>
<p>
<strong>Follow me on social media:</strong></br>
<a href="<?php echo $current_author->qodef_user_facebook; ?>">Facebook</a>
<a href="<?php echo $current_author->qodef_user_instagram; ?>">Instagram</a>
<a href="<?php echo $current_author->qodef_user_twitter; ?>">Twitter</a>
<a href="<?php echo $current_author->qodef_user_linkedin; ?>">Linkedin</a>
</p>
If you choose to use this code for your own author.php file, please note that the whole code can be directly copy-pasted except the social media links section. This is because the code takes advantage of theme-specific social media fields for users (such as qodef_user_instagram).
Therefore, if you aren’t using the Behold theme, the social media links won’t work as they will be missing a valid href attribute. As such, you will need to find an alternative for the code snippet dealing with social media. If you aren’t sure how to accomplish that on your theme, you can simply delete that part of the code. To avoid any confusion, this is the code snippet in question:
<p>
<strong>Follow me on social media:</strong></br>
<a href="<?php echo $current_author->qodef_user_facebook; ?>">Facebook</a>
<a href="<?php echo $current_author->qodef_user_instagram; ?>">Instagram</a>
<a href="<?php echo $current_author->qodef_user_twitter; ?>">Twitter</a>
<a href="<?php echo $current_author->qodef_user_linkedin; ?>">Linkedin</a>
</p>
Alternatively, you can try to add user-related custom fields for social media accounts. Then replace our code with the one that “calls” the added custom fields.
Now that we’ve covered that, we can explain the second code subsection. It is the one with the custom class author-articles-holder. Its structure can be simplified as seen below.
<h2 class="articles-title">All posts by <?php echo $current_author->first_name; ?></h2>
<?php if ( have_posts() ) : while ( have_posts() ) : the_post(); ?>
<!-- some code here -->
<?php endwhile;
// Previous/next page navigation.
the_posts_pagination();
else: ?>
<p><?php esc_html_e('The author has no published posts.', 'textdomain'); ?></p>
<?php endif; ?>
The code contains a title followed by a WordPress Loop. Thanks to the loop, if an author has published posts, then a certain code block will be executed. But if an author has no posts, then the label “The author has no published posts” will be shown.
There is also a pagination feature, added using the_posts_pagination() function. And the innermost section, contained within the WordPress Loop, shows the relevant post data, stored in an article element.
<article class="post">
<h3>
<a href="<?php the_permalink() ?>" rel="bookmark" title="Article link: <?php the_title(); ?>">
<?php the_title(); ?>
</a>
</h3>
<p class="publish-date">Published on: <?php the_time('d m Y'); ?></p>
<div class="post-category">
<?php the_category ( ', ' ); ?>
</div>
<?php the_excerpt(); ?>
</article>
The article elements show a post’s title, publish date, categories, and excerpt. The post title links to the post, the date is given in the DD MM YYYY format, and the categories are separated with a comma and a blank space as delimiters.
This covers the composition of the code for the author template that we put together for this article.
After you create your custom author template file, the only thing that remains is to stylize it with some CSS. How you stylize it depends entirely on the desired look for your author page.
To help you along, we will share the CSS we used for the author page in this article below. However, if you want to achieve a different look, you will need to create the appropriate CSS code on your own. Keep in mind that any CSS you create to stylize the author page should be inserted in Appearance > Customize > Additional CSS.
#qodef-page-inner{
display: -webkit-box;
display: -ms-flexbox;
display: flex;
-webkit-box-orient: horizontal;
-webkit-box-direction: normal;
-ms-flex-direction: row;
flex-direction: row;
-ms-flex-wrap: wrap;
flex-wrap: wrap;
}
aside{
-webkit-box-flex: 1;
-ms-flex: 1 0 0px;
flex: 1 0 0;
}
.author-card-holder, .author-articles-holder{
text-align: center;
}
.author-card-holder {
background: #f6f7f2;
border: 1px solid #79a2ac;
padding: 20px;
color: #79a2ac;
}
.author-photo {
display: inline-block;
border-radius: 50px;
}
.author-photo img{
border-radius: 50px;
}
.articles-title{
margin: 45px 0;
}
.nav-links{
letter-spacing: 5px;
margin: 20px 0;
}
@media only screen and (min-width: 680px){
.main-content-holder{
-webkit-box-flex: 2;
-ms-flex: 2 0 0px;
flex: 2 0 0;
margin: 0 1.5rem 0 0;
}
}
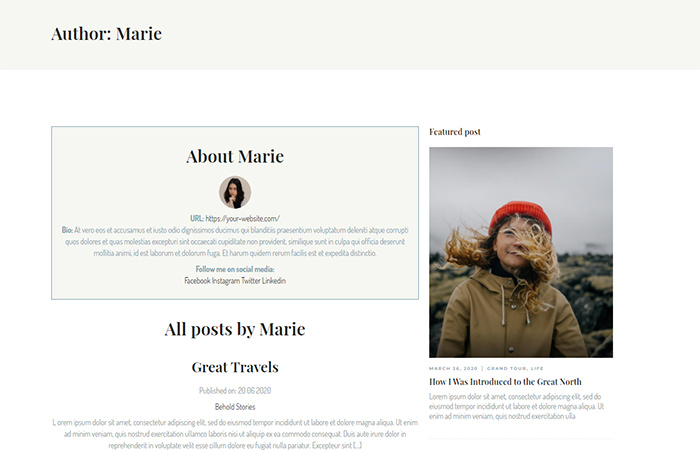
Here’s how the corresponding author profile page would look. This is the result of our custom author template and the CSS code we used to stylize it.
Ultimately, the code we included in this article is meant predominantly as a guideline. It is not set in stone, and you are more than welcome to modify and improve it.
Try out the different methods we suggest in this article and see what suits you best. If you like, you can even combine them. Add some author-related features using a WordPress plugin and add others using code, be it PHP or CSS.
Final thoughts
Having a custom author page or an author box on your posts can help boost your blog popularity and bring readers and authors closer together. In this article, we tried to show you that there are several approaches you can take to make that happen. We touched on some helpful plugins and shared our coding advice and explanations as a guideline. Hopefully, you will find creating custom author templates much easier using this tutorial.
