How to Style Google Maps in WordPress

You – or the web designer you hired – have worked so hard to make everything on your brand new site just perfect. Every single one of the elements has been taken care of. Font family, font sizes, main color, other colors, empty spaces, images, illustrations…everything looks perfect. But, what about the maps?
Maps are there to make it easier for visitors to locate your business. Their functional part is obvious, but what about the visual impression? Google Maps are almost everyone’s choice when it comes to displaying location. And sometimes their default look will fit your website style perfectly. But in many cases it will have to be adjusted a bit in order to blend in and work well with the rest of the design.
There are a couple of different ways to customize Google Maps in WordPress. They are all quite simple and don’t require any particular technical knowledge. Read on and find which one works the best for you.
You can also check out our handy video tutorial on setting up Google maps using any of the Qode themes.
One of the simplest ways to customize your Google maps is to use one of the plugins created just for this purpose. Our choice is Snazzy Maps, a lightweight and simple plugin with hundreds of free styles.
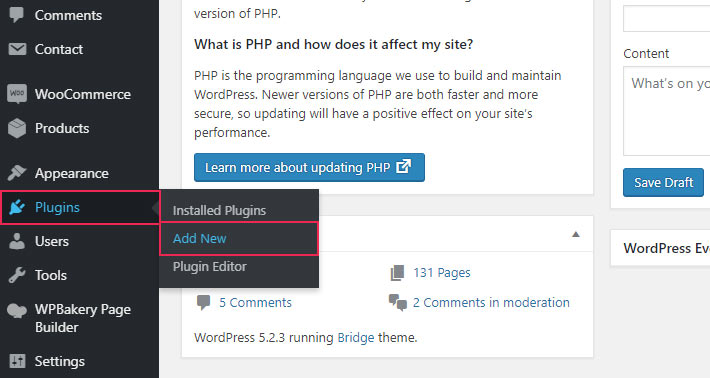
Start by going to Plugins > Add New.
The plugin we are looking for is called Snazzy Maps so type that name into the search form. When you find it, click on the Install button and then activate it.

Now that the plugin is installed and activated, you can reach it under Appearance > Snazzy Maps.

In order to explore and choose styles for your website, you need to create a Snazzy Maps account in order to get an API Key.
When you have successfully created an account, navigate to your profile page and in the Developer section click on the Generate API Key button to get the code.

Now, in the Snazzy Maps Settings, enter your API Key and hit the Save button.

You are now ready to explore styles and customize your maps. Hop back to the Explore tab. You’ll find plenty of map styles over there. You can use the recommended ones, or create your own unique styles.
When you find a map style that works perfectly for your website, click on the Save Style button, so that you can use it later.

And, to create your own custom style, go to your Snazzy Maps account, and click on Create a Style in the menu.

You will now have a chance to create your own style with the colors you set and the type you choose to customize. When you feel your style is ready, hit the green Apply Style button, give your custom style a unique name, and save it.

To find your custom styles in the admin of your site, choose My Styles from the dropdown in the Snazzy Maps Explore tab.

Click on Enable and WordPress will apply the style directly to the Google maps on your website.

If you are using one of Qode Interactive’s premium WordPress themes that comes with a predesigned shortcode for Google maps, then half your work’s been done for you.
Depending on your theme, the shortcode will come with different customization options. For instance, some themes include the ability to add an overlay or to change the colors right there in shortcode settings, while others come with a form for inserting the Snazzy Maps code.
For example, our WordPress theme Gluck comes with a Google Maps shortcode that allows you to enable custom Snazzy Maps styles and contains a field for inserting code.

To get this code, you don’t actually need to install the Snazzy Maps plugin. All you need to do is go to the Snazzy Maps website, log in or create an account, create your own style, or choose from the existing ones, and copy its unique code.
To get the code, choose the View code section.

Your unique code will appear on the left. Copy the entire code.

Insert your Snazzy Map code in the appropriate field in the shortcode, and the map on your page will look exactly as you styled it.
Qode WordPress Themes: Top Picks
View Collection


Qi Blocks for Gutenberg is our collection of more than 80 exquisite blocks you can use to enhance your block editor experience. These blocks can help you do fantastic things in Gutenberg, such as creating progress bars, charts, and graphs, showcasing photos, and adding Google Maps to your website.
You can rely on the Google Map Gutenberg block to get the map up and running on your website. It’s a block available with the Premium version of the plugin alone. We’ll show you how to use it to add and style Google maps on your plugin, so if you want to follow up, make sure you have the plugin installed and activated first. You can also watch our video tutorial on the same topic if that’s your preference.
To get started, you first need to navigate to your website’s dashboard, and under Qi Blocks > Integration Page, find the field where you’re supposed to enter a Google Maps API Key.

To get that key, you’ll need to set up a Google Cloud project, but you’ll need to have a billing account set up, too, and you’ll need to enable Maps JavaScript API.
With the key in place, you can add the map block to any page or post of your liking. You’ll see it open up a map right away, and in the right-hand side menu, you’ll have the option to change the block’s content. This means you’ll be able to change the pin icon and add one or more addresses that should be shown on the map.

After choosing our pin icon and adding a single address, we were ready to proceed to the next step – styling the map. For that, we turned once again to the Snazzy Maps website for its nifty editor where you can create your own map, style it in any way you like, and then copy its code and paste it into the block.
We set the map height to 585px and the map zoom to 13. The remaining options let you enable map dragging, scrolling, street view, type control, and full screen. We changed nothing there.

You should, of course, feel free to experiment and find the best combination of settings that suit your website.
Final Thoughts
Whether you opt for a plugin or use a theme with a built-in Google Maps shortcode to customize the way the maps will be displayed on your pages, what’s important is – you don’t have to settle for the default view. After investing a lot of time and effort into perfecting your website design, you really should make sure the maps fit the overall tone and atmosphere perfectly. Don’t be afraid to play around with the styles. It’s fun, easy and definitely worth your while.
