How to Retrieve a Logged-in WordPress User’s Info

The logged-in WordPress user info can be used in various ways: as part of authentication processes for a plethora of web applications, in specialized plugin dashboards or options screens, as part of the default WordPress interface, and many others.
While most of these features and functionalities are often part of WordPress plugins, both free and premium, some can also be achieved with custom code. Knowing how to retrieve the info of logged-in WordPress users can help you implement those customizations, given sufficient coding knowledge and skill.
The topic that we are going to cover in this article is a bit more coding-focused. And, while the examples that we prepared for the article aren’t that difficult, they still require a great deal of coding and general WordPress knowledge to be understood and implemented properly. Thus, we must put a disclaimer that the article is intended for intermediate and advanced WordPress users before going any further.
In this article, we will show how you can display the info of logged-in users, add personalized welcome messages, and a way to track the date and time of their last login on the website using snippets we created for this article. To use them on your website, you will have to include them, via FTP, either in the functions.php file of your child theme or a site-specific plugin.
To users less familiar with the FTP process, we advise consulting our article on how to use FTP beforehand. Additionally, as a safety precaution, we strongly advise you to make a backup of your website before adding the code. This is what we will be covering:
Qode Themes: Top Picks
View Collection


One way of retrieving and displaying the currently logged-in user info involves using the wp_get_current user() function. Specifically, this function retrieves the current user object, which you can then use to display its relevant properties or perform some other actions. We have included a simple coding snippet showing how you can retrieve that info and show some of the user properties.
function qode_get_current_user_info() {
$current_user = wp_get_current_user();
if ( ! ( $current_user instanceof WP_User ) ) {
return;
}
echo sprintf( __( 'Username: %s,<br />', 'textdomain' ), esc_html( $current_user->user_login ) );
echo sprintf( __( 'User email: %s,<br />', 'textdomain' ), sanitize_email( $current_user->user_email ) );
echo sprintf( __( 'User first name: %s,<br />', 'textdomain' ), esc_html( $current_user->user_firstname ) );
echo sprintf( __( 'User last name: %s,<br />', 'textdomain' ), esc_html( $current_user->user_lastname ) );
echo sprintf( __( 'User display name: %s,<br />', 'textdomain' ), esc_html( $current_user->display_name ) );
echo sprintf( __( 'User ID: %s', 'textdomain' ), esc_html( $current_user->ID ) );
}
Let us elaborate on the code a bit.
This code snippet represents a custom function called qode_get_current_user_info(). In it, we have first stored the instance of the current user inside the $current_user variable using the wp_get_current_user() function. For added safety, we have added a conditional statement which checks whether the previous action was performed successfully. Then, the remaining part of our custom function prints out the info for that user – their username, email, first name, last name, display name, and ID.
As previously mentioned, if you want to use this custom function, you will need to insert the coding snippet via FTP either into the functions.php file of your child theme or a site-specific plugin. However, even after doing so, you won’t be able to see the specified info of the currently logged-in user. The reason for it is that functions need to be executed to work properly.
As our snippet lacks the one line of code which executes it, nothing will happen after adding the previous coding snippet into one of the two suggested locations. You need to add the missing line of code which calls, i.e. executes the function. However, this is a far more complex task than one might imagine as it involves understanding and using WordPress hooks.
Simply put, WordPress hooks are pieces of code which act as a placeholder, allowing other developers or WordPress users to add new functionalities to their WordPress website or to change existing ones. More precisely, we distinguish two types of WordPress hooks. These are action hooks, used for adding new features and functionalities, and filter hooks, used for changing existing ones.
Users need to create custom functions called callback functions or callbacks which are “hooked onto” those placeholders. In that sense, the callbacks are what defines a custom functionality, while the “hooking onto” aspect is what ensures that the callback’s code is executed, i.e. that the functionality is enabled.
Furthermore, by hooking your callback(s) onto a hook you ensure that the custom code is executed at the exact place where the hook is located. This means that you won’t have to change existing template files to add new functionalities or change existing ones, which was common practice in earlier years of WordPress. Instead, using WordPress hooks, you can keep all your modifications in one place, either the functions.php file of your child theme or a site-specific plugin, as previously mentioned. And not only that: you won’t have to worry that your modifications will get overridden after each WordPress, theme, or plugin update.
That said, the “hooking onto” part requires a line of code – the use of the add_action() function for action hooks and add_filter() for filter hooks. Both of these functions accept four arguments. These are the following: the hook you want to “hook onto”, the callback function being hooked, the priority of the callback function in the order of callback function execution, and the number of arguments the callback function accepts.
The default priority is set to 10, while the default number of arguments of the callback function is set to 1. Therefore, in most cases, only the first two arguments can be used, while the default values for the other two are used implicitly. Of the first two, the hook is the more important one, as it determines the placement of the code. It is the choice of which hook to use that makes this method of adding customization to a WordPress website so developer-friendly, as it is done on a case-by-case basis.
Depending on the customization you wish to add, there could be many suitable hooks as a part of the WordPress core files or placed within the template files of your theme and plugins. However, knowing them requires in-depth knowledge of WordPress code, as well as of the code behind your themes and plugins. Therefore, for those not familiar with WordPress code, we strongly suggest consulting your theme or plugin authors to find the most suitable hook to implement the customization you had in mind.
Having explained that, let us return to the custom function we mentioned in the previous section – qode_get_current_user_info(). As it displays the info only without altering any of the data, that means you should hook it onto a suitable action hook. Thus, you would use the following line of code to execute the function:
add_action('suitable-action-hook-here','qode_get_current_user_info');
with the suitable-action-hook-here part properly replaced with a suitable action hook.
One simple yet effective feature you can implement on your website is to add personalized user messages. This can help you create and strengthen bonds with your users. While there are a lot of various types of messages, as an example, we will show how to create a unique welcome message for your logged-in users while showing a more generalized version of that message to non-logged-in visitors of the website. The snippet we created specifically for this article is given below.
function qode_welcome_message() {
if ( is_user_logged_in() ) {
$current_user = wp_get_current_user();
echo '<h1 class="qodef-welcome-title logged-in">' . sprintf( esc_html__( 'Welcome to the website, %s', 'textdomain' ), empty( $current_user->user_firstname ) ? $current_user->display_name : $current_user->user_firstname ) . "</h1>";
} else {
echo '<h1 class="qodef-welcome-title">' . esc_html__( 'Welcome to the website', 'textdomain' ) . '</h1>';
}
}
It represents a custom function called qode_welcome_message(). It is a simple coding snippet that uses the if … else … conditional to display two versions of a welcome message. By using the is_user_logged_in() function we have checked if the current website visitor is logged in and, if they are, displayed a welcome message with their first name at the end. In the case the visitor’s first name doesn’t exist, their display name is shown instead. On the other hand, if the visitor isn’t logged in, a generic welcome message is shown. This is a very simple way of adding personalization to your website which your logged-in users might appreciate.
However, similar to our first coding snippet, you will need to hook the custom function onto a suitable hook for the code to be executed and display its result on your website. As our custom function doesn’t alter any arguments, it should be hooked onto an action hook. The line of code you need is the following:
add_action( 'suitable-action-hook-here, 'qode_welcome_message' );
with the suitable-action-hook-here part properly replaced.
As another example, we will show you how to assign additional properties to your users, add relevant data and display it in the website’s backend. For this purpose, we will show how you can extend the Users > All Users section to display the last login date and time for all users that are registered on the website. This will help you track the changes your administrators, editors, authors, and contributors have made to the website, in case some need to be reverted or if some suspicious activities occur during the time they are logged in.
Even though not present by default in WordPress, in this day and age, such a feature is very important for your website’s security. And, while we have already created a separate article on how you can display the user’s last login date, we have decided to include this example that offers a slightly different take on the subject. The custom coding snippet you need is below.
function qode_add_user_last_login( $columns ) {
foreach( $columns as $key => $value ) {
$columns['last_login'] = esc_html__( 'Last login', 'textdomain' );
}
return $columns;
}
add_filter( 'manage_users_columns', 'qode_add_user_last_login' );
function qode_update_user_last_login( $user_login, $user ) {
update_user_meta( $user->ID, 'last_login', time() + 3600 );
}
add_action( 'wp_login', 'qode_update_user_last_login', 10, 2 );
function qode_display_user_last_login( $value, $column_name, $user_id ) {
if ( $column_name !== 'last_login' ) {
return $value;
}
$last_login_timestamp = get_user_meta( $user_id, 'last_login', true );
if ( ! $last_login_timestamp ) {
return '/';
}
return date( get_option('date_format') . ' ' . get_option('time_format'), (int) $last_login_timestamp );
}
add_filter( 'manage_users_custom_column', 'qode_display_user_last_login' , 10, 3 );
This coding snippet is more complicated than the previous two, as it consists of three separate functions which are hooked onto corresponding action and filter hooks. Therefore, to properly elaborate on the code, we will try to explain the functions one at a time.
The first function is called qode_add_user_last_login() and it adds a new column to the Users > All Users screen. That new column is called “Last login”, added using a foreach cycle. Of course, for the code to execute properly, we would need to hook our functions onto a suitable hook. In this case, that was the manage_users_columns filter hook. This hook is a part of a larger, dynamic filter hook – manage_{$screen->id}_columns which filters a list of headers for the list table on a specific screen.
function qode_add_user_last_login( $columns ) {
foreach( $columns as $key => $value ) {
$columns['last_login'] = esc_html__( 'Last login', 'textdomain' );
}
return $columns;
}
add_filter( 'manage_users_columns', 'qode_add_user_last_login' );
The second function is called qode_user_last_login() and it updates the user’s last login time in the database using the update_user_meta() function. Even though this might seem quite self-explanatory, the parameters that we used warrant a bit of elaboration. First, we have made sure that the column that is updated is the one denoted by the last_login key, which we previously used while creating the Last login column. Then, the user whose last login is tracked is uniquely determined using his ID. Finally, the user’s last login is calculated using the time() function. This function returns a timestamp which represents the number of seconds since the Unix Epoch (January 1, 1970, 00:00:00 GMT) with regards to the UTC timezone. As the timezone we have selected on our website is UTC+1, we have added an extra 3600 seconds (1 hour) to offset this difference.
function qode_update_user_last_login( $user_login, $user ) {
update_user_meta( $user->ID, 'last_login', time() + 3600 );
}
add_action( 'wp_login', 'qode_update_user_last_login', 10, 2 );
Finally, the third function, called qode_display_user_last_login(), is responsible for displaying a user’s last login time in a more human-readable format than one provided by the time() function. More precisely, the last login timestamp is acquired using the get_user_meta() function. Then, depending on whether the timestamp exists for a given user, two outcomes are specified. Firstly, if a given user has no last login timestamp, a simple slash will be shown in the Last login column next to the respective user. On the other hand, if the last login timestamp exists within the database, it will be displayed in the Last login column in a more human-readable format using the date() function.
As for the format that we have used, it relies on the Date Format and Time Format options which can be set up in the Settings > General section. Additionally, we will say we haven’t altered the values for any other columns. Nevertheless, as we have undeniably changed the default view of the Users > All Users screen, we had to hook the function onto a suitable filter hook, which was manage_users_custom_column, in this case. Of course, the reason for it is that this filter hook is the hook responsible for what is displayed in the custom column we previously created.
function qode_display_user_last_login( $value, $column_name, $user_id ) {
if ( $column_name !== 'last_login' ) {
return $value;
}
$last_login_timestamp = get_user_meta( $user_id, 'last_login', true );
if ( ! $last_login_timestamp ) {
return '/';
}
return date( get_option('date_format') . ' ' . get_option('time_format'), (int) $last_login_timestamp );
}
add_filter( 'manage_users_custom_column', 'qode_display_user_last_login' , 10, 3 );
This concludes the explanation of our third coding example. However, we must add one last remark before showing the result. Since this coding snippet adds a property to any user – the timestamp of his last login – this property can also be displayed using the first coding snippet we mentioned in this article. Specifically, you can edit the snippet shown in the section on displaying basic user info and display the last_login property of the current user. However, you would have to use the date() function or any similar function that converts the last_login timestamp into a more readable format, as we did near the end of the qode_display_user_last_login() function above.
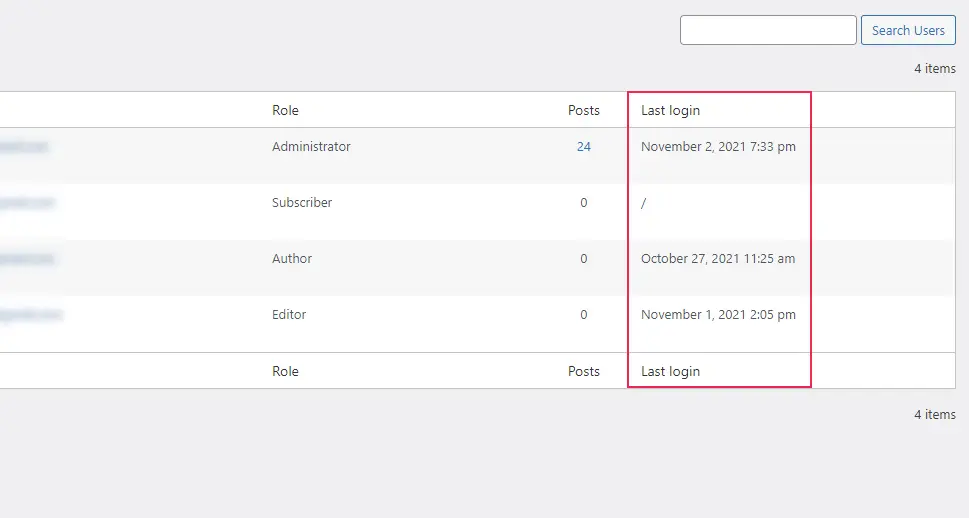
Having said that, the only thing that remains is to examine the result of our coding. As we have specified all the hooks for this example, the code will be executed and the result displayed on the website. In this case, this is in the website’s backend, in the Users > All Users section. We have included a screenshot of the result on our end below.
Final Thoughts
Knowing how to retrieve the info of logged-in WordPress users can help you implement modifications to your website which make the interaction with them a bit more personalized or add features which can improve your website’s security, among other things. In this article, we have explained the ways to display the info of logged-in users, make customized welcome messages, and a way to track the date and time when your users last logged into the website.
While these examples are quite simple in comparison to what can actually be achieved with advanced coding skills, they have been thoroughly explained so as to be clear to intermediate and advanced WordPress users. Therefore, we are sure you will be able to implement them on your end, and even create additional website modifications with the logged-in WordPress user’s info you retrieved thanks to methods described in this article.
