How to Fix the WordPress “Fatal Error: Maximum Execution Time Exceeded”

Solving WordPress errors can seem difficult, especially for new users but in reality, this is not the case—most WordPress errors can be solved quickly and easily. The Maximum execution time exceeded error is very common. It can show up while you’re doing something as simple as updating WordPress, themes, or plugins. When it shows up, the error is followed by a message similar to this:

Fortunately, this WordPress fatal error has a very straightforward fix. In this article, we’ll show you a couple of different solutions you can try, such as:
Solving the Error
Maximum execution time (max_execution_time) is a time limit on how long a PHP script can run. It is a way hosting providers can limit the use and abuse of server resources, especially for shared hosting. The actual default value depends on the hosting, but it-s usually set to 30 (i.e. 30 seconds). If a script exceeds the time limit, you will receive the Maximum execution time of X seconds exceeded error. The easiest solution to this problem is increasing the time limit. Changing it to 300 seconds (5 minutes) is often more than enough. If that doesn’t help, you can try setting even higher values for maximum execution time.
Before you proceed, some of these solutions will involve editing native WordPress files, so make sure to backup your site beforehand.
We will show you four different ways to increase the max_execution_time by adjusting the values set in native WordPress files. The first two methods are for cPanel users while the other two are for FTP client users.
-
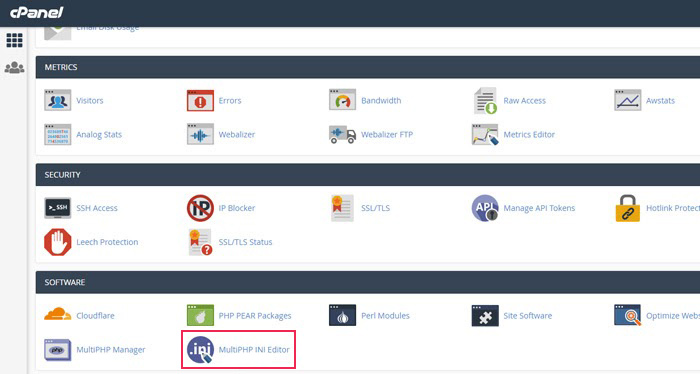
Editing the max_execution_time value in cPanel
Log in to cPanel using your credentials. Navigate to the Software section and click on the MultiPHP INI Editor.
In the new window, select your domain from the dropdown menu, locate the max_execution_time PHP directive, and change the value associated with it to 300.

To finish, press the Apply button at the bottom.
-
Editing the php.ini file in cPanel
There’s another way to change the same value in cPanel. If you are already logged in, navigate to the Software section and click on MultiPHP INI Editor.
In the new window, find and select the Editor Mode tab on the top and then choose your domain from the dropdown underneath. In the field below that, insert the following line of code:
max_execution_time = 300;
If the field already contains code for max_execution_time then simply replace the value with 300.

To finish, click the Save button.
-
Editing the .htaccess file via FTP
In case you don’t have access to a hosting control panel, you can increase the max_execution_time via FTP just as easily. Connect to your server using your FTP credentials and navigate to the root WordPress directory (usually called public_html). Then find the .htaccess file within. If you don’t see it, it’s likely hidden, so you need to enable showing hidden files in your FTP client. For example, in FileZilla, the option is called Force showing hidden files and you can find it under the Server tab.

Once you locate the .htaccess file, right-click on it and select View/Edit from the dropdown menu.

Open the file using a text editor and then add the following code at the bottom:
php_value max_execution_time 300

Save the changes. Upload the edited file back to your server to overwrite the old one.
If you are unable to edit the .htaccess file, it is most likely that the file permissions need to be adjusted. You can set file permissions for the .htaccess file to Read and Write by typing in 644. You do that by locating the .htaccess file, right-clicking on it, and selecting the File permissions… option. Find the Numeric value field, type in the number 644, and then press OK.

Now go back to editing the .htaccess file. Change the execution time by adding the php_value max_execution_time 300 code—just as outlined above. Save changes and upload the edited file to your server to overwrite the old one.
-
Editing the wp-config.php file via FTP
You can also increase the max_execution_time value by editing the wp-config.php file. Connect to your server via FTP and navigate to the root WordPress directory (usually called public_html). Locate the wp-config.php file, right-click on it and select View/Edit from the dropdown menu.

Open the file using a text editor and find the /* That’s all, stop editing! Happy blogging. */ line. Immediately above it insert this code:
set_time_limit(300);

If you are unable to edit the wp-config.php file, it is most likely that the file permissions need to be adjusted. The default permissions for it are usually set to 440 or 400. Those permissions only give reading privileges, so you need to temporarily set them to 644 or 666 so you can write as well. You can change the privileges by right-clicking on the wp-config.php file and selecting the File permissions… option.

Find the Numeric value field and type in 644 or 666 there. Press OK to finish.
Then edit the wp-config.php file as outlined above. When you’re done, save the file and upload it to your server to overwrite the old one. After that (and once you checked if the error is gone), change the permission on the wp-config.php file back to 440 or 400.


If you tried increasing the execution time allowed and it hasn’t helped, then the error might be caused by a faulty plugin or theme. To check if this is the case, log in to your WordPress admin dashboard and navigate to Plugins > Installed Plugins. Then start deactivating your plugins one at a time. Deactivate one, then check if the error is still present; carry on like this until you’ve examined all your plugins. Once the error stops showing, the last plugin you disabled was causing the problem.
If you tested all the plugins, and still haven’t found the problem, then you should try switching your current theme to another. We suggest using one of the WordPress default themes, like Twenty Twenty. If the error notice stops after you switch themes, then your theme was causing the problem.
If you are using WordPress versions 5.2 or above, then this can be solved even easier. Any fatal error should prompt newer WordPress versions to send a message to the admin email address. This message will include information which plugins/themes are currently paused due to fatal errors, and what exactly these errors are. You will be provided a link so you can access recovery mode and proceed with troubleshooting from there.
So, once you’ve determined whether the theme or the plugin caused the error you should contact its authors for further help.
Final Thoughts
The Maximum execution time exceeded error is a relatively common one and now you’ve seen it has a few straightforward solutions. We hope that the steps and methods we’ve shown you here will help you troubleshoot it with ease. Feel free to bookmark or save this page so you can refer back to these tips in case you need them again.
