How to Easily Display Your Opening Hours in WordPress

Most will agree that, when running a business, you need to make it clear to your customers when you’re there for them and when not – and this is why it’s important to prominently display your opening hours in WordPress.
This may be more common for, or expected of, brick-and-mortar shops, but even online services might not be available 24/7. Posting your opening hours on your website makes it easier for your visitors – and prospective customers – to plan visits to your stores, to book appointments, tickets or tables, or make calls to your support staff. They will also know when they can expect a customer service representative to return their call – especially useful if your customers are in a different time zone.
With opening hours prominent on your website, you can show your customers how punctual and professional you are. By proving that you value their time, you will make them value your services even more. This is why there are a lot of business-oriented WordPress themes with a built-in working hours shortcode.
But in case your theme doesn’t come with built-in opening hours, in this article, we will show you several ways to display them on your site. Here’s what we’ll cover:


If you’re using the Elementor website builder for WordPress, you’re in luck – we have our very own Qi Addons for Elementor plugin to help you do great things such as adding the working hours on your website. It’s not all you can do with the plugin, of course. The full, premium, version of the plugin has over a hundred different add-ons that cover everything from image presentation to building charts and graphs.
The widget you’ll need to show the open hours on your WordPress website is the Working Hours widget. It’s one of the widgets included with the free version of Qi Addons for Elementor, and you can use it with the free version of Elementor, too. So why don’t you go ahead and download and install both those plugins, and we’ll show you how to create one of the examples from the widget’s page.
Setting the Widget Content
After installing Qi Addons and Elementor, you can go ahead to any page or post you want to, open it in Elementor, and search for the Working Hours widget. We’ve prepared the area to include two columns, so we started by dragging the widget to the one on the left. You should do the same.
You’ll notice that the widget has a lot of sample content and that the options menu is open to the General content option.

The general content options you can set up here include pretty much everything that you see in the widget. The subtitle, title, text, separator enabler, and menu item options are all there. In the menu item options, you’ll be able to set icons, and add the name of the day, and the hours.
We added the content we prepared for the example, including the subtitle, the title, and the text. We removed two of the items and edited the contents of the remaining three.

Because we didn’t choose to use the separator, the remaining content options weren’t of interest to us, so we moved on to styling our working hours display. If you choose to use the separator, you’ll be able to choose its type and position, and later set the icon or image if you choose to use any.
Styling the Widget
Once you switch to the Style options, head straight over to the General Style option – that’s where you can change the background color of the widget. It’s not all you can do there, of course – you can set the type of the background, add an image to it, and pick the type of border, its width, and color.
We used the Classic background type and set its color to #072c8d before moving on to Item Style options.

The Item Style options are where you fine-tune everything there is about the items on your open hours list. You can set the icon color and size, change the color and typography options for days and hours, as well as adjust line and border type.
We made a couple of adjustments to the Item Style options. We’ve set the icon color to #ffffff, and its size to 15px. We set the same color for the day and hour letters, too. In the Hours Typography options, we set the size to 18px and the weight to 500. We chose the “between” for our line type, set the border type as dashed, its width to 1 pixel all around, and the color to #ffffff80.
For the final touch, we switched back to Content options and made a slight change to our third item, the one that shows Sunday open hours. We switched its color to #ffffff80.

Moving on to Text Style options – the section where you can choose the color, typography, and tags for the title and subtitle, as well as the color, typography, and underline options for the text.
We switched the title tag to H3 and its color to #ffffff. We chose H5 for the subtitle tag, #ffffff for its color, and 17px for its size in the Subtitle Typography options. We again chose #ffffff for text color and set 500 for its weight in the Text Typography options.

The following two sections, Separator Style and Separator Icon Style are where you can style the separator and its icon if you’re using them. We didn’t, so we skipped straight ahead to the Spacing Style options.
The Spacing Style options allow you to set spacing, paddings, and margins for the widget. You can choose how much space there is between the items, how much padding there is in the item holder, or the bottom margins for titles and subtitles.
We chose 23px for our spacing between items. We unlinked the holder padding values and set them, starting with the leftmost, to 63px, 60px, 63px, and 60px. We set 29px for the bottom title margin, and 32px for the top text margin.

With that, we’ve finished one-half of our open hours display. For the other half, right-clicking and duplicating the widget we’ve already made is a great way to kickstart its creation.
The changes we’ve made with the second widget include setting the color of the third item to #e35521, the background color to #fbf6eb, and the colors for the icon, day, hours, as well as the title, subtitle, and text, to #1e1e1e. For Line type, we set the color to #1e1e1e23.

If your open hours table doesn’t look exactly like this, don’t worry. Depending on the theme you’re using and its settings, your results might differ slightly. You should feel free to experiment with the setting and create the open hours display that suits your website the best.
WordPress’ Gutenberg editor is a powerful block-based tool you can use to create all sorts of pages for your website. In case it’s your preferred page builder and you want to use it to display your business’ open hours somewhere on your website, Qi Blocks for Gutenberg is just the plugin you’ll need.
With exactly 81 blocks, the full version of Qi Blocks aims to be your go-to tool for expanding Gutenberg’s native block selection. The blocks are sorted into usage-based categories such as WooCommerce blocks, typography, and showcase blocks.
The block you can use to display open hours, the Working Hours Gutenberg block, is a business block, and a premium one, too. This means that you’ll need the premium version of the plugin to be able to access this block. Once you’ve taken care of that part, and installed the plugin, open up a page or post. We’ll show you how you can use the block to create the same example we created using our Elementor addon.
Setting the Block Content
Before getting started, make sure you have two columns set up for the blocks. Adding the Working Hours block to one of them will immediately show you lots of sample content – title, subtitle, dummy content, and five items.

On the right-hand side, you’ll notice a bunch of content options, starting with the subtitle, title, and text. The first thing we did with the block was to replace the example copy with our own. For the Text field, which lets you display some text below the working hours table, we’ve used some code to create a clickable phone number that’s, for now, entirely invisible because it’s white.

Moving further, we’ve set the column responsive layout to activate under 680px. The next big set of content options is the item options. That’s where you set the days and the hours, but also the colors of specific items if you want them to stand out from the rest, and an icon.
We created three instead of the default five items. We added an icon to all of them, as well as the appropriate days and hours information. For the third item, we set its color to #ffffff80. That made it white and invisible against the white background we have at the moment.

That’s all the content setting you’ll need to create a working hours table like the one in our example. You’re free to add or remove items and change the copy to better reflect your business’ open hours, of course, and get ready to move on to styling your open hours display.
Styling the Block
A great place to start styling the Working Hours block is Style > General because that’s where the background options are. You’ll be able to choose between a classic background – a solid color or an image, and a gradient background with lots of interesting settings.
For our example, we used the classic background, and set its color to #072c8d.

Back to Style > Item options, and you’ll see that every element of the item – the icon, day, hours, and line – has its own section of options. This is where you can set the size and color of these elements, as well as other styling and typography options where appropriate.
For the icon options, we changed the color to #ffffff and the size to 15px. We then moved on to day options, where we changed the color to #ffffff. For the hours, we set the color to the same white using the hex code #ffffff, but we also used the typography options to change the font family to DM Sans, font size to 18px, weight to 500, and line height to 26px.
As for the line options, we set our border to be solid and its color to be #ffffff80.

Moving on to Style > Text options, you’re able to set up options for the title, subtitle, and text of the block. The options you have at your disposal are the ones you need to style text – tags, typography, and color options.
For the title and subtitle, the only changes we made were to switch their color to #ffffff. We used the same color for the text, too, but we also set the weight to 500 in the typography options.

The final set of Style options is the Spacing options. Whatever spacing, padding, and margin you want to add or tweak, this is where you’ll get to do it. More specifically, these are the options where you can set the space between the items and the item and holder padding, as well as the subtitle, title, and text margins.
For our working hours block, we set the space between items to 23px. For the holder padding, we entered the following values from left to right: 63px, 60px, 63px, 60px. We set the title margin bottom to 27px, and the text margin top to 32px.

That’s it for the first of the two blocks. The easiest way to create the second would be to duplicate the first block, move it into the column to the right, and then just change the colors.
That’s exactly what we did. In the code we used to create the phone number in the text – that’s in the Content options – we set the color to #1e1e1e. We removed the icons from the items and switched the color of the third item to #e35521.
Moving on to the Style options, we changed the colors for the day and the hours to #1e1e1e, and for the border under Style > Line to #1f1f1f33. We switched the background color to #fbf6eb. Finally, under Style > Text, we changed all colors to #1e1e1e.
We suggest using the Business Hours Indicator plugin, and we will be showing you around its free version.
The first thing you need to do is install the plugin on your WordPress website.
Once the plugin is installed and activated, you’ll need to configure it from its settings screen.

In the general tab, select the time zone you are operating in from the time zone menu. We picked Belgrade. Then, select the time format you wish your hours to be displayed in. Choose between 12 or 24 hours. We chose the 24 hour format.

Next, go to the hours tab. Click on the add location button to create a new shop location.

Now it’s time to name your shop. We named our shop Bridge_Shop for this example. If you want to rename the shop you have to delete and recreate it, using the X button on the right.

Your shortcodes will use this name to display the opening hours you just set. If you have multiple shops, you will have to create separate locations for each one of them. If you have different opening hours in different time zones, this is a feature you might especially want to take note of.
Once you create your shop, you will see that you have some new options (edit hours, holidays, and vacation).

First, we will set up the regular hours using the edit hours option. Set up the opening hours using the menus for each day. When we are done, we will click the done button in the lower left. Note that leaving the hours for a day blank will mark the shop as closed for the day with no special settings required.

Back on the hours tab, use the holidays option to set up special hours during the holidays.

Say Bridge_Shop is not open on December 25th and January 1st. You set that up by simply selecting the date from the menus on the left and leaving the times blank, then clicking the plus button on the right to add another day.
Say Bridge_Shop opens for 4 hours every January 2nd. You may set that up by setting the date using the menu on the left and the time using the ones on the right.

Again, when done, we will click the done button in the lower left.
Next, selecting the vacations option, we will set up days off for Bridge_Shop. Simply mark the days off interval using the date menus and clicking the plus button on the right to add as many intervals as necessary.

Once more, when done, we will click the done button.
Now we have set up the regular hours, holidays, and vacation days for Bridge_Shop.
You can always go back and reedit them, because holidays may change date, and vacations even more so.
Selecting the indicator tab, you will find several options for the open/closed indicator.

You may want your visitors to know at a glance whether a store of yours is open or closed. This is also a good chance to personalize your website, make it less generic. We will edit the open and closed messages using some HTML (we’ll add a <b> tag for bold and the closing tag </b> to end the bold section) for emphasis.

You can see the effect in the example window on the right-hand side.
This indicator tab also includes the time and day options. You may check them if you want your visitors to see the current time and day for your shop, dependent on the time zone. If you have set up your “open” and “closed” indicators, they will be active during holidays and vacations.

The final set of options is the opening/closing soon notification. When checked, this box opens a set of very useful options.

You may want to indicate if your shop opens or closes soon. You may also choose to personalize these messages, as we have. Be careful to use an X between curly brackets for the number of minutes before or until closing time. You can see an example in the picture below.

Next, we get to the table tab.
The table tab is used to customize the appearance of your opening hours on your website. You may choose to display your opening hours in different ways dependent on the website’s layout.
The normal display mode simply lists opening hours for each day.

The consolidated display mode conflates all the hours in consecutive days which share the same opening hours.

The table display mode shows the opening hours as a table, but if you want an inline view, you have the inline mode. This works better if you want your opening hours to fit a horizontal bar, say.

You may also want to display vacation times and holidays at all times. You can do this using the provided checkboxes.

Finally, we come to the nuts and bolts: the codes tab. This is where you can copy your shortcodes and paste them to where you need them.
There are several shortcodes to choose from. The one we are most interested in here is the overview shortcode, but you can use these all over your website. You may, for instance, choose simply to display the open/closed indicator as a welcoming message in individual posts.

We have now configured the plugin and familiarized ourselves with its options. There are many ways in which we can use it to display our opening hours on our website’s front end.
Using the Plugin with the Gutenberg block editor
Here is how to display your hours in a post using WordPress’s default Gutenberg block editor. First copy the business hours shortcode from your plugin’s codes tab, and open a post you are editing.
Click the plus sign in its top left corner to open the block picker. Now search for the shortcode block, and add it to your page.

Paste your shortcode into the block.

Remember to change “your location name” to the location you want the hours of to appear in a post.

To see if your opening hours have been displayed correctly, click the preview button in the upper right.

And that’s all there is to it. Now we’ll take a closer look at how to do the same using the Classic editor.


Using the Plugin with the Classic Editor
The first thing you need to do is install and activate the Classic Editor plugin.

Next, after having configured your Business Hours Indicator plugin, you need to go to its codes tab and copy the shortcode you want.

Say you want to display your working hours as a post. Simply go to your post editing screen and paste it where you want to see it on your page.

Remember to edit the shop name in your shortcode (change it to your location name.).

You can click the preview button to see how your opening hours will appear on your website.

Now you know how to display your opening hours in a post. You might also want to display it as part of another element of your website, such as the header or the footer.
Displaying Open Hours in the Footer or Headerr
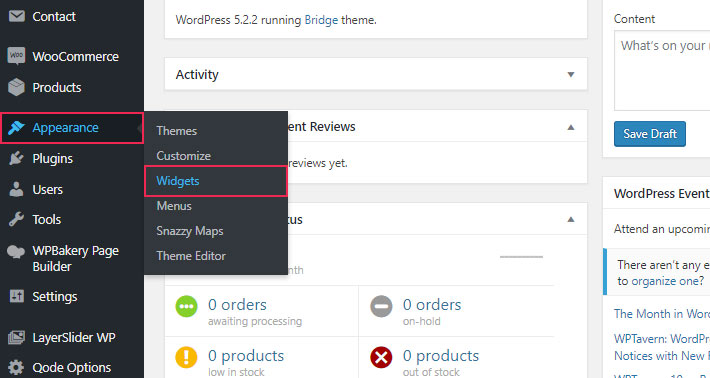
If you want to display your opening hours in your website’s header or footer, or indeed any other widget area on your site, simply go to the Appearance > Widgets screen of your WordPress dashboard.
The next thing you need to do is find a place for your widget. We have selected the third footer column widget area.

You then need to find your Business Hours Indicator plugin in your Available Widgets library. Select [BHI] opening hours overview, and then choose Footer column 3 from the drop-down menu, and add it.

Your plugin will now be shown in the footer. If you have multiple shops, remember to pick the one you want to display the opening hours for. You can change shops in the Locations dropdown menu.

You may also want to add a title to your widget section, making it stand out more.

Now, in the same space on your footer, you can add another widget – your “on open” message, for instance. Repeat the above steps to place the widget in the footer.

Since the entire section already has a title, we will only input the message itself. When the shop is open, the message will be displayed.

When the shop is closed, no text will appear in the footer underneath the opening hours overview.
Here is an example of how your footer may appear to the visitor now.

Of course, you may be using Elementor, the visual page editor for WordPress. Not a problem: displaying your opening hours is even easier in Elementor.
Using the Plugin with the Elementor Page Editor
After you install and set up the Business Hours Indicator plugin, copy the shortcode you need from the codes tab.

Then, access the page you wish to edit. Click the Edit with Elementor button.

Find the shortcode widget in your left-hand side menu (you should find it under the general heading).

Drag it to the desired location, in this case, the post main body.

Paste your shortcode in the shortcode field, and you will see it in the preview section. Remember to change the name of your shop to a location name (in this case the name we used is “Bridge_Shop“), and the plugin will draw all your configuration data for that specific location.

One you are done with that, the business hours will be displayed in Elementor’s preview screen.

Still, Elementor’s way is not the only one. WordPress’s versatility means that you can do much the same things using different page editors.
Using the Plugin with the WPBakery Page Editor
If you are using WPBakery, you still need to install and configure the Business Hours Indicator plugin to display your opening hours. Copy the shortcode you need from the codes tab.
Then, access the page you wish to edit. Click the WPBakery Page Builder button.

You should be seeing the WordPress classic mode. In order to edit with Bakery, you need to click the Backend Editor button.

Next, you want to add an element.

Since we are adding a shortcode to the page, the element you want is Raw HTML.

In the element editor, you can simply paste the shortcode you have previously copied.

You still need to change the location name to match one of the locations you have configured.

And your opening hours will be displayed.

The same goes for all of the other shortcodes. In this case, we are only showing you the business hours overview, but you may choose to use any of the plugin-provided shortcodes here.
And you are done! Now let’s see how you can use your theme’s features to display opening hours on your WordPress website.
In Conclusion
As we have shown, there is a variety of ways to inform your visitors of your opening hours. An overview of opening hours is always useful, but you can also, say, tack on an “on open” indicator to any of your menu item pages, prompting website visitors to sample your offers immediately. Or maybe you have a clickable phone number, and would like to indicate that you will not be immediately available: easily done with an “on closed” indicator right underneath your phone number.
And even if your store is closed, a welcoming “you could be enjoying yourself here in X minutes” message might turn out to be the difference between a website visit and a real life sale.
With so many easy ways to do it, and so much potential improvement to your visitor experience, there is no reason why you shouldn’t display your opening hours on your website.
