How to Create an Email Newsletter

Email has been around for a long time – in fact, chances are it is older than you. It‘s gone a long way since its inception, but the basic mechanisms are still there. It shouldn‘t surprise you, then, that it also has a long history of use in marketing, and that email marketing still endures. In fact, for a lot of businesses and other online services email is still an irreplaceable tool.
Newsletters are among those email-based services, and, in this tutorial, we will show you how to easily create an email newsletter. But not only that: we will first take some time to discuss what an email newsletter is in the first place, and how your WordPress website can benefit from it. If you are already aware of the importance of this marketing tool and only want to know how to create a newsletter, feel free to scroll right down to the section you need.
Here‘s what we would like to talk about:
An email newsletter is basically an emailed news update. It is often used by businesses or media, but also by online communities, fan and hobby associations, and similar.
Typically, a person has to subscribe to a newsletter to receive updates. They usually do this using a form to submit their email address. In the context of marketing, users who submit their addresses are referred to as leads or contacts.
A business will typically use a newsletter to advertise new additions to their stock, special offers, events, and similar, while an online community might also use them for special events notifications, a fan association might share news from other media, a podcast might notify subscribers about new episodes and so on.

Do you remember which websites hosted the last five or so articles you found interesting or helpful? Possibly, if you keep returning to them or if you have to follow them for professional reasons. A lot of your visitors may find your content interesting in the long run, but the first thing that hooked them will have slipped their mind.
Not so if you prompt them to subscribe to your newsletter. You will be keeping your content fresh in their minds, while at the same time supplying them with news on your activities, your content, your stock, your special offers, and everything else they chanced upon your website in the first place.
Not only can you use your newsletter to keep visitors coming to your website, you can also use it to grow your community online and off, as well as your social following.
We have so far been concentrating on the business side of things: a store might send a catalog of new items to entice regular shoppers, and any business might alert interested parties to special offers. Why a news website might want to reach out to followers by email is self-explanatory: discerning readers will appreciate a news digest. A non-profit might want to publicize an event such as a fundraiser or a donation drive, while a fan association might want to publicize a convention or an online event. The why is not related to the type of online activity.
What‘s more, email is personal and independent of any other media. Only the people who subscribe to your list will get your emails, but they will get all of the content you wish to send their way – no chance of their missing an important update.
So, if you keep your emails interesting and on-topic, they will not languish unopened and unread in inboxes, and your visitors will appreciate them.
Best Themes for Marketing
View Collection


Now, as we are about to show you, sending out a newsletter is easy enough. But to make it truly effective, you have to be reasonably certain your subscribers will actually read it. There are no magic formulae which are guaranteed to work, but here’s a list of tips we find useful in this respect:
-
Use a compelling subject line: whether your subscribers click on it or not, they will likely at least read the subject line.
-
Format your emails with accessibility in mind: what goes for your website, goes for your newsletter, too. Use best practices in accessibility.
-
Use targeted lists: all your content may not be for everyone. Targeted emails will keep them from appearing random and generic to your audience.
-
Use personalization: your audience will appreciate a personalized subject line. Customize it to be as formal or informal as it suits your brand.
-
Be mindful of the frequency of your emails: Send them too often, and it might seem annoying.
-
Maximize the effectiveness of your CTA. Use best practices in creating a call to action where appropriate.
-
Keep them coming: be consistent and regular. If your emails are informative or entertaining, your subscribers will look forward to receiving them even if you are not advertising anything specific.
With all that in mind, let’s get into the details of how to set up an email newsletter.
The simplest and quickest way to set up and send out email newsletters is to subscribe to a newsletter service. You could try doing it all by hand, old school-like, but then you risk running afoul of an overzealous spam filter, not to mention that it would take an inordinate amount of time if you have a lot of addresses to send to and especially multiple recipient groups to cater to.
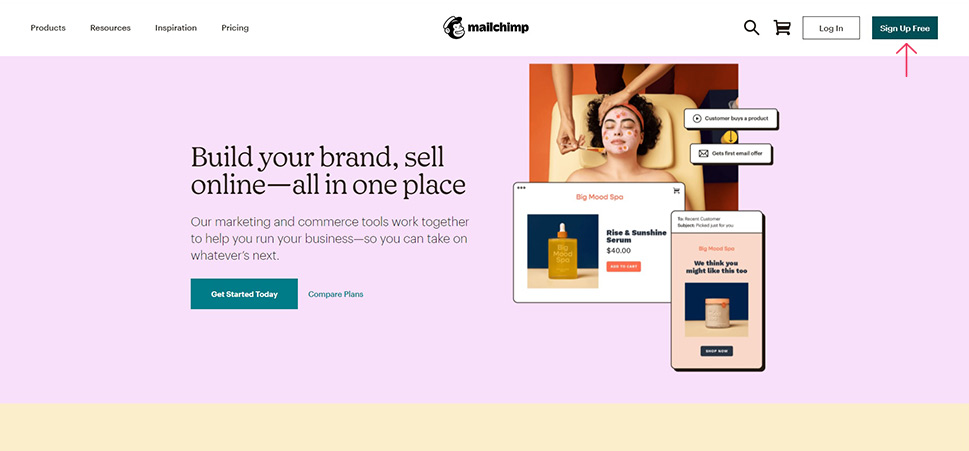
There are tons of these services around, but, from our experience, the best option for most small to medium-sized websites is Mailchimp. Mailchimp is an email marketing service, but it has all sorts of other functionalities. All you need to do to get started with Mailchimp is create an email account. You can use literally any email account you like, but there are some limitations if you choose a free email provider.
Once you have an email account, go to Mailchimp‘s home page and click on Sign Up Free.
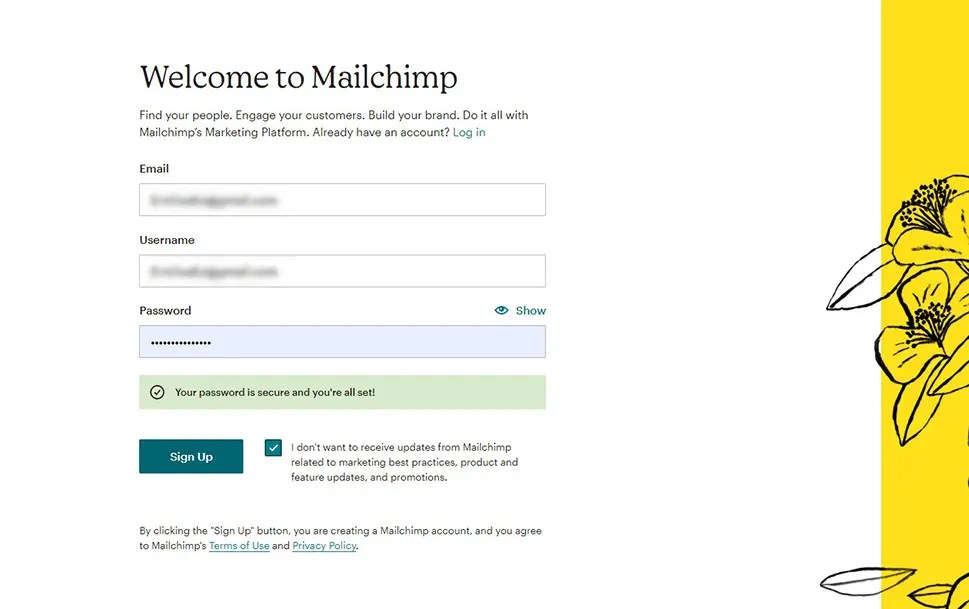
On the next screen, enter your email address, and user name, then choose a password, and hit Sign Up.
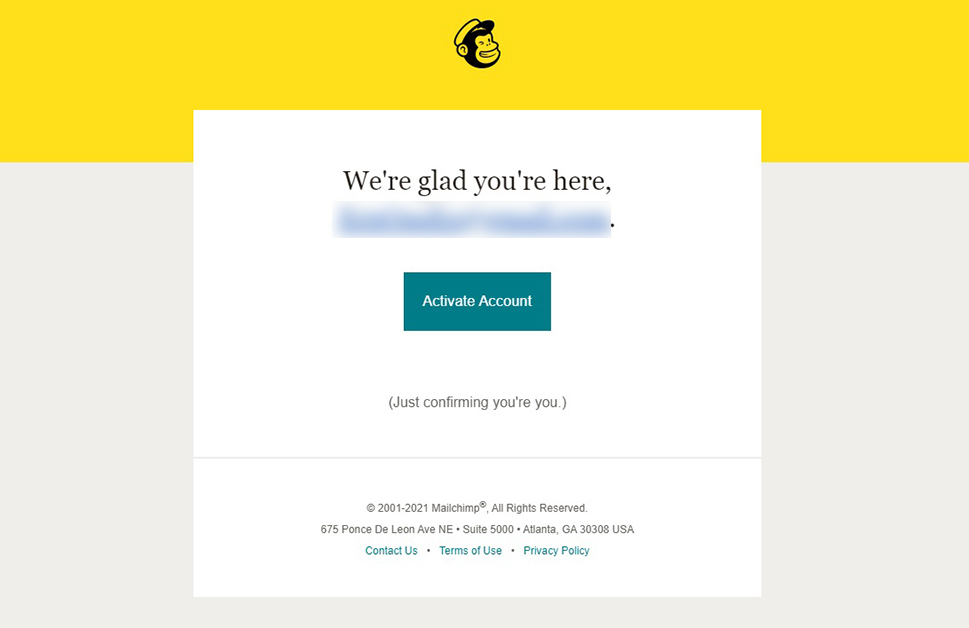
You should get an email from Mailchimp at this time. Open it, and click Activate Account.
You will then be taken to another screen where you need to click I‘m Not A Robot.

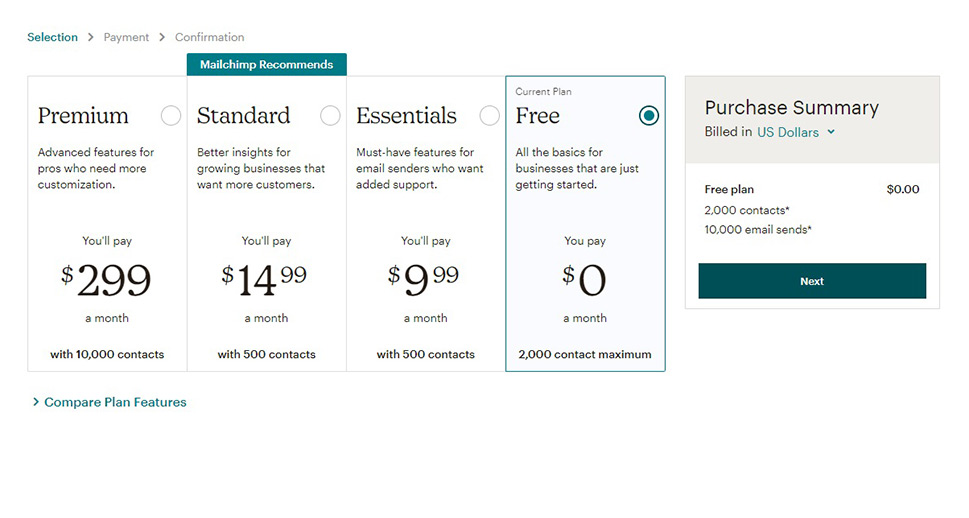
On the next screen, choose a plan. We will go with a free plan for the purposes of this demonstration. When ready, click Next.
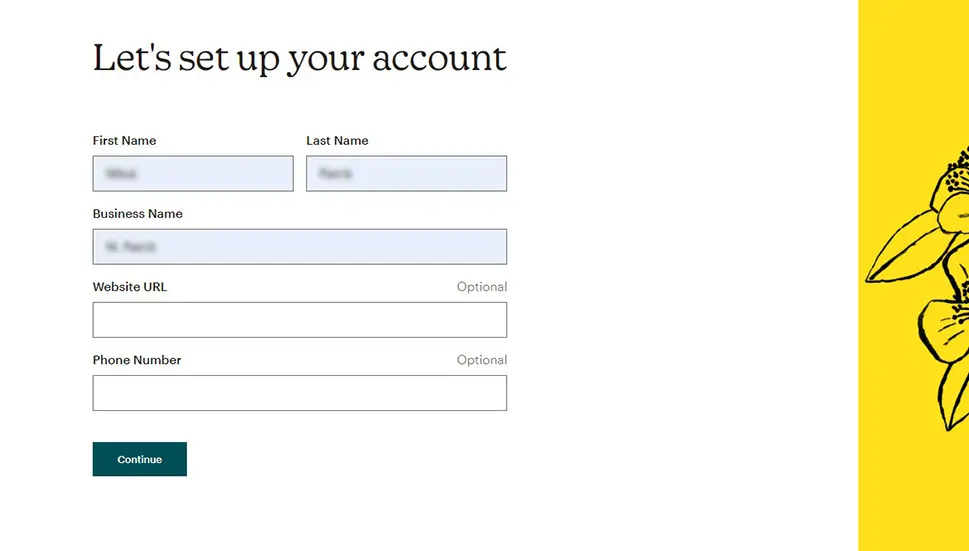
Next, you need to provide Mailchimp with some of your business data. First, it‘s the name and business name, and, optionally, website and phone number. Click Continue.
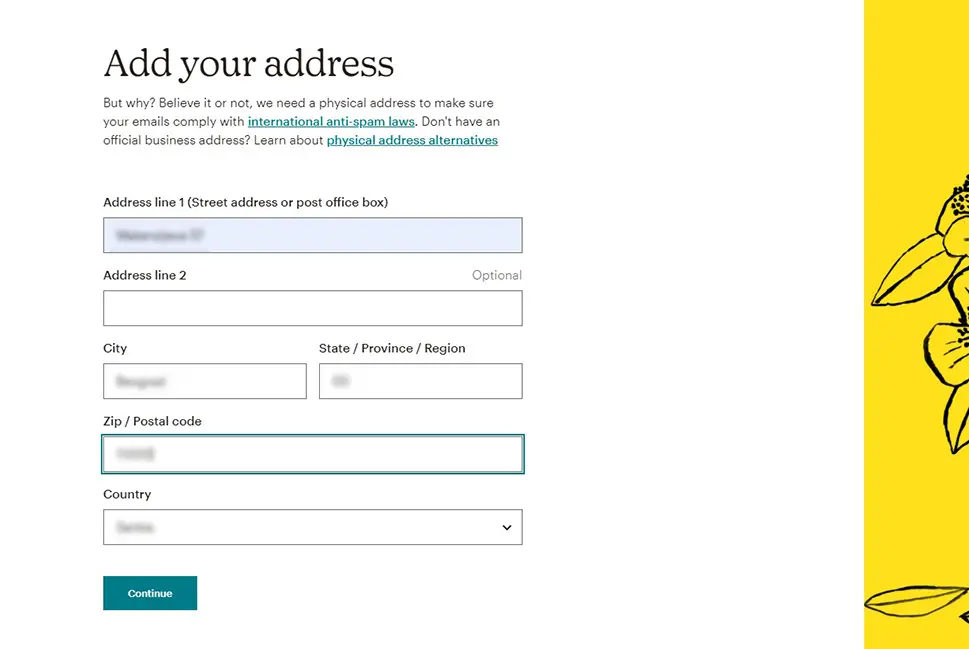
On the next screen, you need to enter your physical address. Once you have done that, click Continue again.
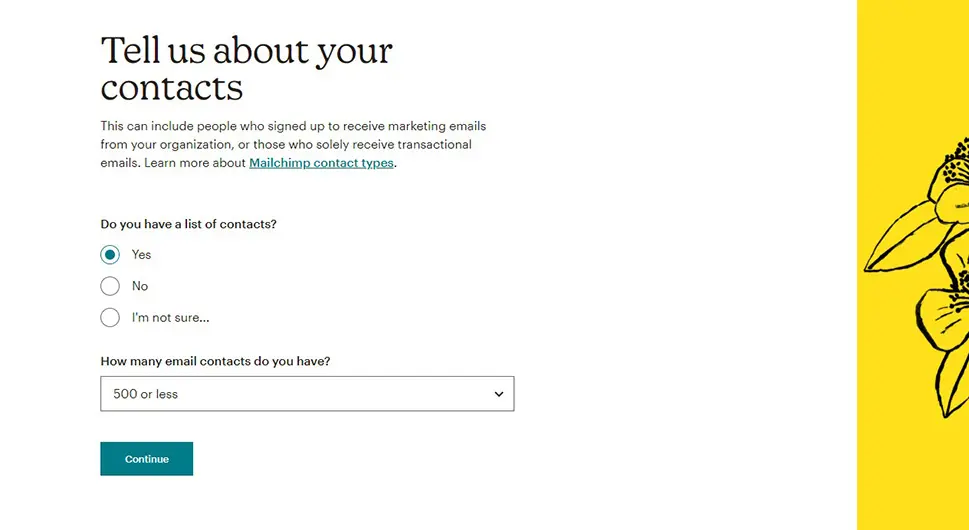
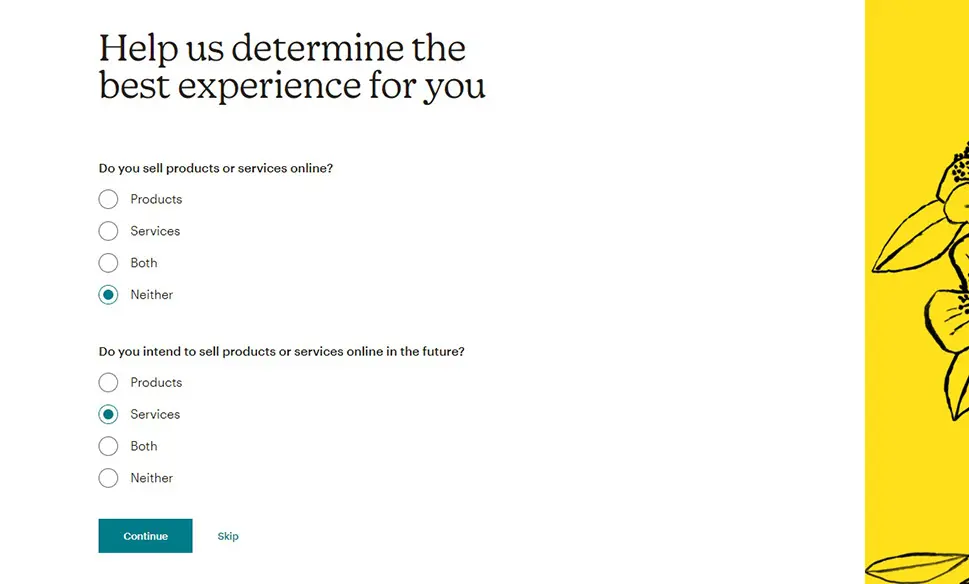
On the next screen, you need to enter the data on your contacts. Answer to the best of your abilities, then click Continue.
You will then be prompted to answer whether you are or will be selling products or services. Answer and click Continue or just Skip this.
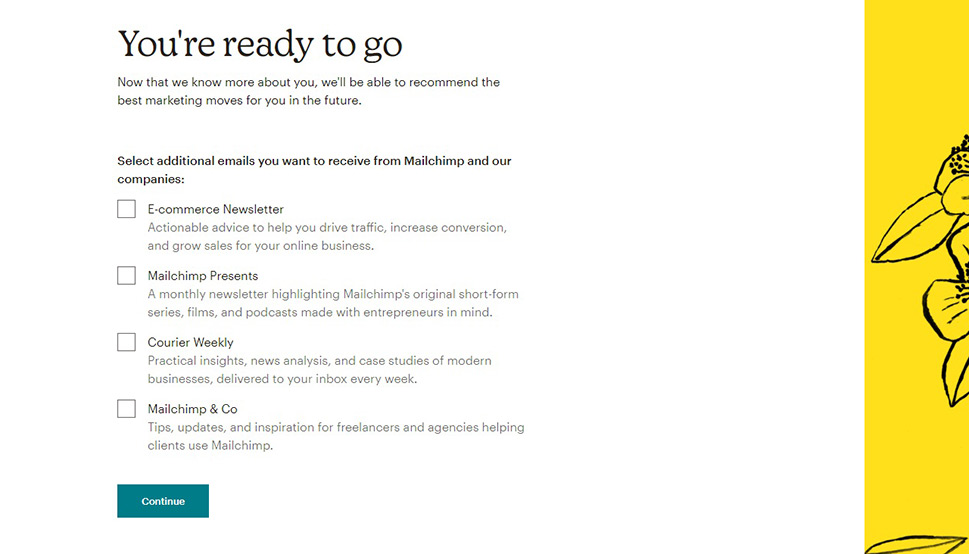
Finally, you can subscribe to additional Mailchimp services if you like, and then click Continue.
Now, Mailchimp is a service with a lot of functionalities and a lot of possibilities for integration with WordPress. Using Mailchimp with WordPress is a topic all its own – and this is why we covered it in a different article. In this article, we will concentrate on sending out a newsletter, but you should know that Mailchimp is a powerful toolkit.
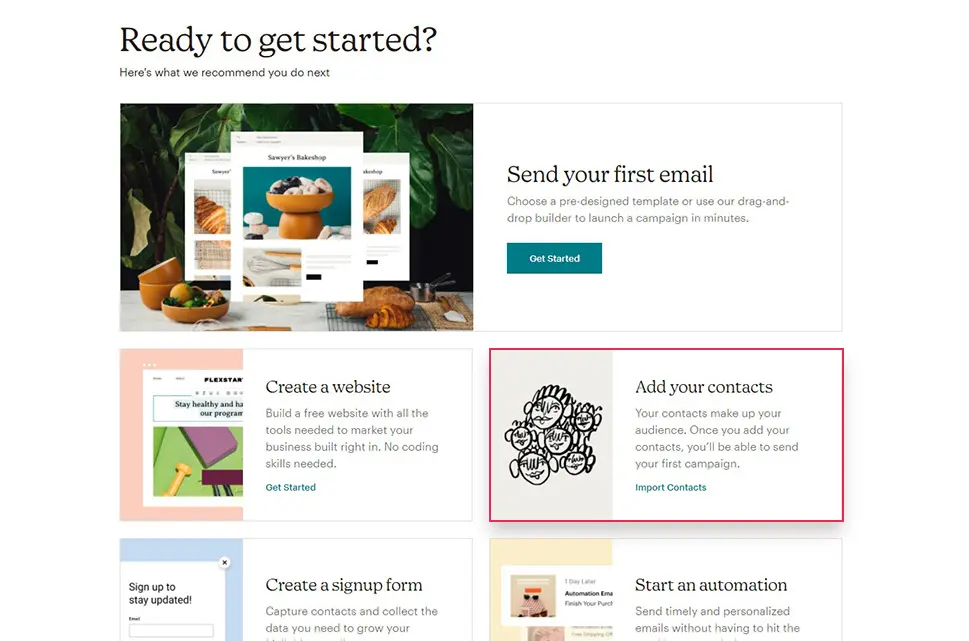
In order to start sending out your newsletters, you first need some addresses to send them to. In order to import your list of contacts, find the import link on your Mailchimp admin screen.
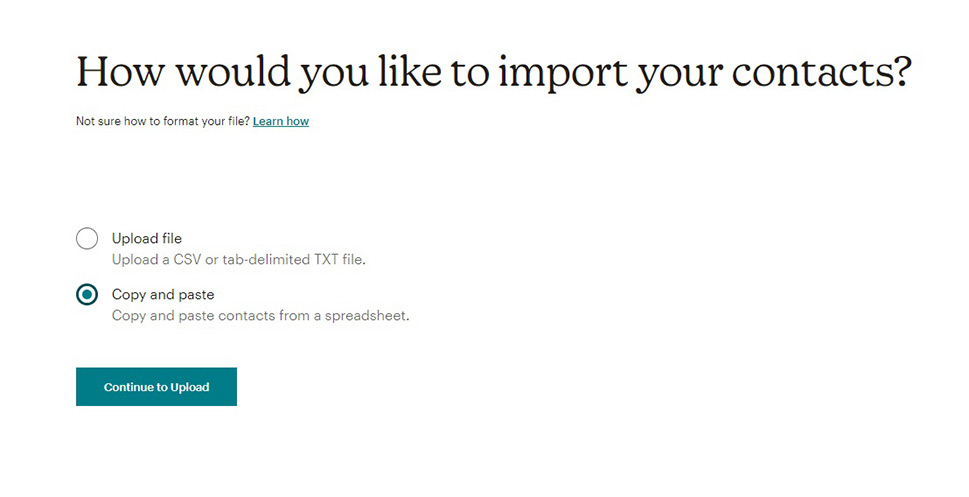
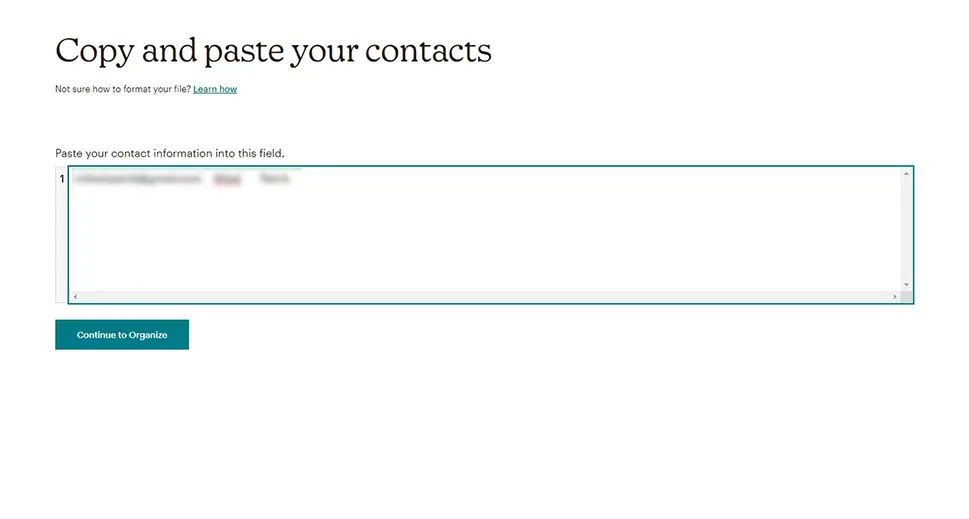
On the next screen, select the upload method of your choice. You can upload a file provided it is properly formatted, or simply copy and paste your list of contacts from a spreadsheet, which is what we‘ll do. Click Continue to Upload.
In order for Mailchimp to work with your contacts list, it has to be correctly formatted: as a spreadsheet, with an email address, first name, and last name. Select and copy all the personal data.
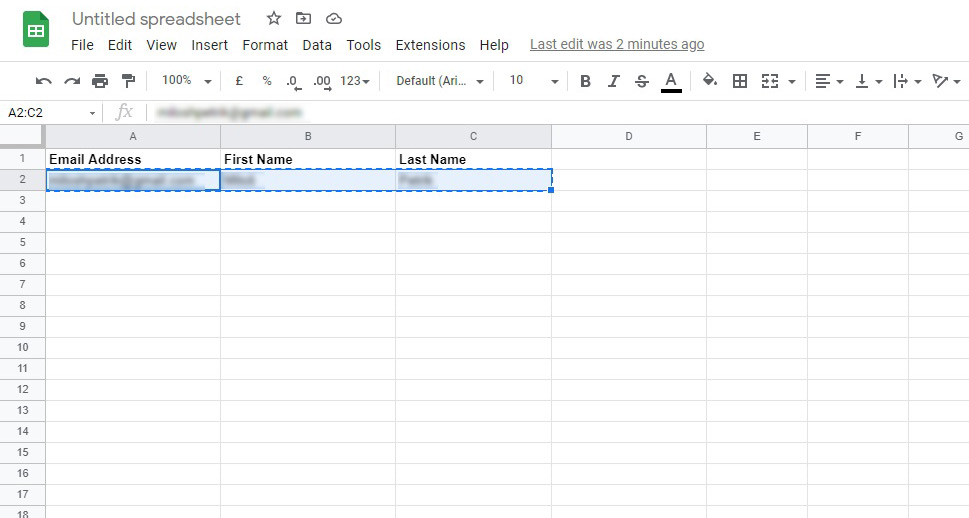
Paste the email and address data into Mailchimp‘s field, and click Continue to Organize.
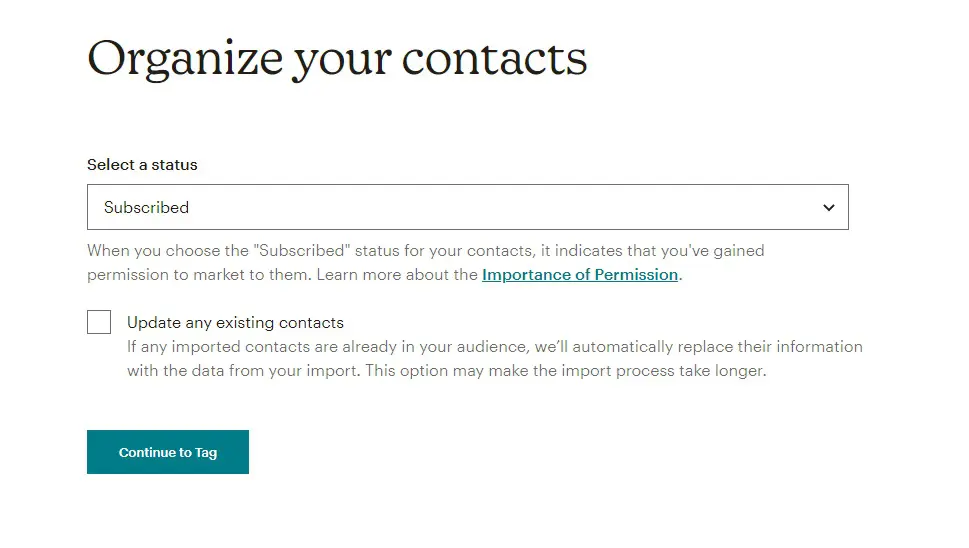
You next need to add these contacts to a list of Subscribed contacts by selecting that option from the drop-down menu and clicking Continue to Tag.
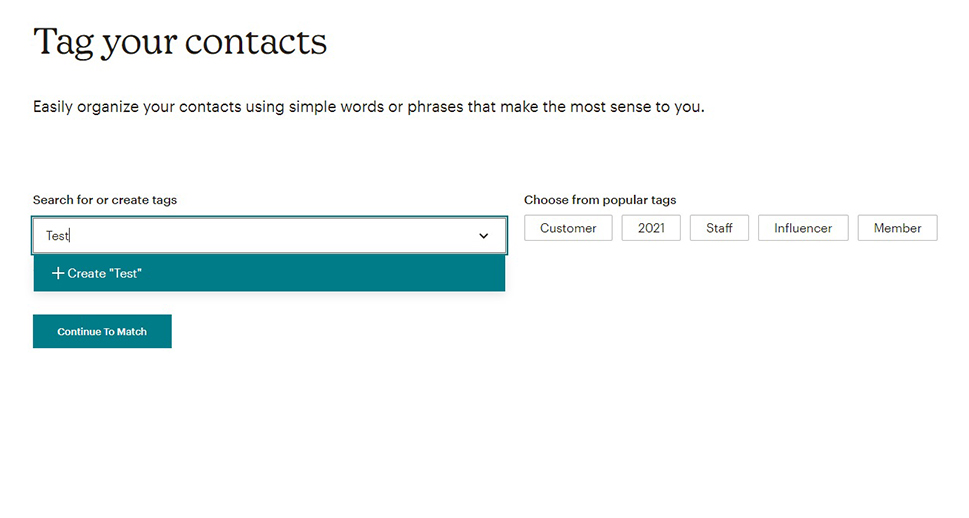
Here you can tag your new contacts to make sense of them and make grouping them easier. You can enter any tag, and you even have some suggested tags on the right. Once done, click Continue To Match.
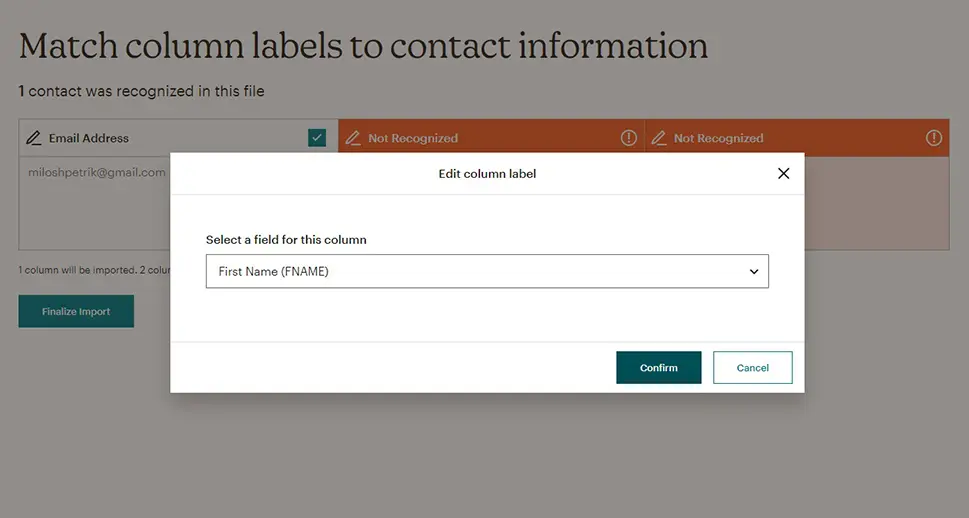
Next, you need to match the data which Mailchimp doesn‘t recognize by default or else choose not to import it. When it comes to columns containing names, for instance, Mailchimp has no way of attaching any significance to the data. You can do this yourself by clicking on any Not Recognized column and assigning it a label, such as FNAME for your subscribers‘ first name. When you choose the correct label from the menu, click Confirm, and then Finalize Import when satisfied.
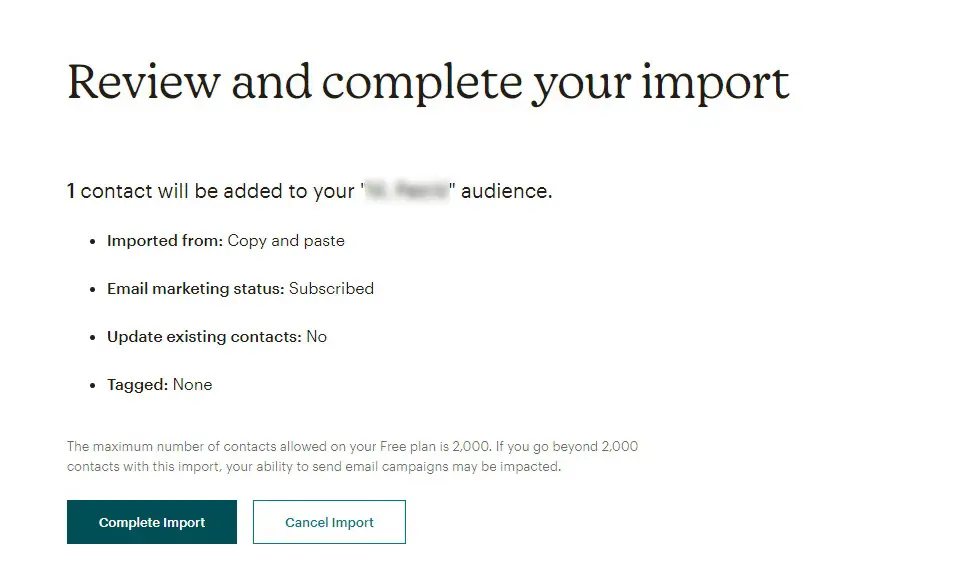
You will then receive a report for review. If you are satisfied, click Complete Import. If not, you can Cancel it.
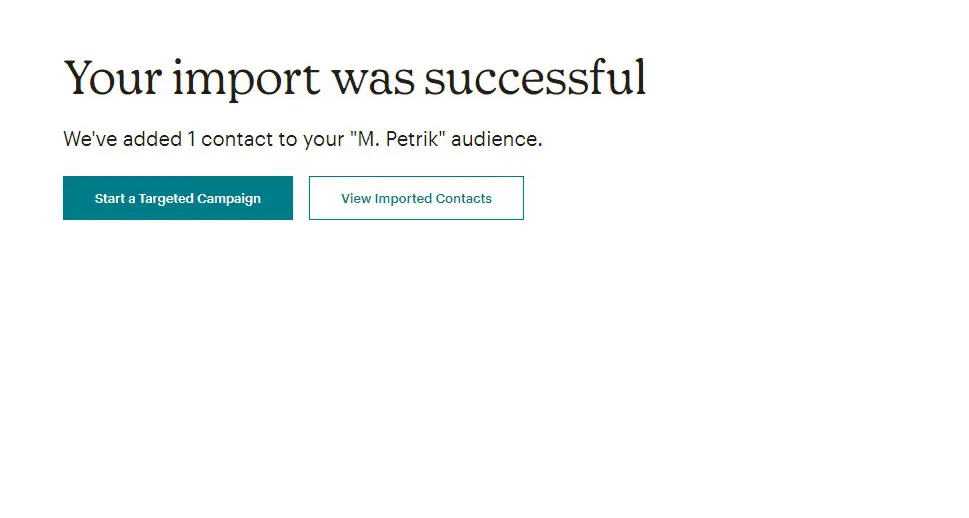
We have used only a single contact for this demonstration. Of course, you can add as many contacts as your plan will allow. Once you have a list of contacts, you can Start a Targeted Campaign.
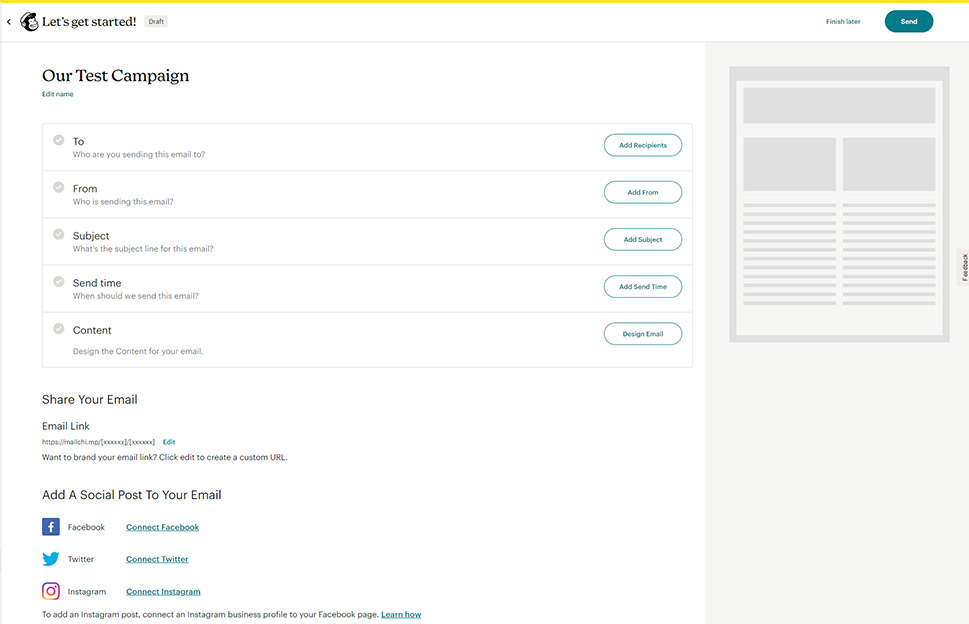
Once on the campaign screen, you can finally start sending out your newsletter. First, give your campaign a name by clicking on the Edit name.
In the To section, select the intended audience for your contacts. You can do a lot to filter and select contacts among your contacts. You can also personalize your messages using data which your subscribers have submitted. In our case, the *|FNAME|* tag which corresponded to one of the columns we matched above.
The From section should hold a name of the sender (the default is yours, but you can actually use an assumed name), and an email address.
The Subject section should contain, most unsurprisingly, the subject of your email, and a preview which will appear to the recipient.
Here you’ll also set the send time for your newsletter.
Once you are satisfied with this, it‘s time for the content of your email. Click Design Content.
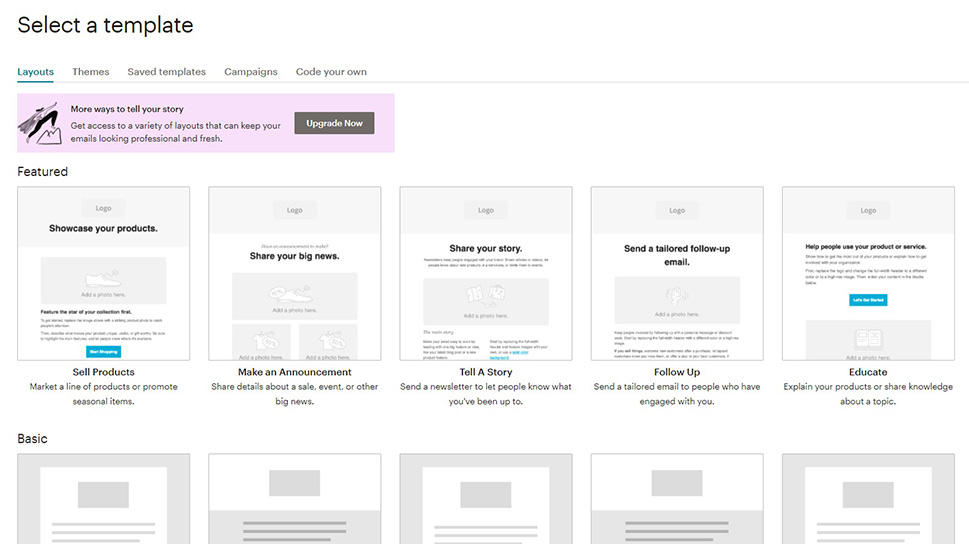
On the next screen, select a template from the available selection. We have gone with 1 Column – the first option in the Basic section, but you can choose whichever one best suits your needs.
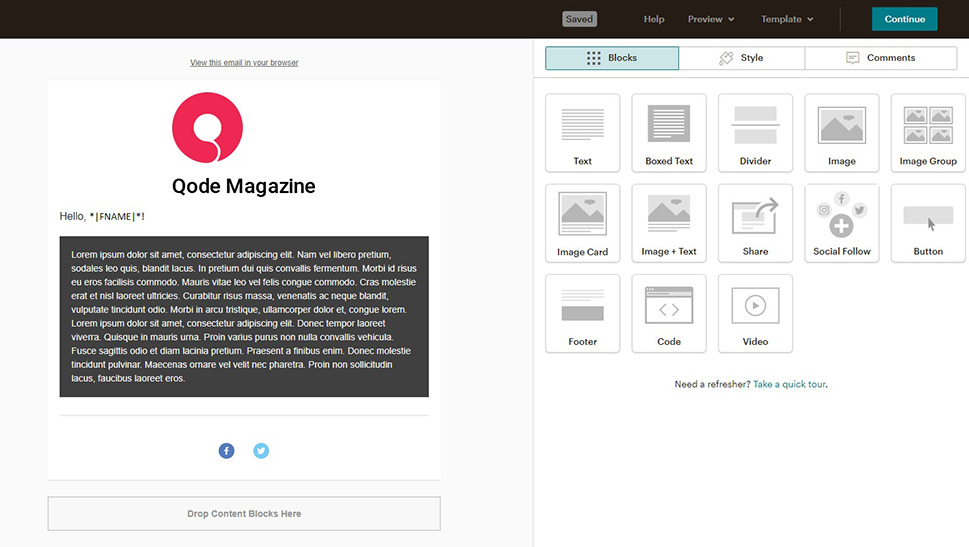
Having selected a template, you will be taken to the email block editor. Use the blocks in the right-hand side menu and edit them.
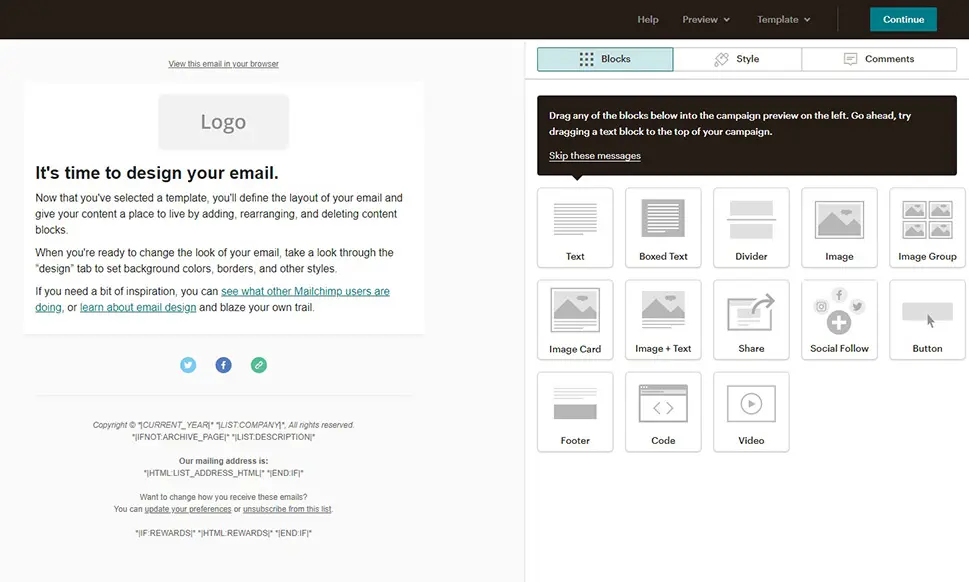
We have deleted all the placeholder blocks, and then added our logo as an image block, a personalized message using the *|FNAME|* tag, a boxed text block with some Lorem Ipsum text, a divider, and a social follow block with a Facebook and Twitter icon. Of course, this is just one of the literally unlimited number of options available.
In the menu on the upper right, you can choose to Preview this email in various circumstances, or choose a ready-made Template or save your template for future use.
Once you are satisfied with your settings, click Continue.
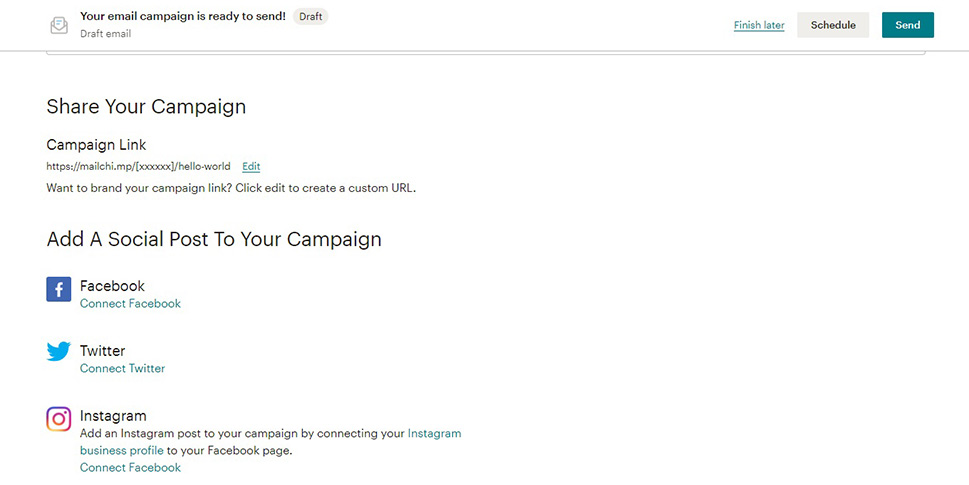
Back on the campaign screen, you can give your campaign a link by clicking Edit next to the Campaign Link section. This is useful if there are more contributors to the campaign.
Next down, you can connect your social networks (Facebook, Twitter and Instagram) to your campaign.
Finally, you can choose which activities you will be tracking and how your content will behave in the Settings & Tracking section.
We will not be using any of these settings at the moment. Once you are happy with your settings, click Send.
And that‘s it! Your newsletter is out!
Newsletter signup spam happens when bots fill your subscriber list with fake or dummy email addresses, artificially increasing your list and raising your newsletter service costs, since with more subscribers you have to pay more money, too.
There are several ways to prevent this. Mailchimp itself, being a reputable newsletter service, offers double opt-in as a way to prevent spam subscriptions. This process includes two steps: in the first one, the user fills in and submits a subscription form. In the second step, he or she receives a confirmation email with a link that needs to be clicked in order to confirm the subscription.
Check to see if the double opt-in is selected in your Mailchimp settings and, if it’s not, toggle it on. The settings for customizing the double opt-in are located in the Forms and response emails section of the form builder. Note that this option is only available for Mailchimp subscription forms, and that the EU-based subscribers will probably already have double opt-in enabled as part of their privacy settings.
Another thing you can do to prevent spam subscriptions is to add CAPTCHA. We’ve written an extensive tutorial on adding CAPTCHA to forms in WordPress so make sure to check it out.
Finally, if you want to make sure all your contacts are valid, there’s an excellent tool you can use. Emailable parses your subscribers base (and very quickly too – up to eight times faster than the competition, or so they claim). This tool removes duplicates, filters out temporary and disposable addresses and verifies if the addresses are stilla active. All this can drastically improve the deliverability of your email campaigns and reduce bounce rates.
In Conclusion
We‘ve led you step by step towards the creation of an email newsletter. It takes some little setting up, but it‘s really not that much of a problem. The hard part is up to you: people will be submitting their email addresses to you, and they will be expecting relevant, high quality content. You need to deliver on that. What good would it do you to create an email newsletter, if nobody is going to bother to register for it or read it?
