How to Add a Line Break or Single Line Spacing in WordPress

Your visitors come to your website for your content, that much is a given. But there are many factors which affect the visitors’ impression of your website, and one of them is how your content looks. WordPress’s default editor, Gutenberg, had introduced some novelties in terms of text formatting, but adding a line break at the click of a button is not among them. This doesn’t mean that there is no way to generate a line break in WordPress. In fact, there are several, and we will go through them in this tutorial.
There is a thing you should bear in mind: a lot of the look of your website text is dependent on the theme you are using. Whether you are trying to change your text color, increase or decrease font sizes, or introduce a line break or line spacing, you may find that the theme is hindering you, or that some of the solutions we will offer you do not work equally for all themes.
Here’s what we will be discussing:
If you are using a word processor (or the Classic WordPress editor), you can typically use the Enter key on your keyboard when you want to introduce a new line. In Gutenberg, the same key will just generate a new paragraph block. If you want to add a blank line between two paragraphs, your theme will likely already be configured that way. Most themes have a blank space between paragraphs by default.
We will begin with a simple text post, populated by some randomly generated text. To create a line break, simply select the place where you want to end the top paragraph.

Once you have done that, hit Enter. You will have generated a new paragraph block.

A theme will typically interpret this automatically. In the live version of your post, you can see a line break between the paragraphs.
The same works for Elementor when typing in the Text Editor element’s text field.

You may, for whatever reason, want to begin writing in a new line without a line break. You can do that by placing the cursor to where you want your top line to end and hitting Shift + Enter.

You will find that the text after your cursor begins in the next row, but forms part of the same block.

Again, the Shift + Enter command works the same in Elementor’s Text Editor element.
CSS, or cascading style sheets, is the part of your theme’s code which governs the way your text looks, among other things. If you want to manipulate your theme’s default options, you will need to add some custom CSS to your website.
The value we will be using here is the em. In typography, em originally meant the width of the capital M for any given typeface, and that’s where we get the extra wide em dash (—) from.
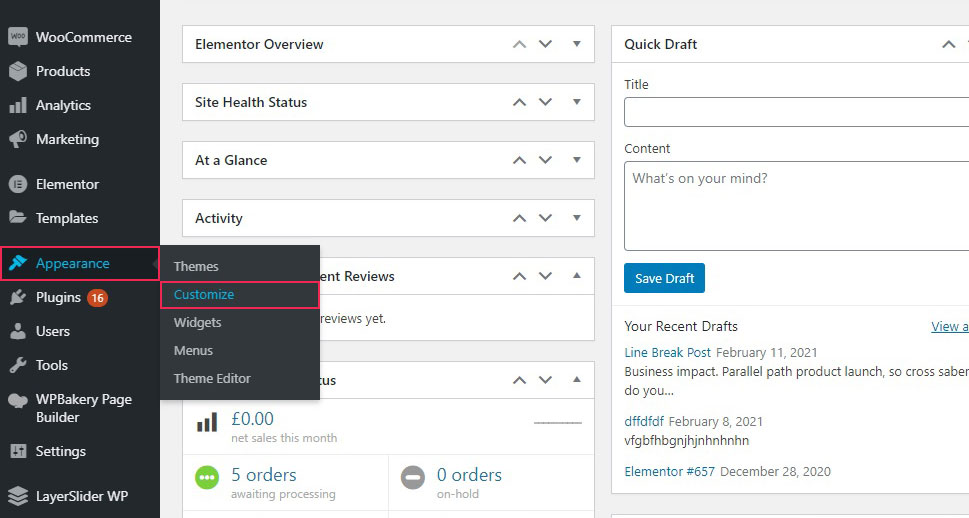
In order to add CSS code to your theme, you need to access your theme customizer. Navigate to it from the left-hand side menu on your WordPress dashboard: it’s at Appearance/Customize.

Next, click the Additional CSS bar in the left-hand side menu.

In order to change the line spacing, the code you need to enter is p{line-height: Xem;}, where X is the number of ems you want to reserve for each line. See how the line spacing changes if we switch our line height to 3 ems.


Now, in order to change paragraph spacing (the space between paragraph blocks), you need a different piece of code. Use p {padding-bottom: Yem;}, where Y is the number of ems you want between paragraphs.
You can, of course, use either or both to style your website’s text however you like it. You can also replace em with px in your code if you want to enter values in pixels.
In Conclusion
As we have shown, you can tweak your line spacing and paragraph spacing in WordPress pretty much however you like, provided it meshes well with your theme. You can do it irrespective of the editor you are using, and in no time at all, for a single paragraph or all of them across your website. Bear in mind, though, that not all settings will work for all colour palettes and text layouts. It’s up to you to make sure your text formatting settings make your text as legible as you can for your visitors.


