How to Add a Free SSL Certificate in WordPress

Any internet user has, at one time or another, come across an insecure site while browsing. Depending on the website, there could be a small notice next to the site’s URL – “Not secure” or a red, warning page. Such a sight can scare users and make them think that their data might be stolen or that they might have acquired some malware. As such, visitors quickly turn away from or leave such sites and they usually never try to access them again. To address this issue, most webmasters have opted to add an additional security layer to their sites in the form of SSL certificates. In fact, adding SSL is a must, no matter if you are a beginner or an advanced WordPress user. Therefore, we decided to make a guide explaining how to add free SSL in WordPress quickly and easily. Please note that this guide is aimed mostly towards beginners, but it contains information that anyone can find useful.
Importance of SSL
Two important internet security protocols were developed in the past—SSL and its successor TLS. They are often referred to as SSL/TLS but in most circles, only the name SSL has stuck. Therefore, we will refer to it as such in this article, as well.
SSL means Secure Socket Layer. It adds an important layer of encryption to any data used or shared on the site. As such, it’s mandatory for any eCommerce website. Users can feel safe if they want to use their login or credit card information on a site that has an SSL certificate. SSL also provides an added layer of security against malware and it has a positive influence on your website speed. By adding SSL, you will be switching from an HTTP protocol to HTTPS (Hypertext Transfer Protocol Secure). However, to enjoy all those advantages, your SSL needs to be generated by a certificate authority (CA), whose trustworthiness can be recognized by browsers. Only then your site will have the secure padlock next to the URL.

Free SSL certificate configuration
A couple of years ago, SSL certificates needed to be paid for, which made them less accessible for the general public. However, since then, various free SSL certificate authorities have emerged. One of the most famous is Let’s Encrypt. It is a non-profit organization, supported by Google Chrome, Mozilla Firefox, Facebook, OVH, and many others. They make acquiring, setting, and maintaining SSL certificates much easier. Nowadays, most hosting providers offer free SSL certificates, and those are often from Let’s Encrypt. However, depending on the hosting provider, the SSL configuration process may vary substantially. As such, we suggest asking your hosting provider first whether a free SSL certificate is included in your hosting plan and how to implement it.
If your hosting provider doesn’t offer an SSL certificate or you weren’t able to implement it properly, you can always try to find a website that issues free SSL certificates. The one we’re going to use to explain the process is SSL For Free, which functions thanks to Let’s Encrypt.
To create and configure your free SSL certificate, enter your domain URL. Please note that the https:// is already included, so make sure not to double it, and press the Create Free SSL Certificate button.

This will open a sign-up window. If you don’t already have an account with SSL For Free, you can create one for free now. Simply insert a valid email address, input a password, and press the Register button.

Then, press the Next Step button since you will have the domain URL already inserted.

In the following window, make sure that the Free option is selected and press the Next Step button.

Then, choose the HTTP File Upload as the verification method and click on the Download Auth File link, which will download a .txt verification file.

Afterward, open a new browser tab and log in to cPanel using your cPanel credentials. Navigate to File Manager option, located in the Files section at the top.

Then, navigate to the root WordPress directory of your domain, often called public_html, and press the +Folder option at the top to create a new folder within that directory. Insert “.well-known” as the folder name and press the Create New Folder button below.


Open the newly created .well-known folder and add a new folder within it named “pki-validation”.

From within the pki-validation folder, select the Upload option found near the top. In the following window drag and drop the .txt verification file that you downloaded and wait until it is finished uploading.

Afterward, return to the first tab where you’re setting up your SSL certificate, and press the Next Step button.

In the following window, press the Verify Domain button and wait a bit until the domain verification process is done.

Then, click the gray Download Certificate (.zip) button, followed by a click on the Next Step button.

Meanwhile, unzip the file you downloaded. Inside it, you will see three different files: ca_bundle.crt, certificate.crt, and private.key, you’ll need them for the following steps.
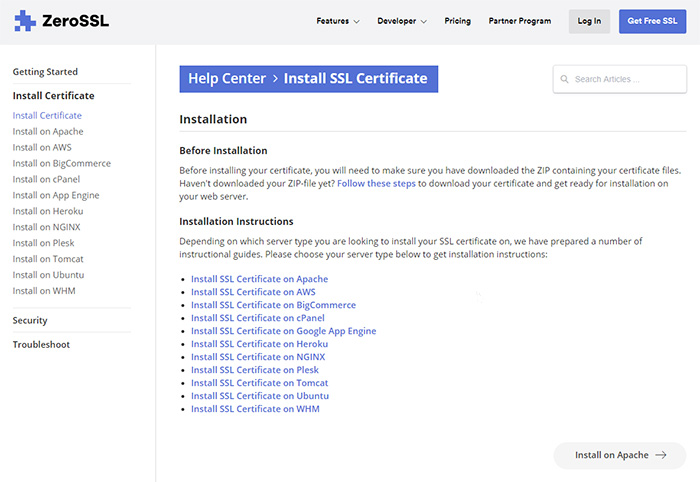
Press the Help Centar link that will lead you to the documentation describing the remaining steps for the certificate installation.

The instructions are separated based on different server types you can have. Choose the appropriate link for you and follow the instructions. If you aren’t sure what your server type is or if you can implement the steps outlined in the instructions, we advise you to ask your hosting provider for help.
After you’ve completed all the steps outlined in the appropriate installation link, return to the Install Certificate window and press the Check Installation button to see whether the SSL certificate was installed properly.

If all went well, you should be able to see the following success screen.

The only thing that remains now is to implement a 301 redirection rule. To do so, navigate once more to the File Manager option, located in the Files section in cPanel.
Open your root WordPress directory and find a file named .htaccess within it. If you aren’t able to see it, make sure to enable the options for viewing hidden files. You can do so within cPanel. Click the Settings option in the top right corner, tick the checkbox next to the Show Hidden Files (dotfiles) option, and press the Save button.

When you’ve located the .htaccess file, right-click on it and choose the Edit option in the dropdown.

A popup window will appear, you need to press the Edit button to edit the file.

Insert the following code into the file and press the Save Changes option found in the top right corner.
<IfModule mod_rewrite.c>
RewriteEngine On
RewriteCond %{HTTPS} !=on
RewriteCond %{ENV:HTTPS} !=on
RewriteRule .* https://%{SERVER_NAME}%{REQUEST_URI} [R=301,L]
</IfModule>

If you don’t have access to cPanel, you can also add the redirection code via FTP. If you have difficulty finding the .htaccess via FTP, make sure to enable the option for viewing hidden files within your preferred FTP client.
With that, the SSL certificate configuration process using SSL For Free is done.
Qode Themes: Top Picks
View Collection


Changing URLs from HTTP to HTTPS
However, even though we configured and activated the SSL certificate, the process of adding SSL to your WordPress website isn’t over yet. Some additional steps need to be taken, and we will quickly cover them in this section. But, before we start, we suggest that you manually back up your WordPress site, or ask your hosting provider for help making a backup.
Changing WordPress URLs
The first thing you need to do is to change the WordPress URLs from your dashboard. Those include your Site Address (the URL your visitors type in to access your site) and your WordPress Address (the location of your WordPress folders and files).
Changing your WordPress URLs is done by navigating to Settings > General and updating them to HTTPS. Press the Save Changes button afterward.

But, doing so will change only these two addresses. If your site is new, and if you haven’t added any content to it (such as links, images, files, etc.), then you have successfully added SSL to your site and you’re done. However, for the vast majority of users, this is not the case since they already have content on their site. Therefore, there are some added steps you need to take to change the URLs found in the site content and we will cover them in the next section.
In case you weren’t able to change your URLs directly from your dashboard, you can try other ways of changing WordPress URLs.
Using Really Simple SSL plugin
After changing the WordPress URLs, you need to install the Really Simple SSL plugin. It is a very user-friendly plugin, which is also lightweight and it makes the process of moving to HTTPS a rather simple task.

After installing it, you will be redirected to Plugins > Installed Plugins where you will see the Almost ready to migrate to SSL! message at the top section of your screen. Simply click on the Go ahead, activate SSL! button to activate the plugin. Doing this will also log you out of your dashboard. Log back in using your admin credentials.

The process is mostly over by this point. You can navigate to Settings > SSL to see what the Really Simple SSL plugin has done and if it has some further suggestions. Have in mind that some features are restricted to the premium version of the plugin.

Solving mixed content issues
The main features of the Really Simple SSL plugin are setting 301 redirects and a mixed content error fixer that changes your HTTP links into HTTPS. However, some links might not have been changed and remain HTTP despite the plugin being active. This is what is referred to as a mixed content issue.
In most cases, those links belong to images that were uploaded using the HTTP protocol or, rarely, some CSS or JS files. To solve this issue, we first need to acquire a list of insecure resources that are causing it. You can do this by going to the Why no padlock site. Once there, insert your site’s URL, tick the reCAPTCHA, and click on the TEST PAGE button.

The test report will show if your site is secure or not. It will also give you a list of insecure resources if it finds a mixed content issue. If the results list only contains links for images, you simply need to re-upload the images causing the issue. However, if the insecure URLs are located in a CSS or JS file, you will need to edit the files manually to solve the issue. For the less programming savvy, we suggest that you ask your hosting provider for assistance. You can also contact the developers of your theme or plugins if the insecure files are part of a theme or plugin that you’re using.
Updating Google Analytics URL
Google Analytics is a widely-used web analytics service, offering various kinds of site-relevant data. It includes data on website activity, visitors and their geographical location, poorly performing pages, advert or shop revenue, and much more. So, if you don’t want to miss on all the data that is so neatly packed in your Google Analytics dashboard it is important to update your URL after adding an SSL certificate
To update your URL, you must first log in to the Google Analytics website with your credentials, and head to the Admin section. Click on Property Settings and locate the Default URL option. Click on the protocol part of the URL and select https:// as your protocol. This will update your URL, so you can keep getting all the currently relevant site data.

Final Thoughts
This concludes our guide on adding free SSL. If you have any further questions regarding any of the steps covered or want some additional tips, we suggest that you also take a look at our in-depth guide on switching from HTTP to HTTPS.
Switching to HTTPS and using SSL will do a lot for your site security. And it will let your visitors rest easy knowing their information is secure and your site trustworthy. So don’t wait, make sure to add free SSL to your WordPress site today! Use the information from this article and follow the steps carefully so your site will reflect the best security practices out there.
