How to Add a Countdown Timer in WordPress

In this digital era where online presence plays a major role in promoting your business, countdown timers have become one of the most effective solutions for bringing attention to any future brand-related happenings. There’s no better way to hype up any time-sensitive occasion or offer than to place a clock-like feature somewhere on your web page that keeps ticking away, naturally creating a sense of urgency and building excitement around any event that is yet to come.

While there are some great WordPress themes with a countdown shortcode, with others, you usually need to install one of the available WordPress countdown timer plugins to add this useful feature to your site. And we will help you learn how to use the potential of your countdown timer to the fullest by showing you how to add it with two different plugins (one of which is our very own Qi Addons for Elementor plugin), as well as how to do it in Qode themes.
Here are the topics we will cover:
Acting as an animated clock that shows the remaining time, a countdown timer is a handy element you can add to your website to build anticipation when it comes to any major events related to your business. Since countdown timers have the natural ability to spark curiosity in people, they can be effective when it comes to generating leads, boosting your sales, and engaging your visitors with your brand in general. To give you a better idea of its versatility and practicality, here are some of the most common instances when adding a countdown widget to your site may prove to be particularly convenient:
-
When planning to launch a new product or service – it’s no secret that any brand-related product or service needs to be effectively promoted in order to gain attention from your visitors, and a countdown timer indicating their release is one of the best ways to do so.
-
When launching a new website – adding a countdown timer to your Coming Soon page is a great way to bring attention to such a big announcement. It can do wonders for user engagement and can get your visitors to come back and check out the end result.
-
Announcing an upcoming event – a clock counting down the time until any event you have planned can get your visitors excited and urge them to come back regularly to see how much time is left until the D-day.
-
A limited-time offer – nothing creates a sense of urgency and boosts conversions like adding a countdown timer next to a major discount, coupon-based product, or any limited-time offer. If you have anything you want to sell, consider adding a countdown timer to your website next to your offer. You could be surprised by the results.
There are many other examples where a countdown timer feature can be useful to site owners, but we wanted to include some of the most commonly used ones.
With that said, let’s take a look at how you can add a countdown timer to your WordPress site.

If you prefer to have plenty of options at your disposal and want to get creative when making your countdown timer, you should look no further than our own Qi Addons for Elementor plugin and its Countdown widget. This widget is fully customizable and allows you to adjust different styles for your countdown timer with the utmost ease. You will be able to input different labels, hide specific label types (such as minutes and seconds), set background colors or add images, change typography, adjust the spacing, and more.

If you end up installing this plugin, you will also have plenty of other flexible widgets at your disposal (60 widgets in total) completely for free. You will get to customize and combine these widgets in many different ways to create all sorts of pages and sections on your WordPress site – from item showcases and striking image galleries all the way down to sliders and business-oriented sections.
Before we begin showing you how to add a countdown timer using the Countdown widget, we should note that Qi Addons for Elementor is a plugin that works with Elementor, so you need to have the Elementor page builder installed first in order to use it.
Finally, if you prefer to watch videos, we also have a video that covers the same subject, so make sure to check it out:
To get started, go to the backend of your page or post and search for “countdown” in the Elementor sidebar. You will be able to distinguish the Qi Addons for Elementor Countdown widget from other similar widgets thanks to our trademark red color.

Drag the element to the right side of the screen and you’ll instantly be able to see what the default widget looks like.

Now, to start customizing, you should pick the Date option in the Content tab. This option will allow you to use the calendar to choose the date you want to countdown to. You will also be able to use the clock right underneath to further adjust the exact time.

The Format option below lets you choose the exact format of your countdown, i.e. whether it will show minutes, seconds, etc.. We’ve used “Show All” for our countdown example.

The next section contains Labels settings. These settings will let you change the text under the numbers. You just have to type in the new word next to the desired label.

There are two tabs you can use here – one for Singular word forms and another is for Plural forms.

Moving on to the Style tab – here you will get to adjust the styling of your countdown widget and change its look in more detail.

The first option on this list is called Justify Content. It lets you choose the way the numbers will be spaced within your column. The default option is set to Space Between (it creates even gaps but only between the countdown items). You can also change it to Space Around (evens out the space on both sides of the countdown items), Space Evenly (evens out the space between them), and Center (puts the items in the center close together).

The next option, Alignment, lets you move your content to the left, center (which is our default), or right.

The Digit Color option is particularly neat as it allows you to change the color of the countdown numbers and easily adjust them to your overall website design. You can choose any color from the color picker or simply enter the hex code. We’ve added the hex code (#1e1e1e) to make our numbers appear a dark shade of grey:

Next, the Digit Typography option contains all the necessary typography-related options. You will be able to set things like font family, size, weight (we’ve chosen the weight of 500 for our numbers), transform, style, and decoration. The last three options, however, have more of an effect on the text below the numbers rather than the numbers themselves, and you’ll more likely want to use them when setting your label typography.

If you use the Line Height option, you will be able to adjust the height of the entire line if you want to, while the Letter Spacing option creates more space between the digits.

The Label Color option sets the color of the text below the numbers. We’ve added a hex code (#1e1e1e) and made the label color match our numbers:

Now, the Label Typography section contains the same options as the Digit Typography one. The only thing we’ve changed here is the weight of the labels (we’ve set it to 500 to match the numbers), but you can feel free to change any one of these options according to your preferences.

The Label Margin Top option allows you to create more space between the label and the numbers. You can do so either by using the slider or by entering the desired value. We’ve put 14px for ours.

Finally, the last set of options is Item Style which you can use to adjust the look of your items.
You can change the Background Type option to Classic or Gradient. If you choose the Classic background type, you will get to set the color that will appear as the item background.

Simply click on the Color option and choose your color either by using the slider or entering a hex code. We’ve chosen the color with the hex code #C88E8E for our example:

If you want, you can also use the option that allows you to add an image instead of a background color. You can click on the (+) field to add the image from the media library or upload your own.

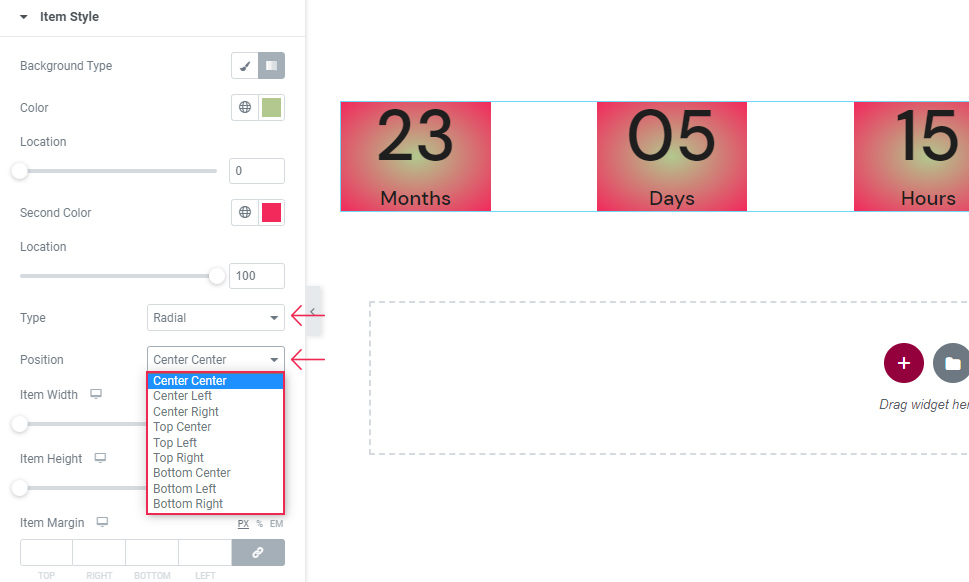
If you choose the Gradient background type, you will be able to pick two different colors that will mix together and form a gradient effect for your background. Here’s what it can look like (we’ve added the color that has a hex code of #B2C88E):

The Location option will allow you to set the amount of space the first color will take up. Like this:

Similarly, you will also be able to change the second color and define the space it takes up right below.

Also, if you use the Linear type, you will be able to change the angle at which the color blend occurs.

In case you opt for using the Radial type, you will have a whole new set of options at your disposal in the dropdown. Namely, you will get to pick different positions of your first color (such as Center Left, Center Right, Top Center, and so on).
Now, we’re going to switch back to the Classic background type to demonstrate what else you can do with the styling of the countdown widget.

For example, the Item Width will allow you to further adjust the space around the countdown items. However, we should note that not all numbers will necessarily have the same width. This can make some numbers fall within the background color, while others won’t (as seen in the picture below):

In case you run into this issue, you can use this option to even everything out. For example, you can fix the width to 200px (like we did) and get something like this:

The Item Height option allows you to do a similar thing. Here’s what your timer can look like depending on your settings (we’ve set it to 200px):

Once again, we’ve reset all these options as we only used them to quickly demonstrate some of the different styles you can create for your countdown element.
Last but not least, the Item Margin option allows you to adjust the margins around the countdown items. You can either increase all sides evenly (by using the arrows or typing in a value) or delink these fields and insert specific values to different sides of the margin.

Make sure to hit the Update/Publish button once you’re done with adjusting your widget settings.

Also, you can go ahead and preview your page/post to see what your countdown timer looks like live:

Now, if you only wish to add a simple-looking countdown timer to your site, we recommend installing a plugin called Countdown Timer Ultimate. The plugin is easy to use and allows you to add a fully functional countdown timer to your pages or posts within minutes.
First, you need to install the plugin and activate it.
Next, head to the Countdown Timer >> Add Timer page in your WordPress admin, and begin with setting the preferences of your timer.
Once there, you should add the title of your timer first, and then proceed to adjust other available options according to your preferences.

The first option you will notice at the very top is the Expiry Date option. Keep in mind that the timer uses the timezone you’ve set in the Settings >> General page in your dashboard, so if you wish to change the timezone, you should access this setting to update the timezone of your WordPress site.
Once you do that, you can go ahead and pick the precise date, day and time for the countdown timer.

There are also multiple settings related to the looks and animation of your timer, like the ability to choose from two animation styles (Smooth or Ticks), Circle, Background and Countdown Width, as well as the colors of your timer (background color and foreground colors for days, hours, minutes and seconds). If you want, here you can also change the label of your time units.

Hit the Publish button when you set your preferences, and then go to the Countdown Timer page to copy the countdown timer shortcode.

Go ahead and paste the shortcode anywhere on your page or post. To do this in the Classic editor, simply pick the Text screen mode and paste the shortcode into the editor box. Hit the Publish button when you’re done.

For Gutenberg, click on the (+) icon and choose the Shortcode block.

Paste the shortcode into the block, and you’re all set.

Once you’re done with creating your page or post, you can go ahead and preview it to check out what your new countdown timer looks like.

If you prefer to have your countdown timer displayed as a widget, the Countdown Timer Ultimate plugin allows you to do that as well.
To do this, go to Appearance >> Widgets and insert a Text widget to your sidebar area.

Then, simply paste your shortcode into the text widget, add the title, and hit the Save button.

You can check out the look of your countdown timer widget in your website or blog’s sidebar area.

As we already mentioned in the very beginning, many Qode Interactive themes come with a built-in countdown timer feature. The appearance of your countdown clock can depend on the theme’s design, and some of its options may vary slightly from theme to theme, though the basic settings are mostly similar. That being said, setting up a countdown timer in Qode themes is really easy to do and can be done in no time. Let’s take a look at how you can add this element to your site using the Bridge WordPress theme.
Once you’re in the page builder, you need to select the Add Element option (WPBakery).

You will be met with many different shortcodes, including some Qode-specific ones which are all green in color. You need to find and select the one called Countdown.

Clicking on this element will open the Countdown Settings. Here, you will be able to set the options such as the year, month, day, hour and minute when you want the clock to finish counting down time. You can also set the label for each one of these elements (year, month, etc.).

Another great option that comes included with some of the Qode themes is the Singular Label option.

If you set the singular month, day, hour, minute, and/or second label, the original label will switch to the singular one when there’s only number one left (as in one month, one day, one hour, and so on). In other words, here you can set any given time unit to display the text that will further bring attention to your upcoming event. For example, if you want, you can set the hour (or any other) singular label to read something like “Only one hour left!”
Finally, you can also set the color of your timer, digit and label font size, font weight, and so on.

Once you’re done with setting your Timer element, click on Save Changes and that’s it. You can go ahead and see your countdown timer in action.

Qode Themes: Top Picks
View Collection


Final Thoughts
Countdown timers are great tools that will help you attract attention and create hype around any upcoming product release, special offer, or event related to your business. When used properly, they can engage your customers with your brand and can be a great sales booster, too. As you could see above, inserting your countdown timer anywhere into your page, post, or sidebar area is quite easy if you use the help of a plugin.
We highly recommend using the Qi Addons for Elementor plugin’s Countdown widget as it allows you to completely customize the look of your timer so that it fits with the rest of your design. On the other hand, if you prefer to have fewer options and simply want to add a basic-looking countdown timer to your site, you should check out the Countdown Timer Ultimate plugin. No matter which option you end up using, just make sure to carefully follow our step-by-step guide and you will be able to add a countdown timer to your WordPress site in no time.
