How to Fix Issues with WordPress not Sending Email

Despite WordPress being a very flexible and user-friendly platform, there are quite a few issues you can experience while managing a WordPress website. One of the most common issues is with WordPress not sending emails. To be more precise, we are referring to instances where your WordPress emails are either not being delivered or end up in the recipient’s spam folder. As emails are such an integral part of effective communication and everyday lives, it is important to tackle these mailing issues swiftly when they appear as they can pose a serious threat to your business, especially if you are running an eCommerce website. Among others, WordPress emails include contact form notifications, user account verifications, password reset emails, emails regarding the status of a product order, or product receipts. Therefore, WordPress mailing issues can make it difficult for some of your users to log in, as well as cause frustration and lack of trust among your customers. But, even though the consequences of this issue are easy to spot, reasons as to why they happen and methods how to solve them are less apparent. This is why we made this comprehensive article explaining both in detail.
To help you navigate, we’ve broken this topic down into several smaller sections:
Qode Themes: Top Picks
View Collection


There are multiple reasons as to why WordPress might not be sending emails. The most common reason is that your hosting server might not be configured to use the PHP mail() function. WordPress employs this function, but since it can be exploited by hackers or spammers, not all servers choose to use it. Even if your hosting server is configured to use the PHP mail() function, the emails can frequently end up in spam folders due to poor email headers. This is because email providers have tightened their restrictions by adding email authentication to ensure only verified emails land in the user’s inbox. Having your emails frequently marked as spam results in bad server reputation, which could lead to your emails being blocked by certain email providers. Even though this isn’t overly common, it is a significant concern for people using shared hosting, as the actions of a single user can result in the whole server being blacklisted. Additional, less usual, reasons for WordPress not sending emails include improperly set plugin options or incompatibility with PHP 7.
How to solve issues with WordPress not sending mails
Understanding why the mailing issues happen brings us one step closer to solving them. However, before you try to pinpoint their cause, you will first need to test whether you are even able to send emails. After that, you should focus on improving email deliverability. We will explain how you can do both in the following section.
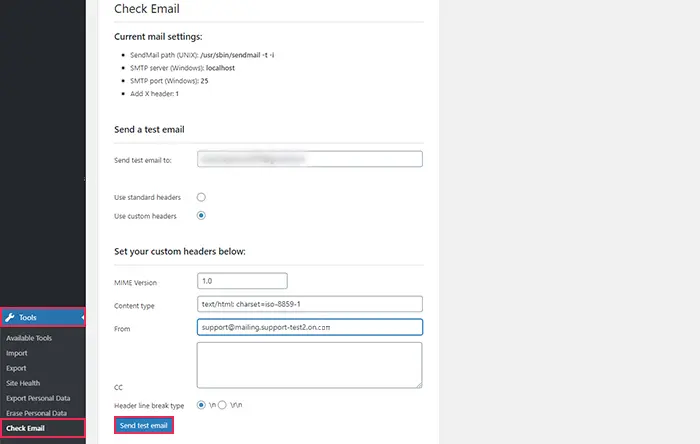
To test whether your emails are being sent, you need to install a plugin called Check Email. When you’ve done that, navigate to Tools > Check Email. Set the email address where you want to send the test email (you should have access to its inbox so you can check it later) and choose the type of headers you want to use. Choosing the standard option will result in pre-set email headers. On the other hand, the custom headers option allows you to adjust the following options: MIME version, content type, from (email address from which the email is being sent), CC, and header line break type. Choose and set all the options you want then press the Send test email button.
Afterward, you will see a notification near the top of your screen stating that the test email has been sent.
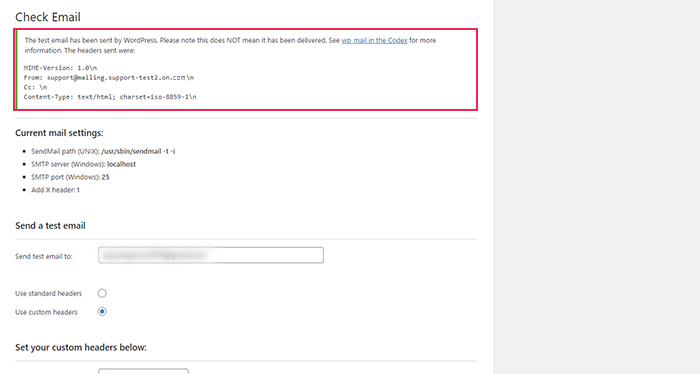
However, to be sure that the email was successfully delivered, you will need to check the inbox of the email address you set as the recipient of the test email. Be sure to check the spam and junk folders, as well. At this point, we are only concerned about whether the test email has been received at all.
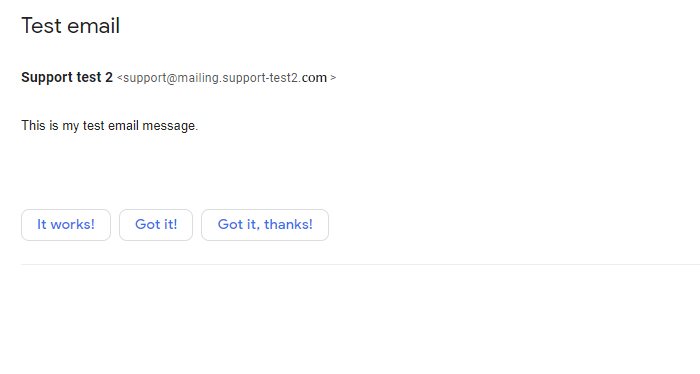
The test email will have a title—Test email from your-domain.com and a default message body saying This test email proves that your WordPress installation at your-domain.com can send emails. It will also show the date and time when the message was sent.
If you received the test email, then it’s likely that the mailing issues you were experiencing with your messages and contact forms were due to the plugin you are using. It could be a plugin settings misconfiguration or a compatibility issue. In either case, your course of action should be to refer to the plugin authors for help.
Configuring SMTP in WordPress
If your issues were caused by a plugin and you’ve resolved them, the following step is to ensure your emails are delivered to the inbox folders of their recipients from now on. This is where the real problem lies, as WordPress emails are often marked as spam by email providers. To help combat this, we suggest using SMTP for sending WordPress emails. It is an excellent solution overall. Especially for users that might have a bad server reputation due to shared hosting. It is also great for those unable to send emails due to server issues, as it bypasses the PHP mail() function.
SMTP or Simple Mail Transfer Protocol is the most efficient way of sending emails as it uses the DNS authentication method which greatly increases email deliverability. You can implement SMTP on your WordPress website either with the use of code or using an SMTP WordPress plugin. We will show the latter, as it is overall more user-friendly. Since there are quite a few good SMTP plugins, make sure to properly test several before deciding which one to use. The ones we found most useful, and which we will cover in this article, are WP Mail SMTP and Easy WP SMTP plugins.
WP Mail SMTP is the most well-known WordPress SMTP plugin that allows integration with the most popular mailing services (e.g. SMTP.com, SendGrid, or Gmail). It is a free plugin that has a premium version, as well. The premium version offers email logging, managing emails based on email types, as well as additional mailing service options.
After you install the plugin, you should navigate to WP Mail SMTP > Settings, which will open the General tab. This is where you will need to configure the most important mailing settings. You will need to set the From Email and From Name options. Make sure to insert the email address you plan to use to send emails via SMTP and set a suitable name that represents your website. Additionally, you can choose to force the From Email and From Name to be displayed on all emails, overriding the email settings in other plugins. You can also choose to set a return path to match the From Email for the emails that weren’t delivered.

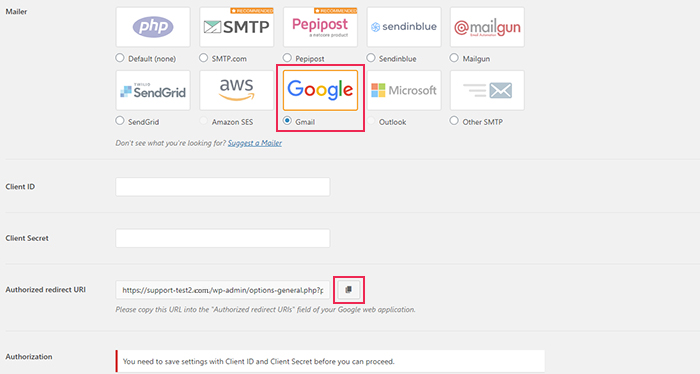
After completing the initial settings, we come to the most important option within the plugin, called Mailer. Mailer includes choosing and setting up your preferred SMTP mailing service (or mailers). We suggest avoiding the default option, as it uses the PHP mail() function, which is known to cause mailing issues. Instead, you should use one of the other available mailer options. At the time when the article was written, all the options shown in the screenshot above were available except for Amazon SES and Outlook, as those are reserved for the premium version of the plugin. You can also choose the Other SMTP option, which allows you to integrate your hosting provider’s SMTP service or to use some of the public mailing services like Hotmail, Yahoo, Gmail, or AOL.
Now that we’ve touched on the plugin’s settings, we will explain, in-depth, how to integrate two of the mailer options—Pepipost and Gmail—inside your WP Mail SMTP plugin. If you need further help setting up your preferred mailer, we strongly suggest examining WP Mail SMTP’s mailer documentation.
As a useful tip before we proceed, we suggest you don’t close the browser tabs during the integration process. The reason being is that you might need to copy and paste certain data from one tab/window into the other, or to re-visit certain options found in different tabs after some time has passed or additional settings have been adjusted. With that being said, we’re going to explain how these mailers can be integrated.
Pepipost mailer
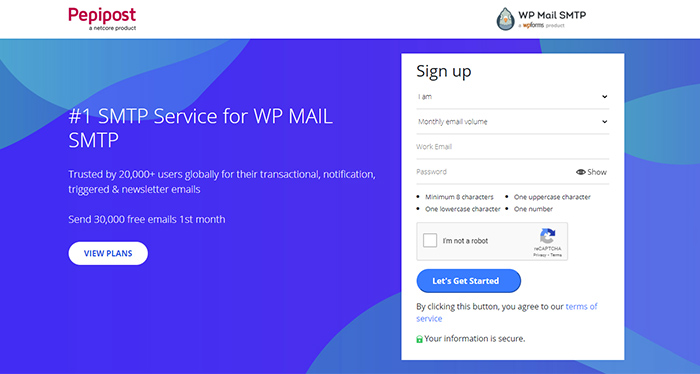
To configure your Pepipost mailer, you need to create a Pepipost account first. Navigate to the sign-up page, fill in the required information, and press the Let’s Get Started button.
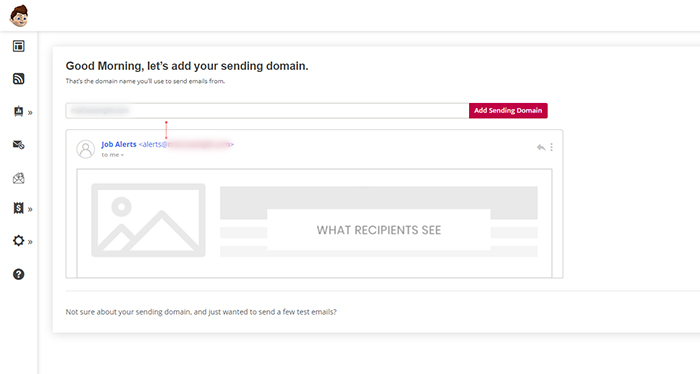
After creating the account, you will be automatically logged into it. If you weren’t or if you already have an existing Pepipost account, you can use this login link. When you manage to log in successfully, you need to add a sending domain. Insert the domain from which you wish to send your emails and press the Add Sending Domain button. To be more precise, you should insert a subdomain as your sending domain to ensure better email deliverability. Subdomains are separate sections of your website whose URL is in the form of subdomain-name.your-website-url.com. You can use almost anything as a subdomain name, with two exceptions. Don’t use mail.your-website-url.com since subdomains starting with mail are often reserved for hosting providers. Also, using underscores is highly discouraged as it could be incompatible with some DNS providers.
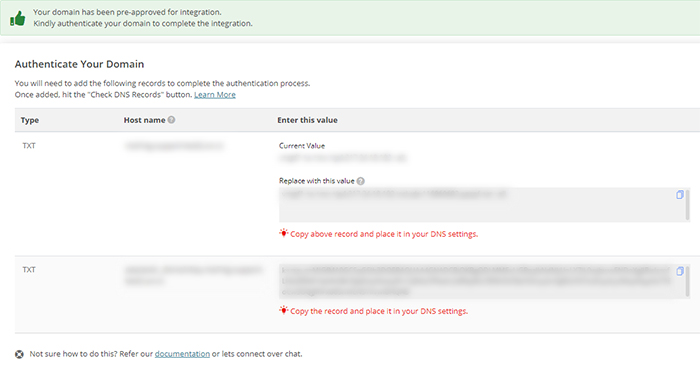
After setting your sending domain name, you will receive SPF and DKIM records, which you need to add to the DNS settings of your website. More precisely, you will need to make adjustments to your DNS settings. As the process of editing your DNS settings greatly differs based on your hosting, we suggest that you ask your hosting provider regarding precise details.
Before we proceed to the following steps, we’re going to quickly cover the purpose of these DNS settings.
As you can see on the screenshot above, both records belong to the TXT type, which signifies that you will be using a third-party mailing service. The first record is called an SPF (Sender Policy Framework) record, and it is used to authenticate the domain from which the email is coming. It is a security measure designed against spam. It verifies whether an email originated from an IP address authorized by the sender’s domain, meaning that the sender’s address wasn’t faked. The second record is called a DKIM (Domain Keys Identified Mail) record, which is used to authenticate whether an email was indeed sent by the owner of a certain domain. This is done by adding an encrypted digital signature, the DKIM signature, to the email.
Depending on the mailer option, there could also be a third text record—a DMARC record. DMARC, or Domain-based Message Authentication, Reporting, and Conformance is a TXT record that performs the same purpose as both the SPF and DKIM records combined. However, it has dome further functionalities as it can give guidelines on handling emails that didn’t pass the authentication process.
Now that we’ve explained what these records do, we can proceed to the next step. After you edit your DNS settings, press the Check DNS Records Now button to test whether the change in your DNS records has taken effect. If it has, you will see a green Success message next to the corresponding DNS record. Don’t be discouraged if the changes in your DNS records aren’t immediately recognized, as it can take 24 – 48 hours.
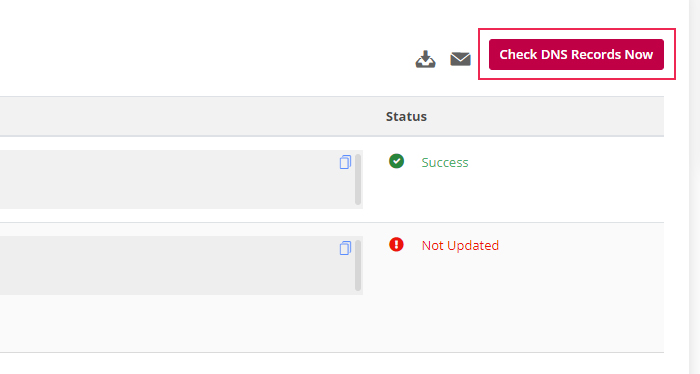
After the records are successfully updated, you will see a popup stating that your domain is under review. While your domain is being reviewed (which often takes 6-8 hours), you can proceed to the remaining steps.
The next thing you need to do to integrate the Pepipost mailer inside the WP Mail SMTP plugin is to extricate your Pepipost integration API key and enter it in the corresponding plugin option.
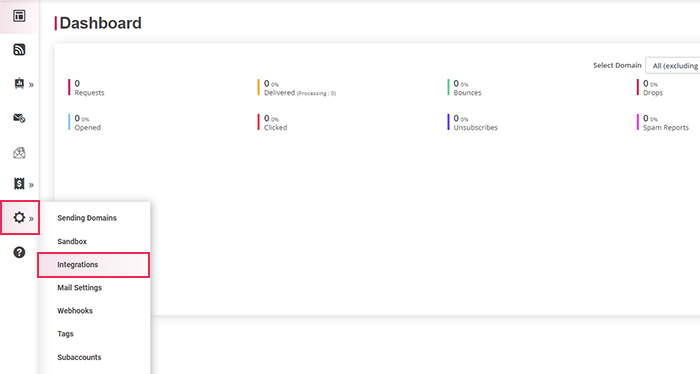
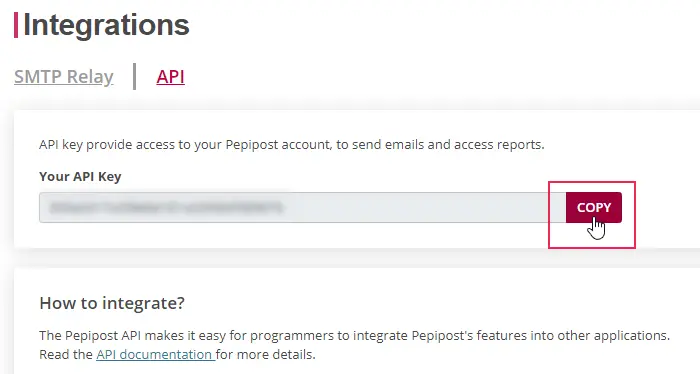
To do so, log in to your Pepipost dashboard and navigate to Settings (cogwheel icon) > Integrations.
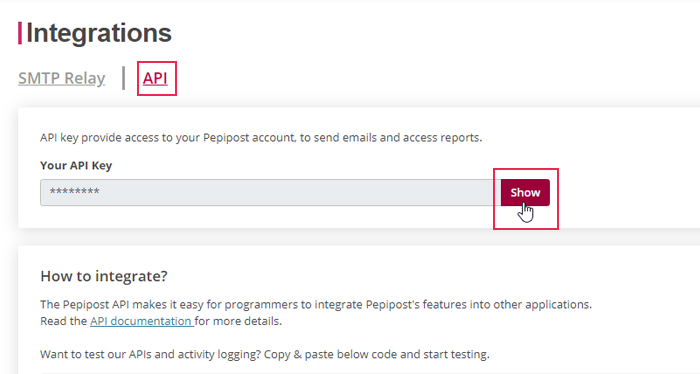
Clicking on the API tab will show the Your API Key option, with the corresponding key hidden. To be able to see and copy it, click on the Show button.
Afterward, you will be prompted by a popup window asking for your login password. This is pretty standard, as API keys are considered confidential data. Insert your Pepipost login password and press the Proceed button.
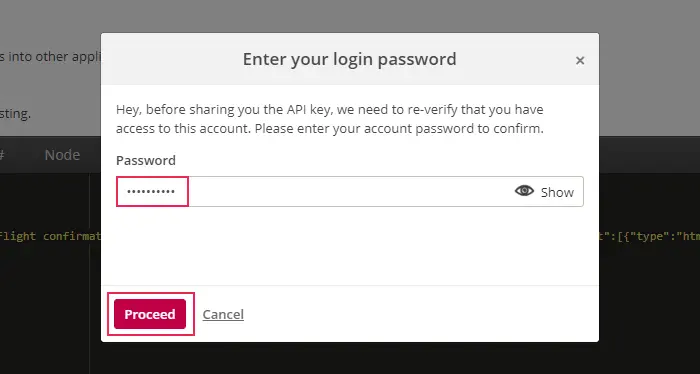
Then, your API key will be visible and you can press the Copy button to copy it.
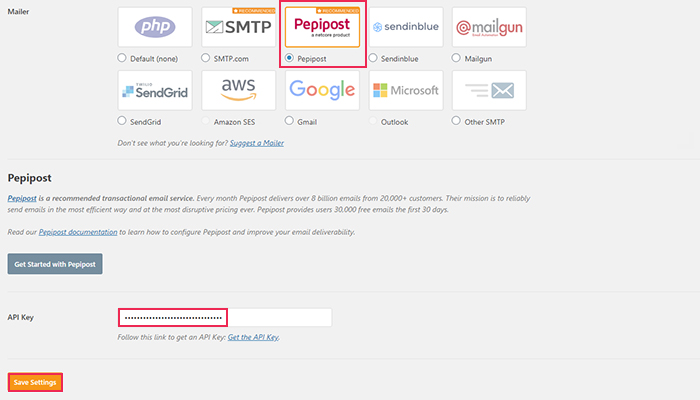
Afterward, choose Pepipost as your mailer from the list of mailer options given within the WP Mail SMTP plugin and paste the previously copied key inside the API Key option. Then, press the Save Settings button below to finish the Pepipost integration process.
Gmail Mailer
To integrate the Gmail mailer, you must first log in to your Gmail account and then create a project that requires Gmail’s application registration. After opening the Gmail API application (accessible via the link above), select the Create a project option, and press the Continue button.

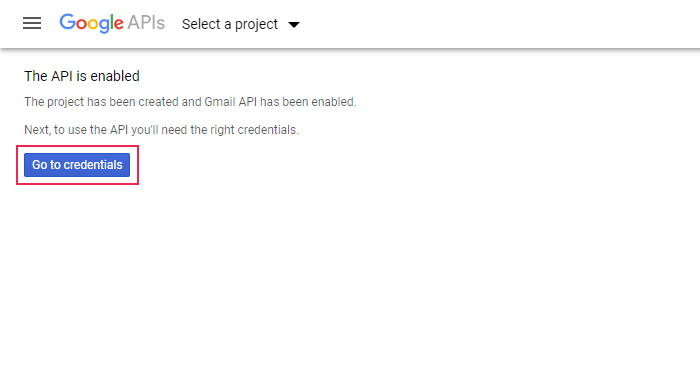
Wait a bit until the project is created. When it’s done, you should receive a message stating that Gmail API has been enabled. To proceed with the integration process, press the Go to credentials button.
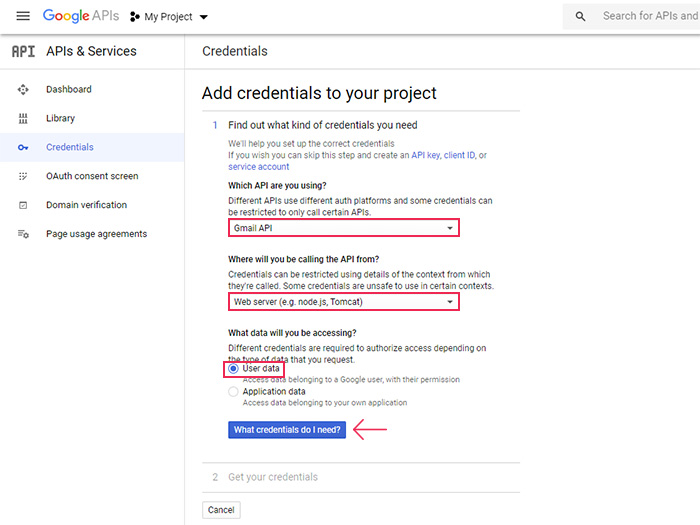
On the following page, you will be asked three questions about the project that will help Google ascertain which credentials are needed. Select the following options: Gmail API as your API of choice, Web server (e.g. node.js, Tomcat) as the place where you will be calling the API from, and User data as the data type you will be accessing. Then, press the What credentials do I need button below.
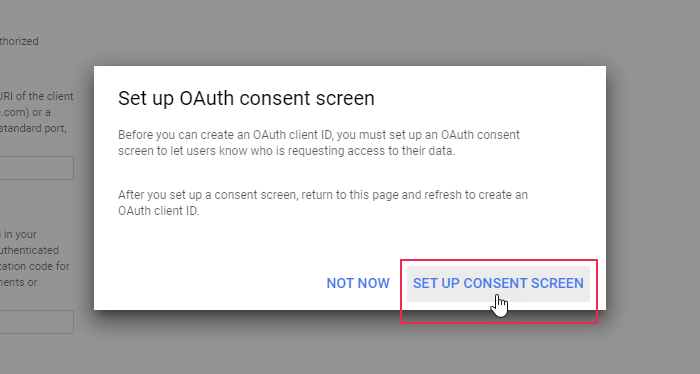
This will open a popup window asking you if you want to set up a consent screen. Clicking the Set up consent screen button will open a new tab or window. However, don’t close the previous window, as you will need it in later steps.
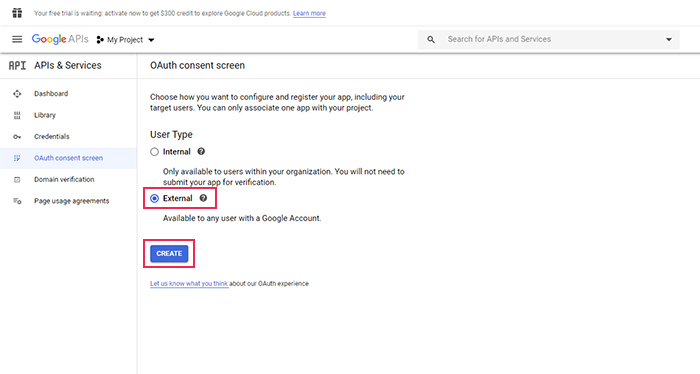
In the new window, you will need to fill in some information regarding your consent screen. Firstly, if you are using a G Suite account, choose the internal user type. But if you are using an @gmail.com account, choose the external user type. Afterward, press the Create button.
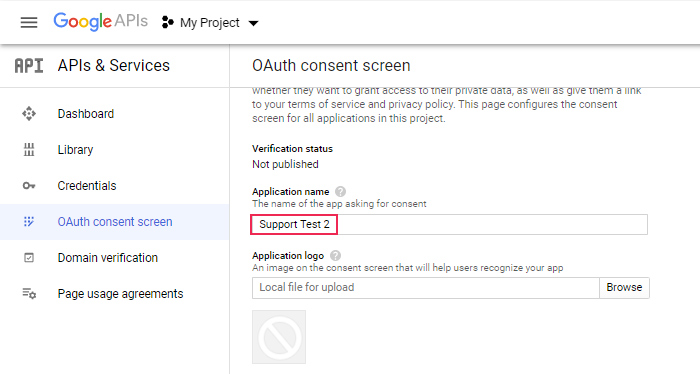
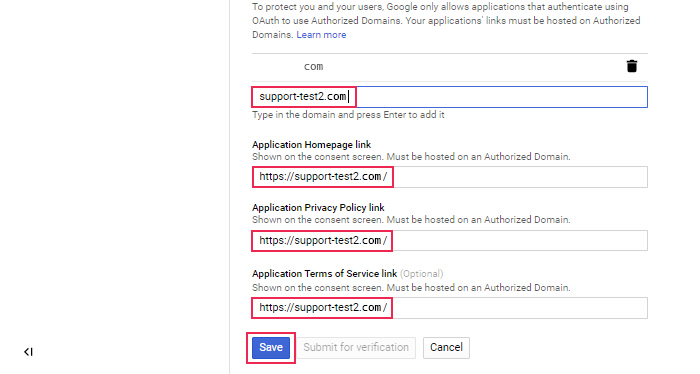
In the following screen, fill in the following options: application name, authorized domains, application homepage link, application privacy policy link, and application terms of service link. The application name will be the one seen in the emails you send, so pause for a bit and come up with a suitable name. As for the links, you can place the URL of your website for all of them. Make sure to omit the http:// or https:// from the authorized domain link. However, all the remaining links should contain it. When you’re done, press the Save button.
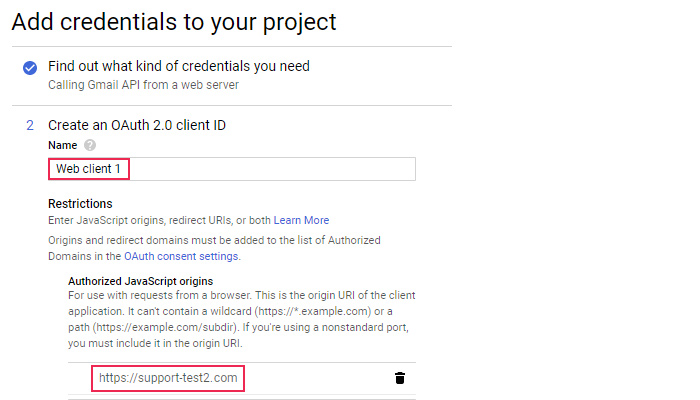
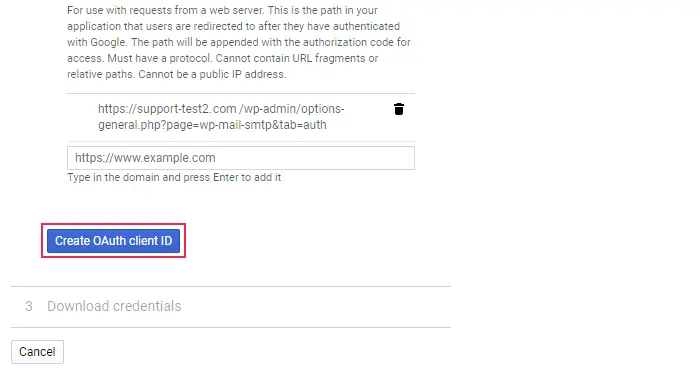
After that, return to the previous tab/window. There, you will need to add some data to create your OAuth 2.0 client ID. Insert a name or use a default one and add your website’s URL as an authorized JavaScript origin.
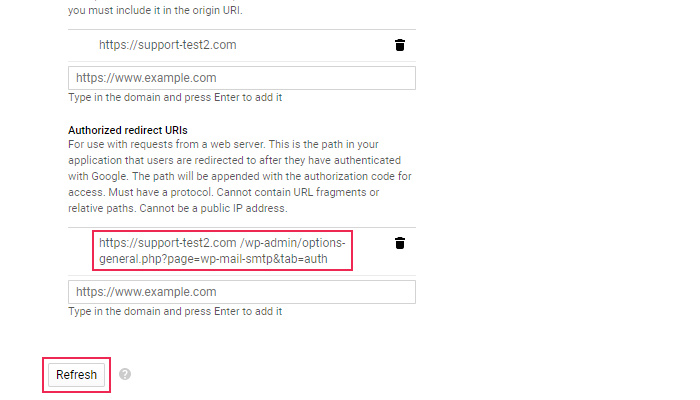
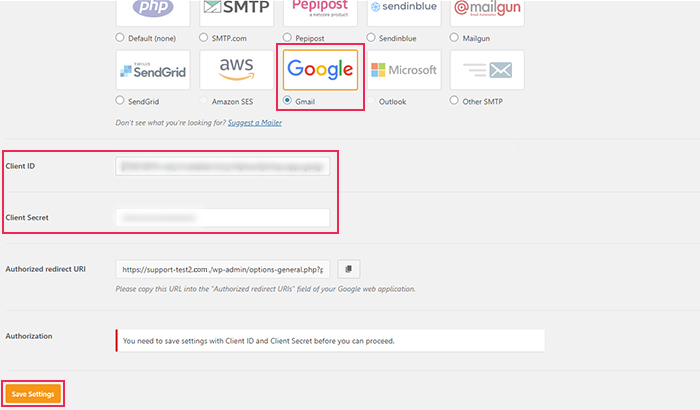
However, to find the third piece of information, you will need to have the tab where you are logged into your WordPress admin dashboard open. Make sure you are located inside the Settings section of the WP Mail SMTP plugin. Then, select Gmail as your mailer and scroll down to the Authorized redirect URI option.
Click on the copy icon next to the option in the plugin and paste that information in the appropriate field (called Authorized redirect URIs) in the Google project tab. Once you’ve done that, press the Create OAuth client ID button.
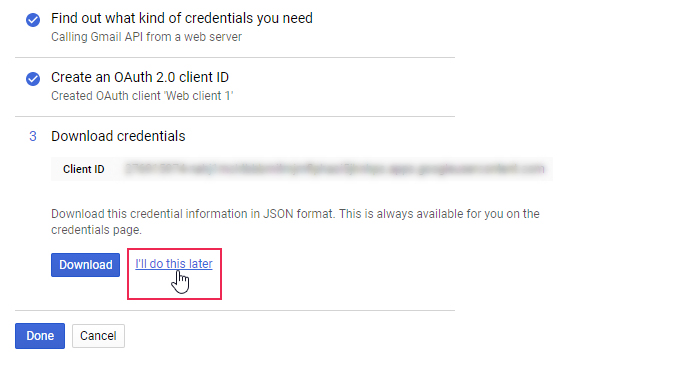
Now your web application has been created, which means you are nearly done with the integration process. You only need to copy and paste the credentials to fully integrate the Gmail mailer with the WP Mail SMTP plugin.
In the following screen, click on the I’ll do this later option, which will refresh the page.
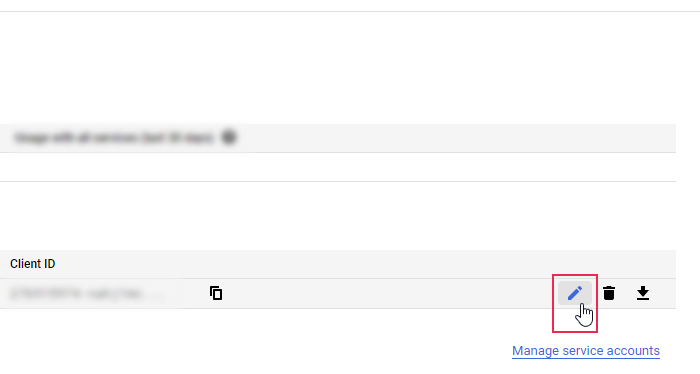
Then, while staying on the Credentials page, find the application you just created and click on the pencil option next to it to edit it.

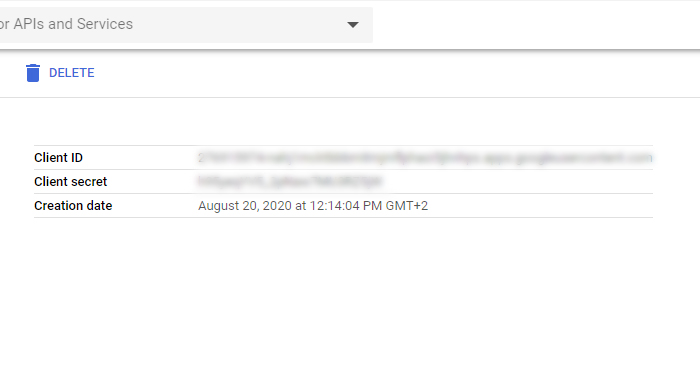
On the right side of the following screen, you will find the Client ID and Client secret information, which you need to copy.
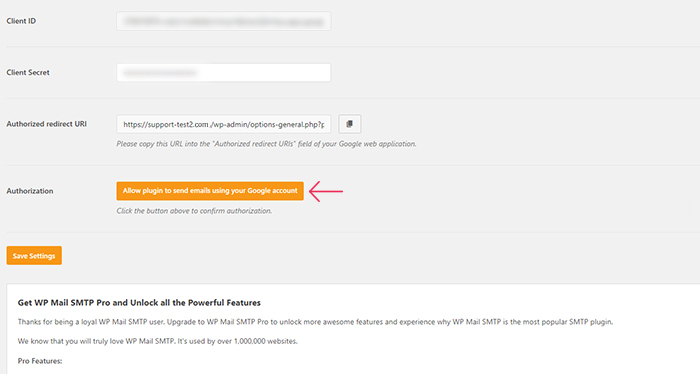
Now, switch to the tab where you have the WP Mail SMTP plugin’s Settings option open. Select Gmail as your mailer, paste the previously copied information into the Client ID and Client Secret options of the plugin. Take care not to mix up the two options. Afterward, press the Save Changes button.
When the page refreshes, press the Allow plugin to send emails using your Google account option.
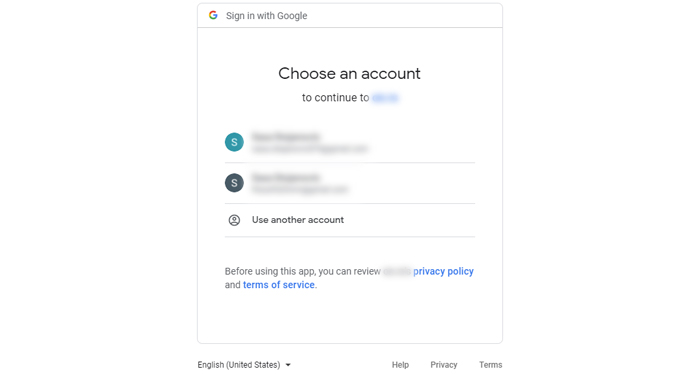
This will open a new login screen asking you to choose a Google account with which to log in.
If you have multiple accounts, make sure to choose the same account you used for the Google API project to finish setting up SMTP.
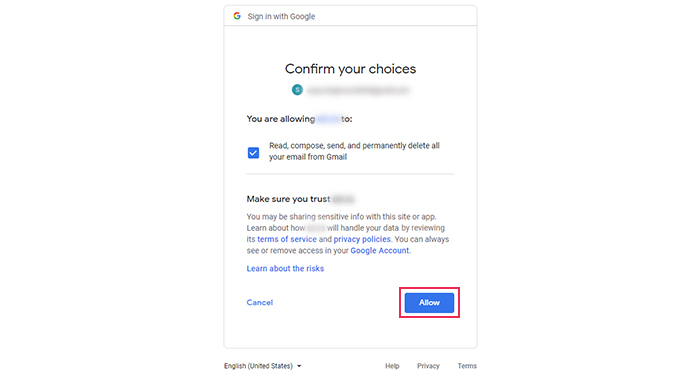
Afterward, make sure to press the Allow button to permit the authorized website to read, compose, send, and permanently delete all your emails.
Doing this concludes the Gmail mailer integration process.
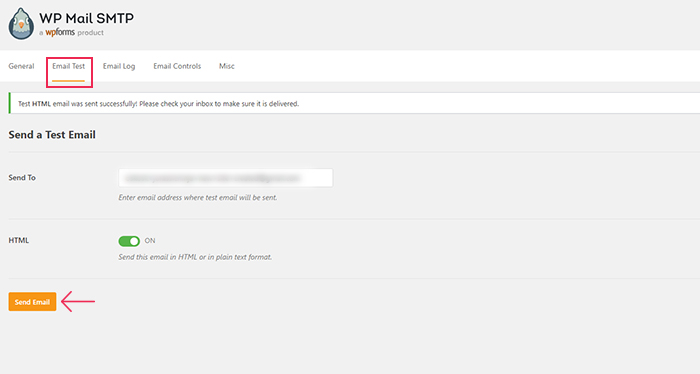
Moreover, you have now finished setting up your preferred SMTP mailer, and all you have left to do is test whether the mailing issues have disappeared. Make sure you are logged in to your WordPress admin dashboard, then navigate to WP Mail SMTP > Settings. Also, make sure that the DNS records of your website have been verified before you start testing. Then, click on the Email Test tab. Insert an email address where you want to send the test email and press the Send Email button. Make sure to use a valid email address that you can access and check whether the email was delivered properly. If the message has been sent, you will receive a success notification near the top of the Email Test tab.
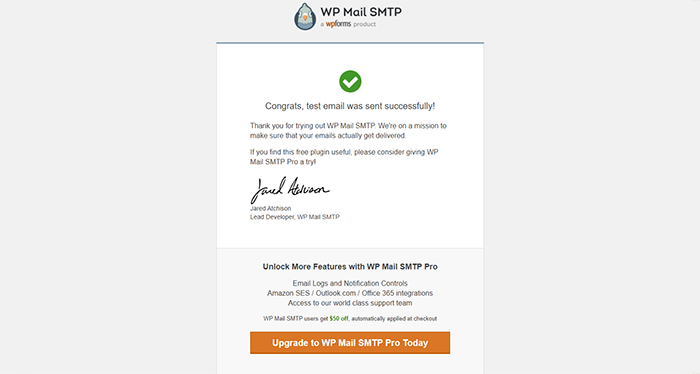
However, you still need to verify that the email was properly delivered. Log in to the email client for the address you inserted and check the inbox folder for the test email. It should have the appropriate From Name and From Email displayed. If all previous steps were done properly, you should receive an email with the following content.
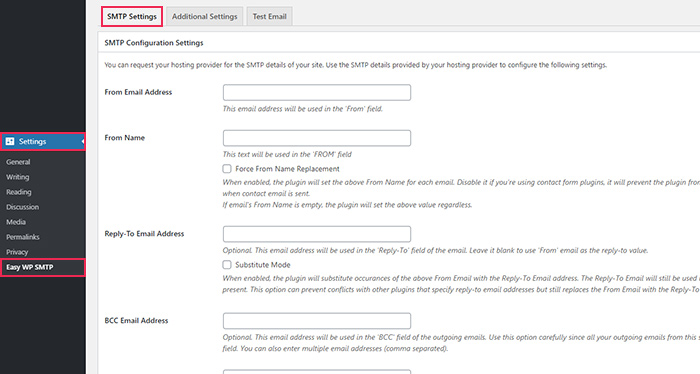
After installing the plugin, navigate to Settings > Easy WP SMTP. This will open the SMTP Settings tab, where you need to enter the information that will allow you to connect to the SMTP found on your hosting server. Apart from that, the plugin offers the option to use common public SMTP servers (Gmail, Yahoo, or Hotmail). You can also enable domain checks and email debug logs, among other features, using the Additional Settings tab. To learn more details, we suggest examining the plugin’s documentation.
As the process of acquiring your hosting SMTP information differs a lot based on the hosting provider, we recommend you ask them directly for the precise steps you need to take. In fact, the plugin itself advises the same, as you can see from the note near the top of the SMTP Settings tab.
However, we will take you through the procedure for cPanel below. Anyone using cPanel as their control panel and server access can use the steps described below.
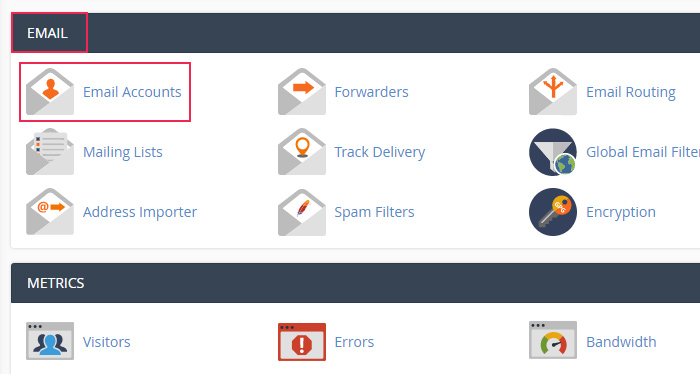
Firstly, open a new tab and log in to your cPanel account, then navigate to the Email Accounts option, located in the Email section.
In the screen that opens, click on the Create option located on the right. This will create a new email account. If you have an existing email account that you wish to use for this purpose, you can skip to the next step.
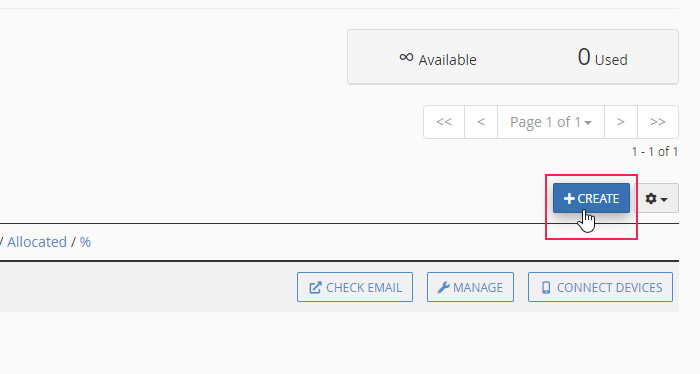
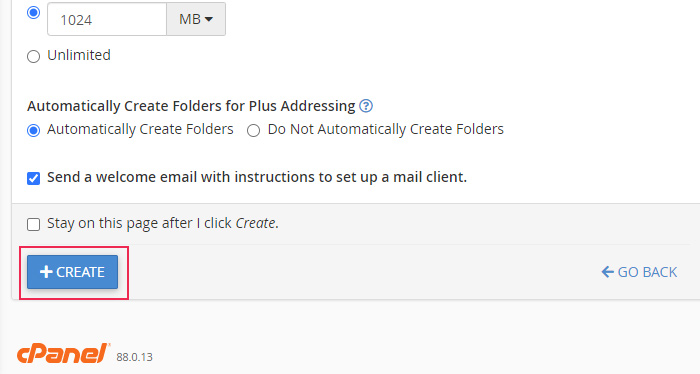
Fill in the settings fields according to your needs. Most importantly, make sure to set a domain, username, and password. Also, memorize them, as they will be used within the settings of the Easy WP SMTP plugin. Afterward, press the Create button at the bottom.
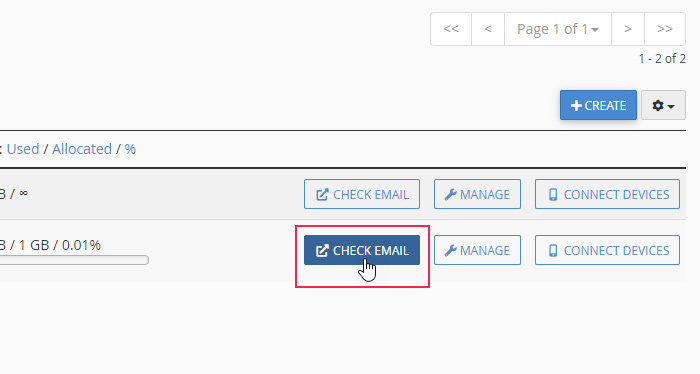
Once you’ve created a new email account, you should see it in the Email Accounts section. Press the Check email option next to your new account.
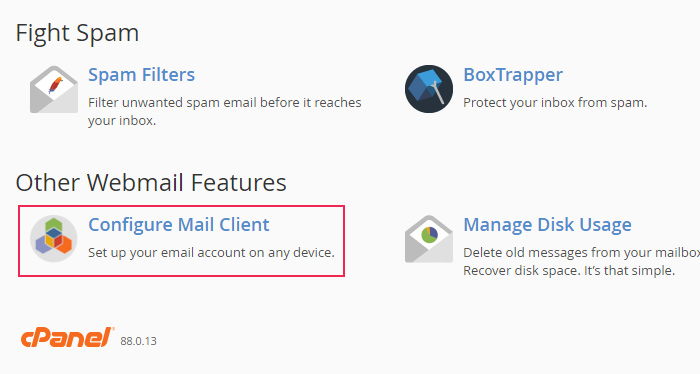
On the following page, click on the Configure Mail Client option located in the Other Webmail Features section.
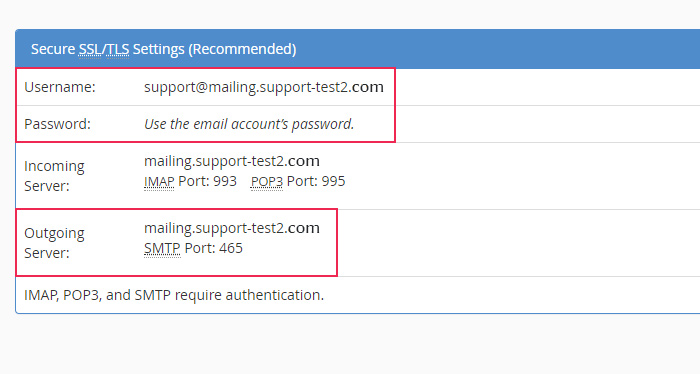
In the window that opens, look for the Mail Client Manual Settings. You will see two sections, one for secure SSL/TLS and other for Non-SSL connection. We will use the secure SSL/TLS settings and copy the username and password, as well as the outgoing server/host and SMTP port for use in our next step. Make sure to keep this tab open, so that you can easily switch between tabs to copy and paste the information. As you can see in the screenshot below, the password won’t be visible and a Use the email account’s password label will be listed in its place. Therefore, make sure that you know your email account password, as it will be required in the next step.
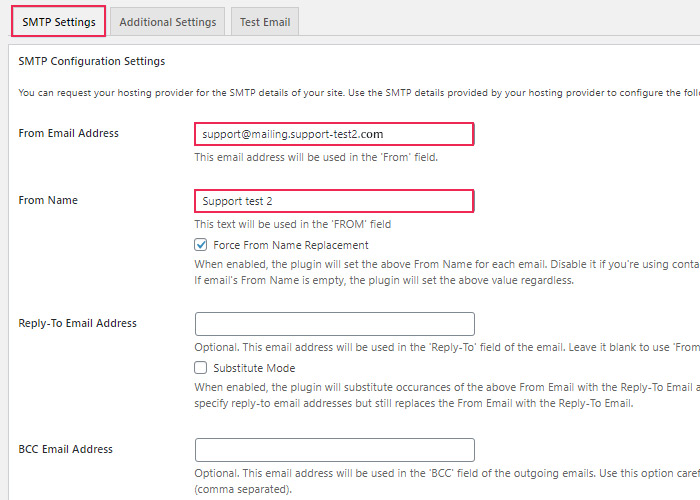
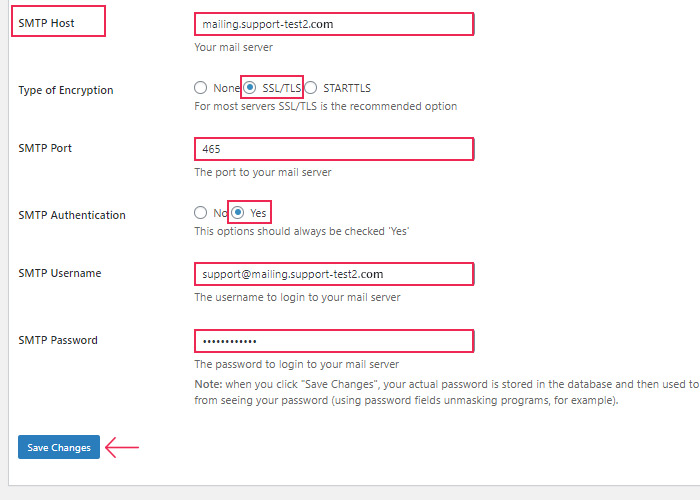
Now you can switch to the SMTP Settings tab of the Easy WP SMTP plugin. You need to fill out the fields using the information you copied from the Mail Client settings in cPanel.
Set the username you copied both as the From Email Address and as the SMTP Username. And under the SMTP password, set the password for your email account. Set the outgoing server as your SMTP Host, choose the SSL/TLS Type of Encryption, and copy the SMTP Port from the information in cPanel. Then, set the SMTP Authentication option to Yes and choose an appropriate From Name. The remaining settings are optional, so you can leave them set to their defaults.
After configuring the SMTP settings, you only need to test the mailing process. To do so, navigate to the Test Email tab within the Easy WP SMTP plugin. Set the email address where you want to send the email in the To field and add your email subject and message body. As we mentioned previously, make sure to use a valid address that you can access to check if the test email was delivered.
Then, press the Send Test Email button. If the message was successfully sent, you will receive a notification near the top of the screen stating so.
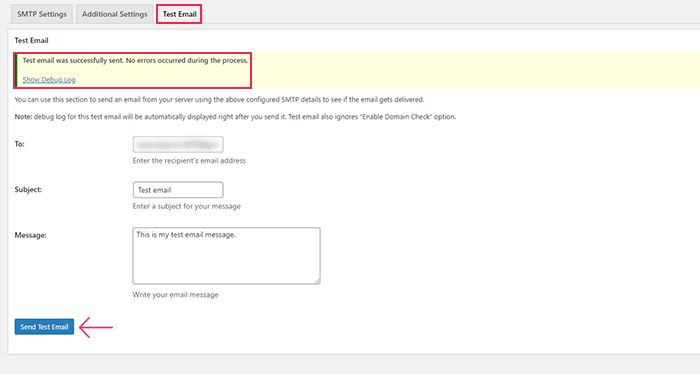
Next, you need to verify whether it was properly delivered. To do so, log in to the email address where you sent the email and check the inbox folder. If all previous steps were done properly, you should find the test email in your inbox.
Final Thoughts
WordPress mailing issues are common and can be very costly for any website. Especially if your site is focused on eCommerce. While there are numerous reasons why you might have issues with WordPress not sending emails, the solutions we proposed in this article can help you get your mailing service back up and running. We picked solutions that are relatively simple so users with different levels of WordPress knowledge will find them approachable and use them with ease. Simply follow all the steps carefully and you will be back in contact with your customers before you know it.
