14 Useful WordPress Features You (Probably) Aren’t Using
All of us who are using WordPress on a daily basis quickly get used to doing things in a certain way. There’s nothing wrong with that. The thing is, though, you may sometimes miss a chance to be more productive simply by not using some options that don’t make part of your usual repertoire or are perhaps tucked away from plain sight. Being unaware of some not so commonly known WordPress features is generally what happens to beginners, but it may as well happen to an advanced user.
In case you haven’t yet had the time to dig deeper and explore all the possibilities that WordPress has to offer, or you simply didn’t need to, we will show you some useful WordPress features that may come in handy in some situations.
In this article you will learn about:
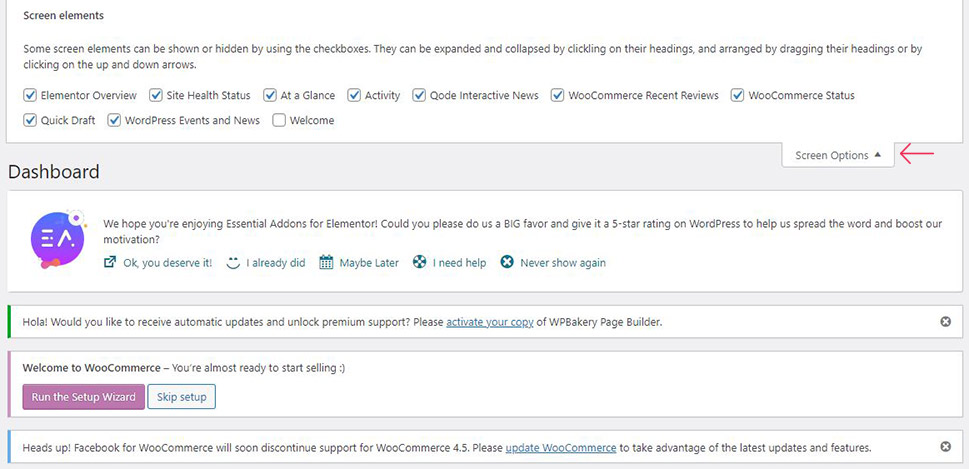
Although the Screen Options button is not exactly an unknown feature, the fact is that many beginners miss using it, and that is a pity as this is a very useful feature.
Screen Options appear at the upper right corner of your WordPress admin panel and when you click on it, a fly-down menu appears. Here you’ll find a set of options you can tick in order for them to show on the backend page you’re currently on. This way, you can simplify managing the page and its content by removing anything that distracts you or adding the options that you frequently use but that aren’t displayed in the editor by default. It is a nice way to make your workflow smoother.
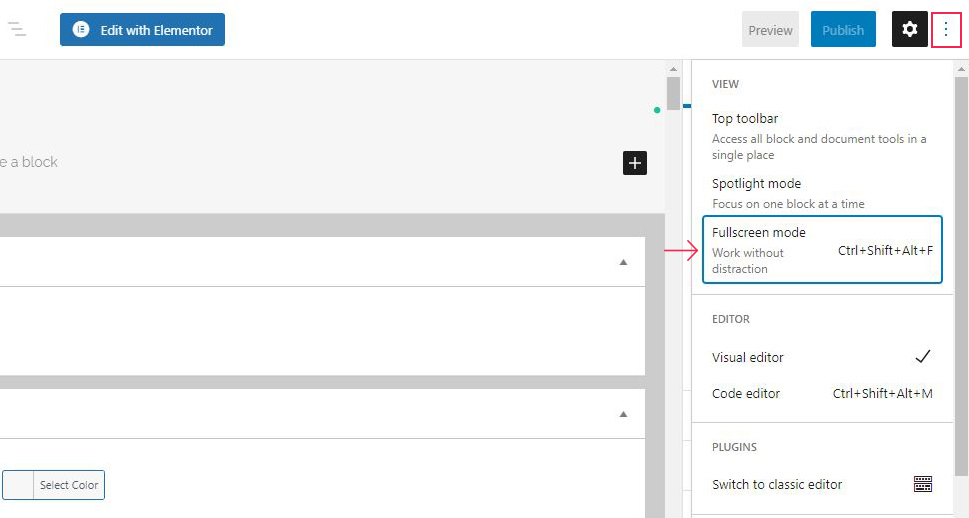
Did you know that WordPress supports your writing efforts by allowing you to focus solely on writing? If you find yourself easily distracted by the options and tabs that appear on the screen while you write, you will love the Distraction Free Writing Mode that you can set in the post editor. The icon for this mode appears in the upper right corner of the post editor. It removes all the tabs and options from your sight, so that you can dive into writing without any distractions.
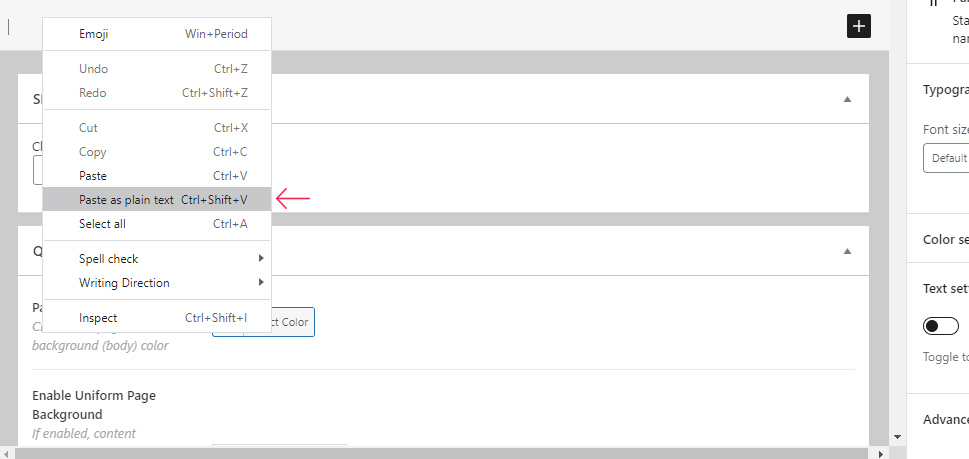
Have you noticed that anything you copy and paste from other websites or rich text editors in your WordPress post editor stays intact in terms of formatting, colors, links, fonts, styling, etc? This is because the WordPress post editor supports formatting automatically.
If you want to avoid this, the WordPress post editor has a built-in Paste as Text button. To use it, simply click the button before you paste the content, and you’ll get the pasted text free of any formatting. To make sure you see this option, toggle the Toolbar.
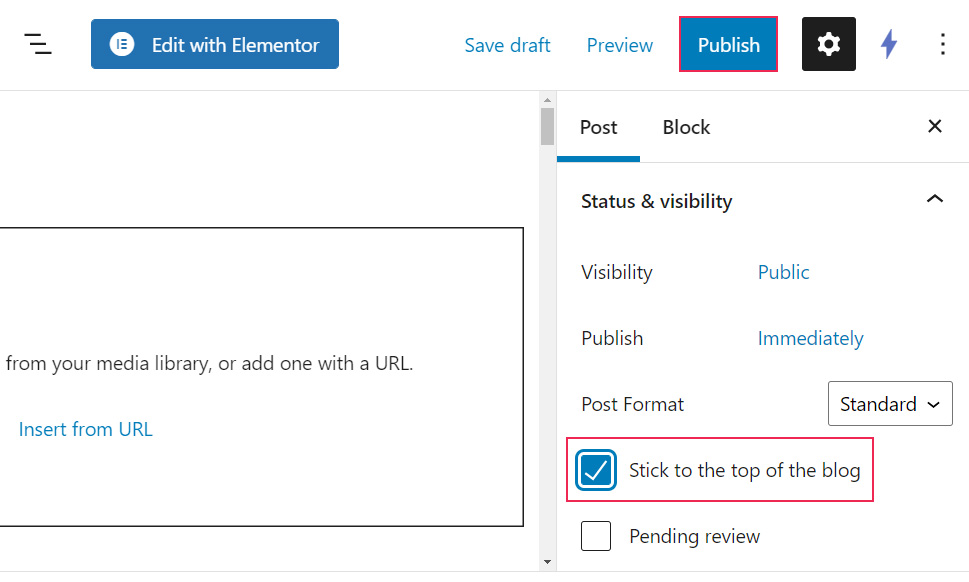
Just like you can pin a post on your Facebook page, you can do it on your website too. The Sticky Posts feature allows you to stick a post on top of your homepage. Even when you publish other posts, the selected sticky post will stay on top.
This feature is very useful whenever you have an important post like a contest or a promotion that needs to be in focus for some time.
To access this option, click on the “Edit” link next to the option “Visibility” under the “Publish” section, then check the “Stick to the top of the blog” and click on the OK button. Now you can update or publish the selected post, and you are ready. In case you want to explore this option further, check out our article on how to make sticky posts.
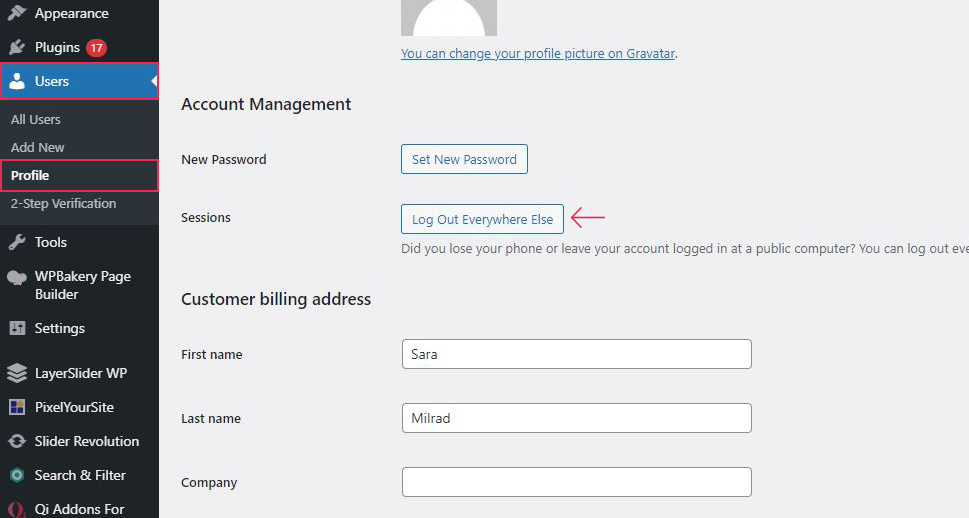
In case you are using WordPress on multiple devices, like many of us do, it may easily happen that you stay logged in on one of the devices.
That’s why WordPress introduced the Remote Logout feature from version 4.1. Thanks to it, it is now possible to log out of active sessions remotely. All you have to do is choose the Profile page from the Users section in the left-hand menu, then scroll down to the Account Management section on the page and click the Log Out Everywhere Else button.
For some reason, this feature is easily forgotten, and staying logged in on a device that is used by many users can be potentially dangerous. So, keep in mind that WordPress also offers the remote logout feature.
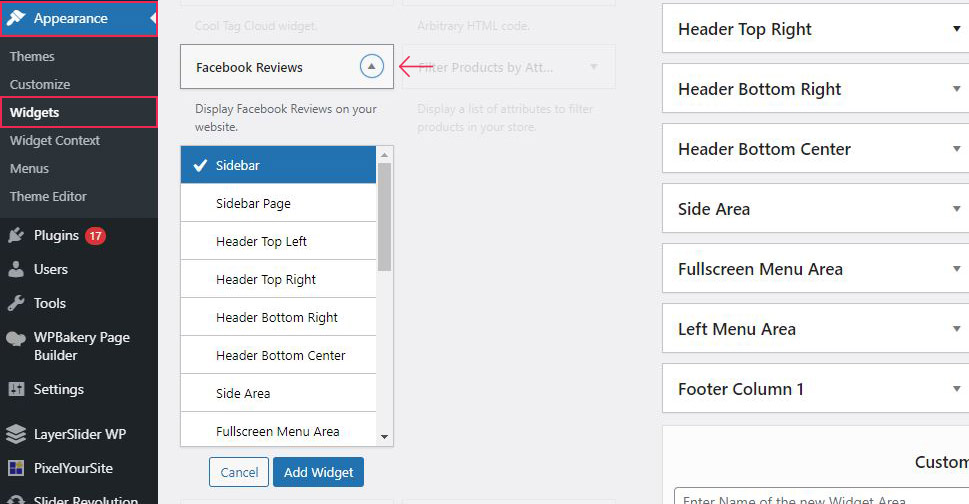
WordPress themes usually come with their sets of custom widgets, and the platform, of course, has a set of its own default ones. WordPress allows you to arrange them simply by dragging and dropping them in the desired place in the Widgets section of your dashboard. But, not everyone finds the drag-and-drop functionality so comfortable. If you prefer ticking boxes to dragging, you can just click on the widget you want to add and all the available widget sections will show. Then simply thick the area where you want the widget to be displayed and it will be added automatically to the selected section. You can also activate the accessibility mode for WordPress widgets by clicking on the Screen Options button on the Appearance » Widgets page.
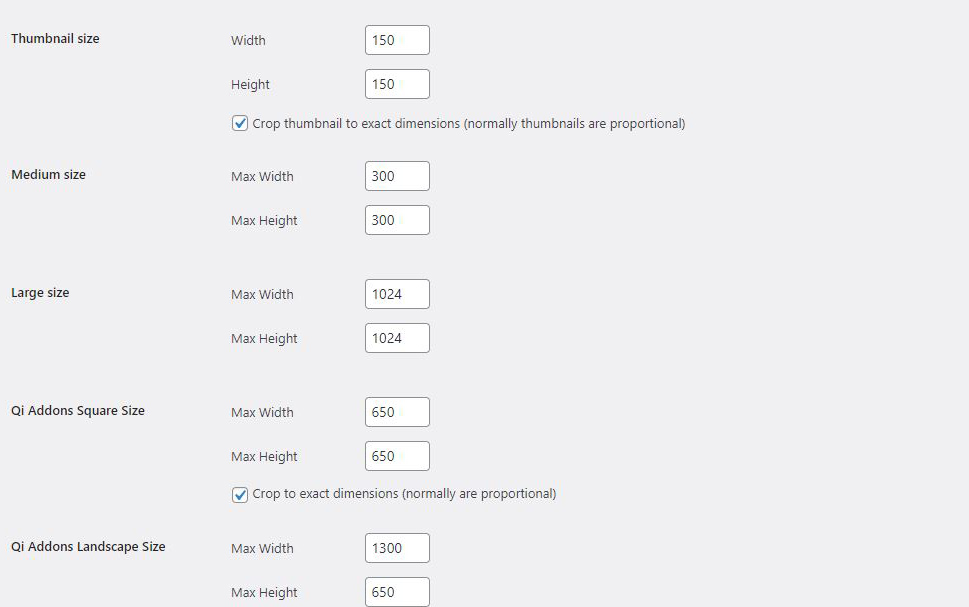
Did you know that every time you upload an image to your website, WordPress automatically creates three different sizes of the uploaded image, so that you can choose the size that fits best on the page? This is one of the most overlooked features of WordPress.
The default image sizes are found under Settings > Media. In case you want to change the default image sizes, you can also easily adjust the settings as per your needs.
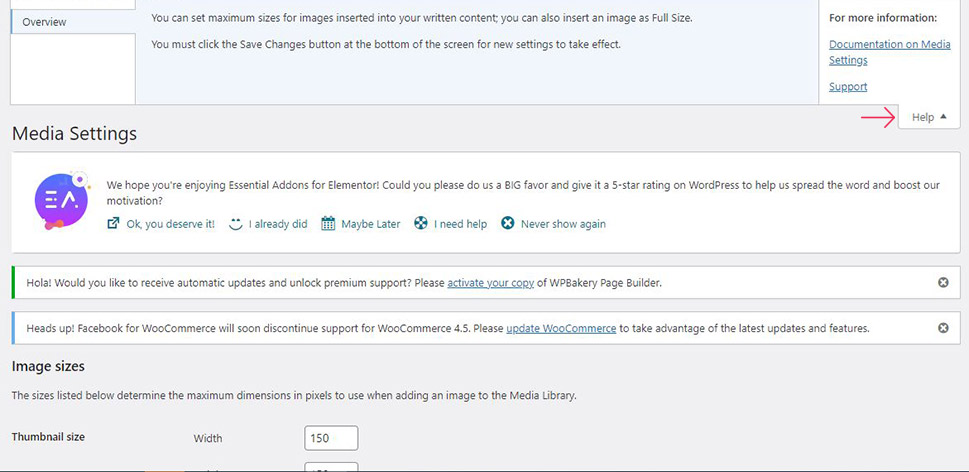
Isn’t it funny how often we need help in using WordPress and how often we ignore the small Help button on the upper right side of each screen in WordPress? Before reaching out to a professional, it is always recommended to check if you can solve the issue on your own. So, don’t hesitate to click on the Help button. When the drop-down menu appears, you will see explanations for the key parts of the screen. Links for jumping straight to the official documentation of the WordPress support forums will also be available in the menu.
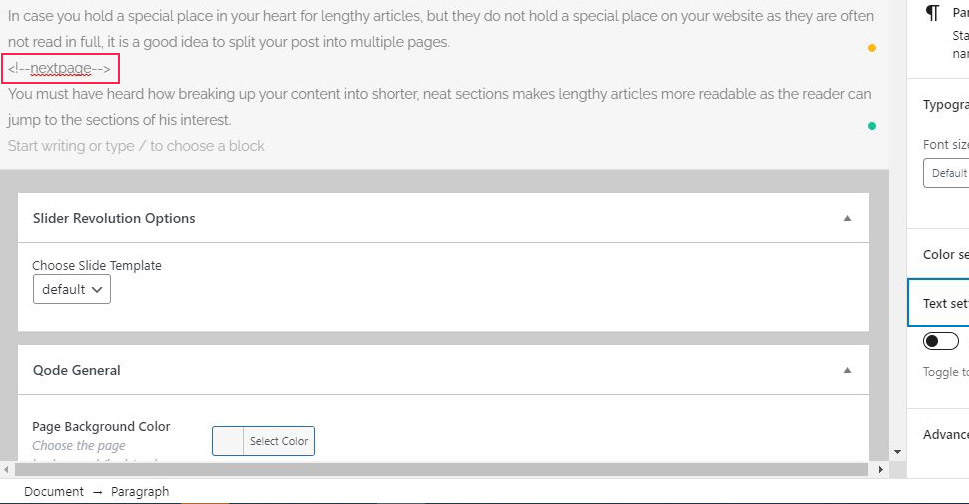
In case you hold a special place in your heart for lengthy articles, but they do not hold a special place on your website as they are often not read in full, it is a good idea to split your post into multiple pages.
You must have heard how breaking up your content into shorter, neat sections makes lengthy articles more readable as the reader can jump to the sections of his interest.
To do that, click on the Text tab that is placed next to the Visual tab in the text editor. Then simply enter the <!–nextpage–> tag at the point where you want your content to split. This way the content will be split into pages, and you can repeat this tag as often as needed.
Not essential but a handy option in WordPress is to mark your “favorite” themes and plugins. This is quite convenient when you are in the phase when you are considering the use of new plugins and themes and want to narrow down your choice. Selecting favorites is easily done, just log into your WordPress account, and start browsing the official WordPress repository. You will notice a small heart icon in the bottom right corner of each plugin section. Click on it, and the plugin will be saved as your favorite. Bear in mind though that this is only possible if you have an account on WordPress.org.
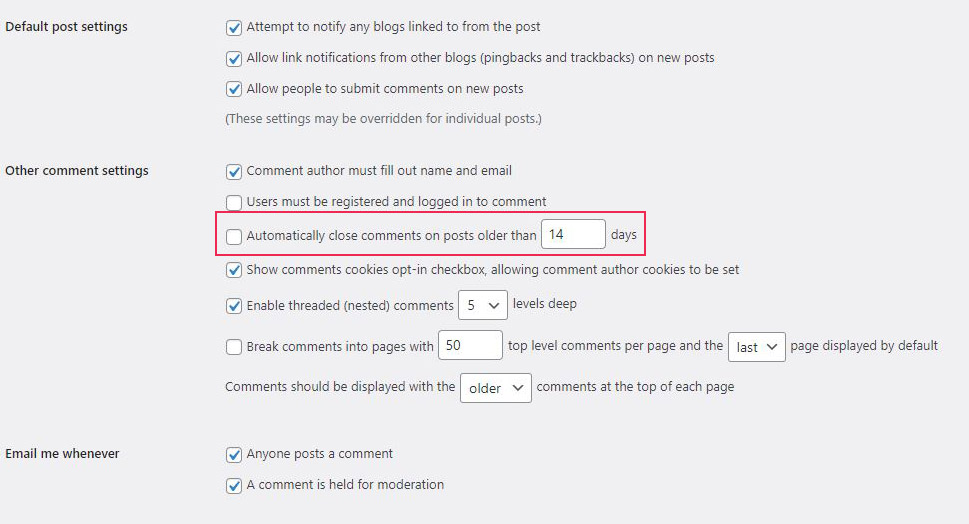
Although it is usually recommended to maintain open and friendly communication with your audience, sometimes, it may take too much time to respond to comments on some of your old posts that are no longer relevant. The solution, in this case, is to turn off comments on old posts. Go to Settings > Discussion, and from there, you have the option to configure comments to automatically shut down on posts after a certain amount of time. In case this seems like a radical solution, you can explore a bit on how to moderate comments and if you don’t want to bother with comments at all, you always have the option to completely disable comments on your site.
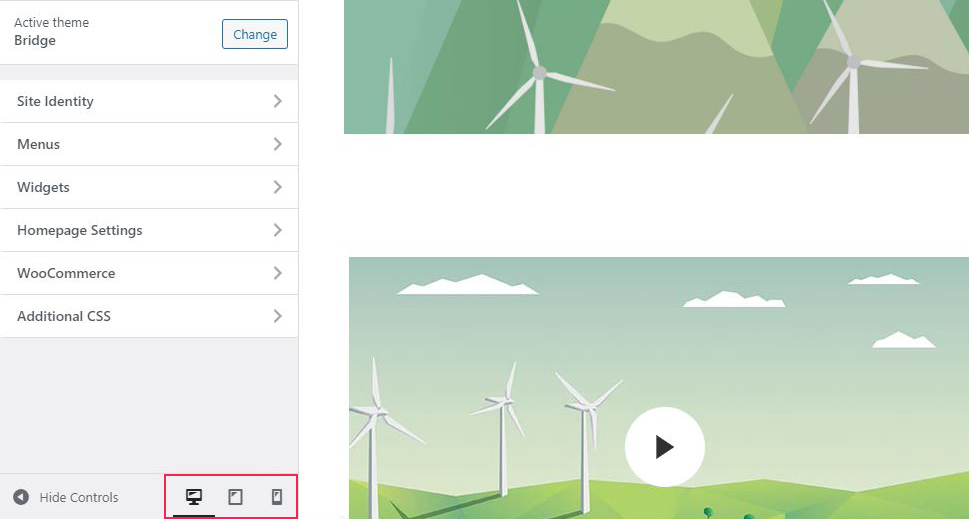
From the WordPress 4.5 version, you can preview your website as it appears on mobile devices and tablets. Knowing how important responsiveness is, this is an option you shouldn’t miss to use. Go to Appearance > Customize, where you will notice three small icons – desktop, tablet, and mobile, at the bottom of the Customizer’s left-hand column, and simply click on the one for which you want to see the preview.
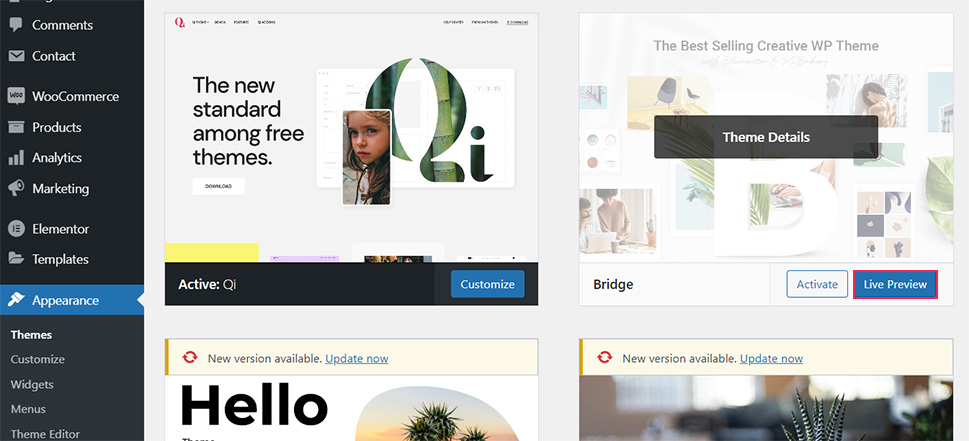
If you are considering switching to a new theme, but you’re not really sure if it is going to work for you, there is a safe way to check that without having to make actual changes on your website. You will have to install the new theme though. After you install it, go to the Appearance » Themes page, find the Live Preview button in the newly installed theme’s thumbnail and WordPress will start the theme customizer where you will be able to see a preview of your website with the new theme.
Hidden Master Options Panel
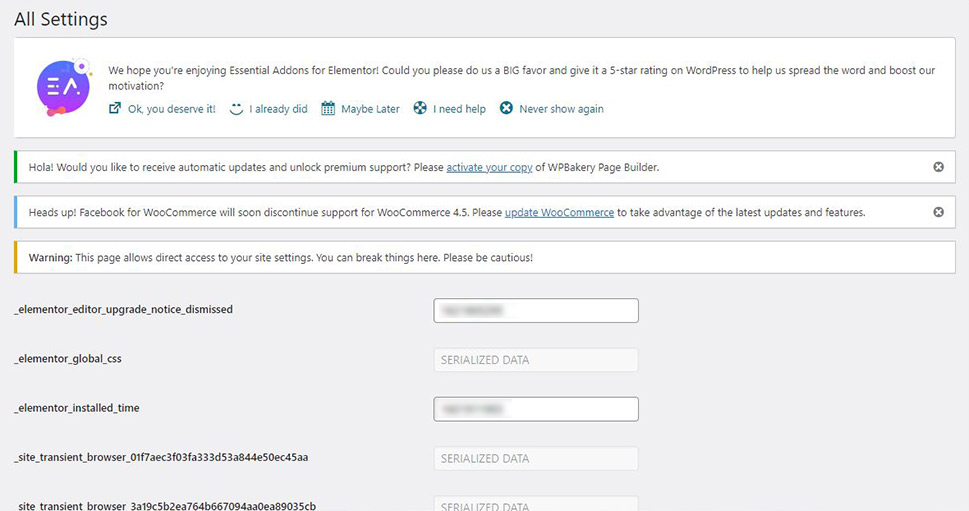
The last feature we choose for this list is the most powerful, but also the most dangerous one, especially for not-so-experienced users. That is exactly why this option is nicely tucked away from your WordPress admin panel, with no direct links to it, so that only the ones who know about it can access it. To access it, go to www.yourdomain.com/wp-admin/options.php.
Be very careful when you open these options, as you can easily do more harm than good, especially if you are a beginner and don’t know precisely what each option is for. Here, you can set a lot of WordPress options like blog name, site description, URL, time format, default image size, auto-closing blog comments, and many more.
In Conclusion
There is almost always more than one way to do anything in WordPress, and you will surely find the way that works best for you. Each new version of WordPress introduces new features, so stay tuned as this list is surely going to grow. Eventually, you will master the basics and start feeling more confident and that’s when you will realize your website can actually be a playground upon which you can create beautiful things.


