How to Manage, Track, and Control File Downloads in WordPress

WordPress has come a long way over the years, evolving into much more than a simple blogging platform. It’s become a powerful content management system that allows users to create websites for all sorts of business niches. One of the biggest reasons for its success lies in the number of useful and good-quality WordPress plugins that have been created to extend its basic features and functionalities.
In this article, we will be looking at the management of downloads in WordPress as one area that has been greatly augmented with the use of plugins. While WordPress by default allows users to easily add downloadable files to their pages and posts, it lacks most of the advanced features that allow you to manage, track, and control file downloads properly.
However, thanks to the existence of WordPress download manager plugins, users can have access to easier download management. Within this article, we will cover two such plugins while carefully explaining the features they provide and how they are used. Additionally, we will discuss why download manager plugins are important as well as:
A complete download management tool in the form of a WordPress plugin is something that could benefit a wide range of WordPress users. It could be extremely beneficial if you are selling e-books, graphic design files, audio, and video lectures, a piece of software, sales enhancement strategies, or something else entirely as it will give you a clear way of keeping track of the files that are being downloaded. Then you will be able to recognize your top-selling downloads and create new marketing plans accordingly.
Furthermore, the same download manager plugins can help you enforce different kinds of restrictions on downloadable files. That will protect them from unauthorized users or user roles, limit the download count or enforce variable pricing based on limited sale offers. Those plugins will often offer a way to integrate third-party storage platforms like Google Drive or Dropbox, giving you a workaround for any storage limits your server might have.
Download managers are also quite useful for any WordPress users who want to share free downloads of their materials as a way to create engagement on the website or grow a community around it. Therefore, whether you wish to distribute free downloads or create a digital store business, finding a quality WordPress download manager plugin will give you complete control over your downloadable files.
How to manage, track and control file downloads in WordPress
Now that you have a better idea of the benefits involved in using download managers, let’s explore two such plugins and how they are used. The first is called WordPress Download Manager and it was designed as a download manager plugin exclusively. The second is a well-known WordPress e-commerce plugin called WooCommerce, which can function as a download manager as well, due to its wide range of capabilities. With that being said, let’s begin.
The WordPress Download Manager plugin is a freemium plugin made specifically as a download manager. However, it can be extended well past its base functionalities using add-ons, both free and premium.
The free plugin features include a custom download package post type and taxonomies, as well as shortcodes and widgets that display them, and adding files by dragging and dropping them from the server, media library, or using third-party storage services thanks to the free add-ons. Furthermore, the Download Manager includes different levels of download protection, an IP block option, and custom page, link, and embed templates. There are also custom shortcodes for the login and register form and a user dashboard, a chunked upload feature that allows you to bypass the upload limit on the server, and custom download logs, among other things.
As for the premium add-ons, there are quite a few of them available. You can see them all on the plugin’s official add-on page. With that being said, let’s explain how the plugin can be used.
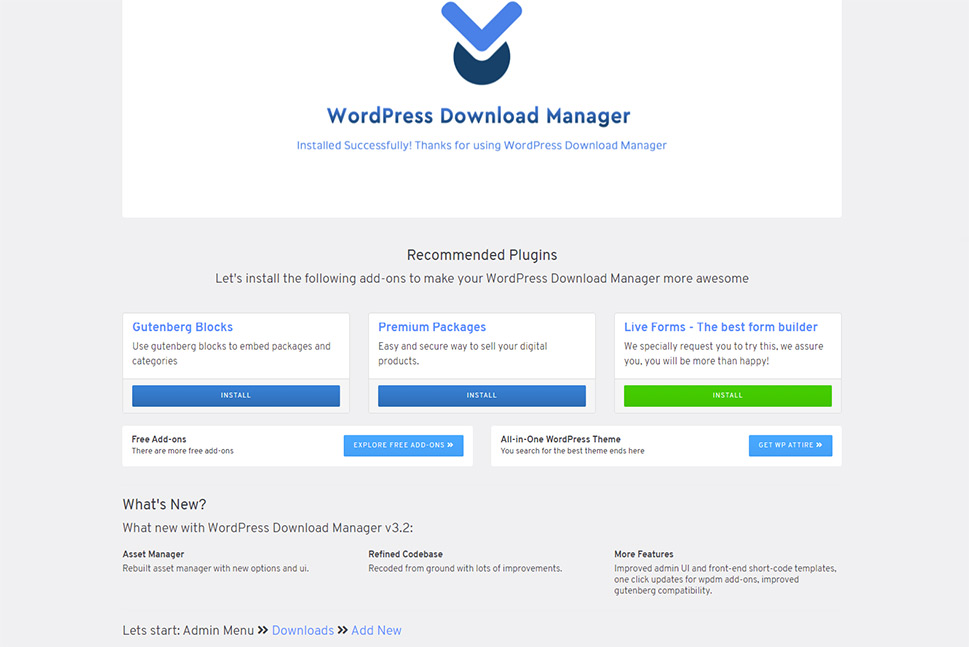
After installing and activating the plugin, you will be greeted by the plugin’s Welcome screen. Within it, you will be able to see the add-ons, i.e. plugins that are recommended to extend the basic functionality of the WordPress Download Manager plugin. This screen will also show what is new in the current version of the plugin and where to start with its use.
For this article, we only used the plugin’s basic functionality. As such, we could navigate straight to the Downloads > Add New section within the admin dashboard.
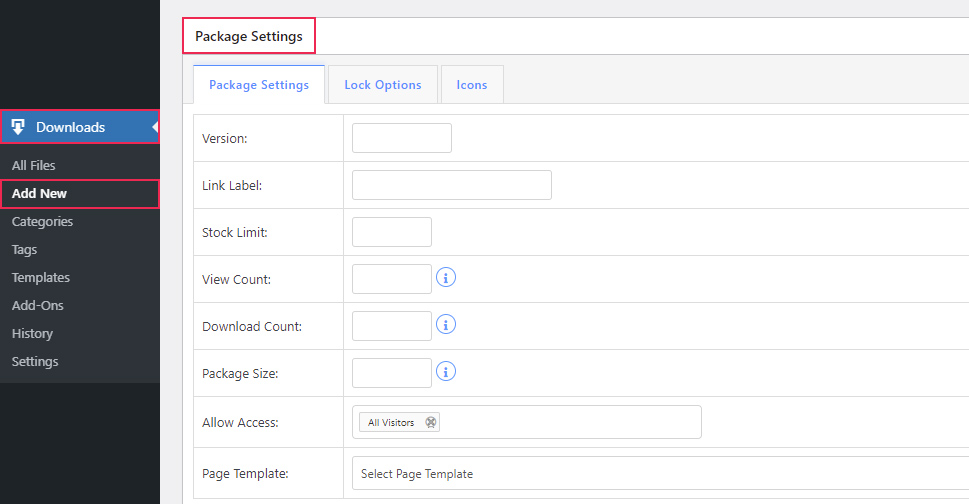
This will allow you to create a new download package using the various sections that are available. Apart from creating a title for your download package and adding a file within the Attach File section on the right, the most important options are located within the Package Settings section below the editor. This section has three tabs by default—Package Settings, Lock Options, and Icons.
Within the Package Settings tab, you will be able to set the package version, a custom download label, as well as set a downloads limit, choose who gets to access the page, and pick a predefined plugin page template. After uploading the file within the Attach File section, the Package Size will be set automatically, while the View and Download count options are updated as your visitors start downloading the file.
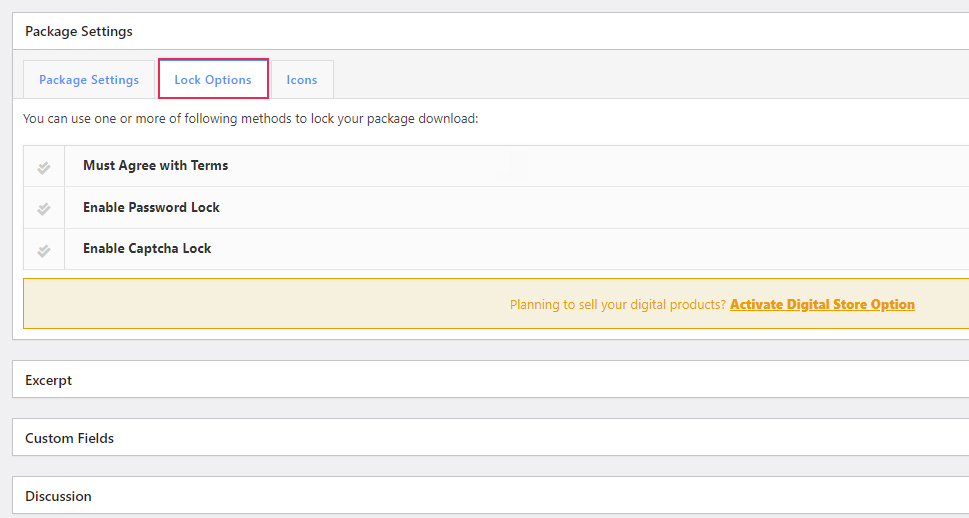
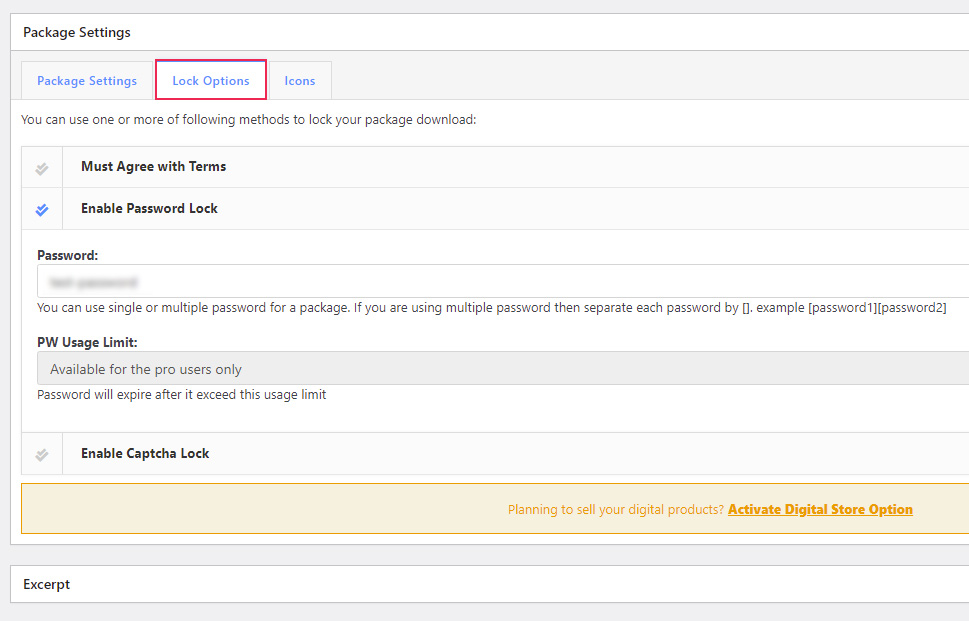
In the Lock Options, you will be able to choose one of three methods that help you secure your download package. Those are agreeing to the terms and conditions, setting a password, or using a reCAPTCHA verification on the download link.
And, in the Icons tab, you will be able to choose the icon that will be displayed next to the download.
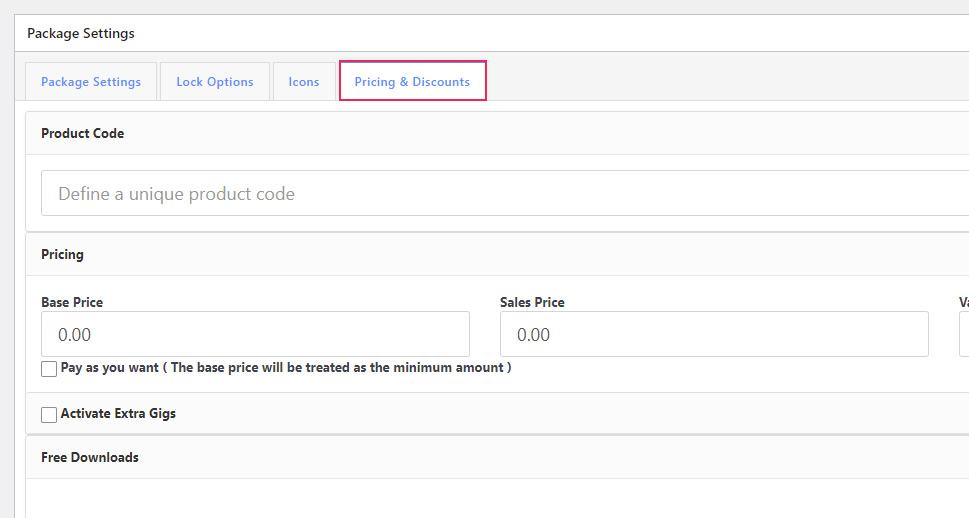
Within the tabs, you will also see a link asking you whether you wish to activate the digital store option. As we are only covering the plugin’s basic functionality in this article, we won’t go into much detail about the digital store option. Still, you should know what to expect if you press the link. By doing so, you will install and activate the Premium Packages – Sell Digital Products Securely add-on for the WordPress Download Manager plugin.
More precisely, after clicking on the link, you will need to wait a bit until the add-on has been installed and activated. Then, after refreshing the page, you will see that an additional tab called Pricing & Discounts has been created in the download page’s backend. Besides that, five additional sub-sections will appear within the Downloads section of the admin menu. Using the Pricing & Discounts tab, you will be able to set all the important properties of a digital product, and using the menu sub-sections will allow you to easily manage the various aspects of the shopping process.
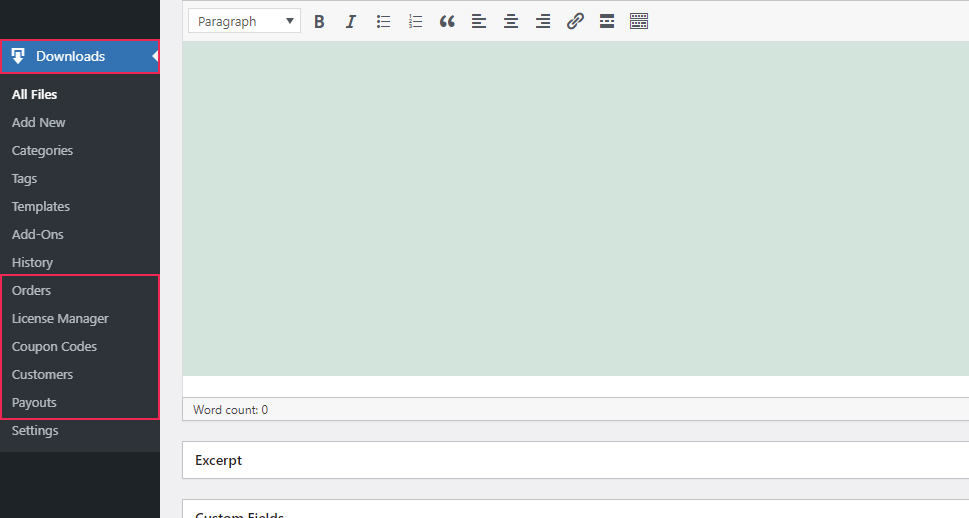
Now let’s return to the process of creating a download package.
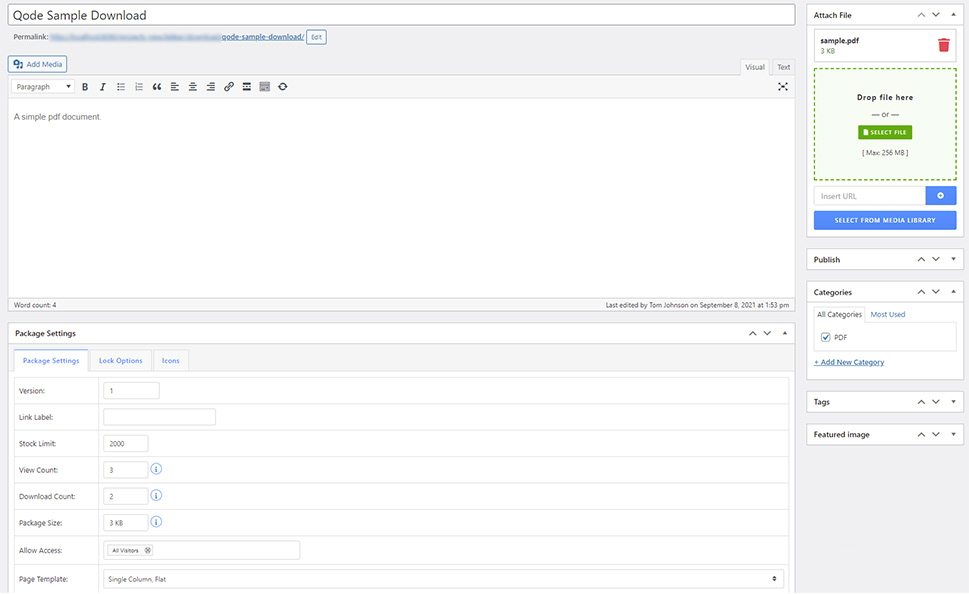
For this article, we created an example using the properties shown in the screenshot below. We set a title for our download package, added a file in the Attach File section, and inserted a bit of text in the editor.
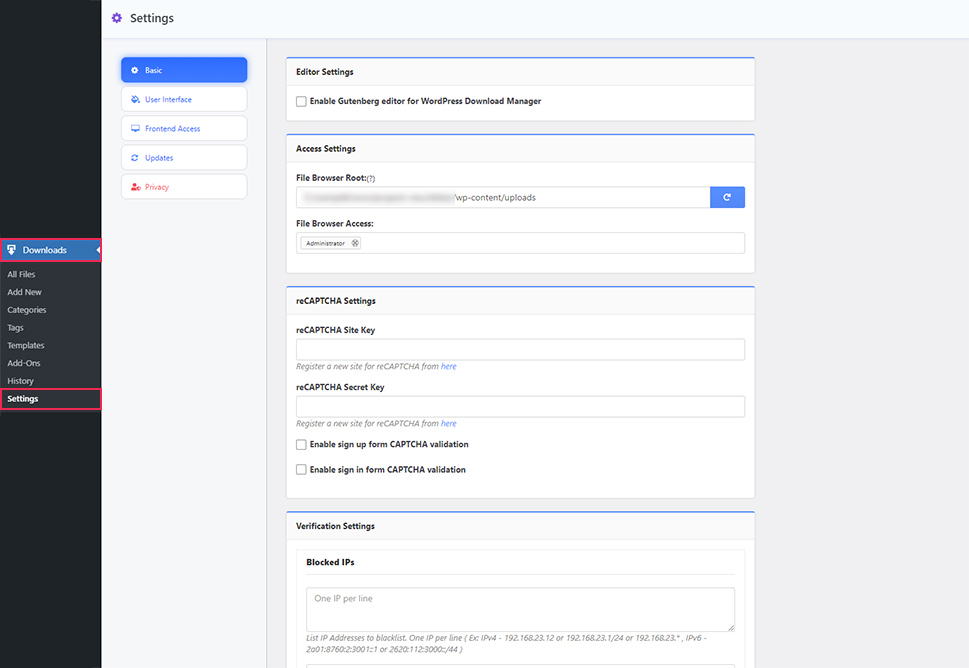
Regarding the file attachment process, you can choose to drag and drop the file, or you can select it from your computer, the website’s Media Library, or the server by inserting the URL. Additionally, the Classic Editor will be enabled by default for any page content you wish to add. But, you can also enable the Gutenberg editor to download package items if you wish. This is done by choosing the Enable Gutenberg Editor for WordPress Download Manager option located in the Basic tab of the Downloads > Settings section.
As for the other settings, we created and assigned a category in the Categories meta box, while the remaining settings were made in the Package Settings section. These include setting a version number, stock number, assigning a page template, and setting the access rights. Since we haven’t set any custom download label, the default one—Download—will be used.
Furthermore, the remaining options within the Package Settings tab will be automatically populated, and we chose to leave them that way. Additionally, it is worth mentioning that the download page templates that are provided by this plugin can be previewed by navigating to the Downloads > Templates > Page Templates section. However, you will have to publish at least one download package item before you can preview them.
Among the other options we set, there was a password lock created using the free Password option in the Lock Options tab.
And we also chose a suitable icon within the Icons tab.
After you publish the download package, it will be ready for review on the website. You can see on the screenshot below how our example package looked on the page.
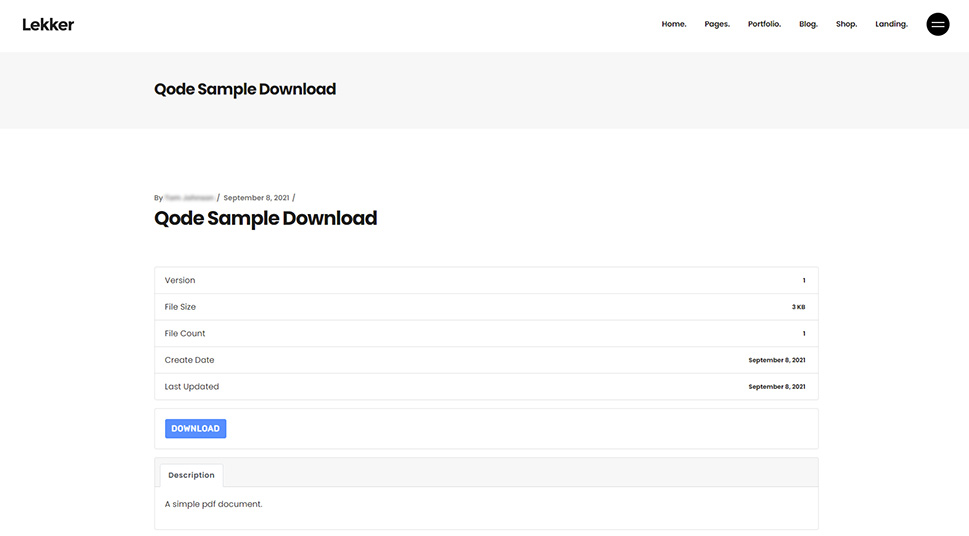
Since we set a password lock, clicking on the Download button will open a popup window where users need to insert the right password to download the file.
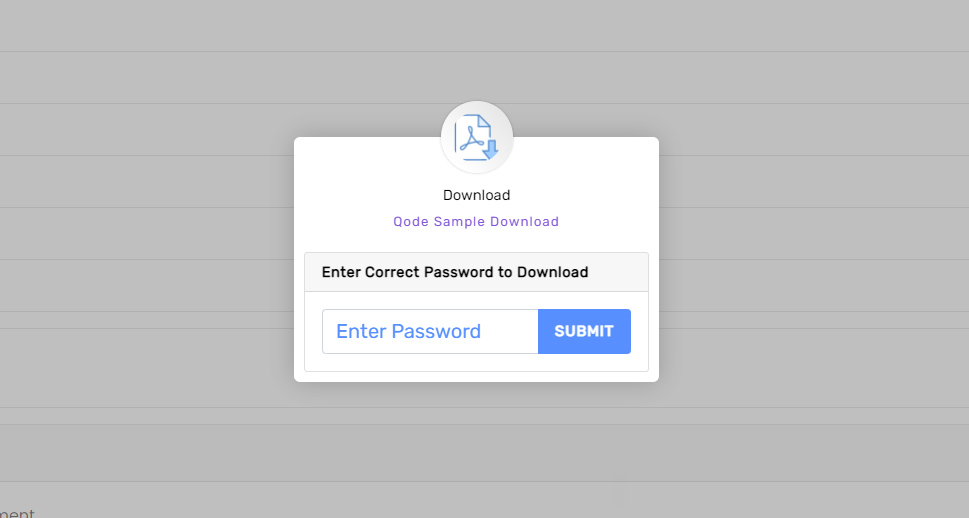
Above is the display we got for our chosen package page template. The display can vary based on the template you choose, but as long as the password lock has been set, the form requesting a password will appear.
Apart from directly accessing the package page, there are other ways to use the packages. These include using the suitable shortcodes and widgets provided by the plugin. We will cover those uses below.
After you create a package item, it’s placed among the other previously created package items. To easily access them all, navigate to Downloads > All Files. If you have a lot of packages already created, you can use the Search Files feature to help you find the exact package you are looking for. Once you’ve found it, you will notice that it contains a shortcode call you can use.
That shortcode call references a shortcode created by the plugin called wpdm_package, which has only one parameter—the ID of a package item. Furthermore, if you observe any package row more closely, you will see additional information regarding the corresponding package item—its icon, name, and the number of times it was downloaded, in that order.
You can insert the shortcode call within the content of your pages or posts to display the download button for a specific package. This is achieved by using the package item ID as the shortcode parameter. Start by pressing the Copy button next to the shortcode call to copy it.
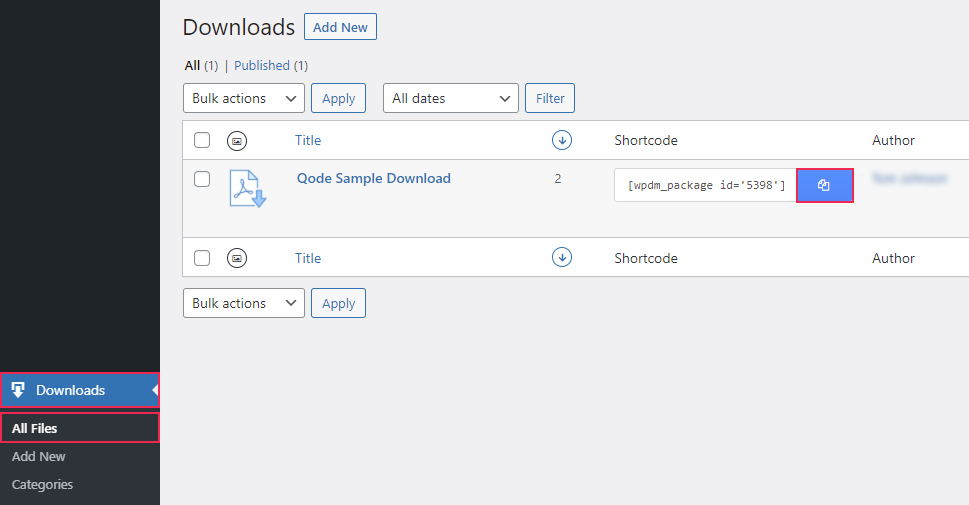
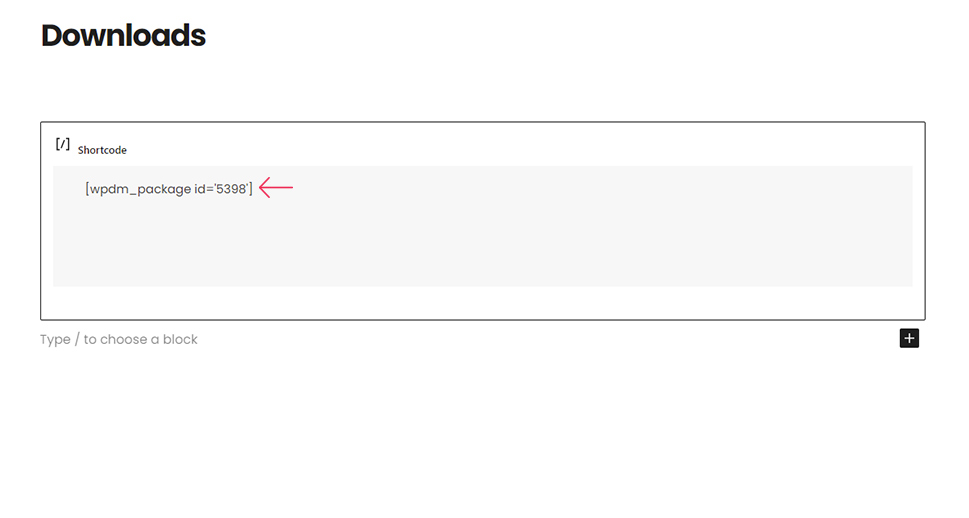
Then, to use it within a page or post, you will need to paste that shortcode inside a shortcode-rendering element. For the Gutenberg editor, which we used for this article, that element is the Shortcode block. We pasted the shortcode call inside the Shortcode block and published the page.
The result was a simplified display of the download package item, with the icon, name, number of files, file size, and the Download button.
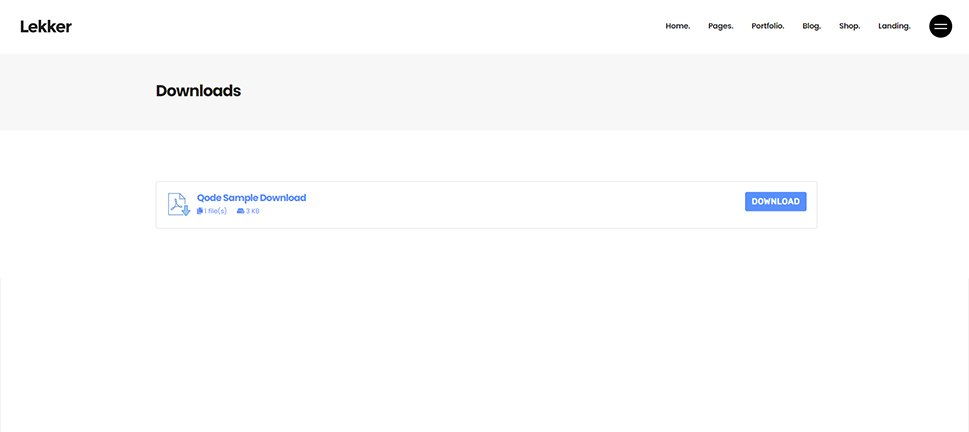
The same display can be achieved using any other editor, as long as you insert a shortcode call inside an appropriate shortcode-rendering element. Since we already covered this in detail in our article on creating and using custom shortcodes, you can check it out to see all the steps broken down for various page editors.
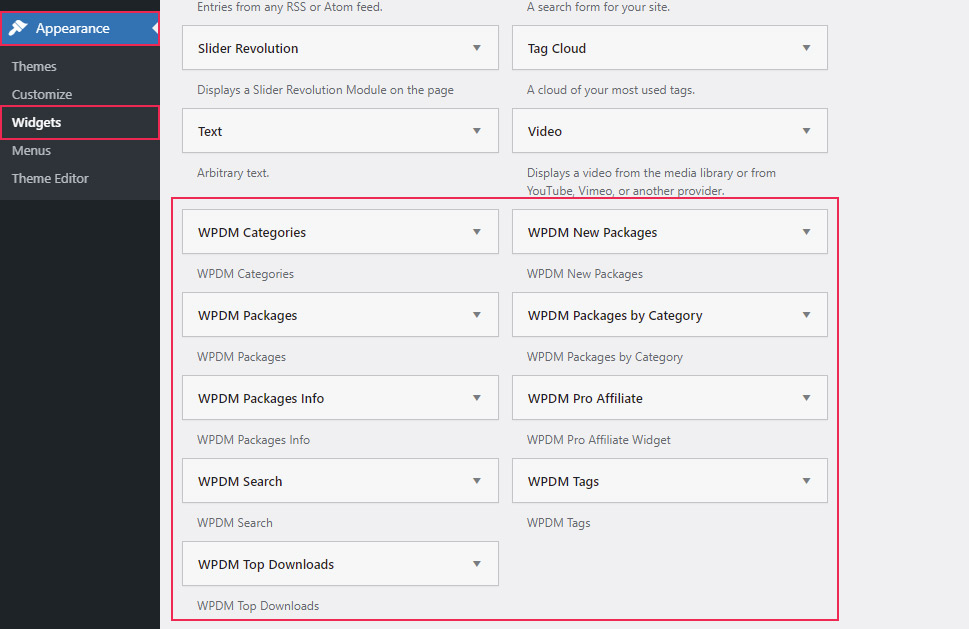
While custom shortcodes can be useful for intermediate and advanced users, they can be frightening for those newer to WordPress. Luckily, the WordPress Download Manager plugin also offers a more user-friendly set of widgets. They can be used to display specific packages or packages within a specific category or tag. The latter can be created in Downloads > Categories and Downloads > Tabs, respectively.
To see all the widgets that the plugin offers, navigate to Appearance > Widgets and scroll to the bottom of the Available Widgets section. The widgets that belong to the WordPress Download Manager plugin will have the prefix WPDM.
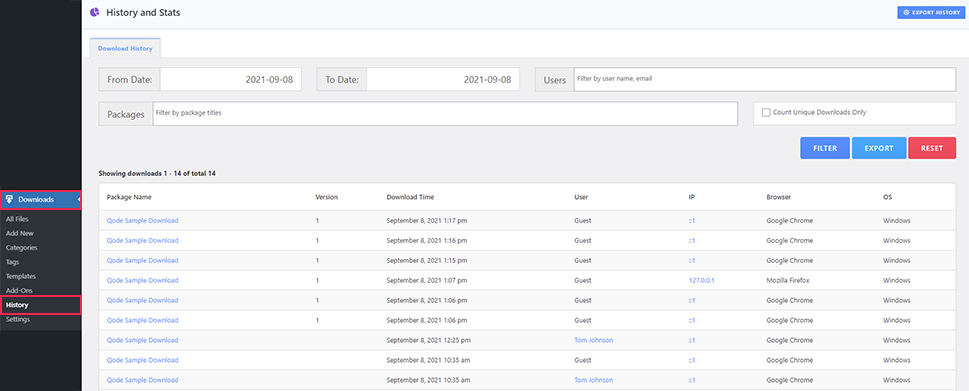
Finally, the WordPress Download Manager plugin allows you to track the downloads that were made. For starters, you can see the number of times that a download package has been viewed or downloaded in the dashboard of a specific package item. Besides that, you can observe the complete download log by navigating to Downloads > History. There, you will be able to filter the downloads that were made based on date, package name, or user.
You should carefully review all the settings within the Downloads > Settings section to get a full grasp of the functionalities this plugin offers. Some notable options include reCAPTCHA verification settings, blocking IPs, setting the upload file types, setting the download speed, styling the download button, and setting the login, register, and user dashboard pages.
WooCommerce is one of the most popular free e-commerce solutions which lets you sell anything, including digital downloads, on your WordPress website. Since it is built as a comprehensive e-commerce platform, you can use it if you plan on selling different kinds of goods besides downloads.
The WooCommerce plugin has a lot of extensions available, both free and premium, for added functionality. And, by reviewing its detailed documentation, any developer can also use the hooks and filters within the plugin code to make additional adjustments. However, in this article, we will only consider the plugin itself, without the possible extensions.
The features you can expect to find include custom post types and taxonomies, as well as custom shortcodes and widgets, which are used to display various parts of the shopping process and to make it function properly. The product post type allows you to create various subtypes, including downloads, each with a unique set of options. You can also set various restrictions on your downloads while using a centralized dashboard for tracking all products, similar to the download log we previously covered.
The WooCommerce plugin offers comparable features to any specialized download manager plugin. As for the extensions, since there are too many to mention, we suggest checking out their Extensions Store to get the full overview. Now, let’s explain how you can use the WooCommerce plugin for managing downloads.
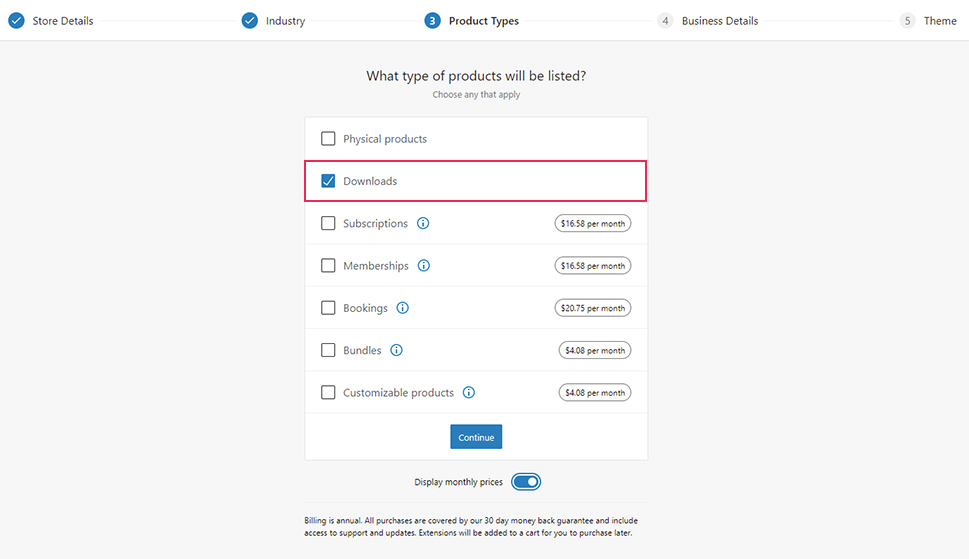
After installing and activating the plugin, you will be prompted with the setup window, where you will need to insert various details about your shop. Most are straightforward, but there’s one we want to draw your attention to—the type of products. If you plan on distributing or selling file downloads, make sure to select Downloads as the product type. And, if you are planning to sell other types of products, you should also select them as well.
After finishing the setup process, navigate to Products > Add New to add file download as a new product. Then you will see a similar display of sections that we had with the WordPress Download Manager plugin. That is, you will be able to add a product name and image, assign a product category and tag as well as add some content in the editor field. However, the most important part is done using the Product data section underneath the editor.
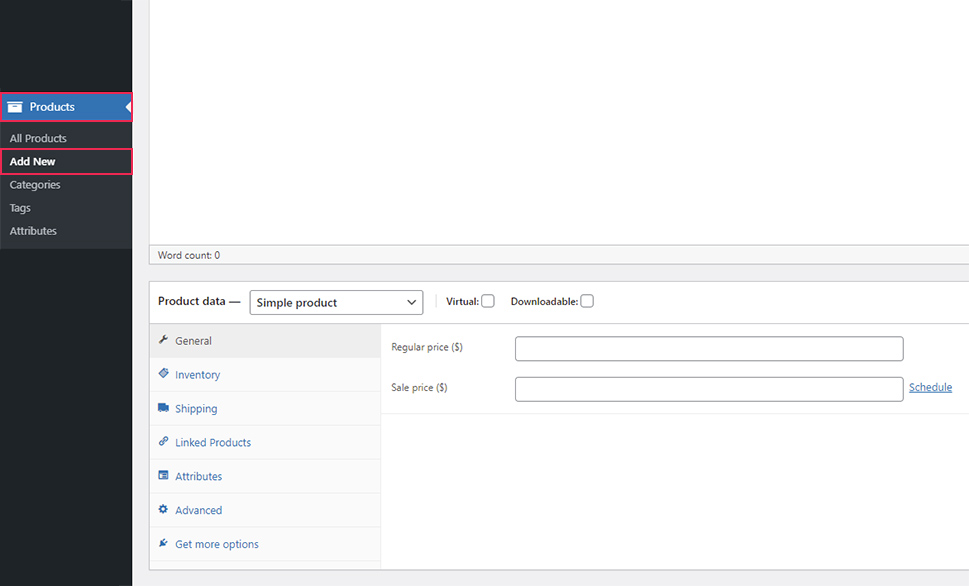
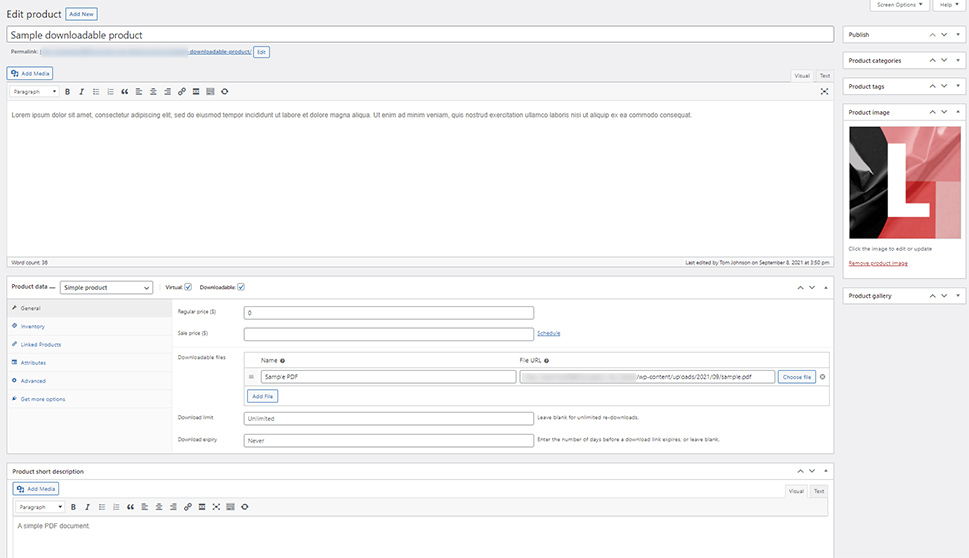
For this article, we created a sample file download product. We added its name and specified it is a virtual, downloadable product by ticking the two checkboxes in the Product data section. This is mandatory if your product is digitally downloadable.
Also, since we wanted it to remain free, we set the price to $0. Of course, if you don’t want your file download product to be free, make sure to insert a proper price value in the appropriate currency. Under the Downloadable files option, we gave a name to the download link and inserted the file that will be downloaded.
All the data we mentioned above is mandatory when creating a file download product. But, filling out the remaining options and sections is optional. Still, we recommend reviewing the two options that are particularly useful for digital downloads—Download limit and Download expiry—and setting them as appropriate.
For our article, we only inserted a bit of text in the editor and the Product short description section, and we added a simple featured image for the product. After that, we published the product by clicking on the Publish button within the Publish section on the right.
With that, the product will be displayed on its product page, as well as on the default shop page. The shop page is set within the Products tab of the WooCommerce > Settings section. Additionally, the product can also be displayed using custom shortcodes that list product items. Shortcodes that let you display some of your product offers in a list can be a part of WordPress plugins or themes. This is the case with all of Qode Interactive’s eCommerce themes.
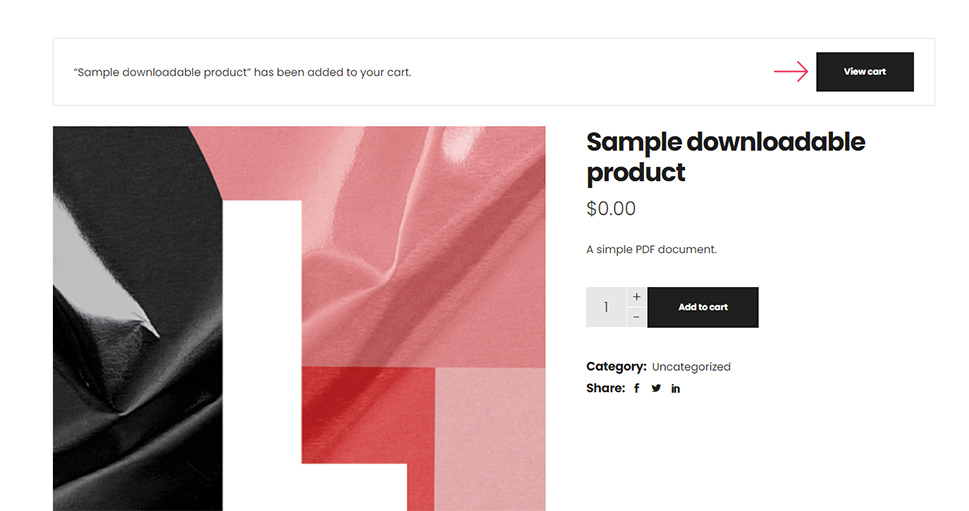
With that being said, you can now check how the process will look from the user’s perspective, or simply verify that everything functions properly. So, after accessing the product page on the frontend of the website, you will be able to add the download product to the cart by pressing the Add to cart button.

Then, you will see a notification that the product was added to the cart, and you can press the View cart button to proceed.
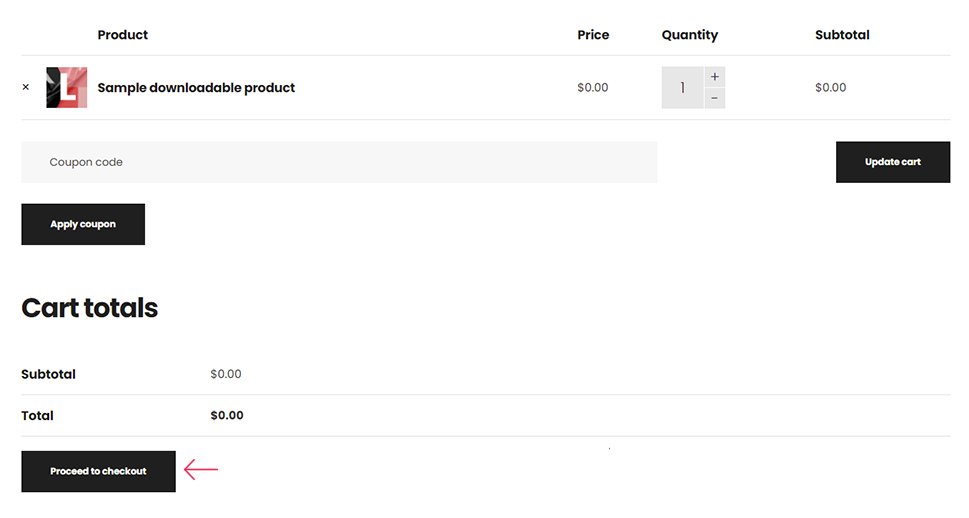
The Cart page will have an overview of your cart content, which you will be able to edit if needed. There will also be a field where you can apply a coupon code. You can see the cart totals and a link to proceed to the checkout page. If you are happy with the state of your cart, press the Proceed to checkout button.
At the checkout page, you will need to insert your billing information. Then, press the Place order button at the bottom.
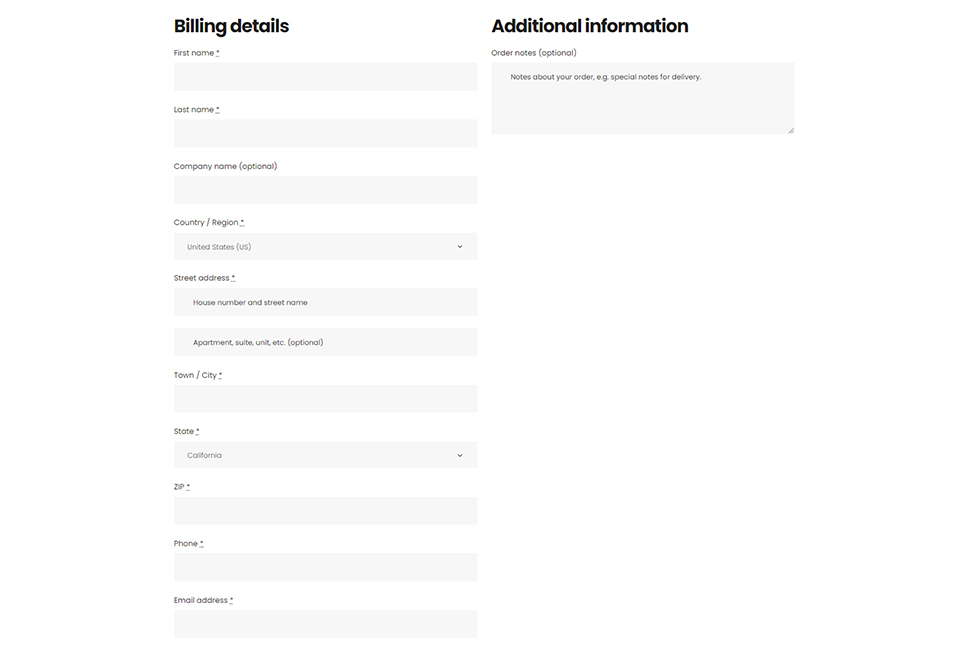
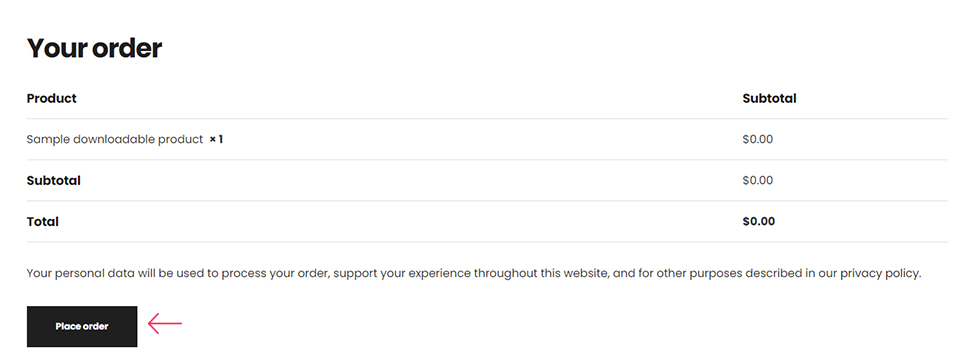
The information you insert this way will be stored as an order in WooCommerce > Orders or Analytics > Orders. These are the two places within the dashboard where you can track the orders placed on your site.
Furthermore, there are extension plugins that can transform the checkout process into one more suitable for digital products. If you will be focusing on this one product type, then you can consider a WooCommerce addon for the checkout. However, this widely applicable checkout is available with the free version of the WooCommerce plugin and can easily be used by all.
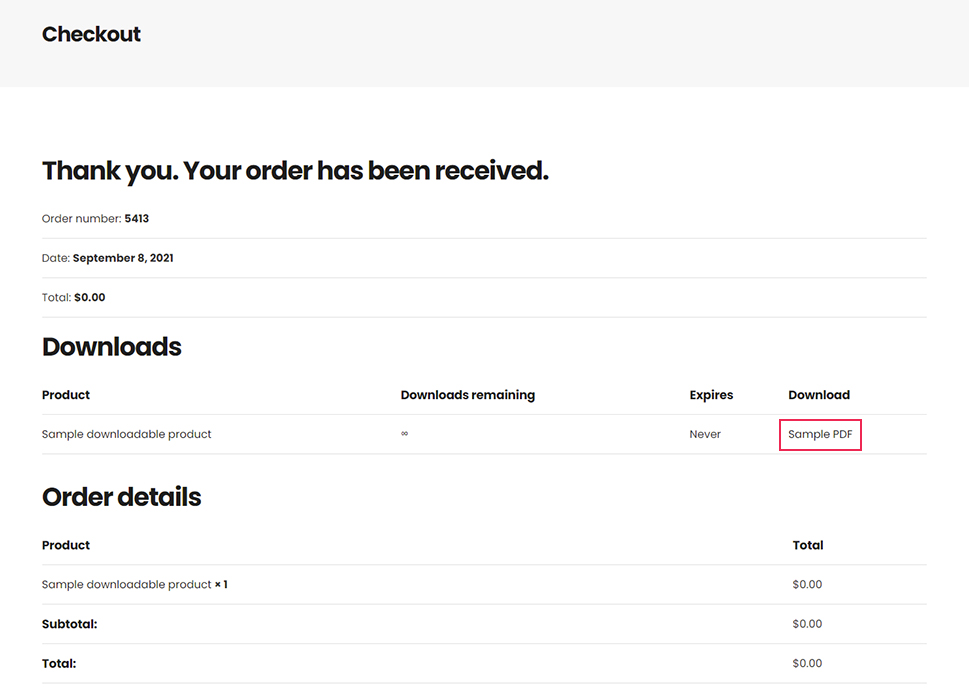
As for the orders, after the payment is verified there are several ways a customer can obtain the download link. Those are via the Order Received page or email notification, as a link on the My Account page if the customer is logged in, or even by getting the permission to download the file immediately. The same applies to free downloads, except the process is a bit quicker—the order is received, processed, and completed at the same time. Shortly after, users can download the file using one of the methods we mentioned above. In the example we created, the file could be directly downloaded from the Order Received page.
To track the downloads in WooCommerce, you can use the new Analytics panel, which was introduced in the plugin’s 5.3 version. It will give you a global overview of your sold products using various displays.
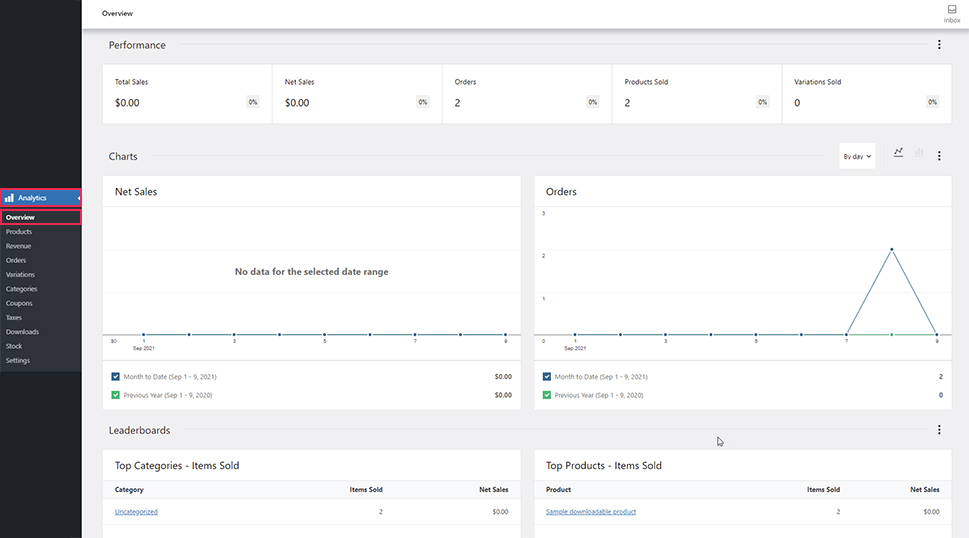
For digital downloads specifically, you can use the Analytics > Downloads section. It offers a similar download log to the one we saw in the WordPress Download Manager plugin. You can filter the information based on the date, show all downloads, or apply advanced filters based on the product, customer username, order ID, or IP address.
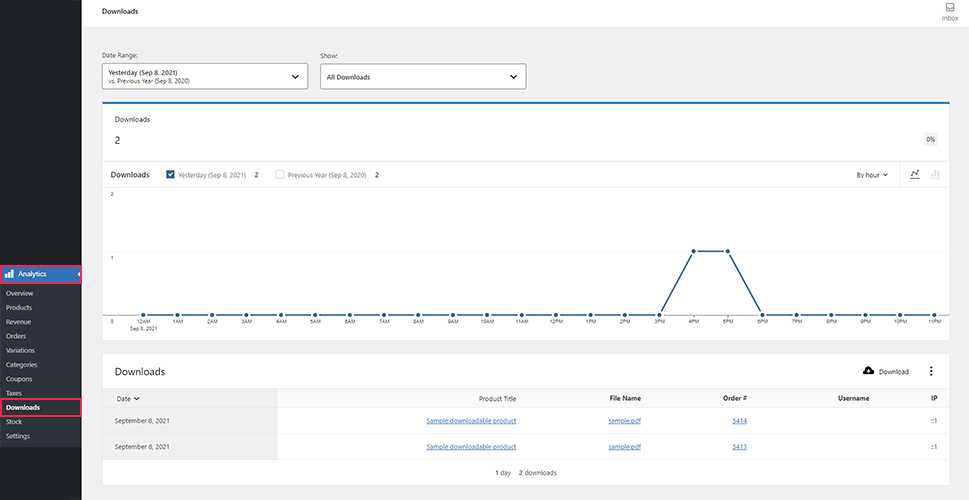
Of course, the Analytics section contains other subsections which you can also use as they offer different kinds of metrics and graphs. We recommend you review the WooCommerce documentation for more information, especially the part on the Analytics section.
Final Thoughts
File download in WordPress is best managed by download manager plugins. These can help you manage your downloadable files within WordPress and enforce security measures to limit their misuse. Good-quality download managers also let you track downloads so you can understand your visitors and subscribers a bit more and improve the selling strategies of your digital online store.
In this article, we covered two great plugins that offer comparable download manager properties—the WordPress Download Manager and WooCommerce. We examined the various aspects of managing, tracking, and controlling file downloads using either plugin. Moreover, we focused on exploring the range of possibilities you have while using the free versions. Therefore, anyone just starting their site or online store, or anyone just interested in testing out these plugins can do so without committing to a big investment.


