How to Install WordPress on Google Cloud

With the multitude of great hosting solutions available nowadays, aspiring website owners might have a hard time finding the best hosting option for them. Hosting options can be classified into the following categories: shared, dedicated, managed, VPS, and cloud solutions. They all have their pros and cons and cater to different types of users.
In this article, we will talk about a cloud hosting solution called Google Cloud. We will explain what it is, its benefits, and provide a detailed guide on how to install WordPress on Google Cloud. To make tackling this topic easier, we’ve divided the article into several sections:
Moreover, in the Additional steps section, we will cover several things you should do after the WordPress installation to properly configure your new WordPress website. If you’d like to skip ahead to a specific step, just click on one of the links below:
Cloud hosting service (or Cloud) enables you to host a website or an application across an infrastructure containing multiple servers. There are quite a few advantages that the Cloud offers, but the two most important are the dynamic scaling of resources and near 100% uptime. Let’s explain that briefly. Dynamic scaling of resources is important during any spikes of traffic your website might have. The Cloud can seamlessly increase or decrease resources, adjusting to the amount of traffic your website has. And since it is run across multiple servers, in case one goes down, your website will get served through another server that is a part of the Cloud infrastructure. And, this reduces the overall cost, as it doesn’t include the maintenance costs associated with running a single server.
Nowadays, there are quite a few cloud hosting services that you can choose from. Those include Google Cloud, which we’ll be focusing on in this article. Google Cloud is a computing service with a wide array of products with powerful cloud hosting amongst them. Let’s go over some of the many benefits Google Cloud offers.
Firstly, Google Cloud has a high-performing global infrastructure with security that is state of the art. It offers all kinds of apps for managing a website, and those tools are constantly improving. Most notably, it has powerful Google Analytics tools for data tracking and analysis. As a part of the Google brand, you can always count on the reliability of the Google Cloud Platform. And, with a unique pay-as-you-go pricing policy and $300 in credits for verified users, it can be more cost-effective than some of the other cloud hosting solutions. However, please note that the credit amount offered by Google is set at their discretion, and can be subject to change.
Having considered some of the benefits of cloud hosting and Google Cloud in general, we can proceed to explain how to install WordPress on Google Cloud. Please note, you are required to make a billing account as a prerequisite for this.
Start by navigating to Google Cloud and creating your account.
This involves logging in with your Google account, adding your business and credit card details, and agreeing to the Google Cloud’s Terms of Service. Google Cloud offers free credit for $300 to users who verify their accounts. You can use this credit for various Google products. Ultimately, whether you choose to verify your account or not, the following steps in this tutorial apply to everyone.
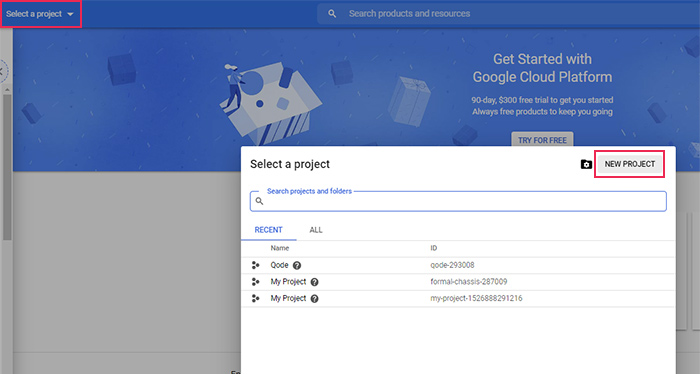
Then, navigate to the Google Cloud Platform to create a new project. Click on the Select a project link in the top left corner. This will open a popup showing all your current projects. Press the New project button in the top right corner of that window to proceed with making your new project.
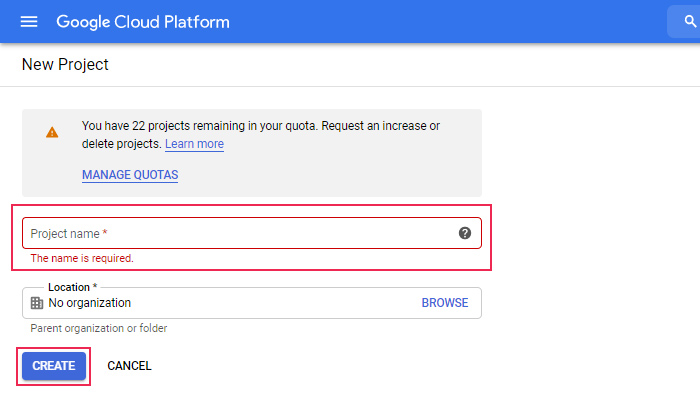
Set a name for your new project and press the Create button.
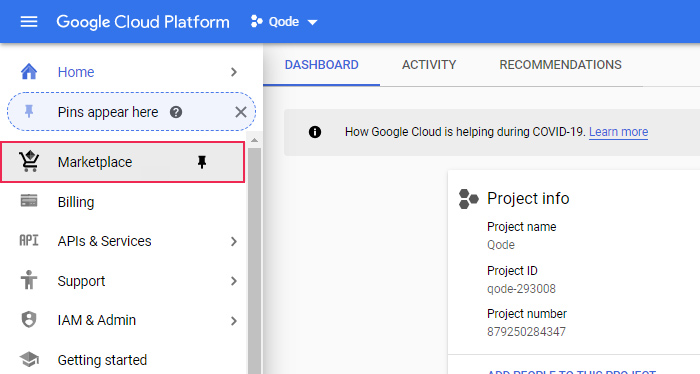
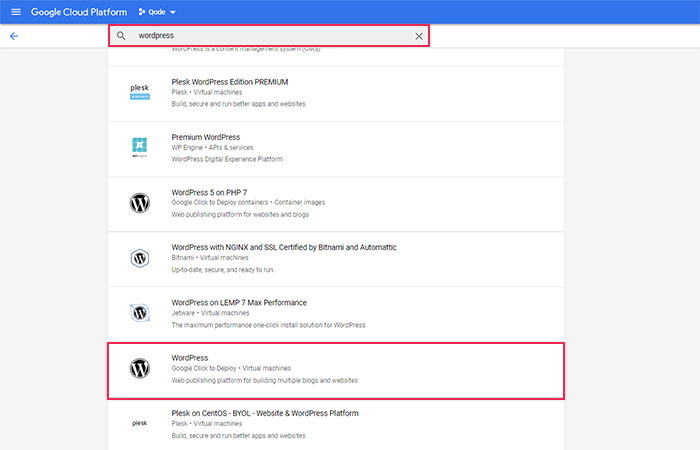
Once you’ve created a new project, click on the Marketplace option in the menu on the left.
When the Marketplace page loads, search for the keyword wordpress. From the results you get, select the WordPress option that has Google Click to Deploy and Virtual machines in the text written underneath it.
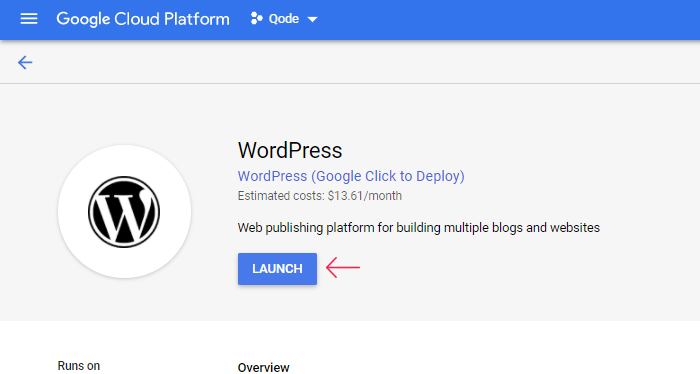
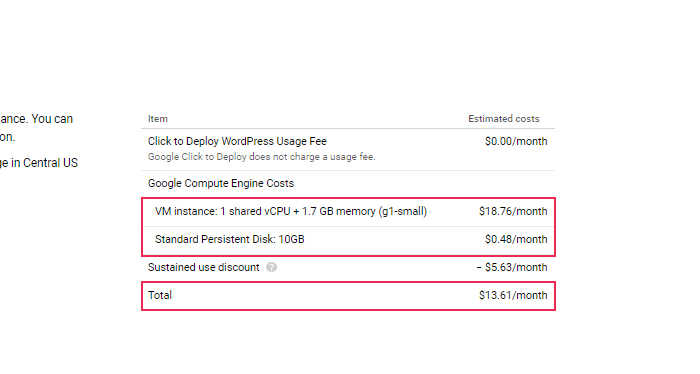
On the following screen, you will see what the WordPress package offers, as well as the estimated cost per month. The package includes 1 CPU, 1.7GB of RAM, and 10GB of storage with the estimated cost of $13.61/month. However, you can adjust these settings in the following steps.
To continue to the next step, press the Launch button near the top.
At this point, you’ll need to wait a few minutes until the configuration process finishes.
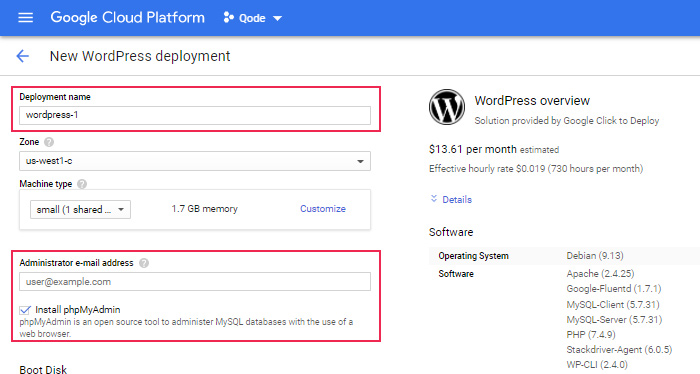
When it’s done you’ll be able to adjust the performances of your new WordPress deployment. Make sure to insert the deployment name and the administrator e-mail address. And tick the checkboxes next to Install phpMyAdmin, Allow HTTP traffic from the Internet, and Allow HTTPS traffic from the Internet options if they aren’t enabled already.
If you need to, you can also adjust the following options: Zone, Machine type, Boot disk type, and Boot disk. However, changing these options from their default values will affect the estimated cost of your new WordPress website. Therefore, we will assume you left the settings with their default values, and proceed accordingly.
After you are done adjusting the options, press the Deploy button below.

Once again, you will need to be patient while your Google project is deployed. This can take a couple of minutes. When it’s done, you will be able to see your WordPress admin and MySQL credentials on the right. We suggest changing these passwords right away for additional security.

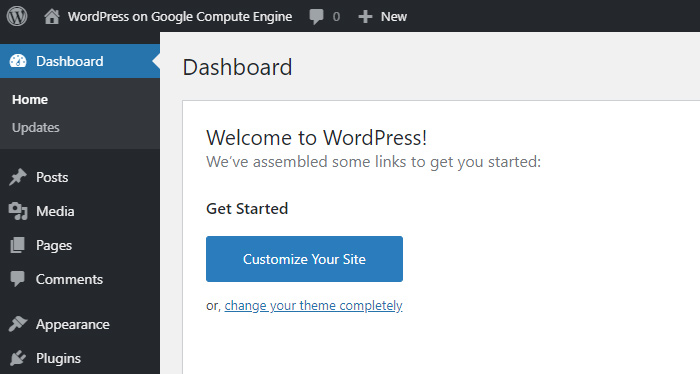
Then, to access your new WordPress website, click on the Log into the admin panel button, located in the Get started with WordPress section.
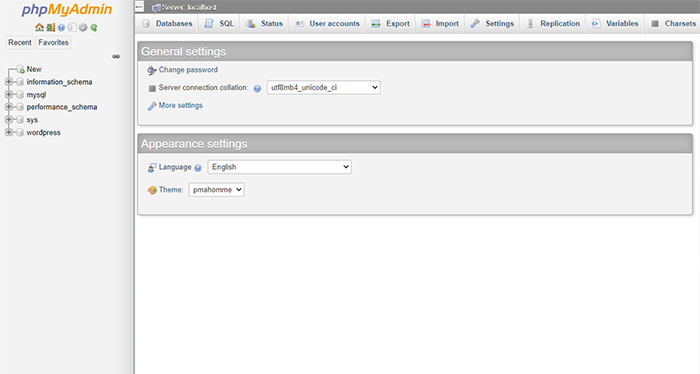
You can access phpMyAdmin in the same way. Simply click on the link ending with /phpmyadmin in the Get started with WordPress section.
This completes your successful creation of a WordPress website stored on Google Cloud. However, there are still some things you should do afterward to make the most out of this cloud-based hosting solution. We will be taking a look at what those are below.
Qode Themes: Top Picks
View Collection


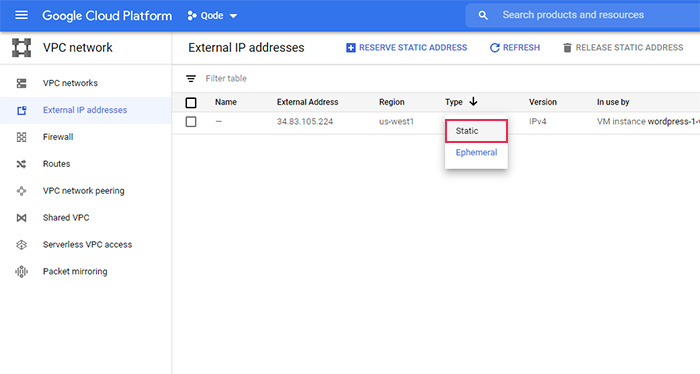
After creating a WordPress website on Google Cloud, your external IP address is set to ephemeral by default. Meaning, every time you reset or restart your compute engine (a virtual machine for using Google Services that serves to replace server hardware), your IP address will change. Therefore, the first thing to do after creating your WordPress website is to assign it a static external IP address. Otherwise, accessing your website will be close to impossible for every other user as its IP address will be changed constantly.
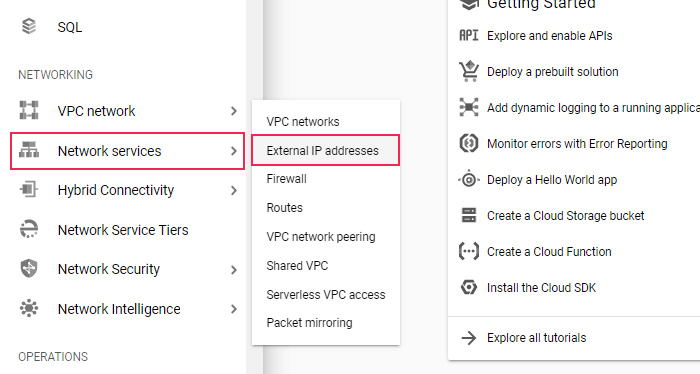
To assign a static IP address, navigate once more to the Google Cloud Platform, and scroll down to the Networking section. Then, click on the VPC network option and select the External IP addresses option from the dropdown that opens.
In the Type column, click on Ephemeral and change it to Static.
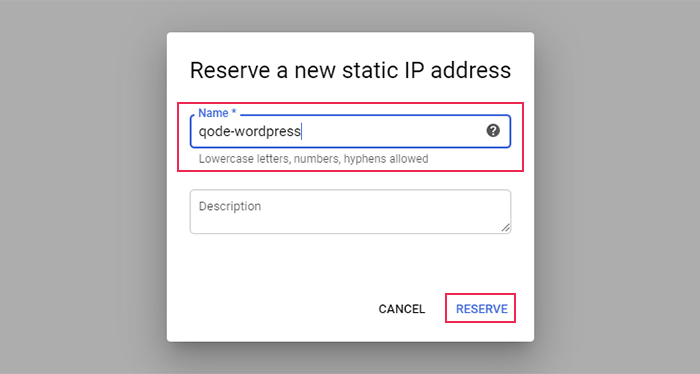
In the following popup window, add a name for this static address and, if you like, a description. As you can see in the screenshot, the name you pick can only contain lowercase letters, numbers, and hyphens. Press on the Reserve button when you’re done.
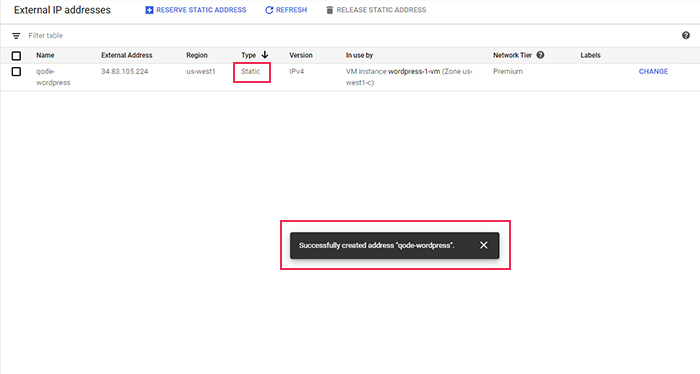
After a few seconds, you will receive a message at the bottom of your screen stating that your address was successfully created. And you will be able to see that the IP address type will be changed to Static, as well.
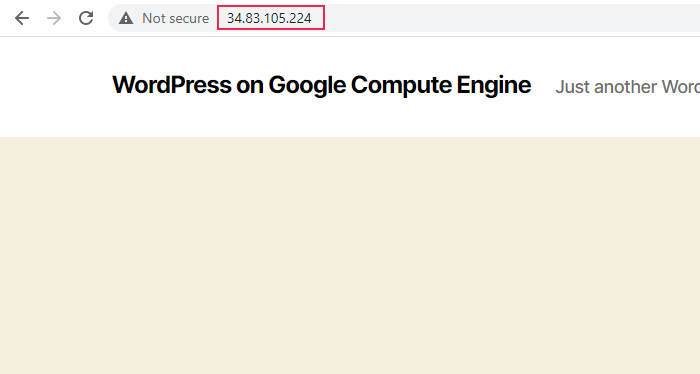
With that done accessing your WordPress website becomes simple. Just insert the static external IP address inside the address bar of your browser. But don’t worry, your visitors won’t have to do that. Check out the next section to see how to make finding your site more user-friendly.
Simply put, a domain name can be equated to the name of a website. It plays a significant role in how visitors find your site. As memorizing the IP address of a website is difficult, assigning a unique domain name to each IP address is essential. That way, visitors can find your website by looking for the appropriate domain name.
You should strive to have a memorable domain name, so your visitors will find it easy to remember and access. A good domain name will help you build a brand, add credibility to your business, and draw in visitors that might stumble across your site while searching for a general topic. And, if you own your domain name, you won’t lose the brand you created and built up when you change hosting providers. You can learn more about this topic in our article on domain names and acquiring them.
Domains need to be bought from domain name providers, i.e. domain registrars. There are a lot of domain registrars available: Domain.com, Bluehost, GoDaddy, Namecheap, Google Domains, etc. All domain registrars have their unique sets of pros and cons. You should carefully investigate each one before deciding where to buy your domain name.
Having a domain name is a requirement for completing the following steps. Once you’ve bought your domain name, you will need to configure it. To do so, proceed as mentioned below.
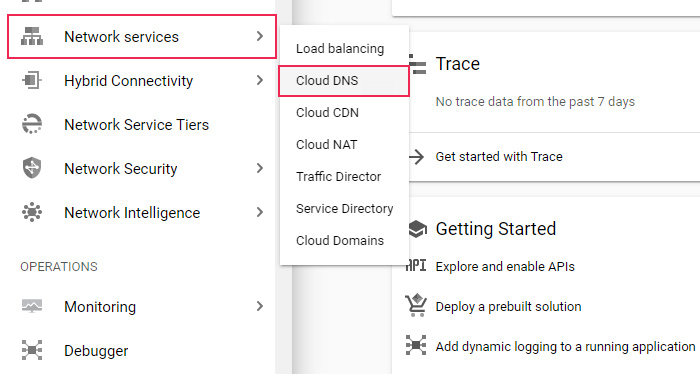
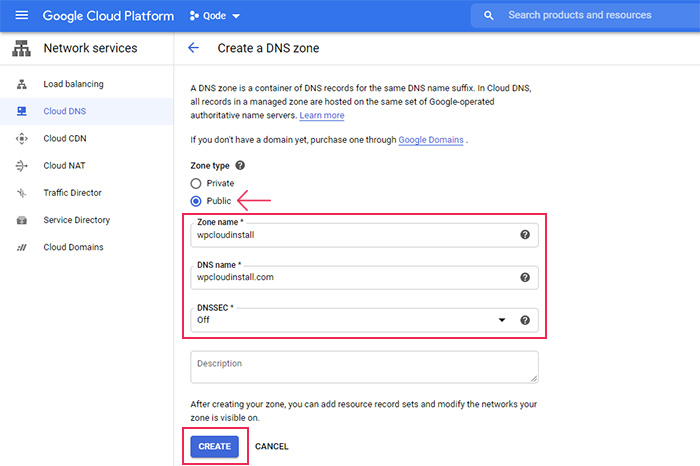
To configure a domain name, you must first set up a DNS zone. You can do so by navigating to the Networking section within the Google Cloud Platform. Then, click on the Network services option and select the Cloud DNS option from the dropdown menu that opens.
Wait a bit until the DNS API is enabled and click on the Create zone button afterward. You can find this button within the Zones tab on the Cloud DNS page.

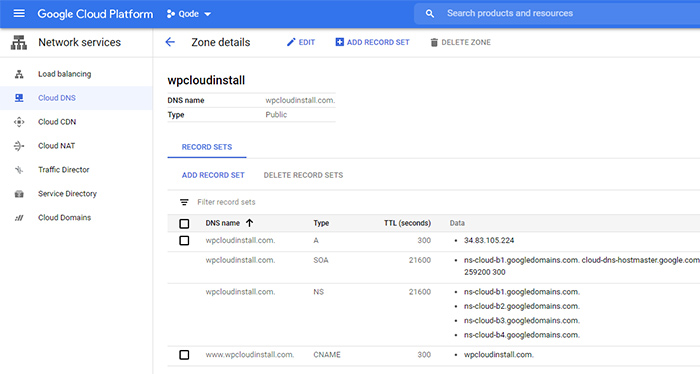
When creating a new DNS zone, make sure to set the zone type as Public to make it visible to everyone on the Internet. Add your previously registered domain in the DNS name field and set a suitable Zone name. You can leave the DNSSEC option on Off for the time being, and omit its description if you don’t want to add one. When you’re done, press the Create button to create your DNS zone.
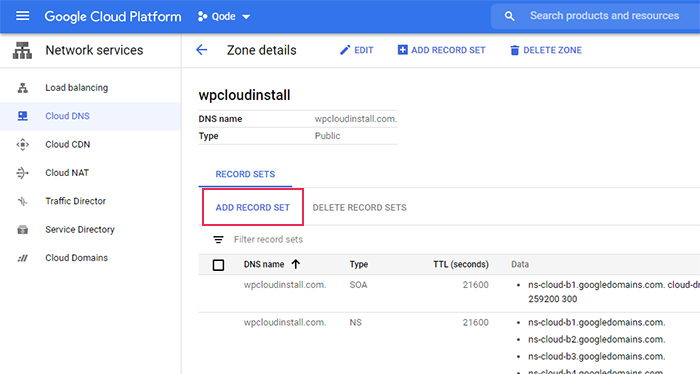
Next, you need to add DNS records. These records can provide valuable information about your site’s current IP address, the domain you’re using, and your hostname. This information instructs user-side servers on how to connect to something hosted on your domain, such as your web site. To add it, click on the Add record set link.
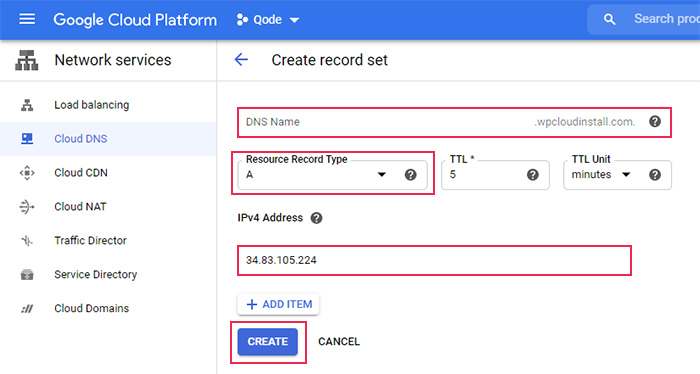
For this article, we will create two record sets. For the first set, leave the DNS name empty. That way your domain name will be automatically selected. Choose A as the record type, and under IPv4 Address insert the IP address you previously made static. You can leave the TTL settings on their default values, i.e. 5 minutes. Then, press the Create button to create the first record.
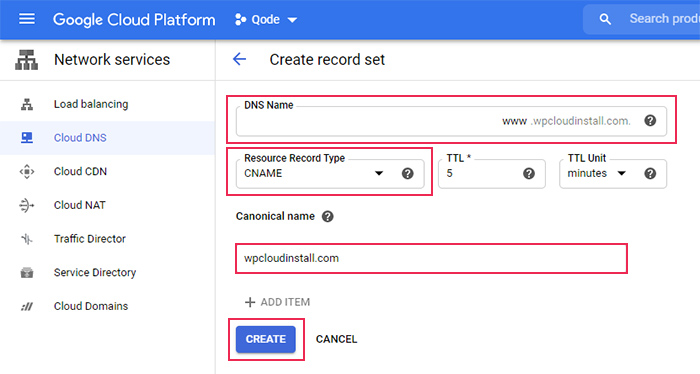
To create the second record set, press the Add record set link once more. This time, fill in the DNS Name option by inserting the www prefix to your domain name. Select the CNAME record type and add your domain name as the Canonical name. As before, you can leave the TTL settings on their default values. Then, press the Create button.
Once you’ve done so, your record sets should look similar to the screenshot below.
Before we continue further, we’ll briefly cover the difference between A and CNAME record types.
Both A and CNAME records are possible ways of pointing a (host) name to your website. The A record type maps a name to one or multiple IP addresses. On the other hand, a CNAME record type maps a name to another name. For that reason, the A records can be used for mapping root domain names, while CNAME records shouldn’t. Also, a CNAME record should only be used on names that don’t have any previous records, so that they are properly resolved to a corresponding website.
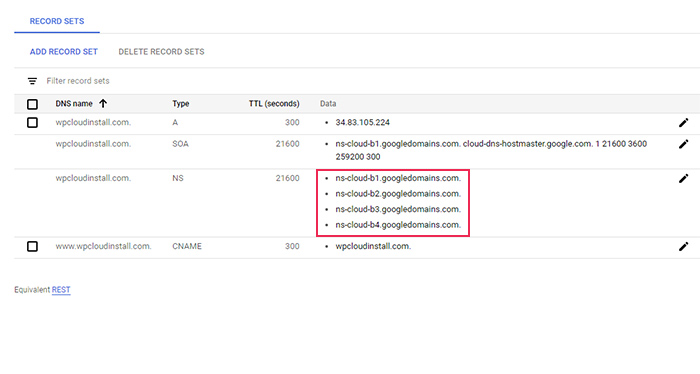
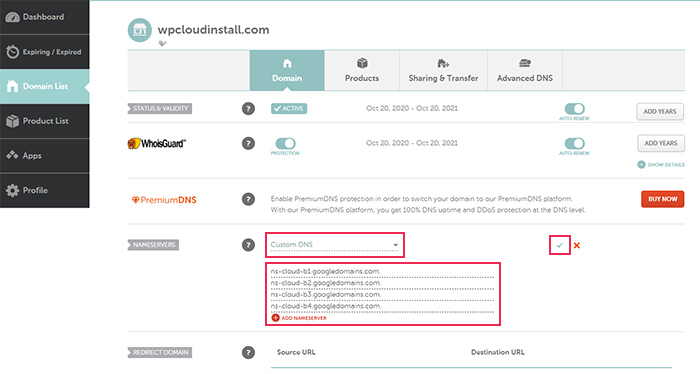
Now that you have a better grasp on the A and CNAME record types, let’s proceed with further steps. To make sure that your domain is pointing to the website you previously created on Google Cloud, you will need to update the name servers inside your domain name provider’s account with the ns-cloud records.
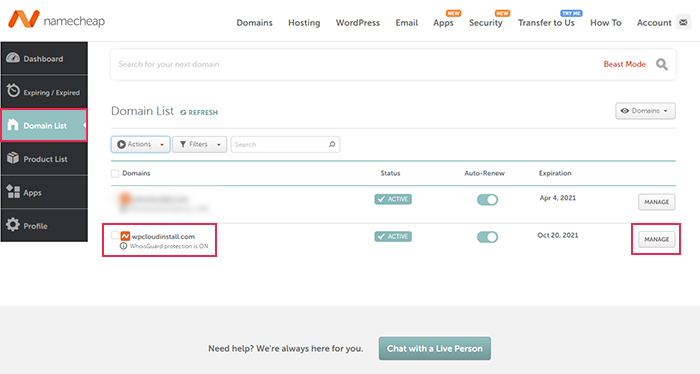
The next stage requires you to log in to your account at the domain name provider you’re using. Therefore, the following steps may differ based on your choice of a domain name provider.
In our case, it was Namecheap. So, once you’ve logged in, you need to navigate to the Domain List option. In there, find your registered domain name and press the Manage button next to it.
Afterward in the nameservers section, choose the Custom DNS option and insert all four ns-cloud records by pressing the Add nameserver option below. Then, click on the small check mark option next to it to save.
After that, the only thing that remains is to wait for the DNS records to propagate. This can take up to 48 hours, but in our case, it only took a couple of minutes. You can always check the status of your website by using one of the DNS lookup tools available online.
After your website is propagated, log in to your WordPress admin dashboard and navigate to Settings > General. There, you should change your WordPress Address and Site Address to match your domain name. At this point, since we haven’t configured an SSL certificate yet, they will have an http:// prefix.
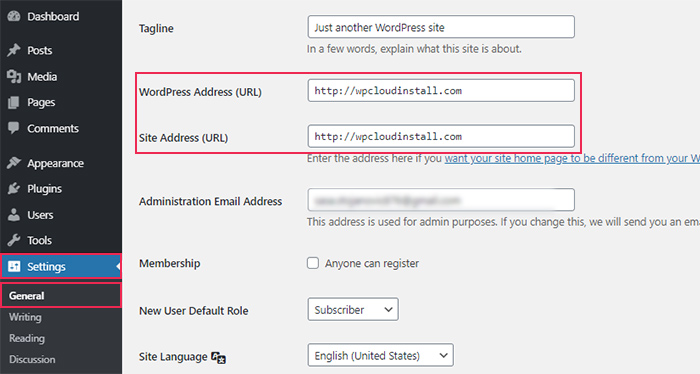
Changing the addresses will log you out of your dashboard and return you to the WordPress login screen.
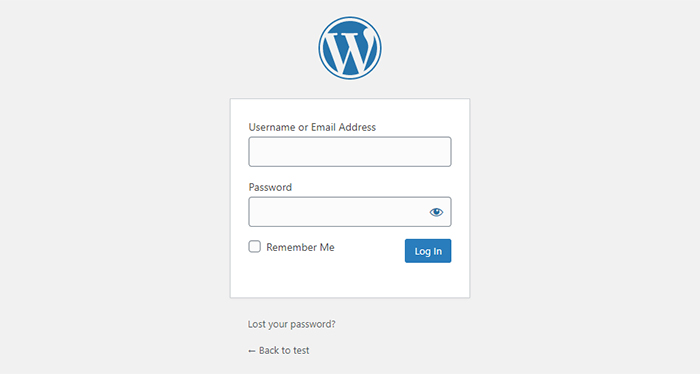
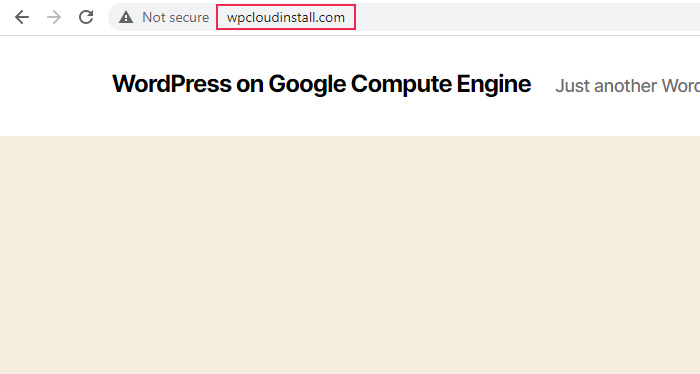
Log in again with your admin credentials and examine your website. Your WordPress website will properly point to your domain name from now on.
SSL (Secure Sockets Layer) is a common technology used for encrypting sensitive information exchanged on a website. SSL can be used to encrypt credit card data, passwords, and more. It makes your internet connection secure as hackers won’t be able to access or modify the confidential data you’re keeping. As such, using SSL is mandatory for any eCommerce website and is highly advised for all other types of websites.
TLS (Transport Layer Security) is the name of the current, updated version of the SSL. However, as the term SSL was widely used before, it has stuck around to this day despite being replaced by TLS.
To make your website secure, you need to configure an SSL (i.e. TLS) certificate. Whereas in the past they were mostly bought, nowadays there are a lot of websites that offer free SSL certificates. One of the most widely recognized websites for doing so is Let’s Encrypt. All their SSL certificates are certified by trustworthy third-party organizations, also known as certificate authorities.
As a final step in our guide on setting up a WordPress website on Google Cloud, we will explain how you can configure a free Let’s Encrypt SSL certificate. Even though most of the instructions given below require typing commands in an SSH terminal, we explained everything in detail so it’s easy to follow. That said, let’s proceed to the steps required to configure a free SSL certificate.
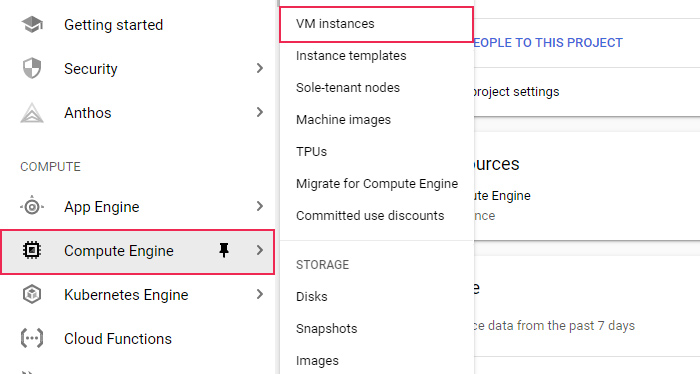
To start, log in to Google Cloud Platform and navigate to Compute Engine > VM instances.
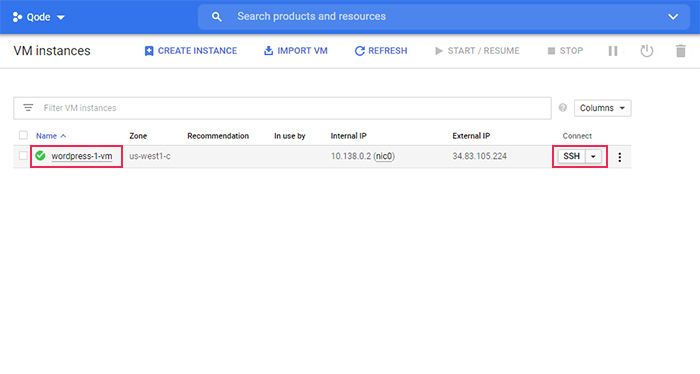
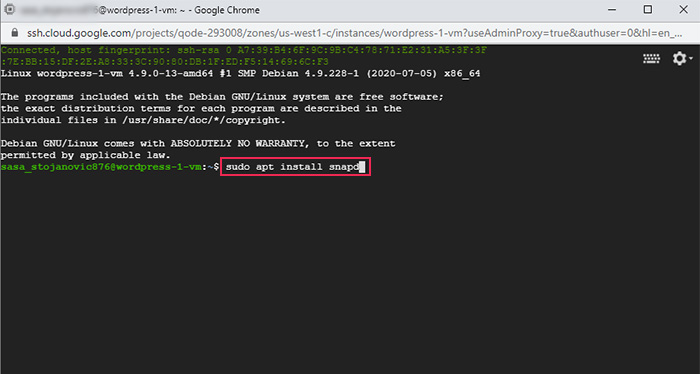
Locate the VM instance you created (the process described in the main part of this article) and click on the SSH button associated with that instance.
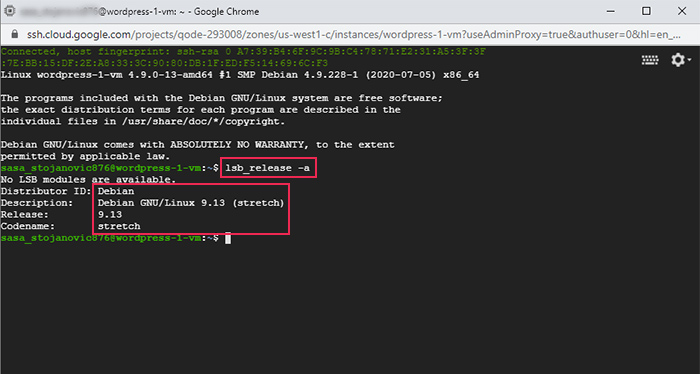
This will open the SSH terminal window. To figure out your current operating system insert the following command:
lsb_release –a
Don’t forget to write down your OS somewhere, as it will be necessary for the following step. In our case, it is Debian 9.13 (stretch).
Then, navigate to the Certbot page where you need to insert your setup to get further instructions. That’s done by selecting Apache as the software and Debian 9 (stretch) as the system. Please make sure to add your own, appropriate system information instead of ours.
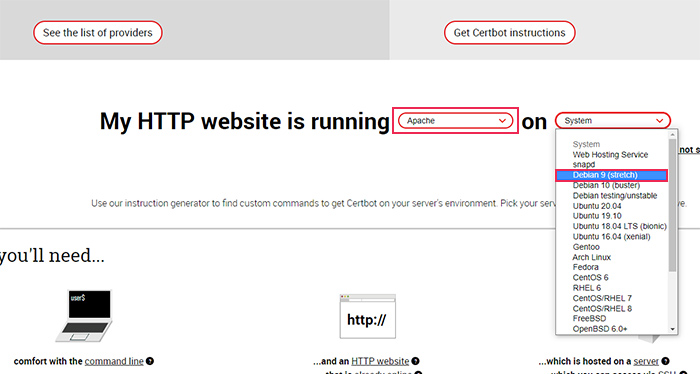
By selecting the software and system, you will be redirected to the appropriate page that contains the remaining instructions.
For those of you that haven’t encountered Certbot before, this is a free open-source software tool for deploying Let’s Encrypt SSL certificates. If you are interested in learning more, we suggest taking a look at their About page for more information.
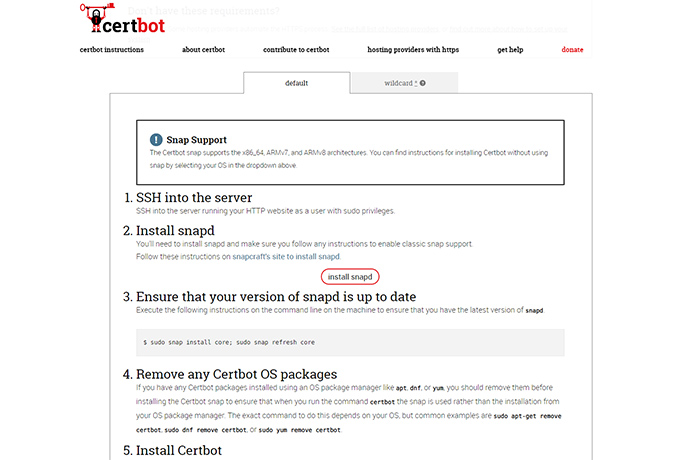
The instructions page contains two tabs – default and wildcard. They provide steps for the deployment of the two kinds of SSL certificates, which have the same names as the tabs: default (or regular) and wildcard certificates. The main difference between the two kinds of certificates is that regular certificates provide encryption only for the main domain and the www. subdomain. Whereas, wildcard certificates secure the domain, as well as multiple subdomains. This is arranged by placing an asterisk (*) at the subdomain level you wish to secure.
For example, *.your-website.com will secure blog.your-website.com, help.your-website.com, news.your-website.com, etc.
For this article, we have opted to show you how to configure a default certificate. If you need a wildcard certificate, you should switch to the wildcard tab, and follow the instructions given there.
Since we have already connected to the server using SSH, we will start from step two and click on the install snapd button. Ideally, you should open the link on a separate page, as we will have to return to this page after installing snapd.
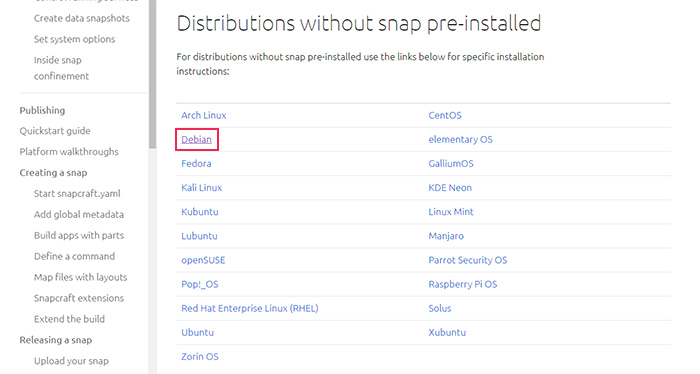
On the page that opens, scroll down until you find the Debian link and click on it to review the full instructions.
Once you’ve done so, you will see a new window explaining how snapd can be installed.
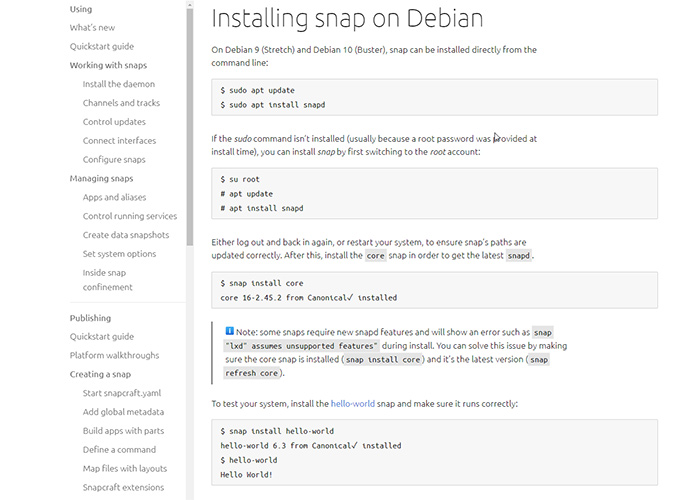
To install snapd, insert the following command into the SSH terminal:
sudo apt update

Then, insert the following command in the SSH terminal:
sudo apt install snapd
Wait a bit until the snapd package is installed. If, at one point, you are asked if you wish to continue with the install, insert y (meaning yes) in the terminal to confirm.
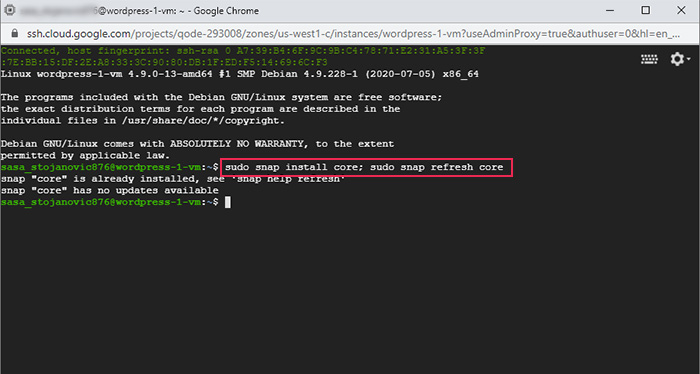
Later, make sure that snapd is up-to-date by inserting the following command:
sudo snap install core; sudo snap refresh core
After that (as noted on the Certbot instruction page), you should remove any leftover Certbot OS packages. As we haven’t installed Certbot previously, we will skip this step. However, if you have installed Certbot, you can delete it quite easily. Just use one of these three common commands: sudo apt-get remove certbot, sudo dnf remove certbot, or sudo yum remove certbot, which are all mentioned in the Certbot instructions.
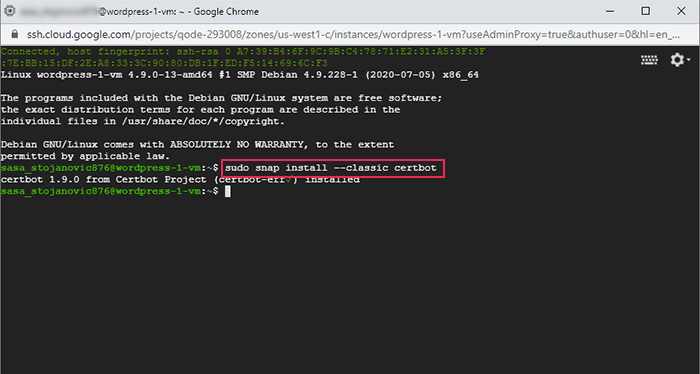
The following step is to install Certbot. To do so, insert the following command into the SSH terminal:
sudo snap install --classic certbot
You will have to wait a bit until you receive a success message stating that Certbot was installed.
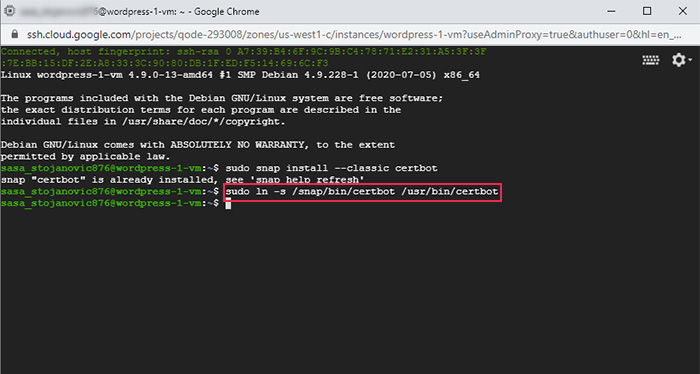
After that, insert the following command to ensure Certbot commands can be run:
sudo ln -s /snap/bin/certbot /usr/bin/certbot
Then, to acquire and install the SSL certificate, insert the following command:
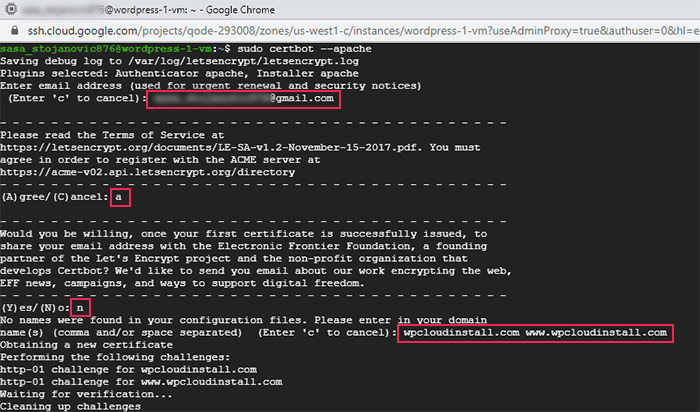
sudo certbot --apache
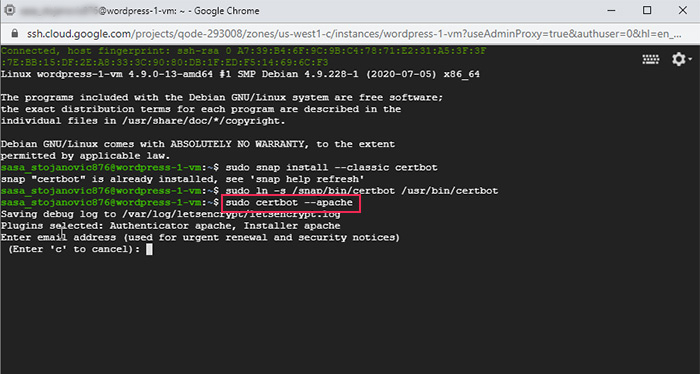
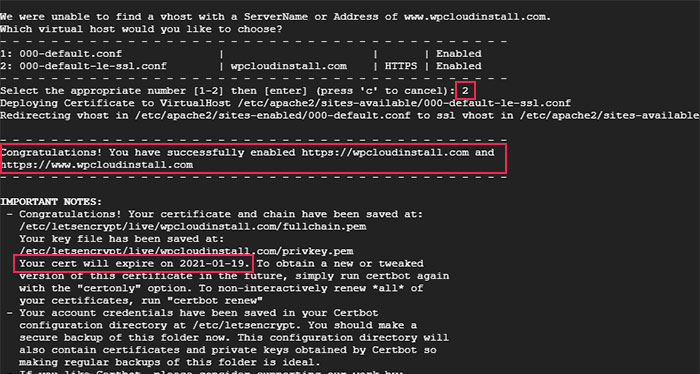
During the installation process, you will be prompted to insert additional information. First, you will need to insert your email address for renewal and security notices. Then, agree on Let’s Encrypt’s Terms of Service by inserting the letter a. If you don’t want to share your mail with Electronic Frontier Foundation for future news or campaigns, insert n in the terminal. Afterward, insert your domain name(s). If you have multiple domains, make sure to separate them with a comma and/or a blank space. Then, insert 2 (the number) to select the correct virtual host, i.e. the one corresponding to your domain name.
This concludes the terminal part of acquiring an SSL certificate. You will see a success message afterward, as well as some important notes. Among other things, the notes contain the expiration date of your newly acquired certificate. We advise going through the notes carefully.
Cerbot comes with a cron job or system timer that automatically renews your SSL certificate when it is about to expire. You can even test this automatic renewal option by inserting the following command into the terminal:
sudo certbot renew –dry-run
You can find more information on it in your Certbot instructions, near the bottom.
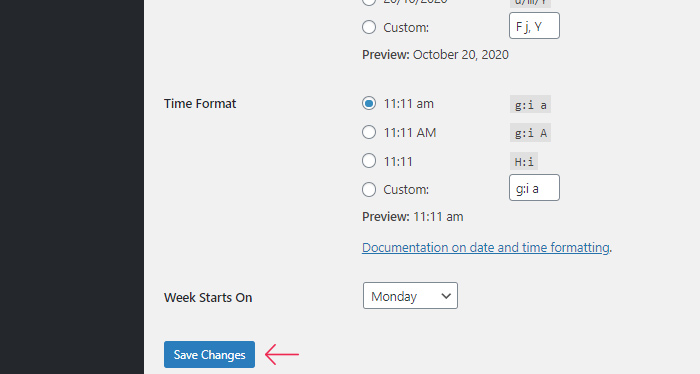
Before we conclude the instructions on SSL for your site, we advise logging in to your WordPress admin dashboard once more. Navigate to Settings > General and change the WordPress and Site Address from HTTP to HTTPS manually (by changing the http:// prefix into https://). This will help you make sure there are no leftover insecure addresses. Press the Save Changes button when you’re done.
Once more, you will be logged out of your dashboard and returned to the WordPress login screen. Log back in with your WordPress credentials, and you will see that both addresses have been updated.
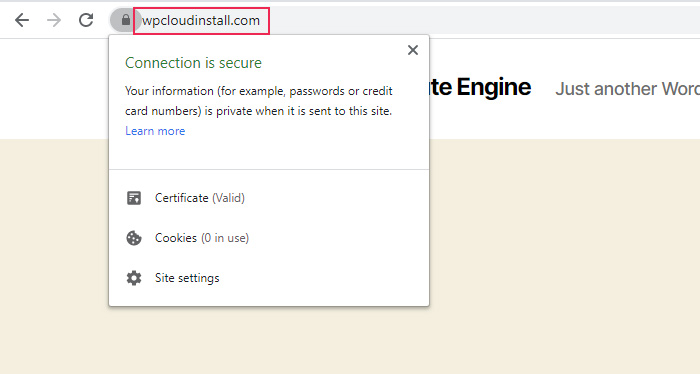
Finally, the only thing that remains is to test the website. You can do so by going to https://your-website.com or by running an SSL test using an online tool like SSL Labs. If you access your website via the browser, you will know that it is secure by seeing the padlock next to the address and by the message shown if you click on the padlock. And if you opt for an online tool, you’ll know your website is secure by the results you get.
Final Thoughts
Cloud hosting is an incredibly valuable alternative to regular hosting. It provides constant uptime while delivering outstanding performance during traffic spikes. That’s why we dedicated this article to explain how to install WordPress using the Google Cloud service.
The process of installing WordPress on Google Cloud is quite easy and hands-on, which lets you adjust the settings of your configuration during the installation process. Moreover, we included detailed instructions for things you should do after WordPress has been installed. Those include setting up a static IP address, a domain name, and an SSL certificate.
If you follow the instructions outlined in this article carefully, we are confident you will be able to install WordPress on Google Cloud without even breaking a sweat. And hopefully, you managed it in a small amount of time. Ultimately, the tips and information we provided should help you get to know some aspects of being a webmaster. Since some parts of this article might have been more technically demanding, we suggest taking the time to learn more about the topics that were less familiar to you before embarking on your WordPress Google Cloud journey.
